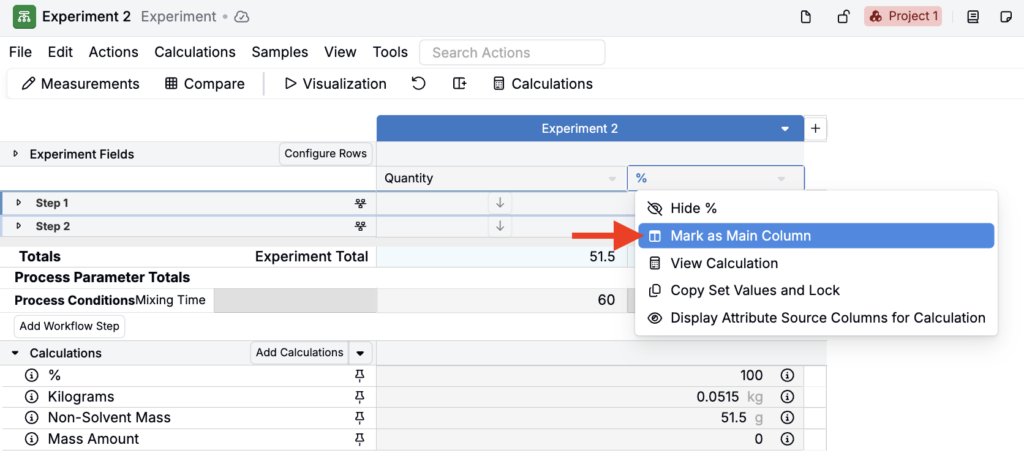
Input calculations are a powerful feature within Uncountable, giving you the ability to display derived values — ingredient ratios, formulation-level properties such as recipe cost or % solids, elapsed time, regulatory compliance, and more — directly on the Recipe view of experiments.
This article provides an overview of what input calculations are, how they work, and how to manage them. For detailed configuration guides on each calculation type, see the linked articles in the Calculation Types section below.
What are input calculations?
Input calculations are by definition tied only to the inputs of an experiment — the ingredients and process parameters that are part of the recipe. Categories and attributes tied to these inputs can be factored into the equation and filtering of input calculations; however, outputs cannot be used. For calculations that incorporate measured outputs, see the Output Calculations article.
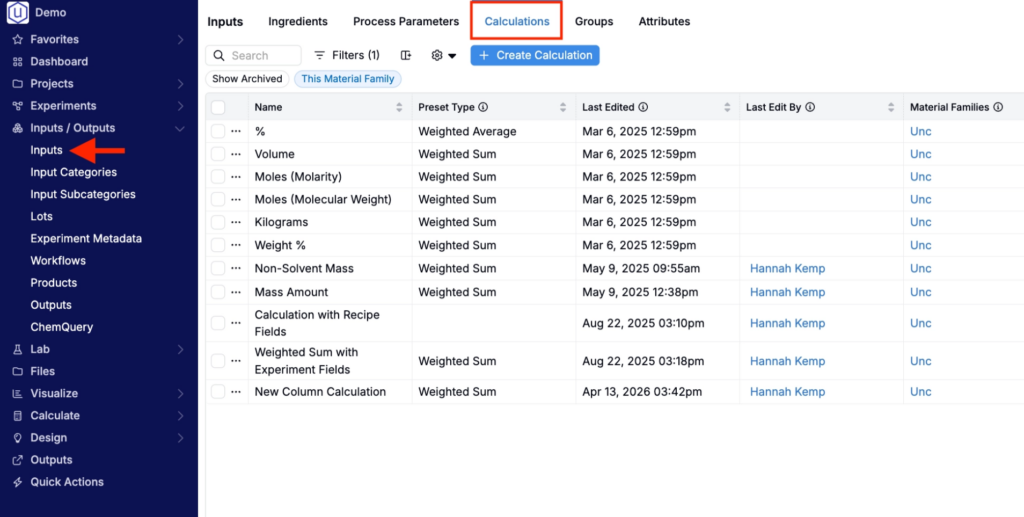
Input calculations are accessed from Inputs / Outputs > Inputs > Calculations. You must have Write Inputs permissions within a material family to create new calculations or make changes to existing ones.
Calculation types
Uncountable currently supports eleven input calculation types. Select a type below to learn more about how it works, when to use it, and how to configure it.
Weighted Sum or Average
Weighted Sum and Weighted Average calculations multiply ingredient amounts by one or more associated attributes (such as cost, % solids, or density) and aggregate those values across the recipe. A Weighted Sum returns the total of all weighted ingredient contributions; a Weighted Average divides that sum by a denominator.
These are the most widely used calculation type, and are the foundation for common formulator metrics like formulation cost, total % solids, moles NCO, and ingredient-level column displays such as Weight %.
Custom
Custom input calculations allow you to define a free-form equation using variables that reference specific ingredients, process parameters, ingredient attributes, other calculations, embedded weighted sums, step quantities, or experiment metadata.
Custom calculations work well for use cases that don’t fit a simple weighted sum structure — for example, calculating a Feed Volume from a Feed Rate × Feed Time process parameter multiplication, or incorporating conditional logic using if() functions.
Date
Date input calculations compute an elapsed time value by subtracting one Date or Timestamp field from another. Both fields can come from experiment metadata, process parameters, component experiments, or the dynamic Current Date.
Common uses include sample age, time in storage, and process duration.
Text Match
Text Match input calculations display a conditional text label on the Recipe view based on whether ingredient attribute values match defined criteria. Rather than returning a number, they return one of up to three text values: one for “any ingredient matches”, one for “all ingredients match”, and one for “unknown/indeterminate”.
Common uses include regulatory compliance flags (e.g., REACH compliance), hazard classification, and certification status.
Composite
Composite input calculations combine multiple existing calculations or process parameters into a numerator/denominator structure. Terms in the numerator and denominator are summed and then divided to produce a ratio.
Composite calculations are useful when you want to build a higher-order formula — such as an NCO:OH stoichiometric index or a cost-per-unit-property — from calculations that have already been individually configured.
Chemical Balance
Chemical Balance input calculations perform a stoichiometric mass balance using Chemical Structure ingredient attributes. You define which workflow steps contain reactants and which contain products, and the calculation computes a mass balance across those steps.
This type is primarily used in synthesis applications where chemists want to confirm or display a theoretical yield or balance directly on the Recipe view.
Experiment Summary
Experiment Summary input calculations display the name of an intermediate (component) experiment incorporated into a recipe, rather than a numeric value. They are configured per intermediate type (e.g., a specific product or project), and make it easy to identify which specific intermediate was used without searching elsewhere.
Common uses include multi-layer coatings (identifying which primer and topcoat were applied), composite formulations, and sequential synthesis workflows.
Aggregate Curve
Aggregate Curve input calculations combine curve-type attributes (such as particle size distributions, absorption spectra, or rheology profiles) from multiple ingredients into a single weighted average curve at the recipe level.
This type is designed for use with the Curve Solver, enabling you to set a target curve and optimize ingredient quantities to match it. Aggregate Curve calculations can pull curve data from lot attributes, with fallback attribute support for cases where the primary source is missing.
Experiment Comparison
Experiment Comparison input calculations compare the ingredient composition of one experiment against a reference experiment and display a configurable match or non-match text label on the Recipe view.
You define the match and non-match labels, an optional tolerance threshold, and specify both the base and reference experiments — either as the experiment itself or via a field reference. Only ingredient compositions are evaluated; process parameters are excluded.
Chemical Reaction
Chemical Reaction calculations display a structured reaction view on the Recipe view by categorizing ingredients into their reaction roles — reactants, products, solvents, and catalysts — based on configurable filters.
This type is designed for synthesis workflows where ingredients are organized into reaction-role categories across workflow steps. A separate calculation can be configured per reaction step in multi-step synthesis workflows.
Creating new input calculations
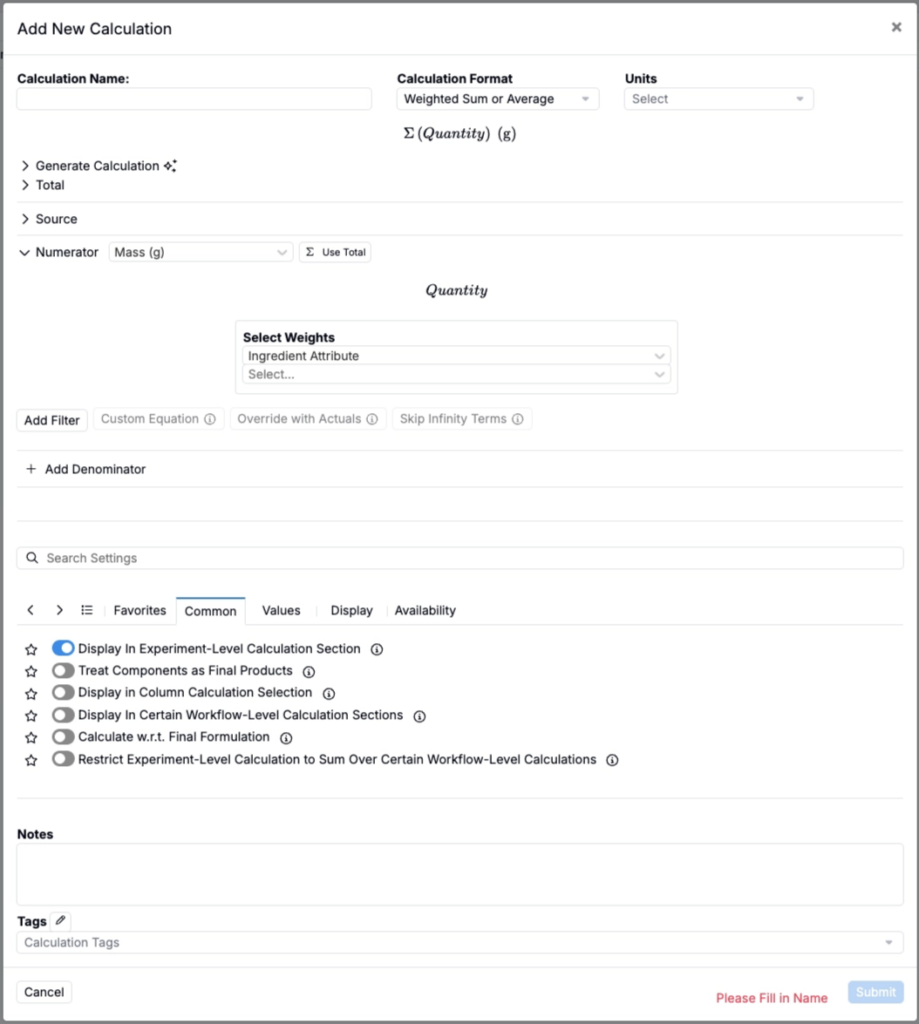
Input calculations can be created from the Calculations listing page or directly in the Recipe view of a formulation. Both methods open the same creation modal.
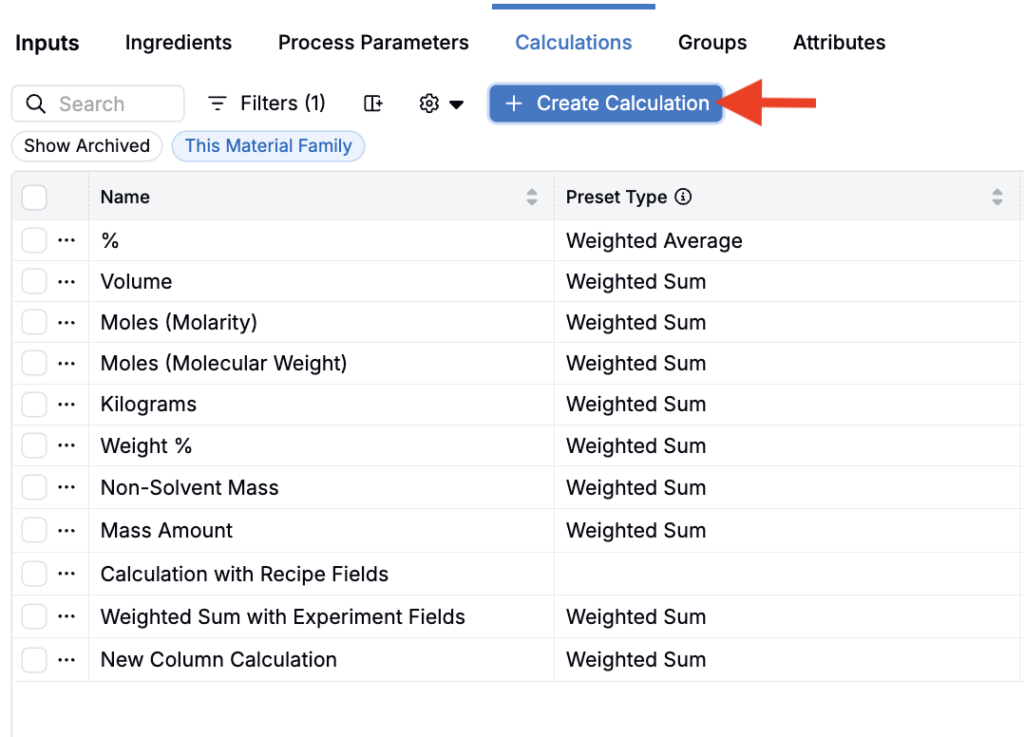
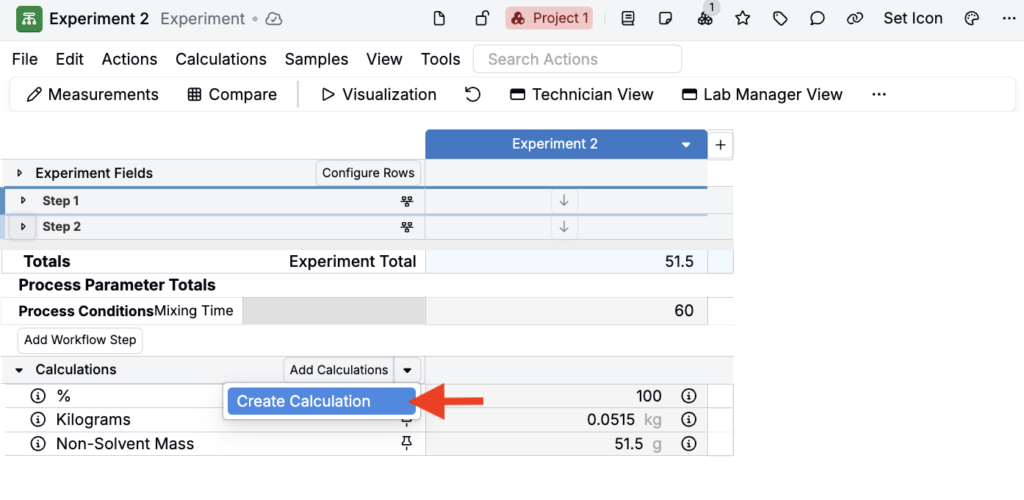
In the modal:
- Enter a name and units (recommended) for your calculation.
- Select a Calculation Format from the eight types described above.
- Configure the calculation according to the type selected.
- Set your preferred Calculation, Display, and Availability settings.
- Select Submit to save.
For detailed configuration steps by type, refer to the linked articles in the Calculation Types section above.
Editing existing input calculations
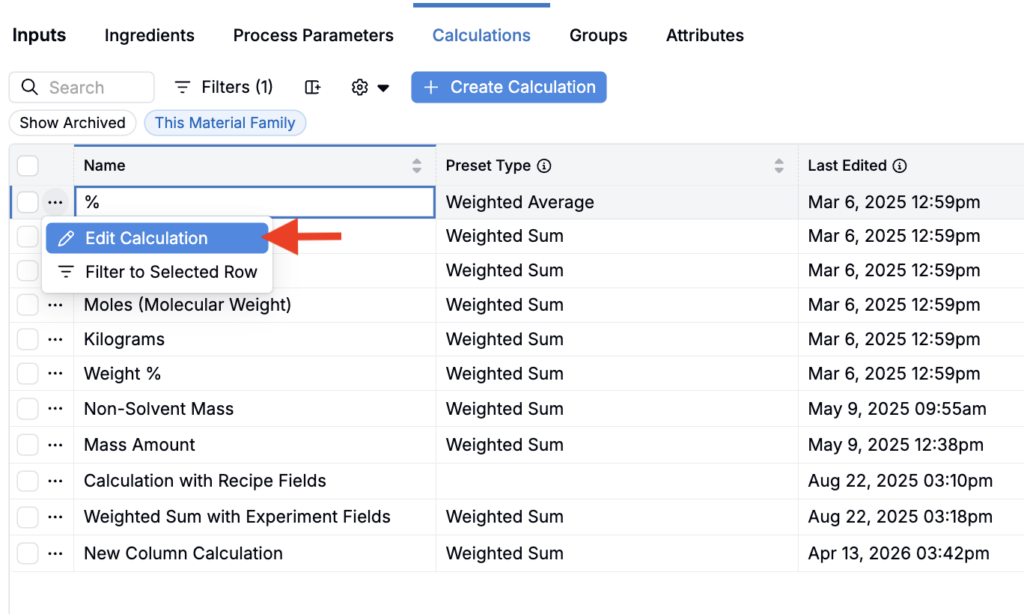
You can edit an existing calculation’s formula and other settings from the Calculations listing page or from the Recipe view of experiments.
On the listing page, search for your calculation and select … > Edit Calculation. In the modal, click the blue Edit Calculation button.
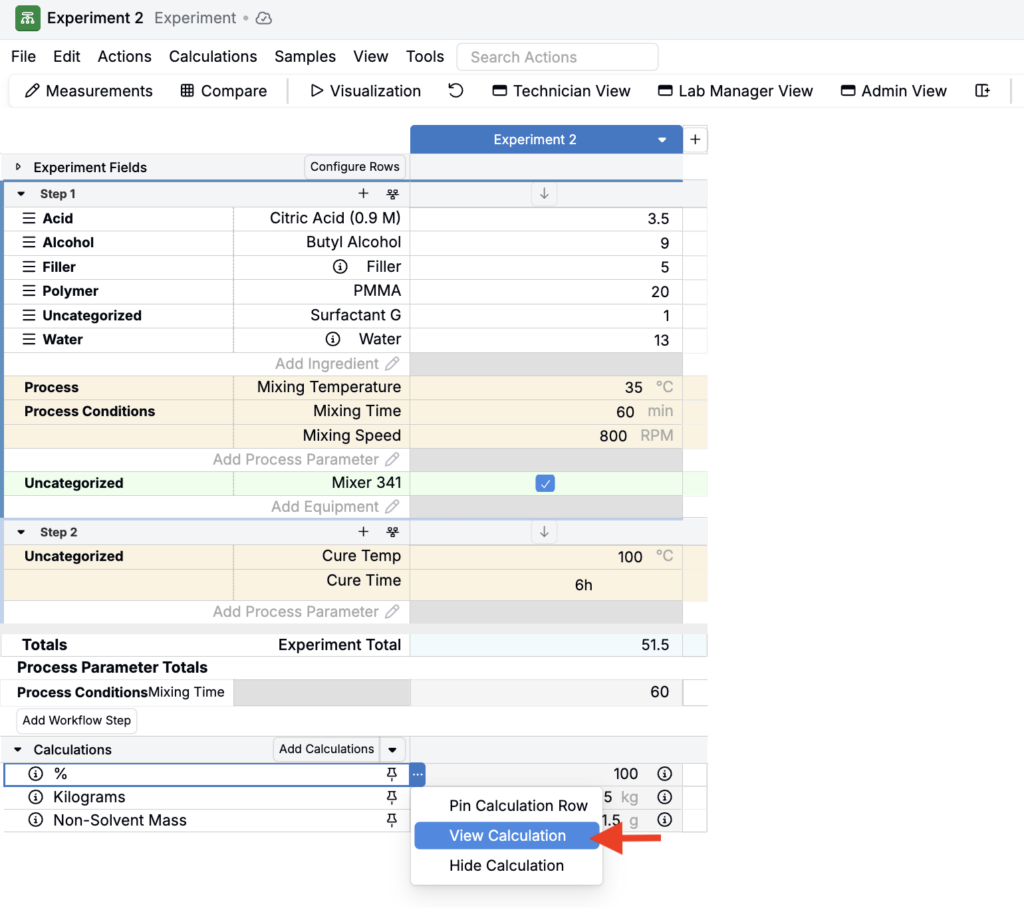
On the Recipe view, select … > View Calculation. In the modal, click the blue Edit Calculation button.
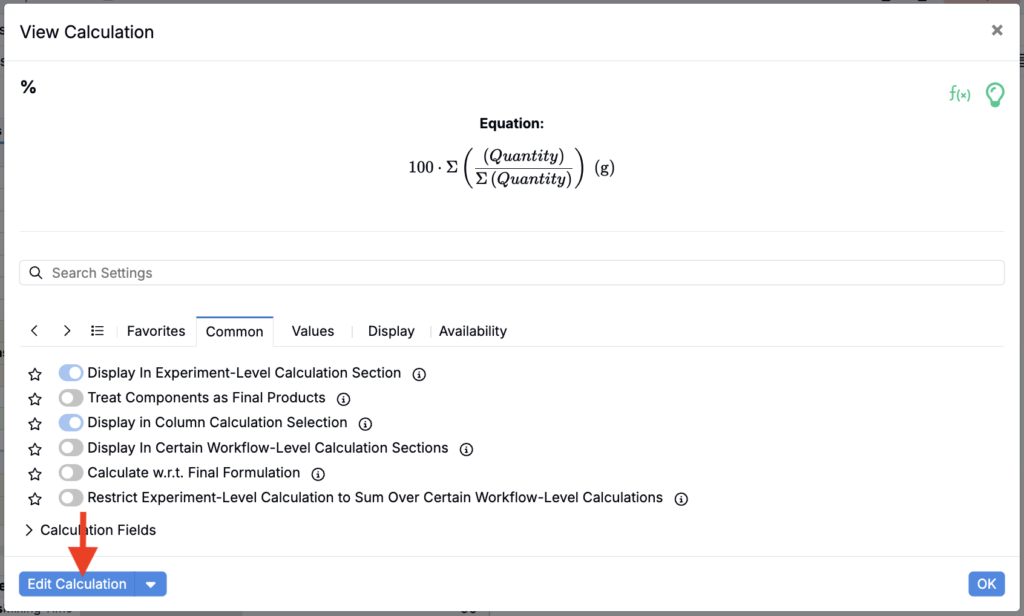
From the Edit Calculation button menu, you can also access additional tools:
- Copy Calculation — Copies the calculation into another target material family
- Delete Calculation — Permanently removes the calculation
- Edit Rounding Settings — Sets the number of significant figures displayed for calculated values
- Lock Calculation — Prevents users from removing or editing the calculation on the Enter Recipe page
- Edit Restricted Access — Restricts which users can view or edit the calculation
- Refresh Calculation Values — Refreshes all values for the calculation across all projects
- Share Across Material Families — Shares the calculation with additional, selected material families
- Export Calculation — Exports the calculation configuration as a file for import into another schema via Config Transfer
Using input calculations
Input calculations can be enabled at the project level, workflow level, or experiment level. Depending on how your experiments are structured, one or more of these approaches may apply.
Project-level
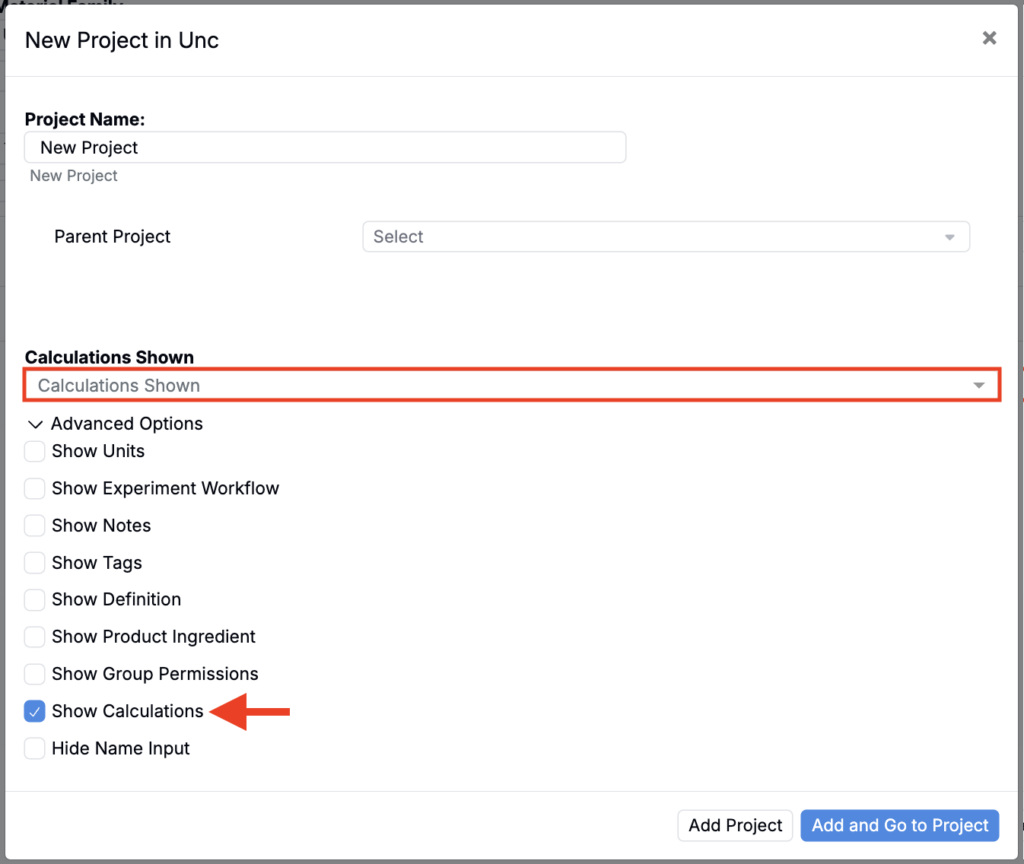
In the New Project modal, enable Show Calculations under Advanced Options. Then use the Calculations Shown menu to select input calculations. All selected calculations will be included on the Recipe view of all experiments added to the new project.
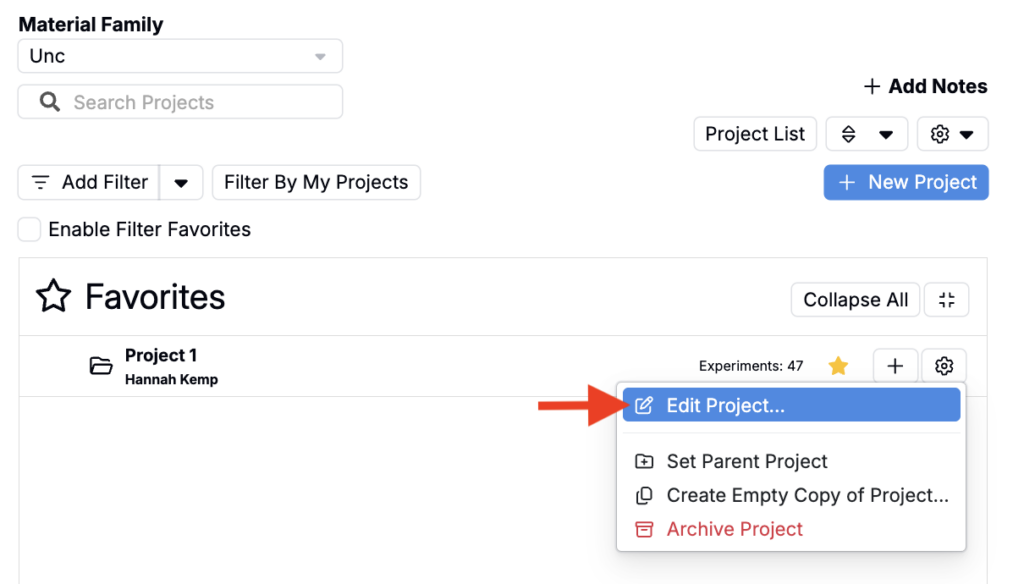
To add or change calculations after a project is created, select the ⚙️ > Edit Project on the Select Project page. Then, use the Calculations Shown field to add/remove default input calculations.
Workflow-level
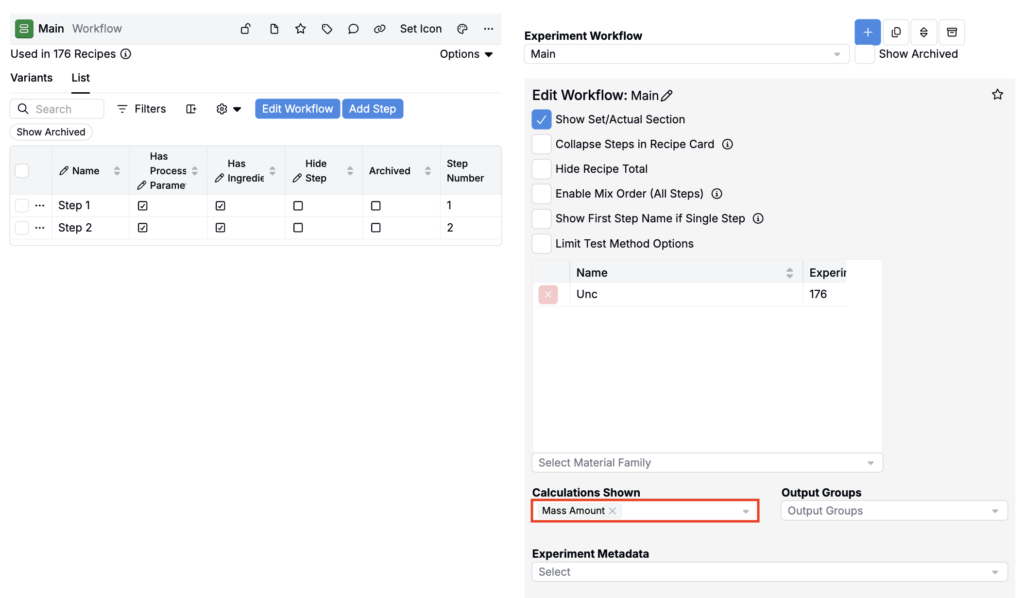
Calculations enabled at the workflow level are additive to those already enabled at the project level. Project-level calculations will still appear even if they are not explicitly enabled on the workflow.
To enable a calculation at the workflow level:
- Navigate to Inputs / Outputs > Workflows.
- Select the desired workflow.
- Use the Calculations Shown dropdown to add/remove calculations.
Experiment-level
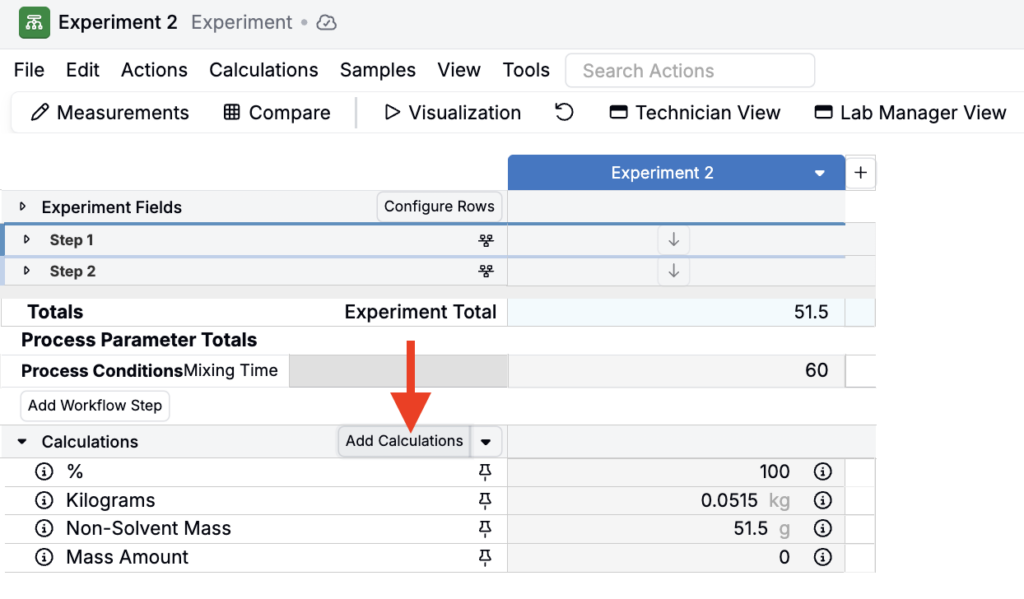
When on the Recipe view of an experiment, you can add calculations directly by selecting + Add Calculations at the bottom of the recipe or at the end of any workflow step.
You can also associate calculations with a specific experiment from the Enabled in Experiments dropdown — useful for displaying calculations only in experiments created from a particular workflow variant.
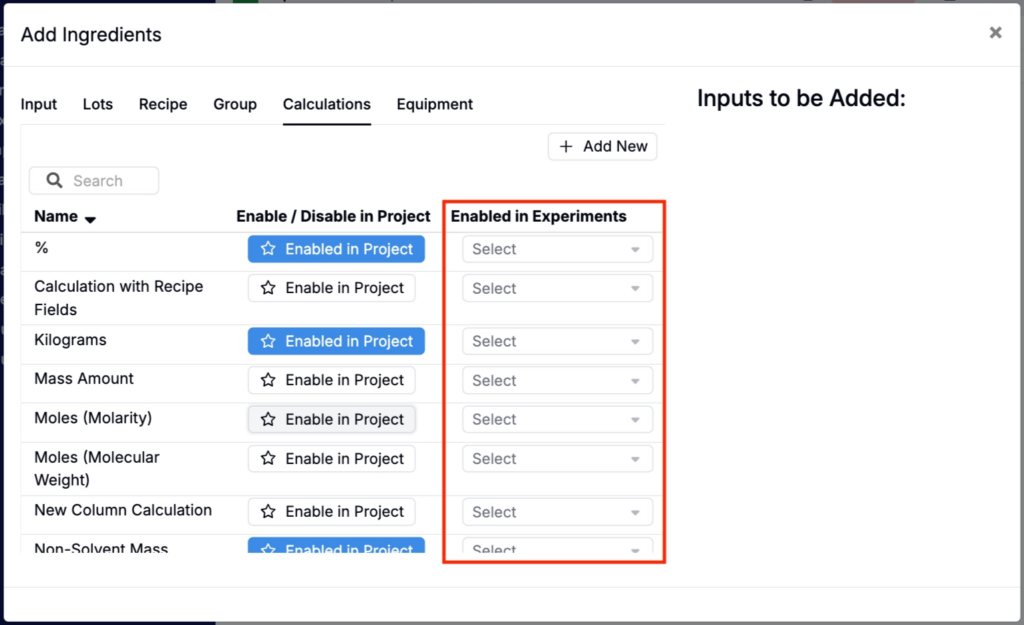
Displaying input calculations on an experiment
Recipe columns
For Weighted Sum or Weighted Average calculations with Display in Column Calculation Selection enabled, you can show the calculation as a per-experiment column on the Recipe view. The column will display each ingredient’s individual contribution to the calculation alongside the entered recipe amounts.
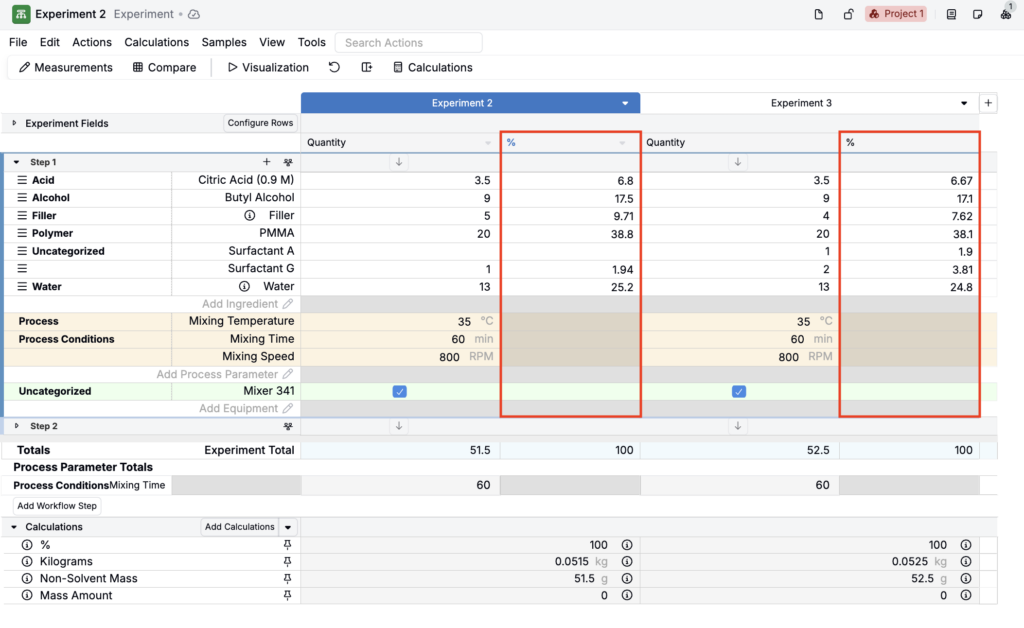
To display input calculations as columns, use the Quick Add Columns action in the Recipe actions bar. Search for and select calculation columns to add.
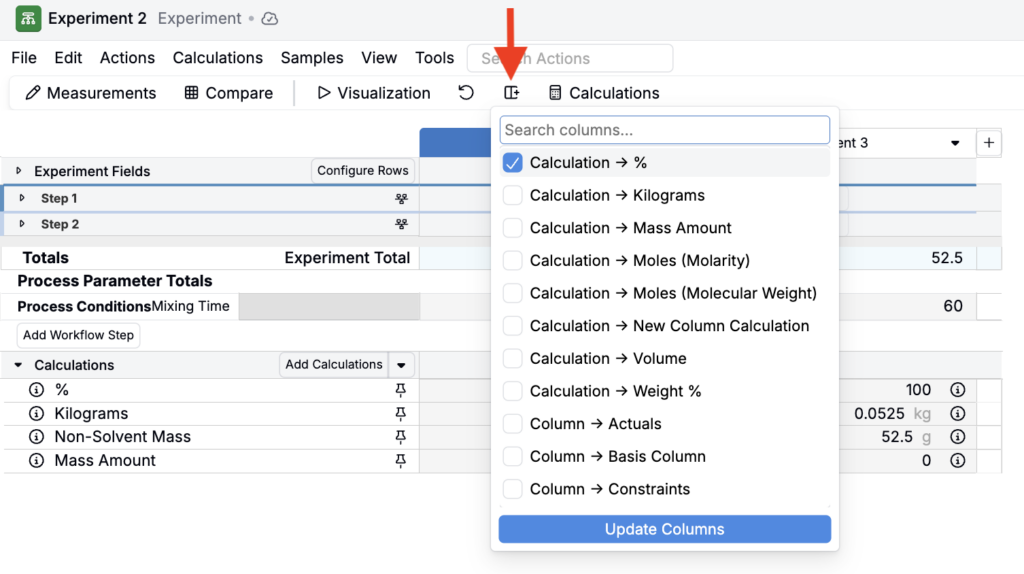
Calculation Sidepanel
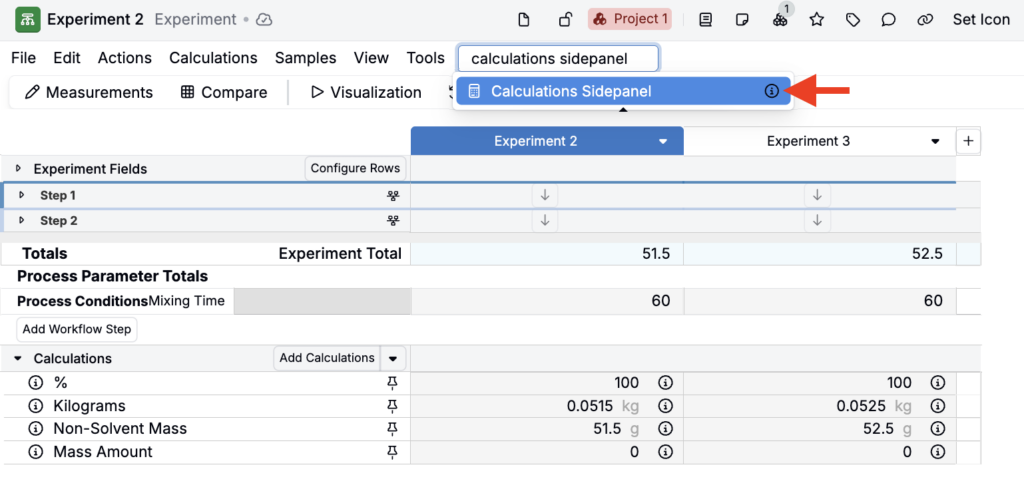
You can also use the Calculations Sidepanel to view all calculations currently enabled on the project or workflow. Toggle Show individual calculation entity values to see how each entity contributes to the final calculated value.
The sidepanel is particularly useful for Solver workflows, where you may want to view calculated values while targeting specific outputs.
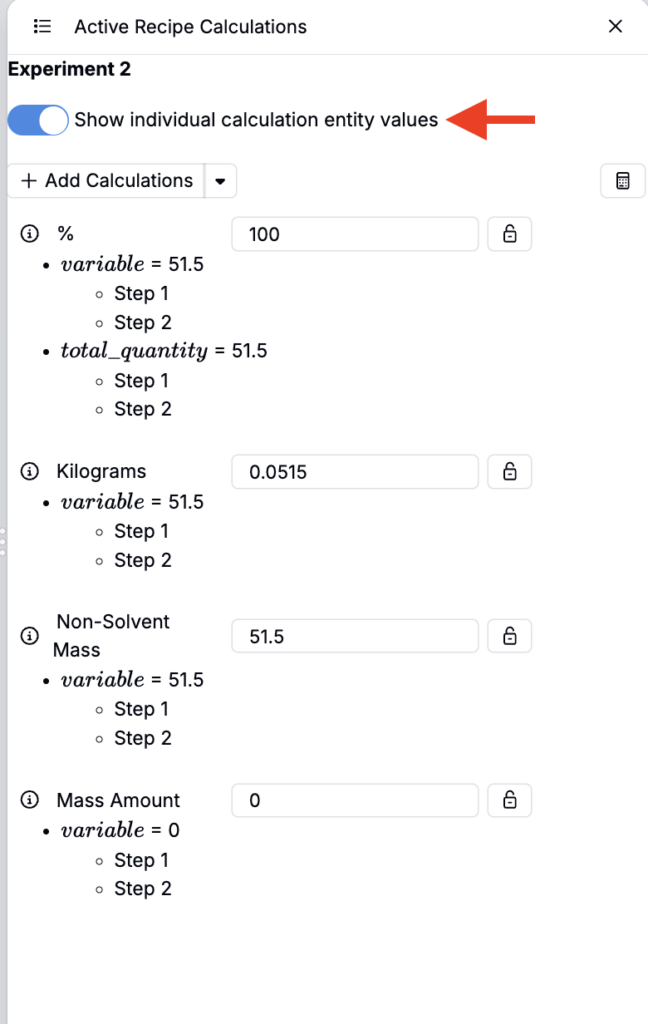
To view the sidepanel, search for Calculations Sidepanel.
“Mark as main column”
In a column calculation’s header menu, the Mark as main column setting sets a column calculation as the primary quantity/value column for the Recipe grid, so the recipe effectively uses that calculation as its main working column. This is commonly used to work in an alternate unit or basis (e.g., grams or %) without needing to keep the default main column visible.