The Recipe view of an experiment (Enter Recipe page) is the primary interface for entering and viewing recipe data. This includes recipe fields, metadata, ingredients, process parameters, equipment, instructions, and input calculations.
This page works in tandem with the Measurements page, which captures the output data and test results from experiments.
Page Layout
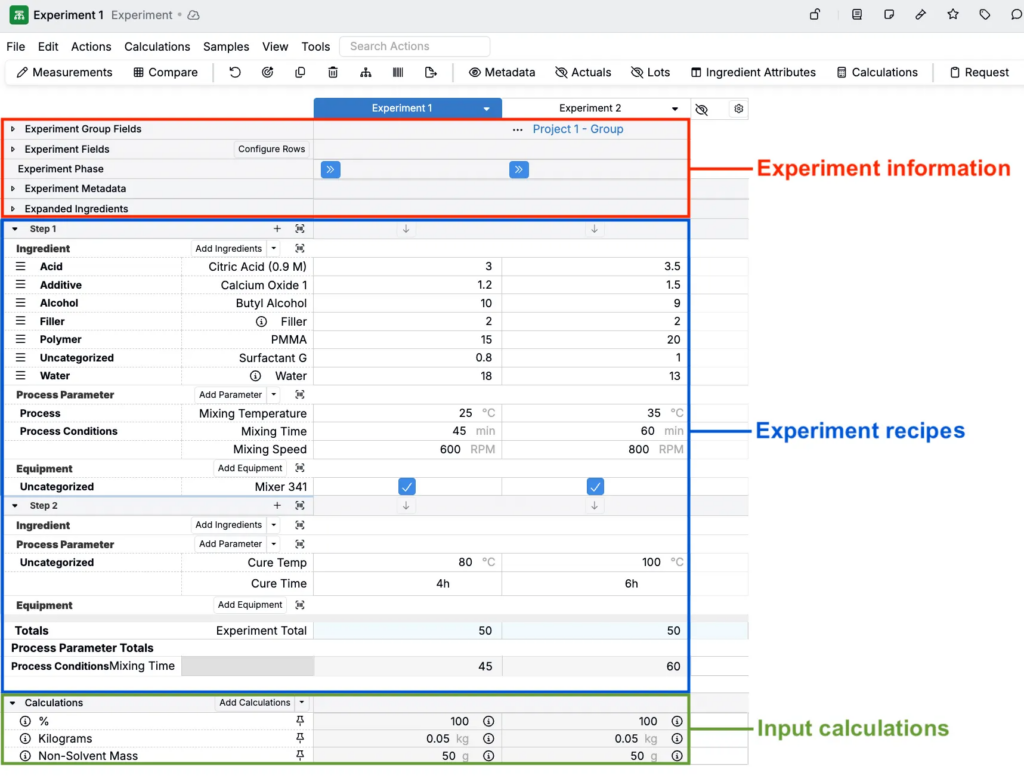
Selecting one or more experiment from the a dashboard or listing will open the Recipe view, which is organized into several key sections:
Experiment Header
The experiment header appears at the top of the Recipe view and displays key experiment name and definition. You can use the header to lock, unlock, favorite, comment, add notes, view linked entities, and more.
File Menu
The File menu provides centralized access to all actions, settings, and tools available on the Recipe view.
Actions Toolbar
The Actions toolbar is a customizable toolbar which displays frequently-used action buttons for quick access.

Recipe Table
The main body of the page displays the recipe table which is organized into sections defined by your platform configuration. Common sections include:
- Experiment information — Experiment identifiers and metadata such as experiment group fields, experiment fields, experiment phase, experiment metadata, expanded ingredients
- Experiment recipes — Data table of recipe ingredients, process parameters, equipment, instructions, etc. organized into workflow steps
- Calculations — Input calculations, auto-calculated fields based on recipe inputs (e.g., total batch weight, ratios)
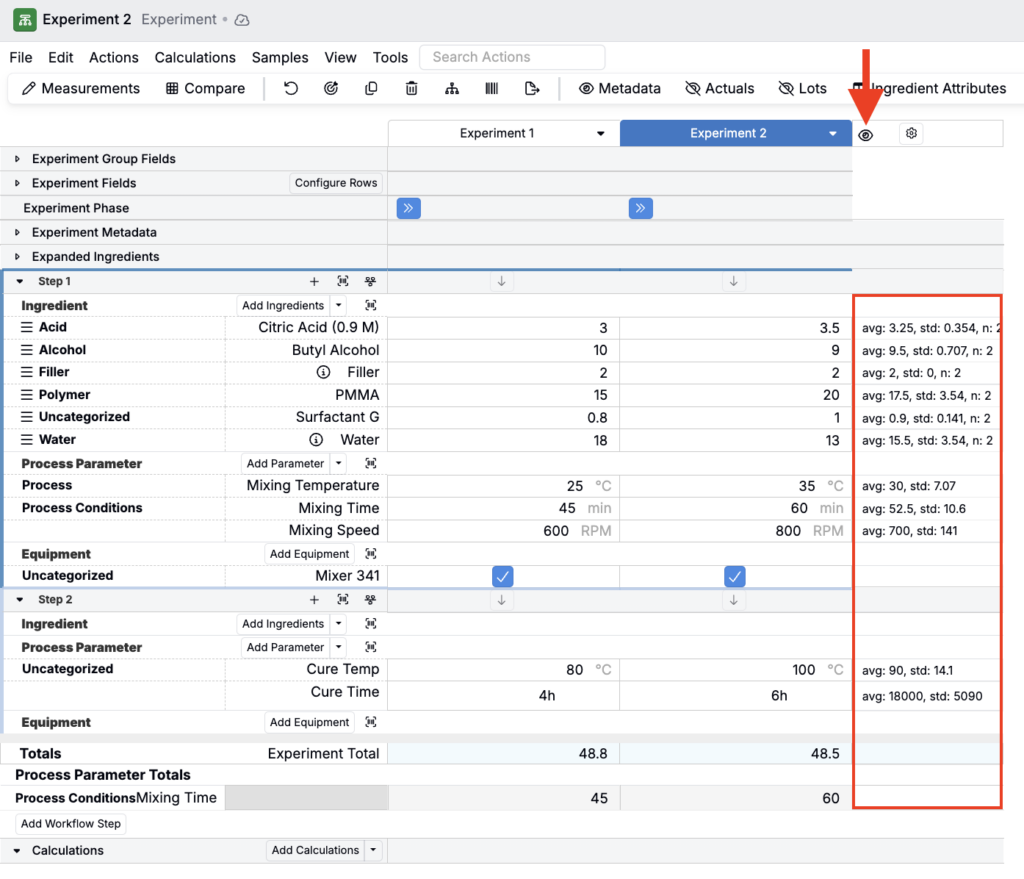
You can also click the 👁️ icon in the far right corner of the recipe table to view row statistics.
Page Actions
Adding/Removing Sections and Rows
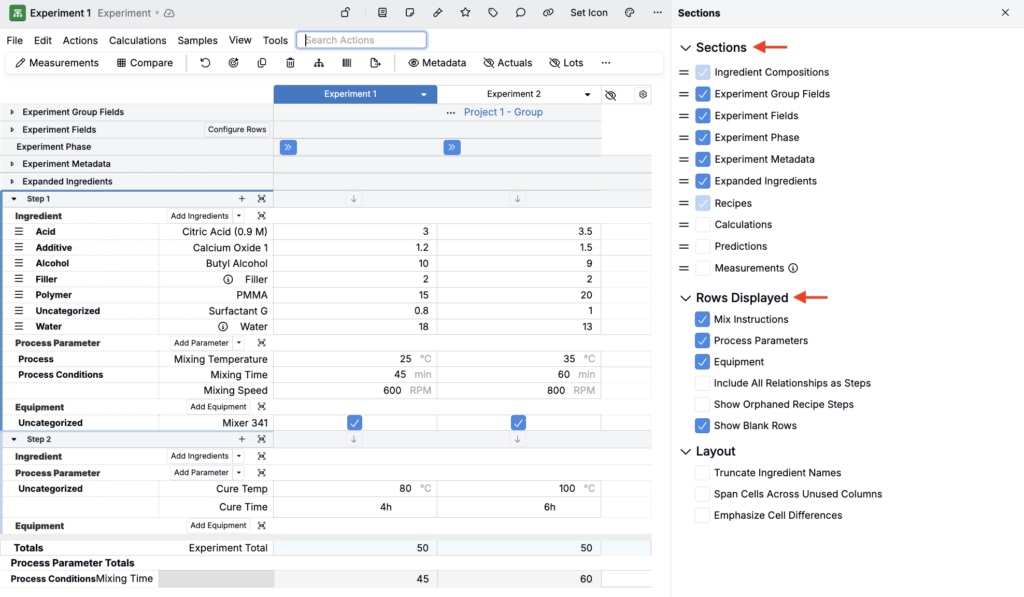
To add or remove sections from the experiment’s recipe view, use the Sections Sidepanel (View > Sections > Sections Sidepanel). Within the sidepanel, use the checkboxes to show or hide sections.
Sections available to add include:
- Experiment Group Fields — Displays experiment group information (e.g. group name, group ID, and group-level metadata)
- Experiment Phase — Displays the current experiment phase with an option to advance the phase
- Experiment Metadata — Displays experiment metadata (e.g. creation date, last modified date, and custom metadata fields)
- Expanded Ingredients — Displays summary of ingredients and totals
- Calculations — Displays the input calculations section at the bottom of the data table
- Predictions — Displays predicted output values based on recipe inputs and machine learning models
- Measurements — Displays view-only measurement data (recorded on the Measurements view of experiments)
Under Rows Displayed, you can also add or remove data table rows. By default, the following rows are enabled:
- Mix Instructions — Show mix order instruction rows
- Process Parameters — Show process parameters rows
- Equipment — Show or hide equipment rows
- Show Blank Rows — Show or hide blank rows
You can also use the View > Sections submenu or Search Actions to quickly add or remove sections or rows.
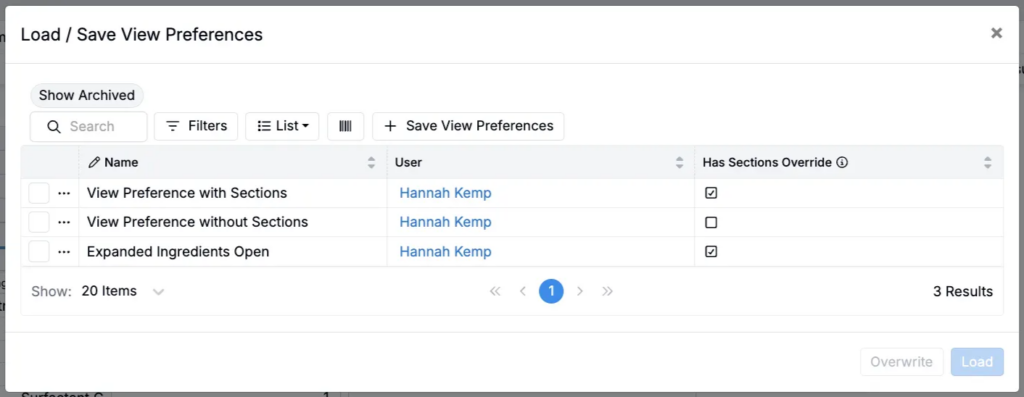
Saving/Loading View Preferences
View Preferences allows you to save and load different column configurations on the Recipe page. This feature lets you create custom views tailored to specific recipe types or workflows, making it easy to switch between different data displays.
To access View Preferences, select View > View Preferences from the File menu or use Search Actions.
Adding New/Existing Experiments
To add an experiments to the Recipe view you can bring in an existing experiment, copy a recipe in view, or create a new experiment from scratch.
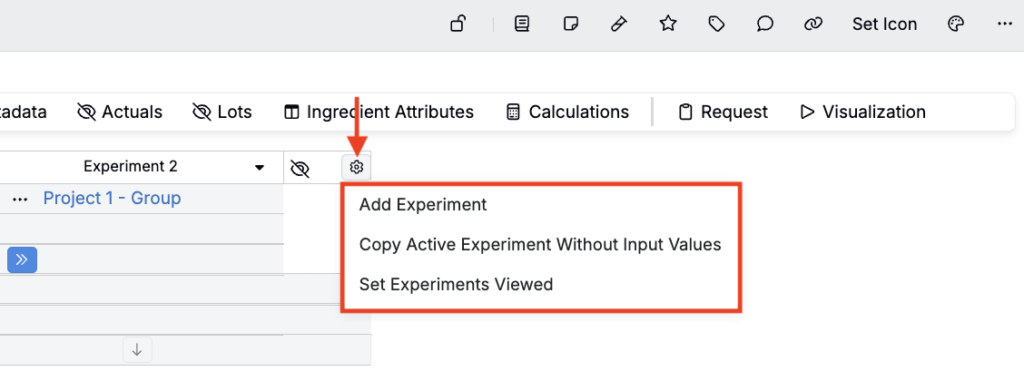
- To create a new experiment, click ⚙️ > Add New Experiment
- To add an existing experiment, click ⚙️ > Set Experiments Viewed
- To copy without values, click ⚙️ > Copy Active Experiment Without Input Values
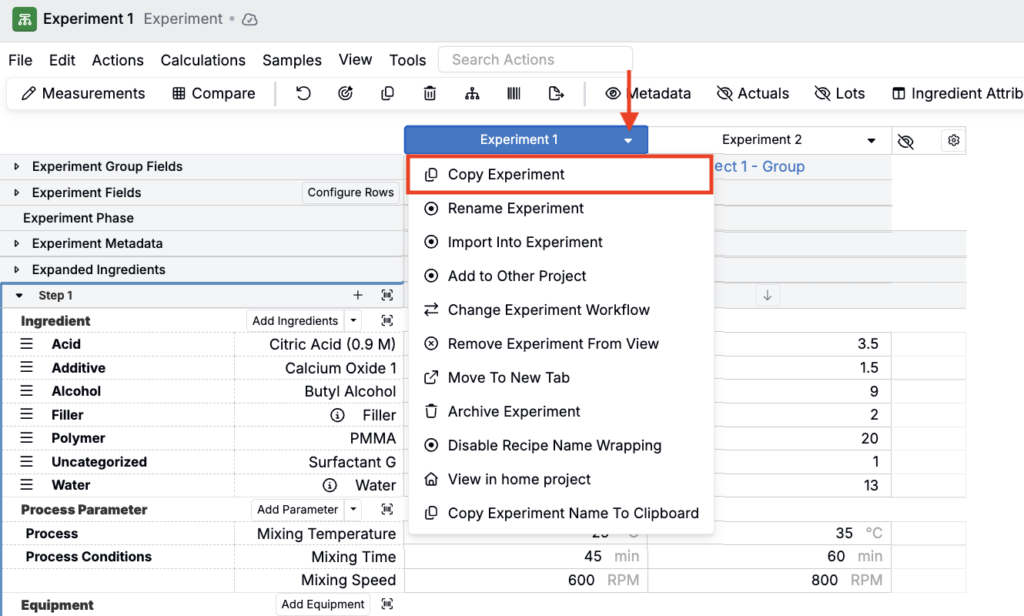
- To copy with values, click the experiment column header and select Copy Experiment.
Removing/Archiving Experiments
To remove experiments from the Recipe view, you can either remove them from the display or archive them entirely.
- To remove an experiment from view, click the experiment column header and select Remove Experiment from View.
- To archive an experiment, click the experiment column header and select Archive Experiment. Learn more.

Adding/Removing Recipe Columns
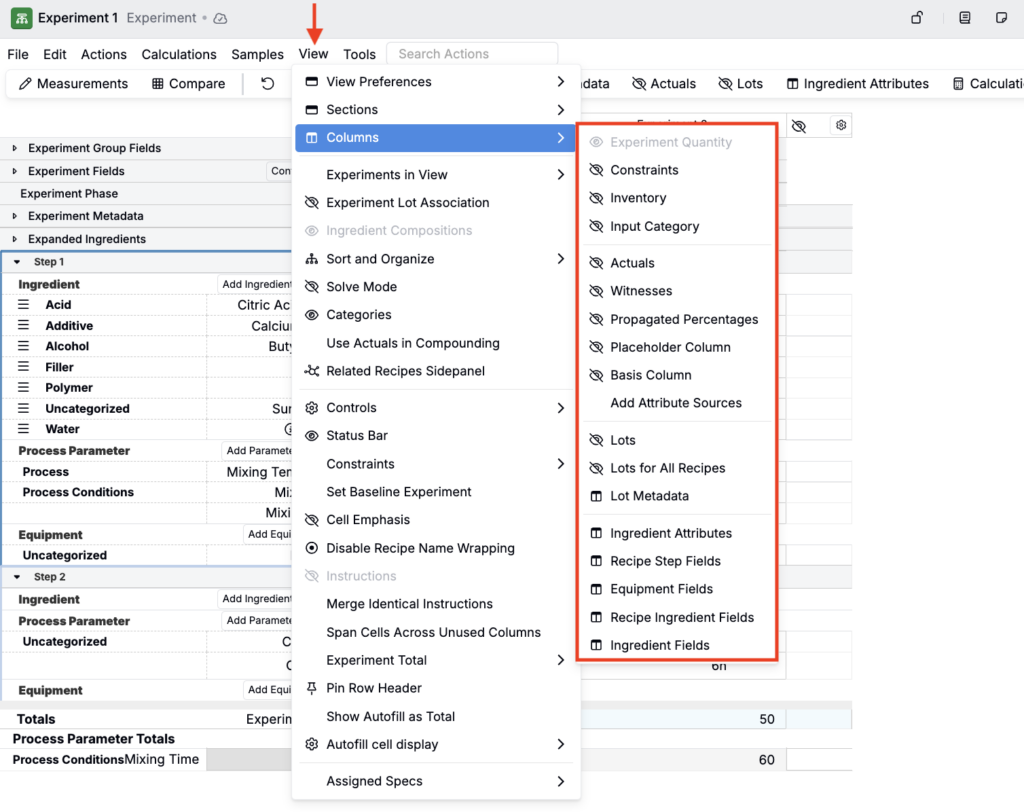
To add or remove recipe columns from view, click View > Columns and select from the submenu.
Columns available to add include:
- Constraints — Displays the minimum and maximum allowable values for ingredients or process parameters, helping ensure recipes stay within acceptable ranges. Learn more.
- Inventory — Allows you to associate ingredients with inventory and to decrement by the recipe amount as needed.
- Input Category — Displays input categories (e.g. polymers, additives, fillers, acids, etc.) as a standalone column on the data table.
- Actuals — Adds a column in which you can record the actual amounts used during experiment execution, which may differ from planned quantities due to measurement limitations or adjustments.
- Witnesses — Adds a column with a checkbox for witnessing each step individually. Records who witnessed the step, when, and optional notes. Useful or quality control and regulatory compliance.
- Propagated Percentages — controls how much of an ingredient’s entered quantity actually contributes to the step total and is used in calculations.
- Defaults to 100% for all ingredients, meaning the full amount is counted toward the formulation
- Can be adjusted to indicate that only a portion of the ingredient is actually propagated in the experiment
- Affects calculations! For example, if an ingredient has 10 parts and propagated percentage is 50%, calculations will use 5 parts (unless Use Pre-Propagated Quantities is enabled on the calculation).
- Use cases: equipment mass that is later removed (e.g. mixing beads), evaporation or moisture loss, ingredients not fully incorporated
- Placeholder Column — Adds a placeholder column that can be used to swap in/out placeholder ingredients during formulation.
- Basis Column — Displays and allows you to swap the basis (mass, volume, moles, etc.) used for percentage calculations.
- Lots — Displays and allows you to select the lot for ingredients used in the active experiment, enabling traceability and batch-specific tracking.
- Lots for All Recipes — Displays and allows you to select an ingredient’s lot for all experiments in the current view.
- Lot Metadata — Select and display ingredient lot metadata fields (e.g. expiration date, supplier) as columns.
- Ingredient Attributes — Select and display ingredient attributes (e.g. molecular weight, density, cost) as columns.
- Recipe Step Fields — Select and display custom recipe step fields (e.g. mixing speed, time stamp, observational image, observational notes) added to the Recipe Step definition in Form Admin.
- Equipment Fields — Select and display custom equipment fields (e.g. capacity, location, calibration status), added to the Equipment definition in Form Admin.
- Recipe Ingredient Fields — Select and display custom recipe ingredient fields (e.g. percent solids, component of interest, batch size), added to the Recipe Ingredient definition in Form Admin.
- Ingredient Fields — Select and display custom ingredient fields (e.g. CAS number, storage temp, regulatory status), added to the Ingredient definition in Form Admin and also visible/editable on an ingredient’s details page.
Adding/Removing Inputs
To add inputs to a workflow step, click the + icon in the step header and select from the menu. Note that to add instruction rows, you must have mix order enabled on your workflow step.
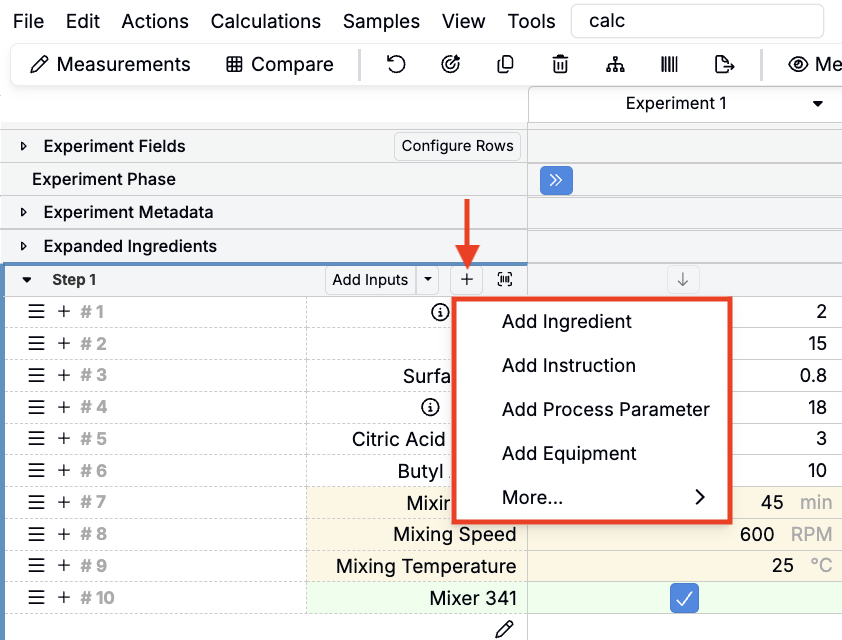
You can also use the Add Ingredient, Add Parameter, Add Equipment, and Add Calculation buttons within each step.

To remove an input row, right-click on the row header and select Remove [Input].
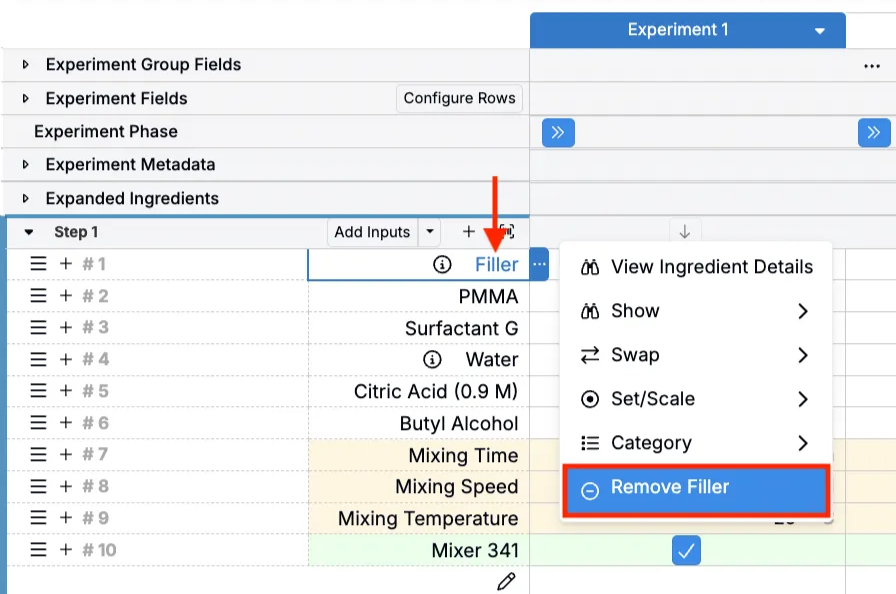
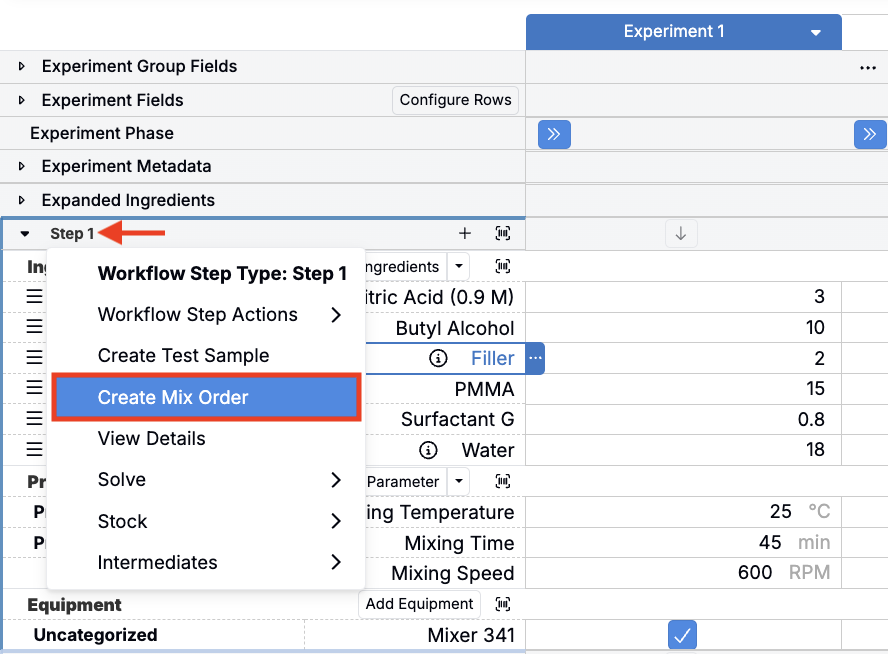
Enabling/Disabling Mix Order
To enable mix order on a workflow step, click the step header and select Create Mix Order.
When mix order is enabled on a workflow step, you can add, reorder, and document the specific instructions for how ingredients should be combined, processed, or handled within that step.
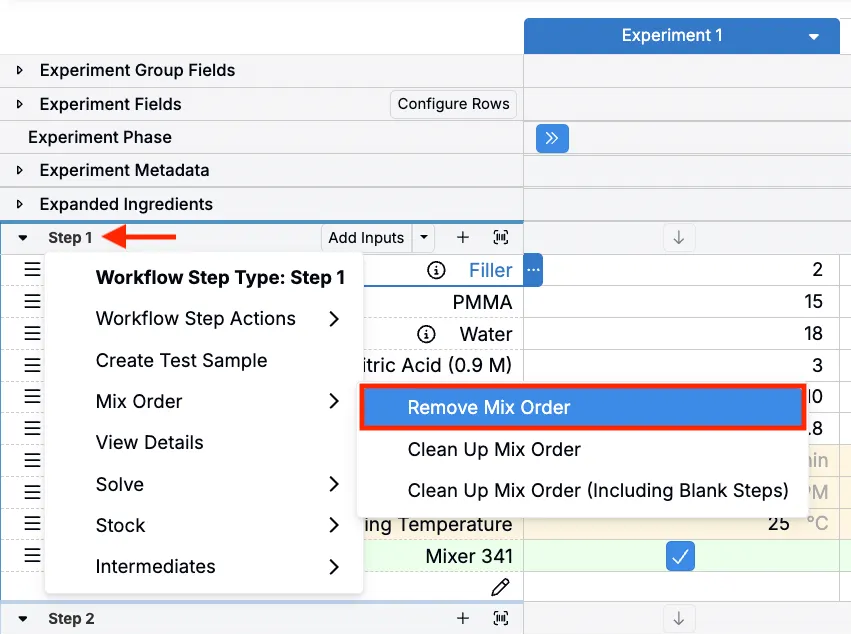
To disable mix order on a workflow step, click the step header and select Mix Order > Remove Mix Order. Note that in order to remove mix order, all inputs rows must be unlocked.
Navigating the Recipe Page
Navigating the recipe page works similarly to a spreadsheet.
- Tab — Move forward to the next field
- Shift+Tab — Move backward to the previous field
- Enter — Move down in tables
- Arrow keys — Navigate between cells in the recipe table
- Scroll horizontally to view multiple experiments side-by-side
- Click experiment names in the header to switch between active experiments
- Collapse/expand sections by clicking the arrow next to section headers
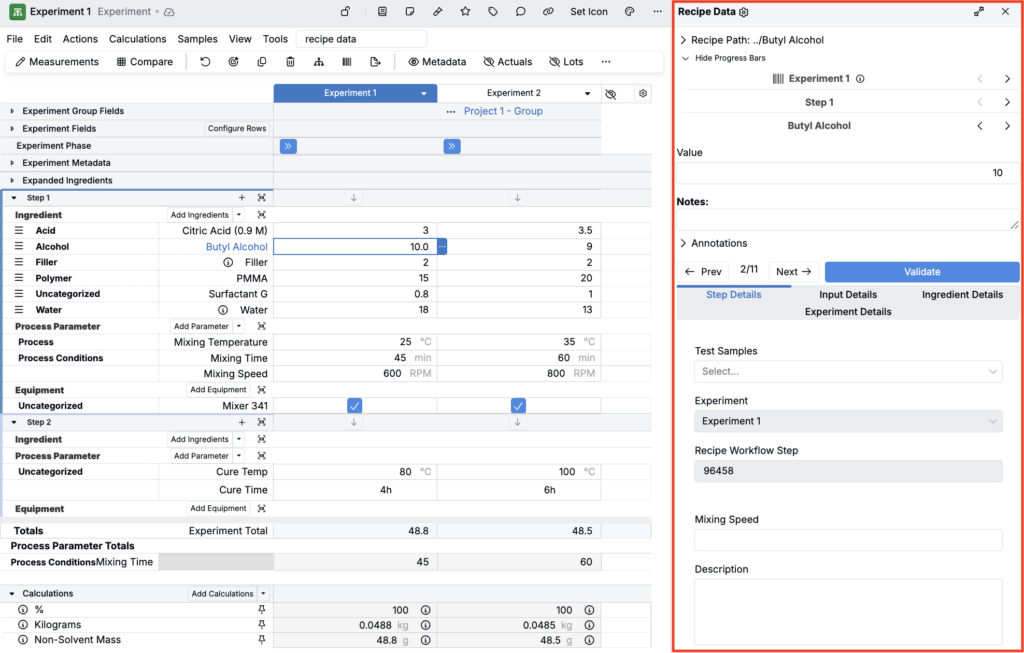
You can also use the Recipe Data Sidepanel (Tools > Recipe Data Sidepanel) to navigate through workflow steps and ingredients.
Entering Recipe Data
Entering recipe data in Uncountable also works similarly to a spreadsheet:
- Click into any cell to begin entering data
- Type values directly for quantities, text, or numeric fields
- Use dropdowns for ingredient selection, metadata, or predefined options
- Tab or use the arrow keys to move between cells
- Enter to move down to the next row
- Copy and paste directly to and from Excel or other spreadsheets
Notes:
- Ingredient attributes (e.g. cost, molecular weight) automatically populate when you add an ingredient
- Calculations update automatically as you enter ingredient quantities
- Use right-click on cells for additional options like copying values across rows or experiments
- Required fields are typically highlighted or marked with an indicator
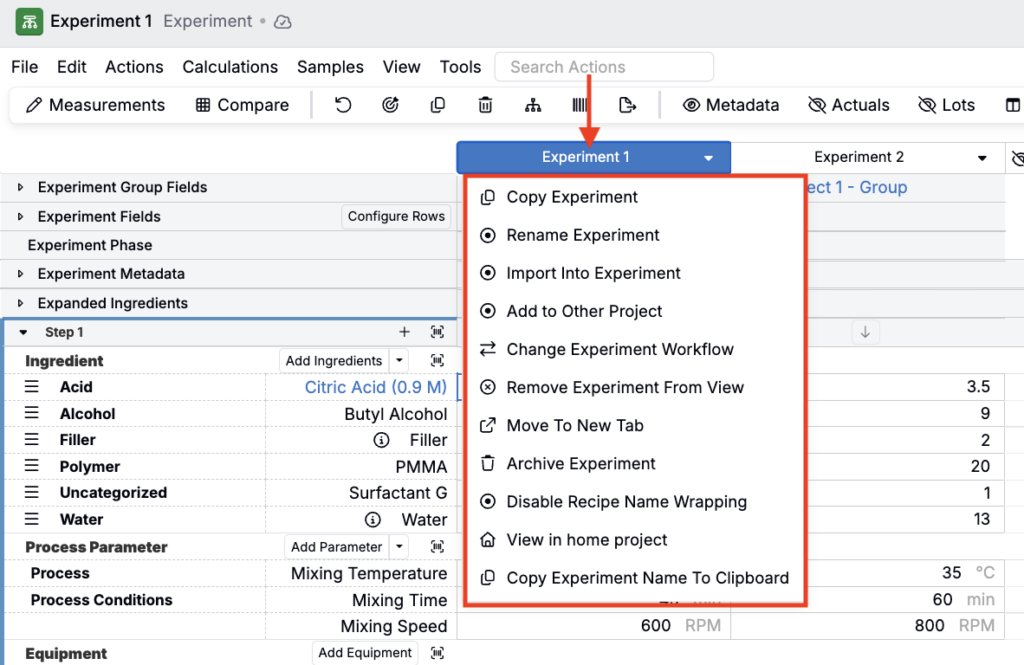
Experiment Column Header Actions
Click an experiment column header to access additional experiment-specific actions, including:
- Rename Experiment — Allows you to edit the name of the experiment
- Import into Experiment — Allows you to import recipe data from another source into the current experiment with optional scaling
- Add to Other Project — Moves or copies the experiment to a different project in your workspace.
- Change Experiment Workflow — Switches the experiment to use a different workflow and/or variant with different steps and structure.
- Move to New Tab — Opens the experiment in a separate tab for easier side-by-side comparison.
- Enable/Disable Recipe Name Wrapping — Controls whether long experiment names wrap to multiple lines or stay on one line in the column header.
- View in Home Project — Navigates to the project where the experiment originally belongs.
- Copy Experiment Name to Clipboard — Copies the experiment’s name so you can paste it elsewhere.
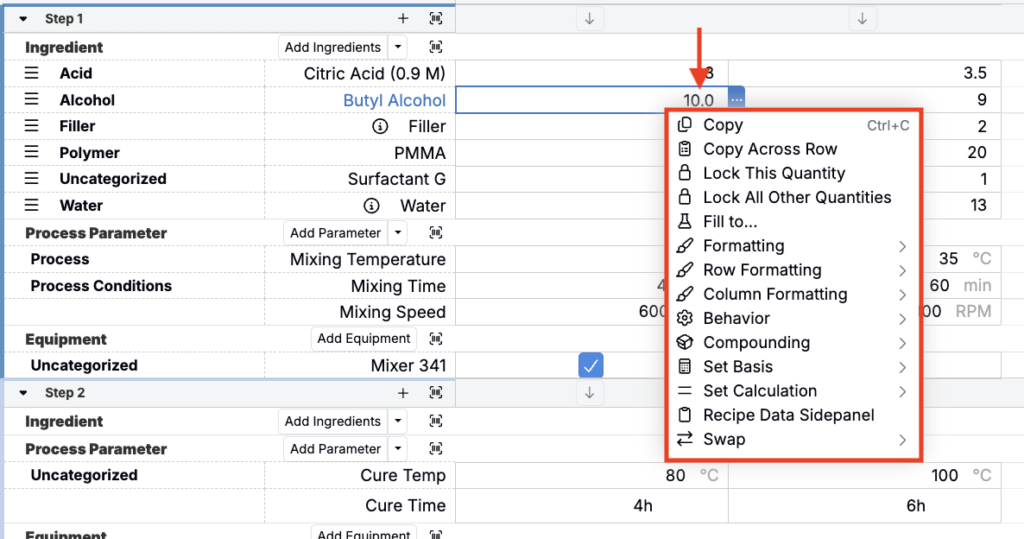
Recipe Cell Menu Actions
Right-click into any recipe cell to access cell, column, or row-specific settings, including:
- Copy — Copies the value from the selected cell to your clipboard
- Copy Across Row — Copies the value from the selected cell to all other experiments in the same row
- Lock This Quantity — Locks the value in the selected cell so it won’t be affected by scaling or other automatic calculations
- Lock All Other Quantities — Locks all other quantity values in the row except the selected cell
- Fill to… — Fills the value from the selected cell down to a specified recipe or step total
- Formatting — Add or remove a highlight color on the individual cell
- Row Formatting — Add or remove a highlight color on the cell row
- Column Formatting — Add or remove a highlight color on the individual column
- Behavior — Controls how ingredient quantities are handled during recipe operations (Standard, Included, Autofill).
- Compounding — Sets compounding rules for how ingredient quantities are calculated relative to previous steps (Standard, Use Lot)
- Set Basis — Changes the basis (mass, volume, moles, etc.) used for percentage calculations for that ingredient
- Set Calculation — Assigns or modifies calculation formulas for the selected cell
- Recipe Data Sidepanel — Opens the Recipe Data Sidepanel to navigate through workflow steps and ingredients
- Swap — Allows you to swap the current ingredient with another ingredient or placeholder
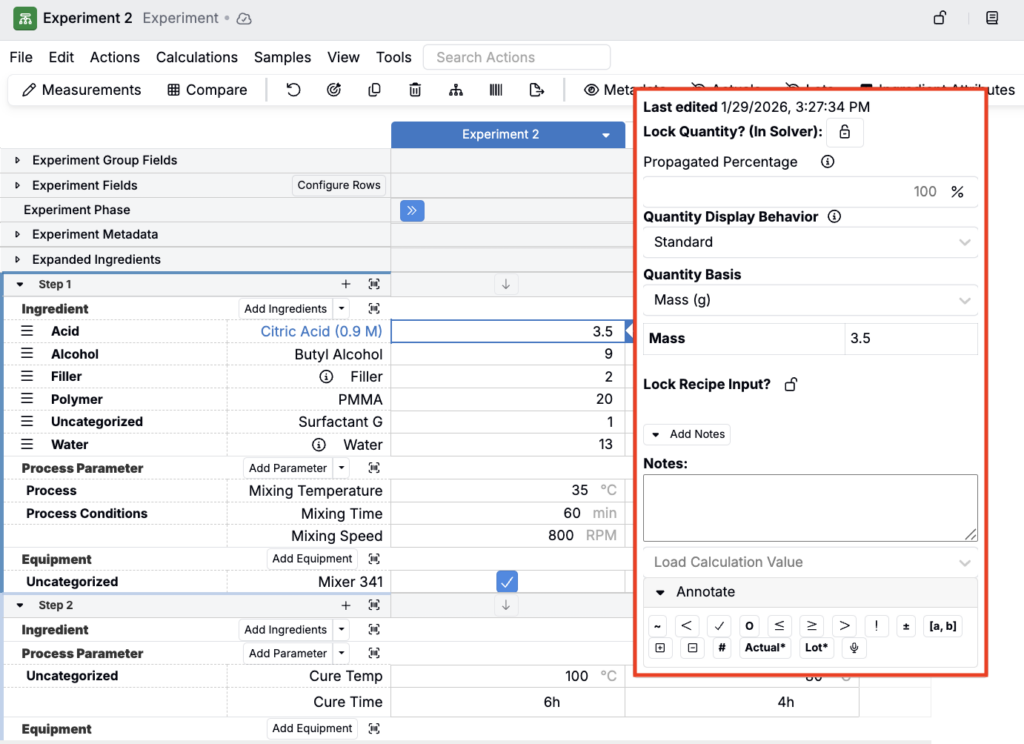
Viewing and Recording Input Details
Click any input cell and select the blue … to open the Input Details popover. This modal provides additional options for managing and documenting input data:
- View last edit — See who last edited the input and when.
- Lock quantity — Prevents the quantity from changing when using Solver.
- Propagated percentage — Indicates the percentage of the ingredient that remains in the formulation after processing. For example, if 30% of the mass is lost due to evaporation, enter 70%.
- Quantity display behavior — Determines the display and entry mode for the ingredient. Standard allows numeric entry. Included allows the ingredient to be toggled on or off. Autofill automatically sets the ingredient’s amount to fill the remainder needed to reach the selected total or basis.
- Quantity basis — Defines the unit basis (mass, volume, moles) for percentage calculations.
- Lock recipe input — Locks the entire input row to prevent accidental changes.
- Add notes — Add notes about the input for documentation purposes.
- Add annotations — Flag the input with annotations.
Viewing Experiment Audit Log
The experiment Audit Log provides a complete history of all changes made to an experiment, including who made each change and when. To view the audit log, select Tools > Audit Log from the File menu.
The audit log contains:
- Name — The name of the user who made the change
- Time— The exact date and time when each change occurred
- Edit type — The type of modification (e.g., ingredients, outputs, metadata, experiment fields)
- Entity changed — The specific field, output, or property that was modified
- Previous and new values — The previous value and the updated value for each change
- Reason — Reasons for the change, if added via the Audit Log Sidepanel (Search Actions > Audit Log Sidepanel)
- Recipe permissions — Use the Recipe Permissions tab to view changes in experiment permissions
