The Measurements view of an experiment (Enter Measurements page) is the primary interface for entering measurement data, including analytical results, performance metrics, and observations. This page works in tandem with the Recipe page, which captures the input data and formulation details for experiments.
Page Layout
From the Recipe view of an experiment, click Measurements to access the the Enter Measurements page.

This page is organized into several key sections:
Experiment Header
The experiment header appears at the top of the Measurements view and displays key experiment name and definition. You can use the header to lock, unlock, favorite, comment, add notes, view linked entities, and more.
File Menu
The File menu provides centralized access to all actions, settings, and tools available on the Measurements view.
Actions Toolbar
The Actions toolbar is a customizable toolbar which displays frequently-used action buttons for quick access.

Measurements Table
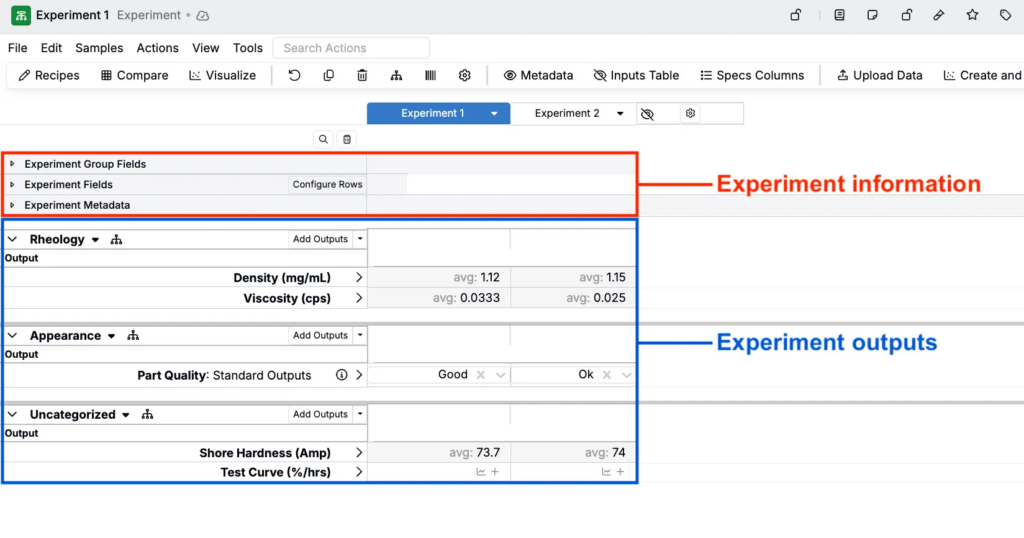
The main body of the page displays the measurements table which is organized into sections defined by your platform configuration. Common sections include:
- Experiment information — Experiment identifiers and metadata such as experiment group fields, experiment fields, experiment phase, and experiment metadata
- Experiment outputs — Data table of measured outputs with conditions, grouped by test type with support for replicates
- Test samples — Optional nested test samples, linked to the parent experiment but having their own distinct workflow, inputs, and outputs
Page Actions
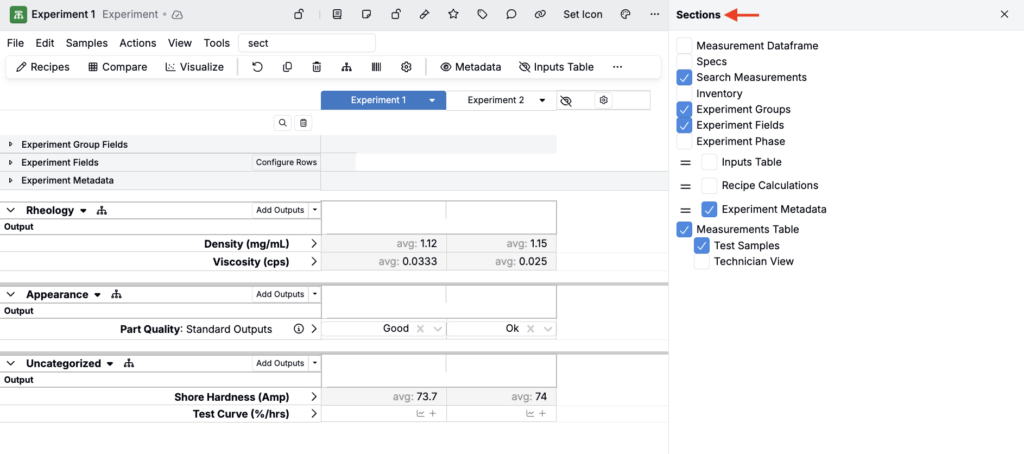
Adding/Removing Sections
To add or remove sections from the experiment’s measurements view, use the Sections Sidepanel (View > Sections > Sections Sidepanel). Within the sidepanel, use the checkboxes to show or hide sections.
Sections available to add include:
- Measurement Dataframe — Adds an alternative “table-like” section to the top of the page that can be used for editing measurement values
- Specs — Displays each experiment’s associated spec as a row in the experiment information section, with options to assign, create, or edit each experiment’s specs
- Search Measurements — Buttons to search for measurements across experiments or filter by lab request
- Inventory — Row containing per-experiment inventory information including location, amount, and units
- Experiment Groups — Displays experiment group fields that categorize and organize related experiments
- Experiment Fields — Shows custom experiment-level fields defined for your platform configuration
- Experiment Phase — Indicates the current phase or stage of the experiment in your workflow
- Inputs Table — Displays the recipe inputs and formulation details from the Recipe page for reference while entering measurements
- Recipe Calculations — Shows calculated values and derived properties from the Recipe view
- Experiment Metadata — Displays experiment metadata (e.g. creation date, last modified date, and custom metadata fields)
- Measurements Table — The main data entry table for experiment outputs, which can include:
- Test Samples — Nested samples linked to the parent experiment, each with their own workflow, inputs, and outputs
- Technician View — A simplified interface for laboratory technicians that shows one test sample at a time, allowing technicians to easily proceed to the next sample after entering results for the current one.
You can also use the View > Sections submenu or Search Actions to quickly add or remove sections or rows.
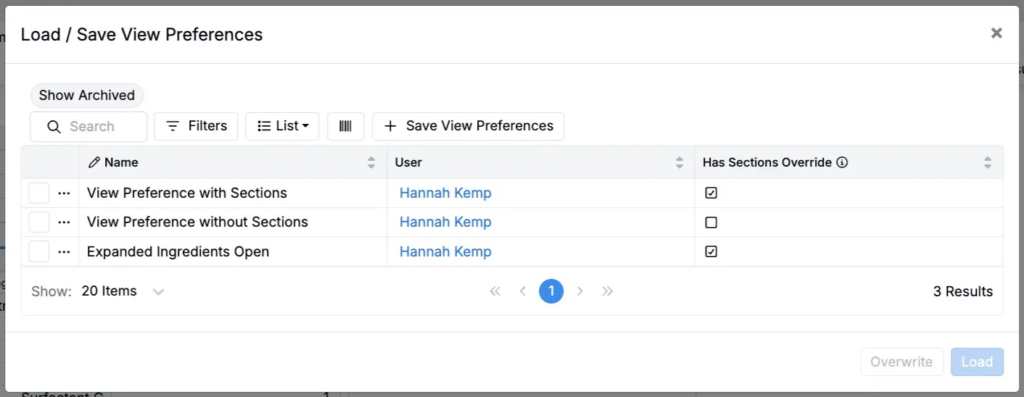
Saving/Loading View Preferences
View Preferences allows you to save and load different column configurations on the Recipe page. This feature lets you create custom views tailored to specific recipe types or workflows, making it easy to switch between different data displays.
To access View Preferences, select View > View Preferences from the File menu or use Search Actions.
Adding New/Existing Experiments
To add an experiments to the Measurements view you can bring in an existing experiment, create a new experiment from scratch, or copy an experiment in view.
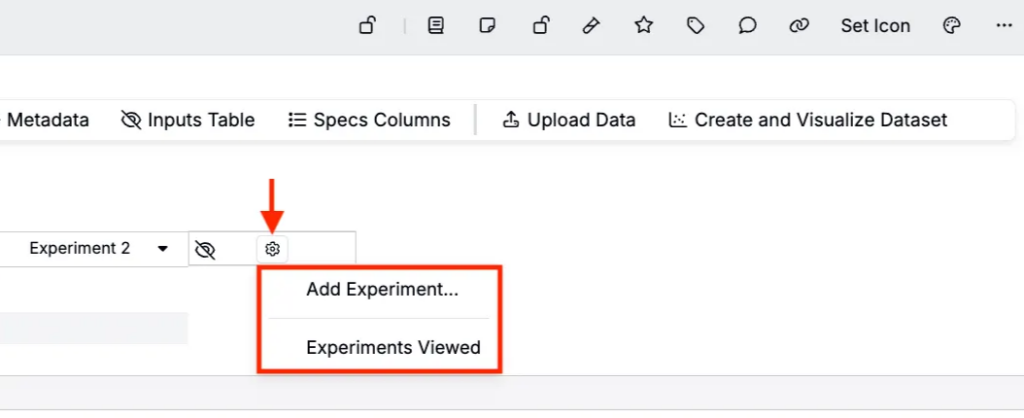
- To create a new experiment, click ⚙️ > Add New Experiment
- To add an existing experiment, click ⚙️ > Experiments Viewed
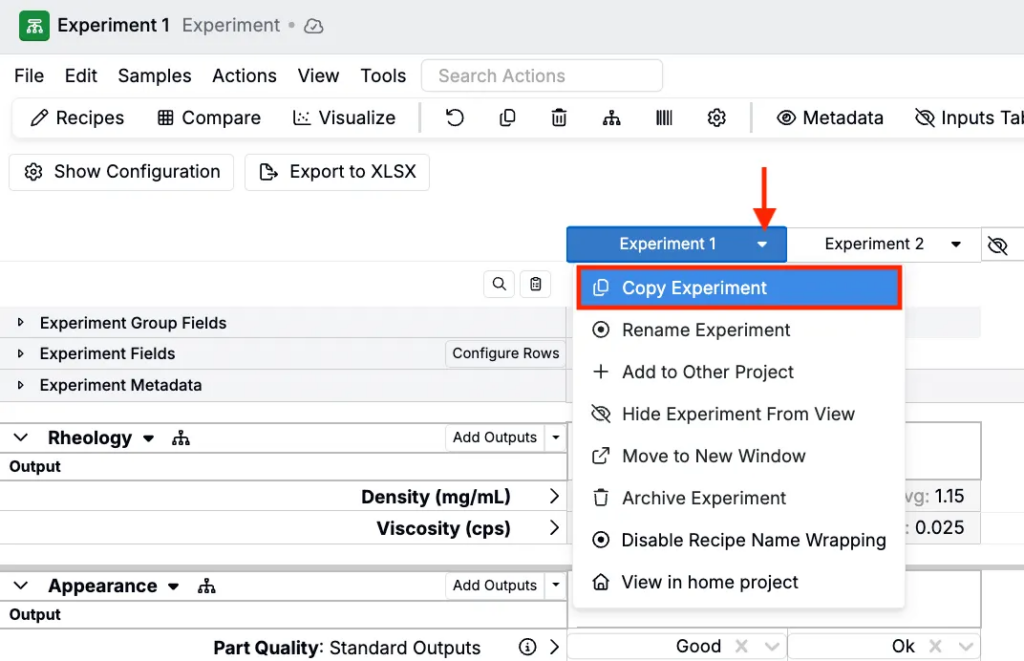
- To copy an experiment, click the experiment column header and select Copy Experiment. In the modal, select what to include in your copy (e.g. values, lots, test samples).
Removing/Archiving Experiments
To remove experiments from the Measurements view, you can either remove them from the display or archive them entirely.
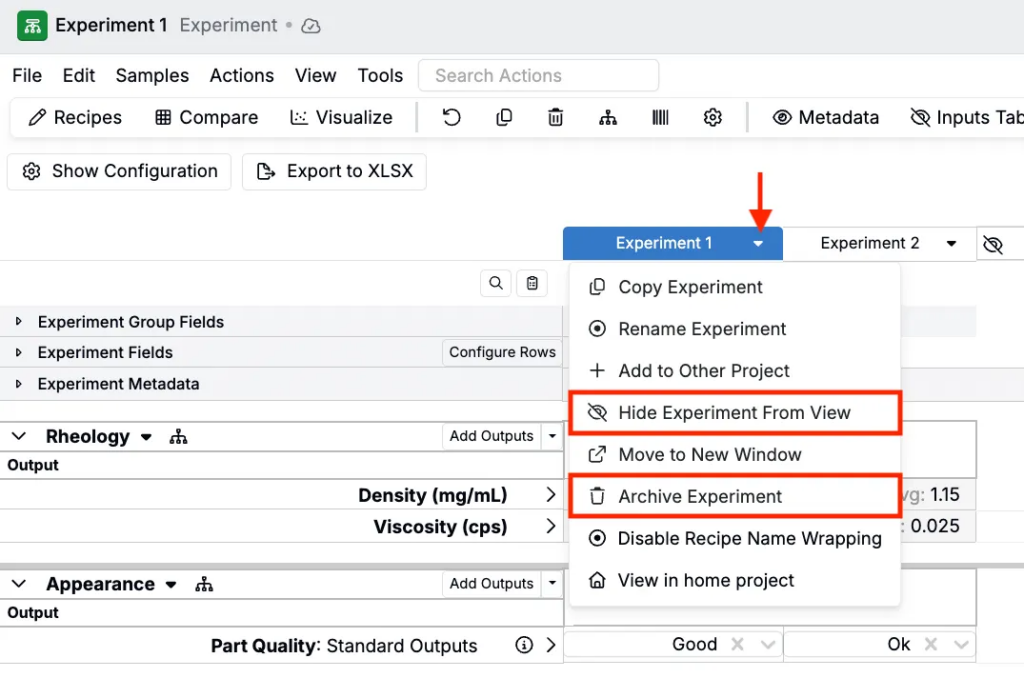
- To remove an experiment from view, click the experiment column header and select Hide Experiment from View.
- To archive an experiment, click the experiment column header and select Archive Experiment. Learn more.
Displaying Spec Columns
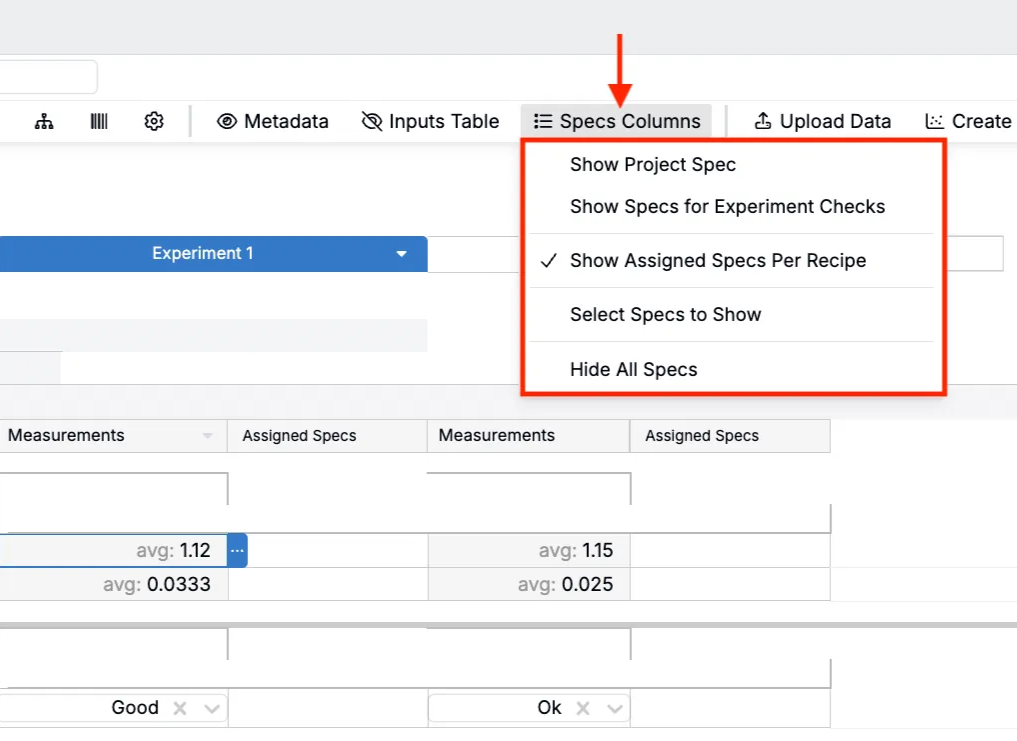
In addition to viewing specs as a row in the experiment information section, you can add project and assigned spec columns to your data table. To do so, click the Specs Columns button in the action bar and select from these options:
- Show Project Spec — Displays project spec output goals and target ranges as a single column for all experiments in the current project
- Show Specs for Experiment Checks — Includes specs in the experiment checks section at the bottom of the page
- Show Assigned Specs Per Recipe — Displays assigned spec output goals and target ranges as per-recipe columns
- Select Specs to Show — Opens a modal to select from all specs available in your schema
- Hide All Specs — Removes all specs from view
You can also access these options by clicking View > Specs Columns and selecting from the submenu.
Adding/Removing Outputs
You can add outputs in a few different ways:
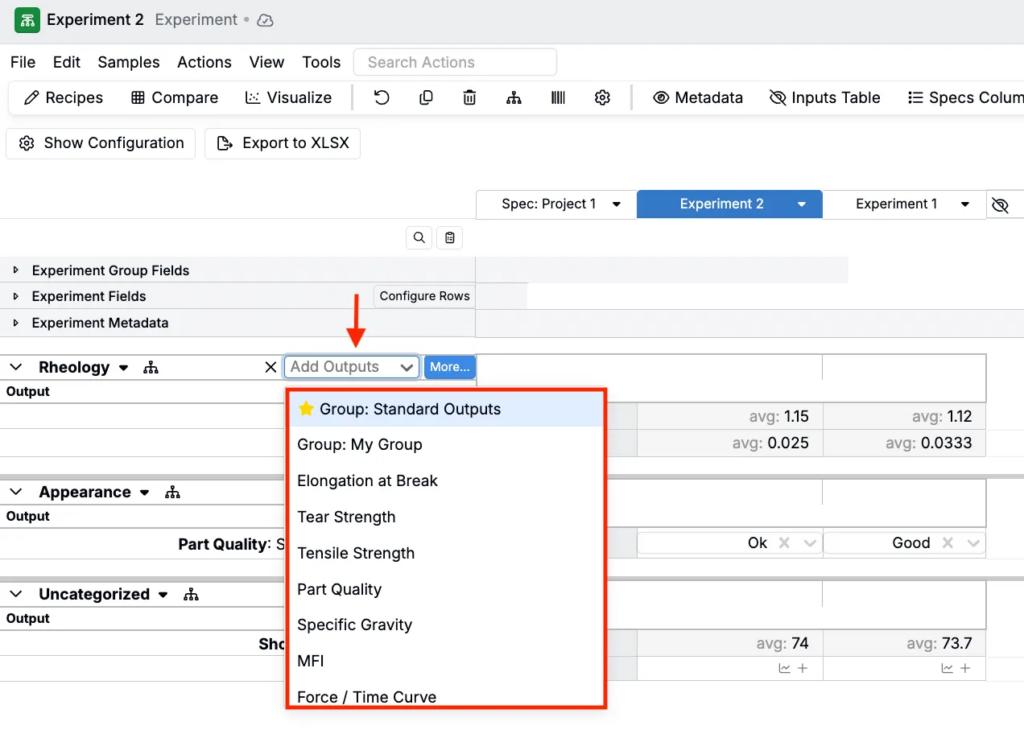
- Click Add Outputs above the data table.
- Select individual outputs or output groups from the menu.
- Click More to open the Add Outputs modal and add multiple outputs at once.
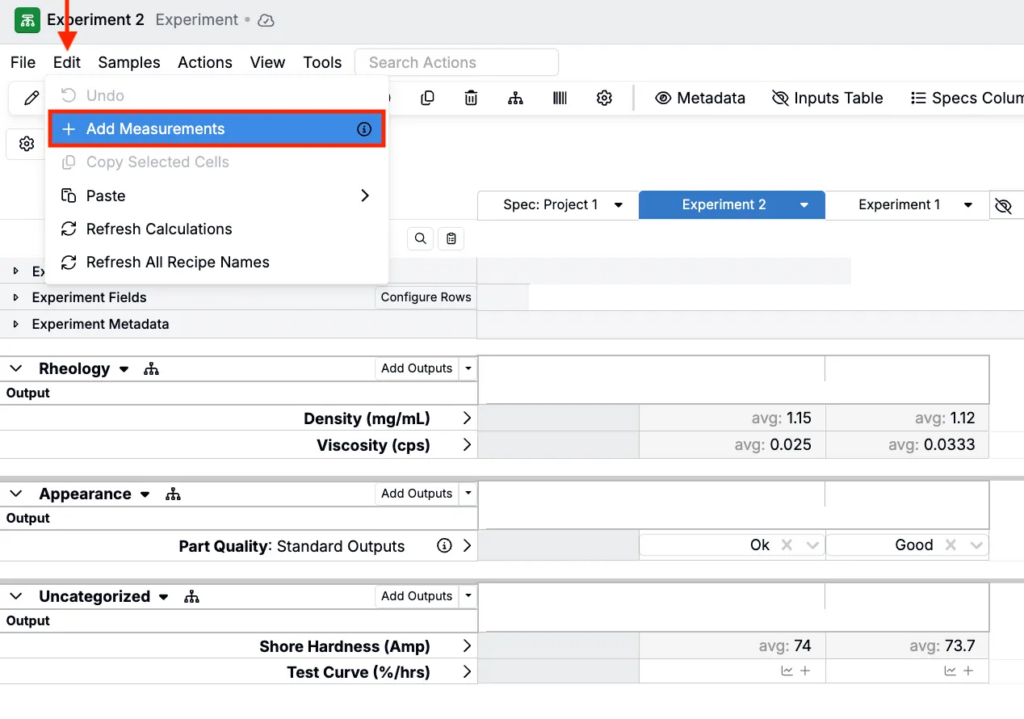
- Alternatively, open the Edit > Add Measurements to open the modal.
- Outputs are organized by category (e.g. Rheology, Performance, Physicals, Appearance, or Tensile).
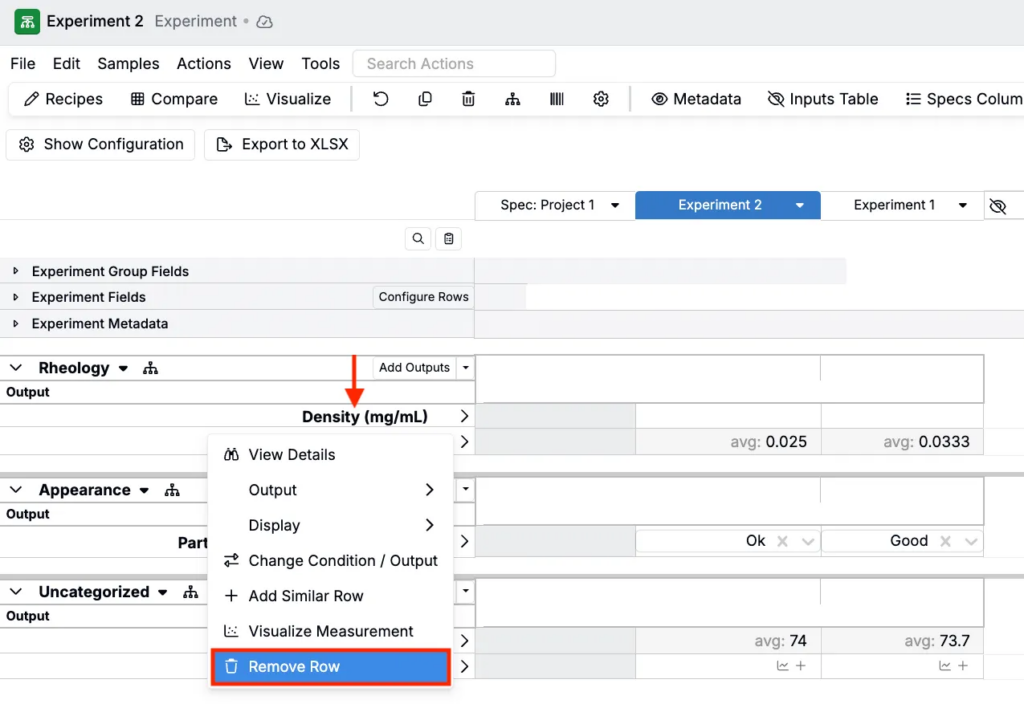
To remove outputs, you must first clear any values on that row.
- Right-click on the output row header and select Clear Row.
- Right-click on the output row header and select Remove Row.
Notes:
- Available outputs are defined in your schema’s outputs listing page.
- Condition parameters can be entered alongside outputs to provide context for measurements (e.g., temperature, humidity, or test duration).
Navigating the Measurements Page
Navigating the measurements page works similarly to a spreadsheet.
- Tab — Move forward to the next field
- Shift+Tab — Move backward to the previous field
- Enter — Move down in tables
- Arrow keys — Navigate between cells in the measurements table
- Scroll horizontally to view multiple experiments side-by-side
- Click experiment names in the header to switch between active experiments
- Collapse/expand sections by clicking the arrow next to section headers
- Expand test samples to view nested sample data
Recording Measurement Data
Entering measurement data in Uncountable works similarly to a spreadsheet:
- Click into any cell to begin entering data
- Type values directly for numeric measurements or text observations
- Use dropdowns for predefined options or categorical data
- Tab or use the arrow keys to move between cells
- Enter to move down to the next row or replicate
- Copy and paste directly to and from Excel or other spreadsheets
- Enter conditions alongside outputs to record test parameters (e.g., temperature, humidity, strain rate)
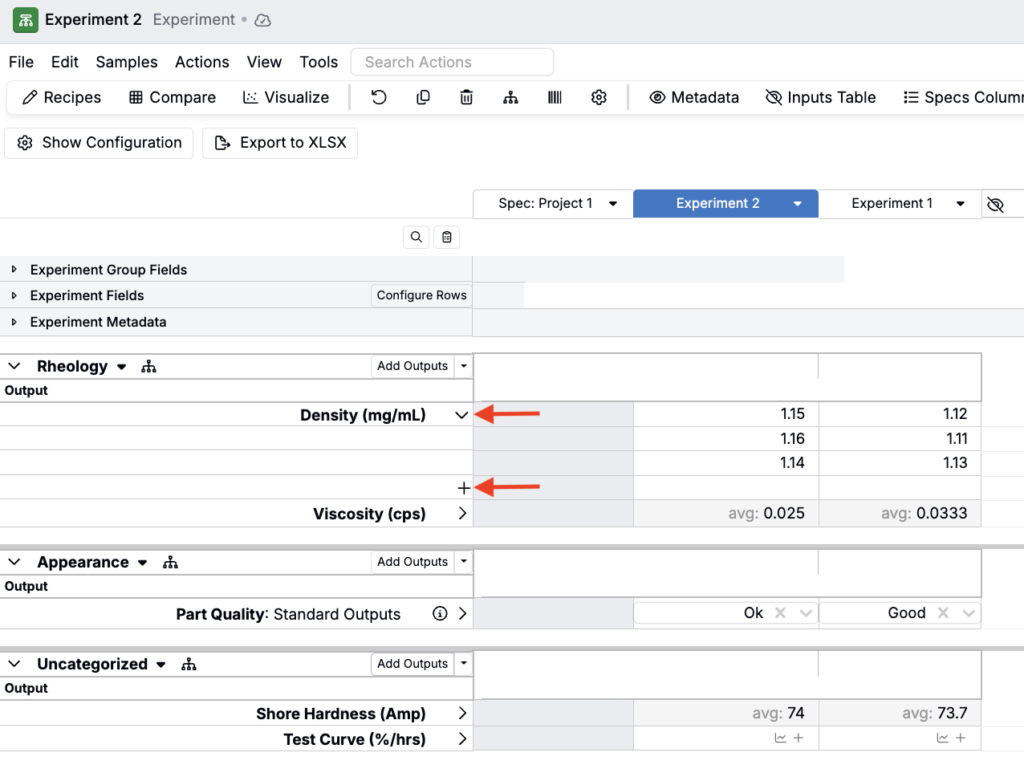
- Add replicates by clicking the > on the right side of the output row, then clicking the + icon to record multiple measurements for the same test
Notes:
- Out-of-spec values may be highlighted automatically if specs are assigned
- Measurement data can be locked/unlocked using the experiment header controls
Importing Measurement Data
To import measurement data from external sources, click the Upload Data action button or select Actions > Upload data from the File menu. This opens the uploader modal, which you can use to drag and drop in machine files.
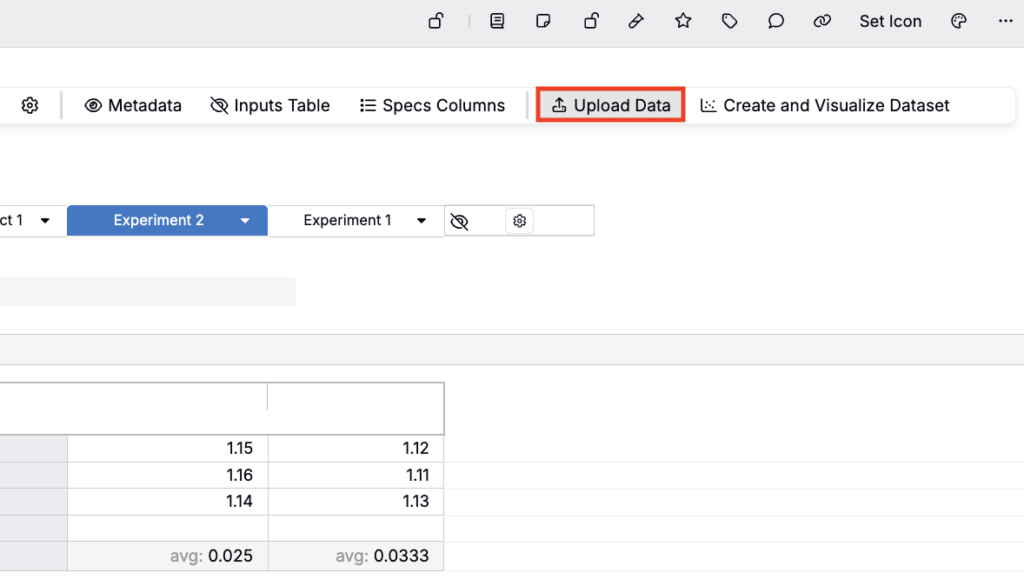
To learn more, refer to Introduction to Uploaders.
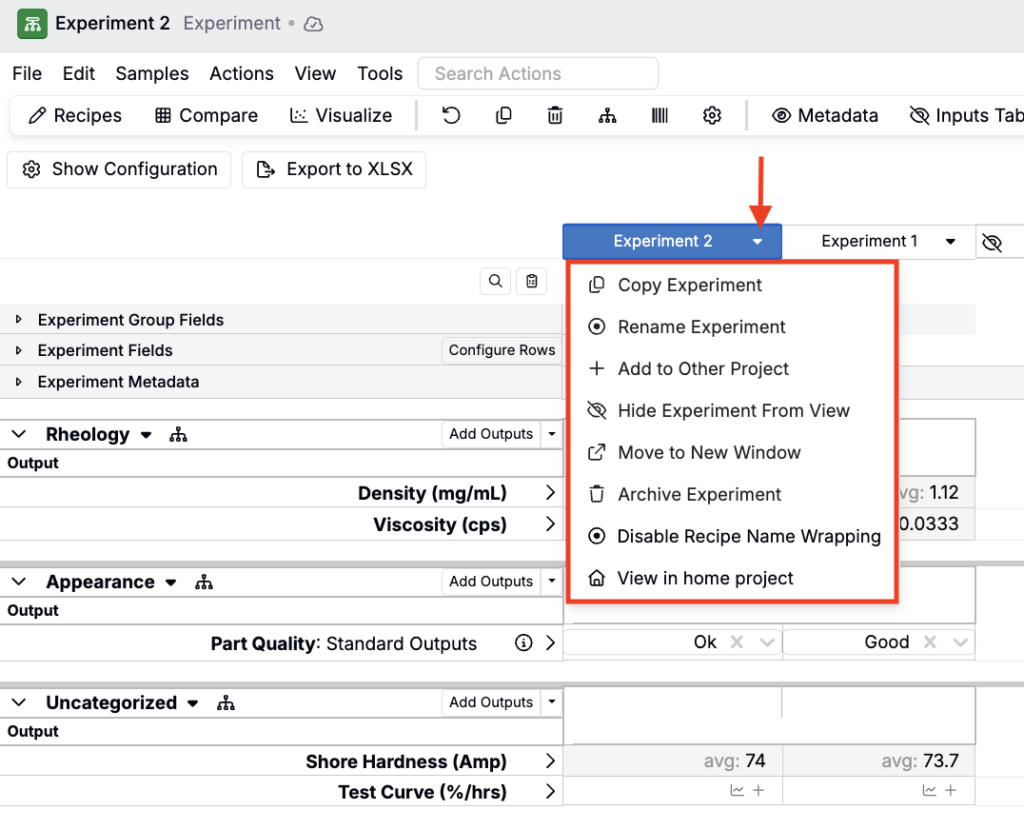
Experiment Column Header Actions
Click an experiment column header to access additional experiment-specific actions, including:
- Rename Experiment — Allows you to edit the name of the experiment
- Copy Experiment — Duplicates the experiment with options to include values, lots, and test samples
- Add to Other Project — Moves or copies the experiment to a different project in your workspace
- Move to New Tab — Opens the experiment in a separate tab for easier side-by-side comparison
- Enable/Disable Experiment Name Wrapping — Controls whether long experiment names wrap to multiple lines or stay on one line in the column header
- View in Home Project — Navigates to the project where the experiment originally belongs
- Copy Experiment Name to Clipboard — Copies the experiment’s name so you can paste it elsewhere
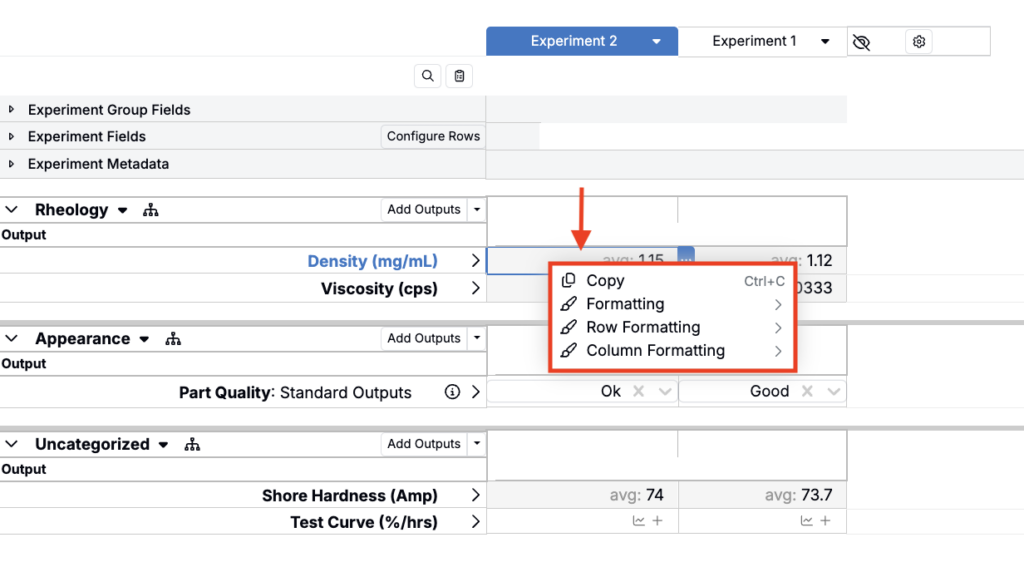
Measurement Cell Menu Actions
Right-click into any measurement cell to access cell, column, or row-specific settings, including:
- Copy — Copies the value from the selected cell to your clipboard
- Copy Across Row — Copies the value from the selected cell to all other experiments in the same row
- Formatting — Add or remove a highlight color on the individual cell
- Row Formatting — Add or remove a highlight color on the cell row
- Column Formatting — Add or remove a highlight color on the entire experiment column
Viewing/Recording Measurement Details
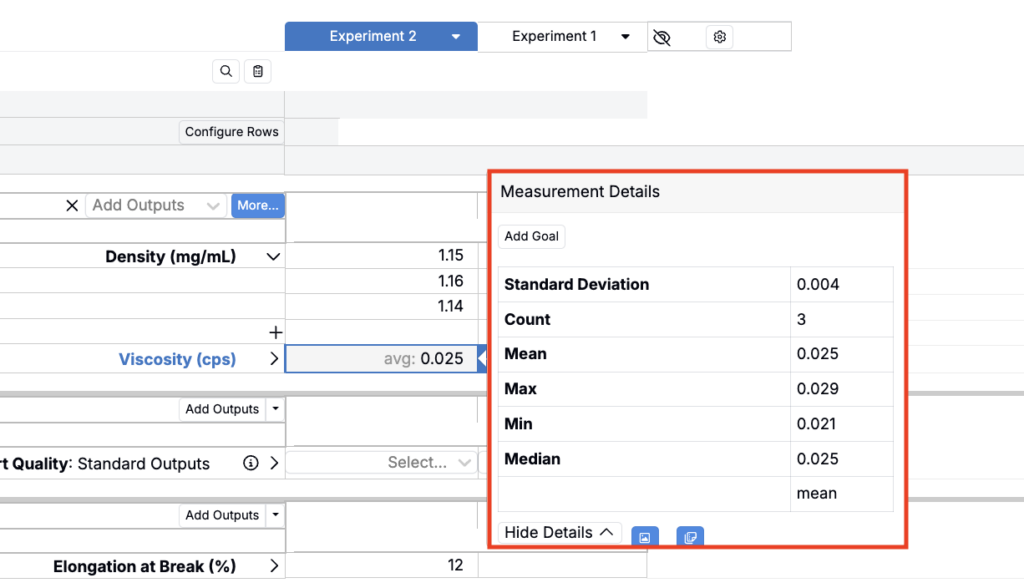
Click into any output cell and select the blue … to open the Measurement Details popover. This modal provides additional options for managing and documenting measurement data:
- Edit recipe output fields — Add or edit recipe output field values, information associated with the output measurement (e.g. test time and date, humidity, operator details, equipment serial numbers).
- Add notes — Include contextual information or observations about the measurement.
- Add an Image row — Attach visual documentation to the measurement, such as photos of test samples, equipment settings, or result displays.
- Add a Notes row — Insert an additional row dedicated to extended notes or comments.
- Add annotations — Flag the measurement with specific annotations (e.g. approximate, less than, greater than, outlier, untrusted).
- View last edit — See who last edited the measurement and when the edit occurred.
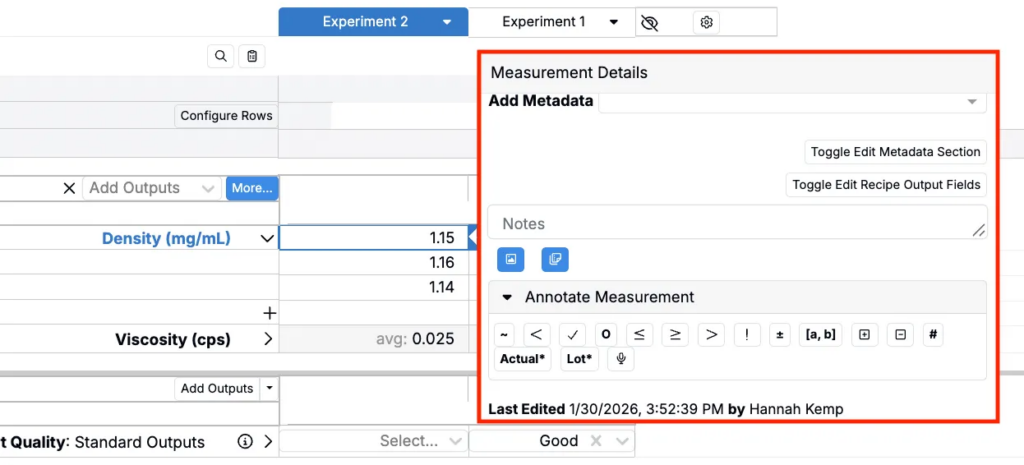
For outputs with replicates, this popover displays replicate statistics including standard deviation, count, mean, maximum, minimum, and median.
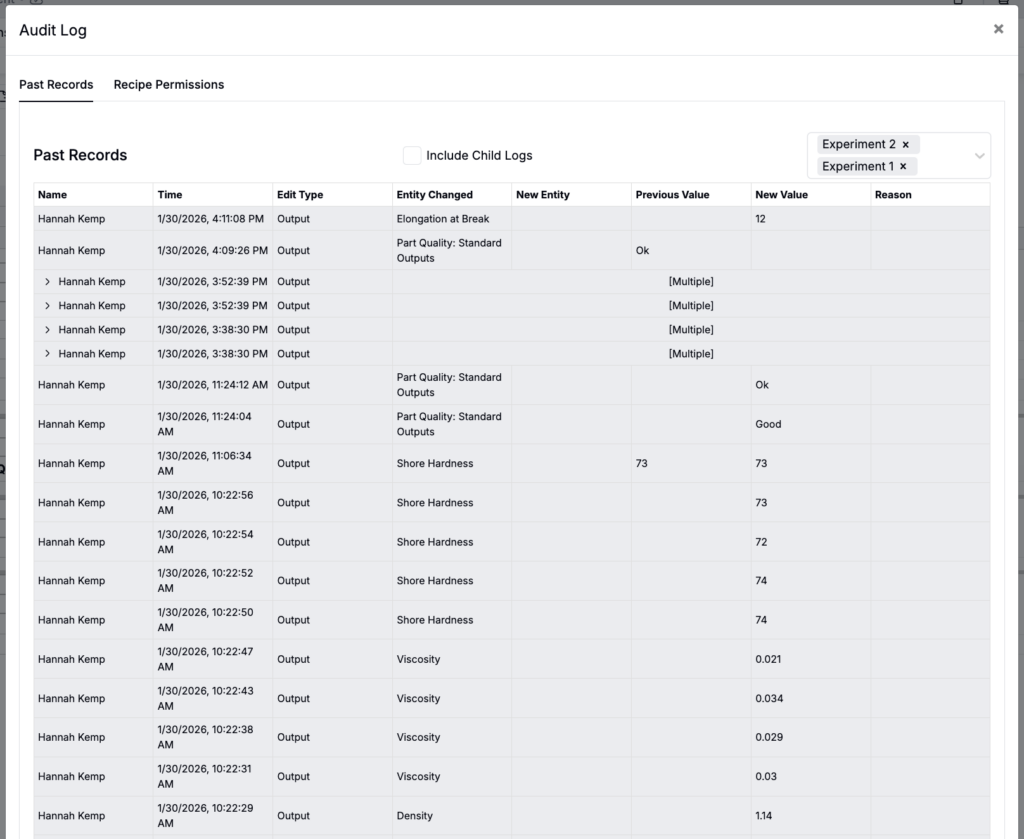
Viewing Experiment Audit Log
The experiment Audit Log provides a complete history of all changes made to an experiment, including who made each change and when. To view the audit log, select Tools > Audit Log from the File menu.
The audit log contains:
- Name — The name of the user who made the change
- Time— The exact date and time when each change occurred
- Edit type — The type of modification (e.g., ingredients, outputs, metadata, experiment fields)
- Entity changed — The specific field, output, or property that was modified
- Previous and new values — The previous value and the updated value for each change
- Reason — Reasons for the change, if added via the Audit Log Sidepanel (Search Actions > Audit Log Sidepanel)
- Recipe permissions — Use the Recipe Permissions tab to view changes in experiment permissions