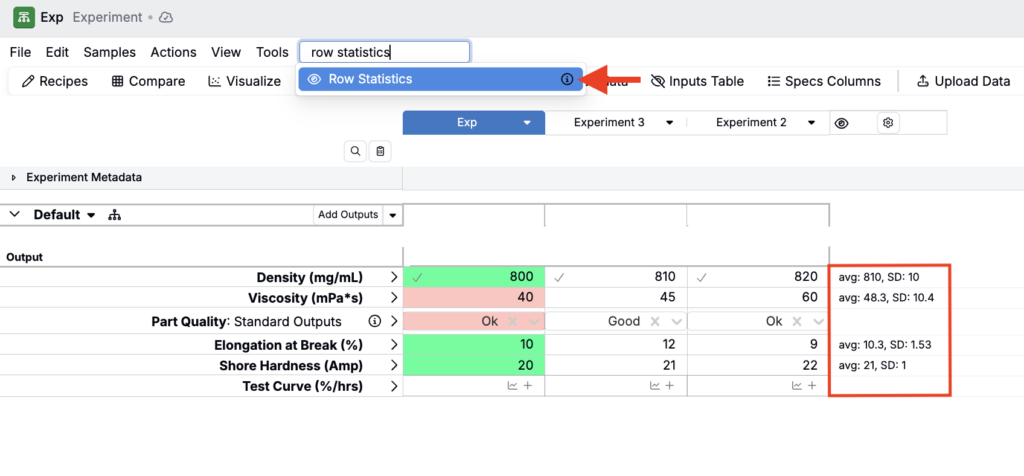
Row Statistics on the Measurements page
Experiment Recipe and Measurements pages now include a Row statistics action, making it easier to quickly compute and view basic statistics (average, standard deviation, n) for the data in a row without leaving your current context.
Row statistics are designed to speed up common “sanity check” moments during analysis and review. It helps you validate data quickly (including spotting outliers, unexpected values, or missing data) without switching views or building a chart.
This is especially helpful when you’re iterating on an experiment and need a fast, lightweight read on what a row’s data looks like before deciding what to explore next.
Notebooks: Snapshot All Visualizations
Notebooks now support a new Snapshot all action that captures snapshots of all visualizations on a page at once—reducing manual work when preparing reports or preserving notebook state.
Previously, snapshotting typically required taking snapshots one visualization at a time, which was time-consuming for pages with many charts. This update improves that workflow by allowing you to capture the whole page in one action, which is especially useful for reporting, reviews, and performance-sensitive notebooks.
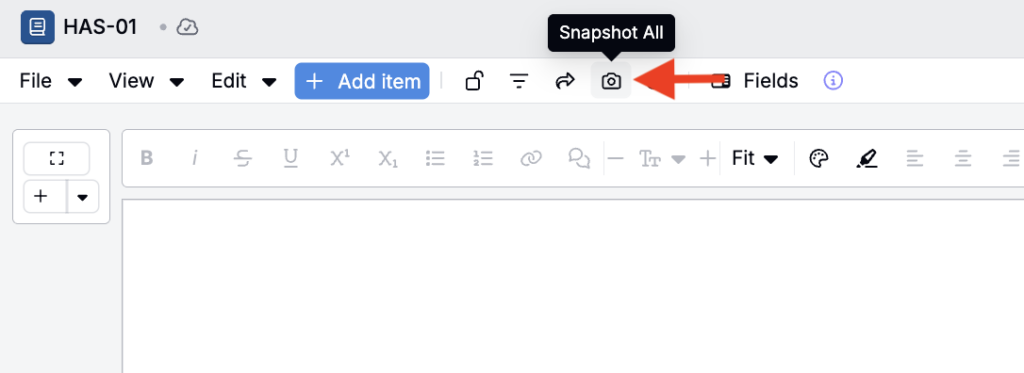
How to use:
- Open the notebook page that contains the visualizations you want to capture.
- Click Snapshot all in the notebook File menu to generate snapshots for every visualization on the page.
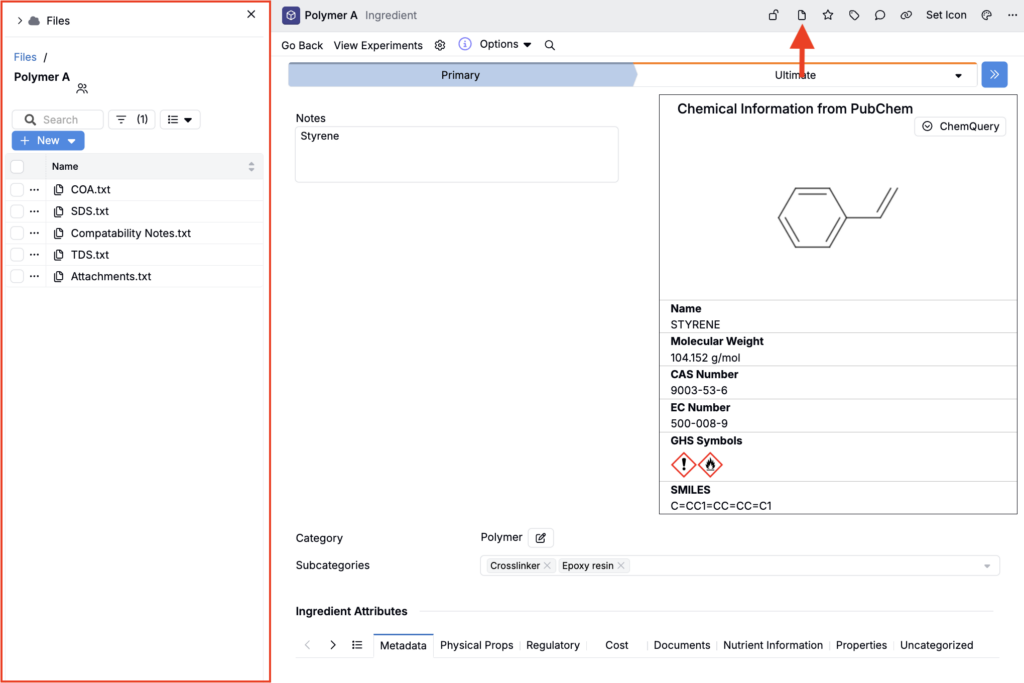
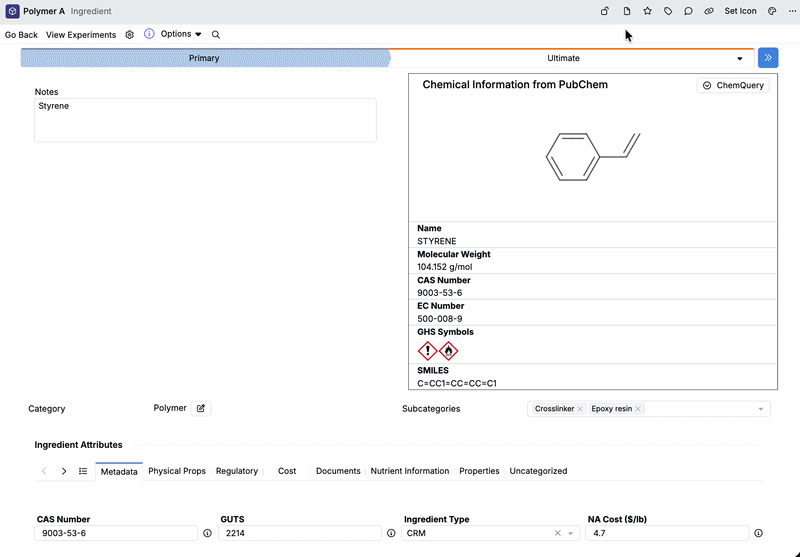
Files on Entities
Entities in Uncountable now include file folders, making it easier to store and manage files directly on the entities your team works with.
Previously, teams often relied on attachments scattered across fields, pages, or external storage locations, which made it harder to find “the right file”. Entity file folders improve this by creating a dedicated place for files on the entity itself, with permissions that follow the entity.
Users with Write access to the top-level entity can create a new file folder directly from the entity header and add new files. The file folder, and all files it contains, are then available to all users with Read access.
How to create a file folder on an entity:
- Open the entity where you want to store files.
- Create a file folder by clicking the folder in the entity header.
- Upload files, or drag and drop them into the folder. These files are then available to all users.
Once created, clicking the file folder in the entity header opens the file folder containing all associated files.
How to add a file folder to a custom entity form:
File folders can also be added to custom entity form definitions.
- In Form Admin, create or edit your custom entity definition.
- Add an Entity Files field group to the definition.
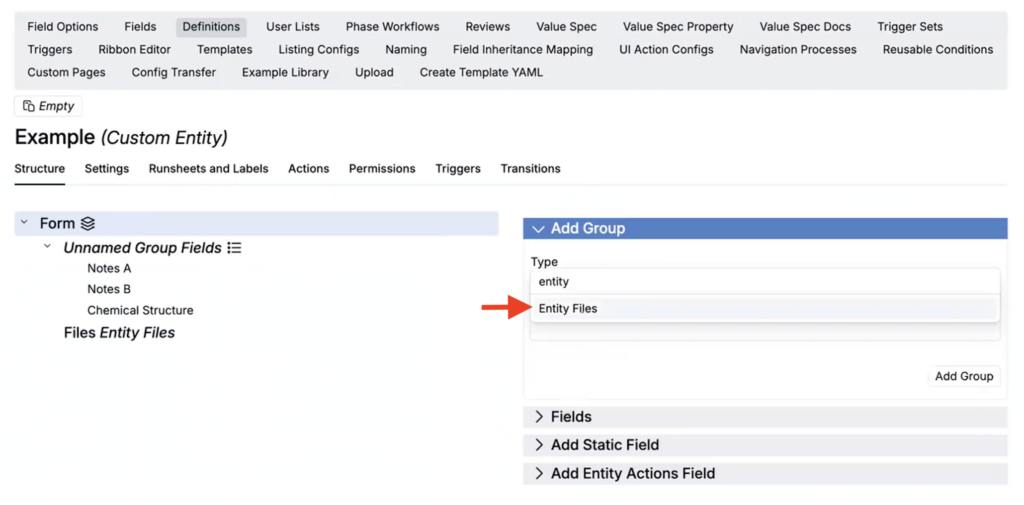
For any custom entity created using that definition, click Add Files to create the file folder.

Once the file folder has been created, you can then add your files.

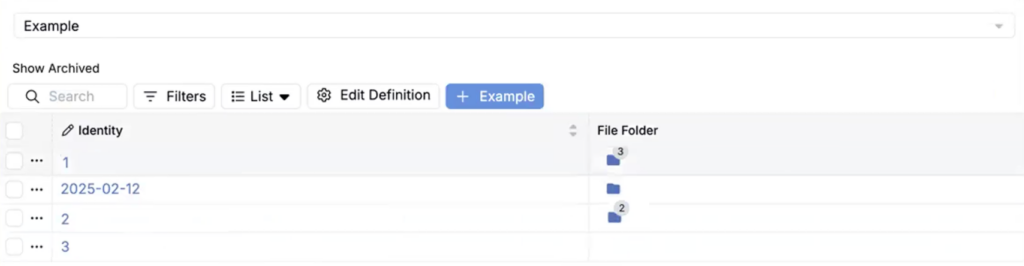
File folder listing columns:
With this update, we have also introduced a new File folders listing column, which can be added to any entities listing. All entities with a file folder created will contain a 📁 icon and a number indicating the number of files within that folder.
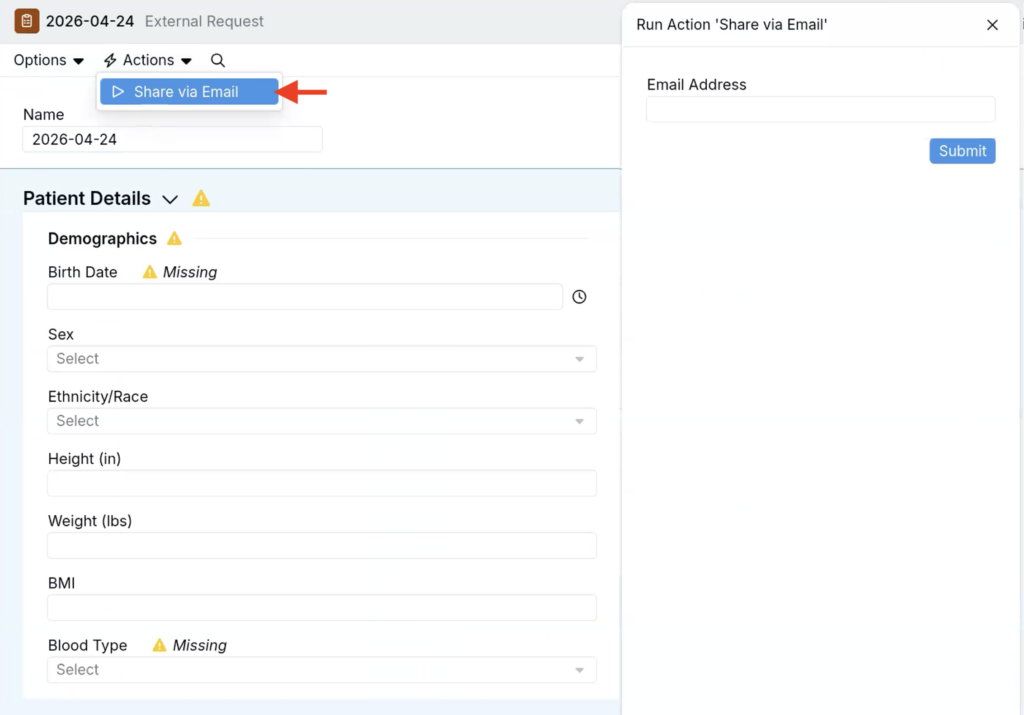
Portal Email Invites
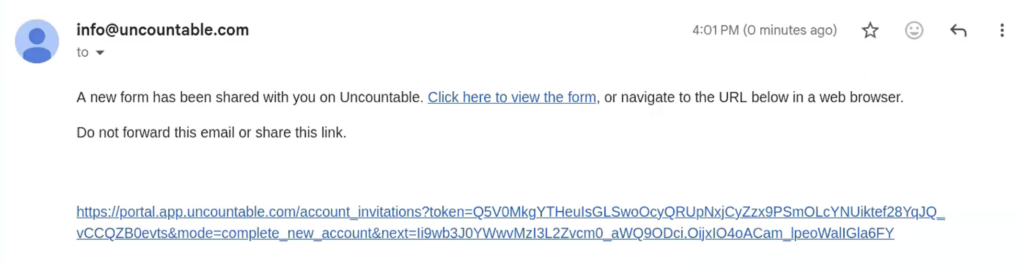
Portals now support inviting people via email so you can onboard external collaborators with a one-click magic link—even if they don’t already have an account.
Instead of coordinating account setup first, you can send an email invite and the recipient can use the link to create an Uncountable account and access the portal immediately. Links can also be configured to be time-bound, useful for workflows where access should expire automatically.
How to use:
- Access any portal form where the Share via Email action has been configured.
- Select Actions > Share via Email.
- In the sidepanel, enter the recipient email.
- Submit the invite.
- The recipient receives an email and uses the magic link to create an Uncountable account and access the form.
How to configure:
This is implemented via a new Invite Portal User trigger action.
- On your portal form’s trigger set, create a Share via Email trigger.
- To the trigger, add an Invite Portal User trigger action.
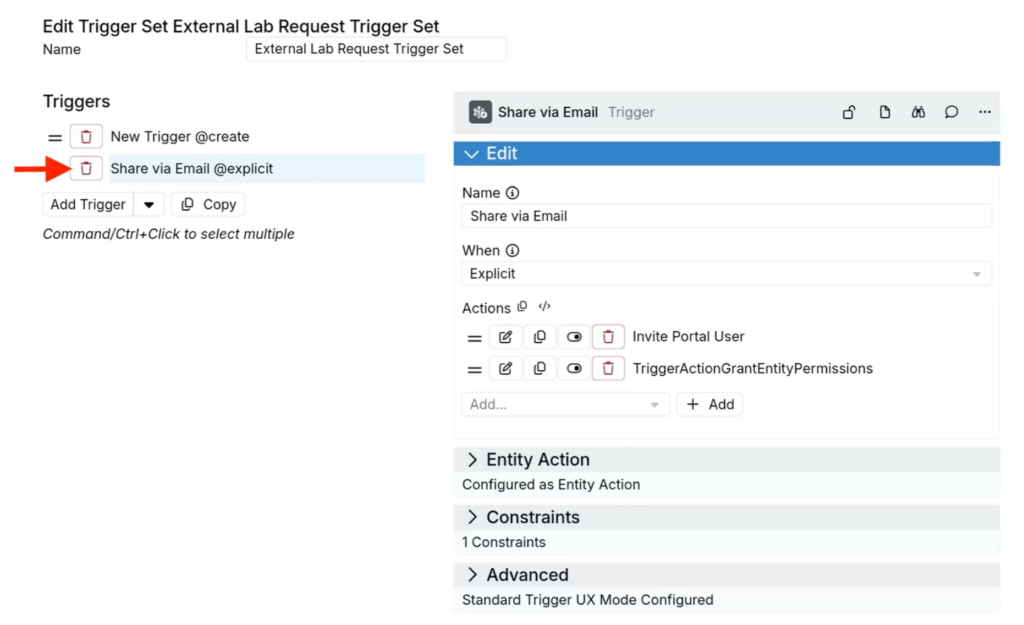
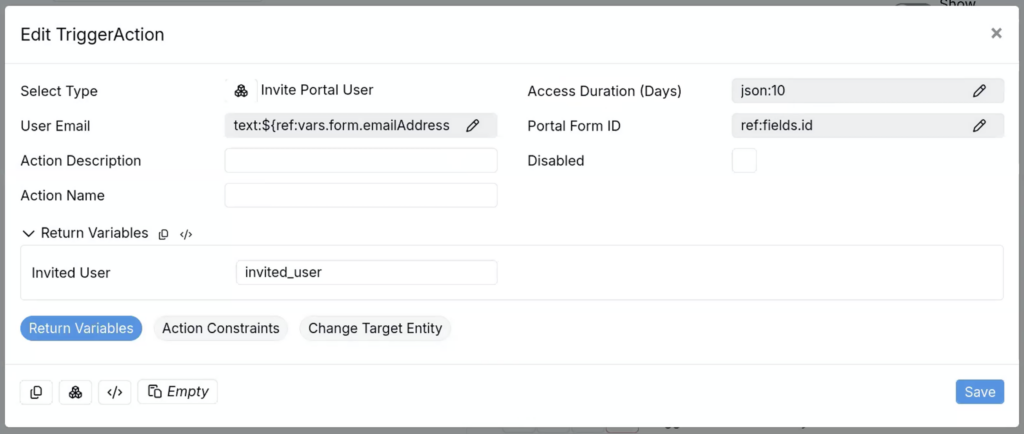
- In the Edit TriggerAction modal, configure:
- Access Duration (Days) — How long before the magic link will expire
- User Email — The email address to invite to the portal. This must evaluate to a plain text email string. Typically you’ll reference the email field the requester entered on the form.
- Portal Form ID — Select the portal form ID from a menu of available options or use value spec
- Return Variables — (Optional) Set to invited_user to save the Invite Portal User action’s output into the trigger’s variables scope
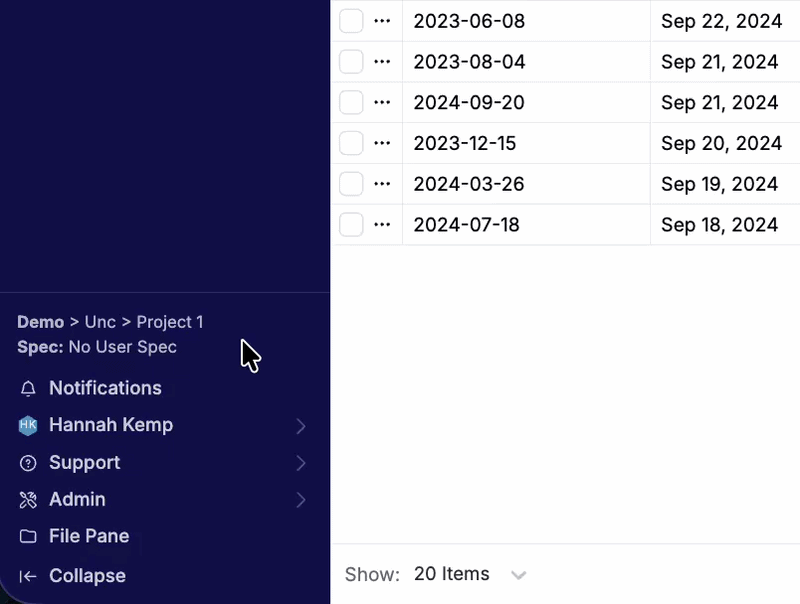
User Assigned Specs
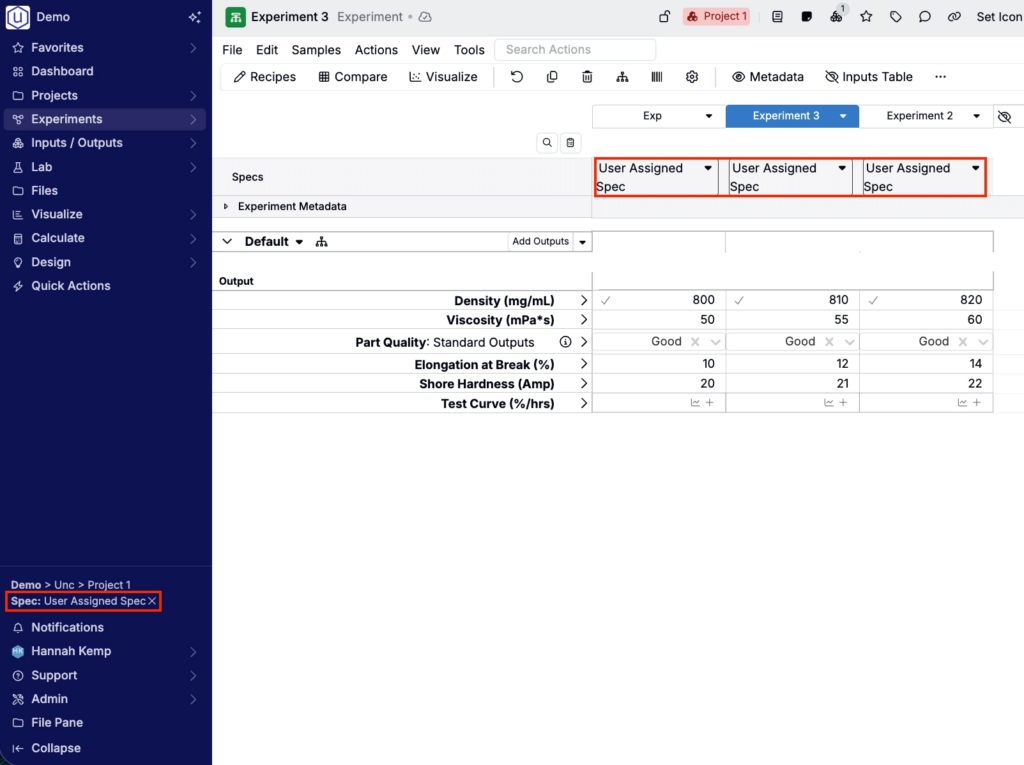
Uncountable users can now select a personal spec for analysis without changing the project spec. A user assigned spec applies only to the viewing user, so different users in the same project can evaluate shared experiment data against their own criteria.
This update makes it easier for teams to compare results, review graphs, use notebooks, and run analysis tools with the spec that is most relevant to their work while preserving the project-level default for everyone else.
How it works:
- When user assigned specs are enabled for your schema, open the Spec selector in the navigation bar.
- Select the spec you want to use for your personal analysis experience.
- Uncountable will use that spec anywhere specs are resolved for your view, including Measurements pages, Compare views, Explore Data, ML tools, and notebooks.
- To remove your personal spec selection, click the x next to the spec name in the navigation bar.
To learn more, refer to User Assigned Specs.
Notebooks: Request Share Access
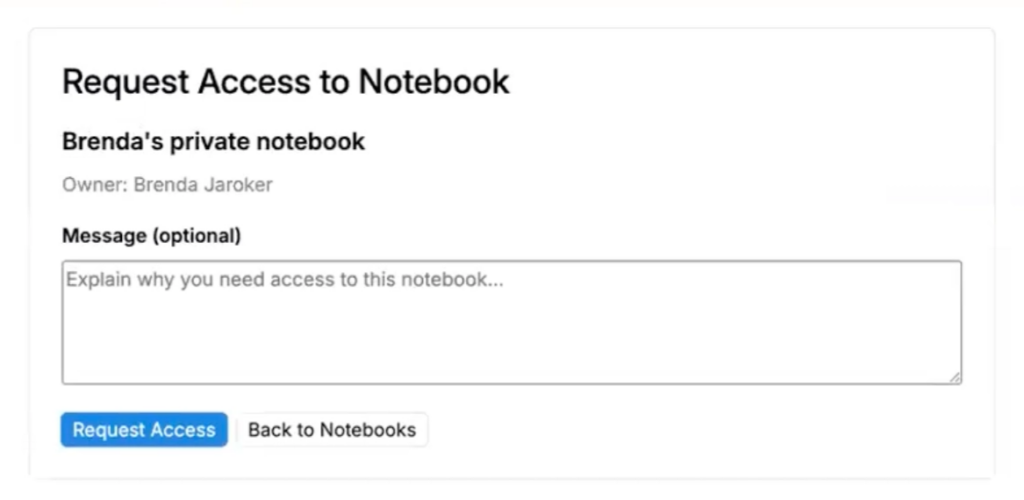
We have recently improved the way Uncountable users can request access to notebooks.
Previously, if you didn’t have access to a notebook, you would see an error message and would need to reach out to the notebook owner to request access. Now, you’ll see a dedicated Request Access page where you can request access and include a message, similar to familiar experiences in tools like Microsoft Word or Excel.
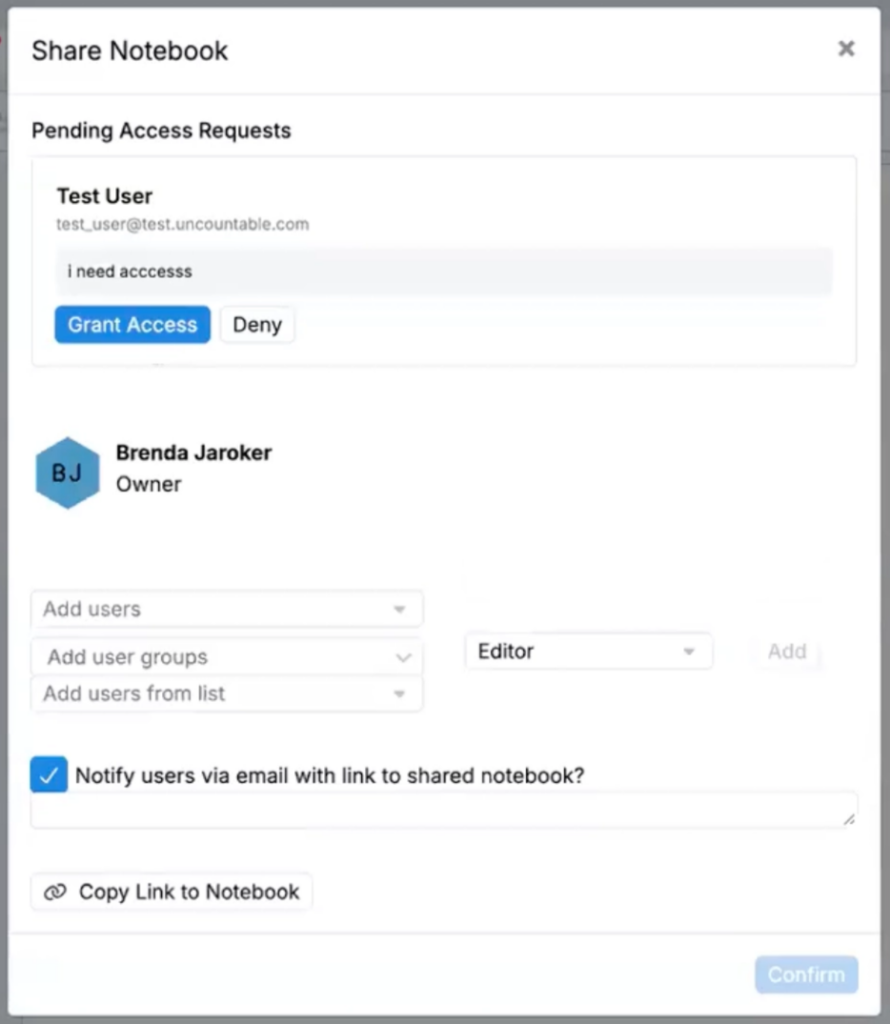
This update reduces back-and-forth, makes it clearer who needs to approve access, and creates a more consistent workflow when sharing notebooks across teams. When approving the request, the notebook owner can choose the access level to grant, such as Viewer (view-only) or Editor (can edit).
How to request access:
- Navigate to a notebook you don’t have access to.
- On the Request Access page, enter an optional message.
- Submit your message.
How to grant access:
- If a user requests access to your notebook, you will receive an in-platform notification.
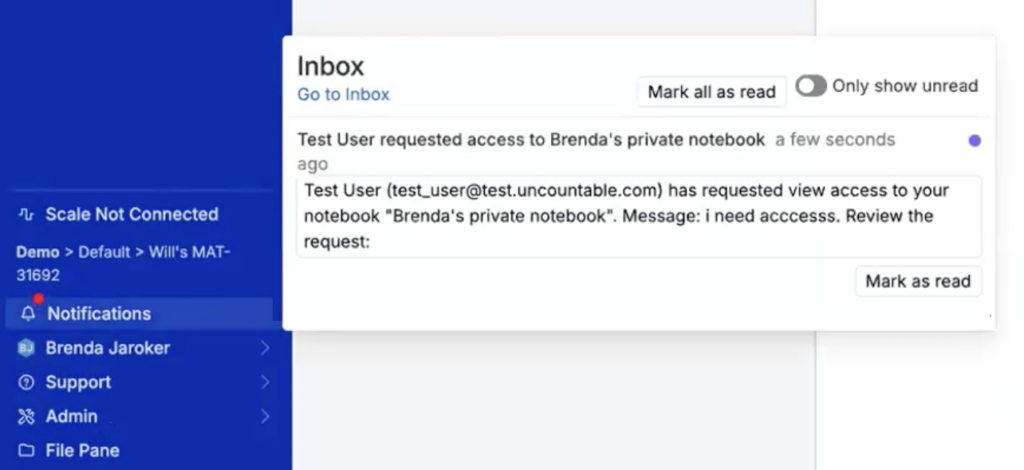
- Clicking the notification will take you to the notebook, where you can grant or deny access, including selecting the appropriate access level (for example, Viewer or Editor).
Entity Field Version History
Fields on entities (like notebooks, experiments, runsheets, and other items you work with in Uncountable) now include their own version history, so you can see how a single field value changed over time and restore a previous value.
Previously, it was difficult to audit or debug changes to one specific field because you had to rely on broader entity history (or manual tracking). With this update, you can open version history for a field to see only changes to that field.
This is helpful for auditing who changed a field and when, debugging unexpected field values, and reviewing changes to an entity field in contexts like notebooks.
How to use:
- Open the entity you want to review (for example, a notebook).
- Open the field menu.
- Click on the field to audit and select Show version history from the menu.
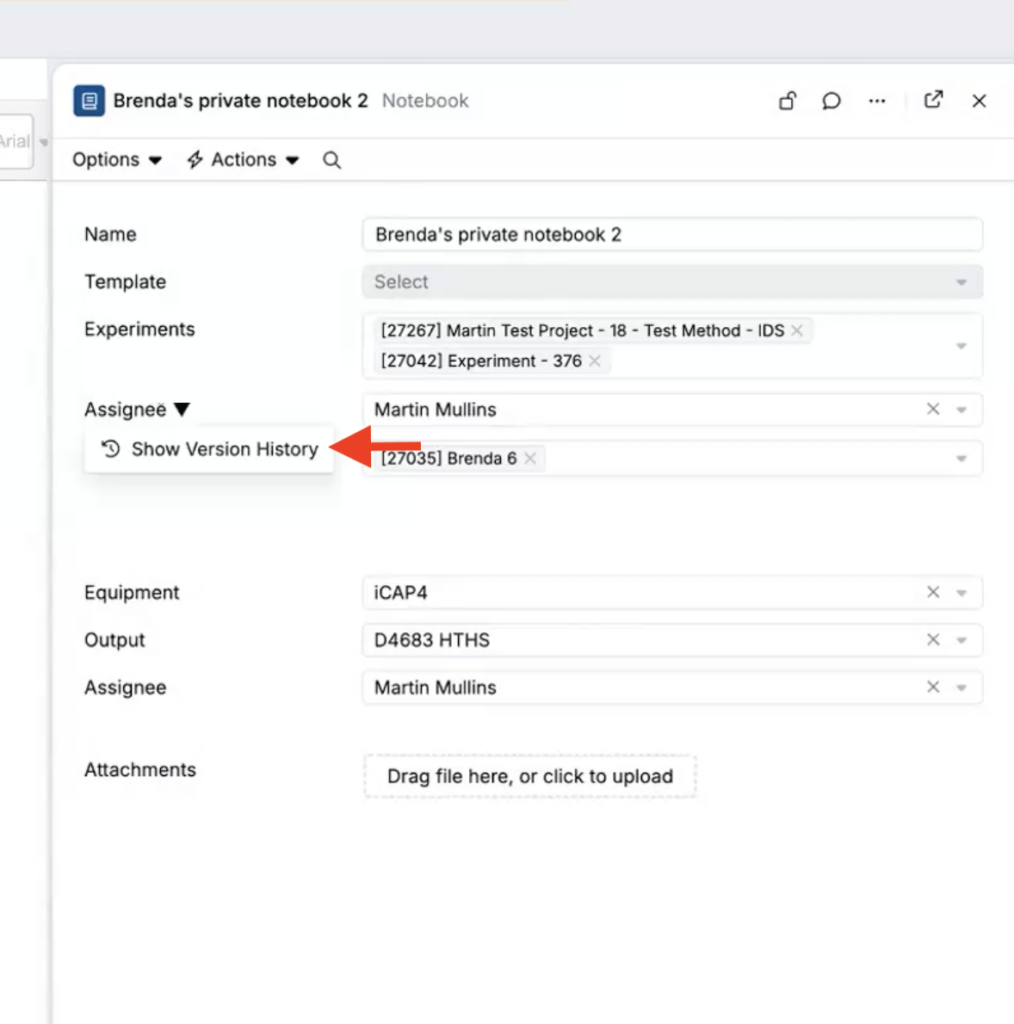
- Review changes to that field over time.
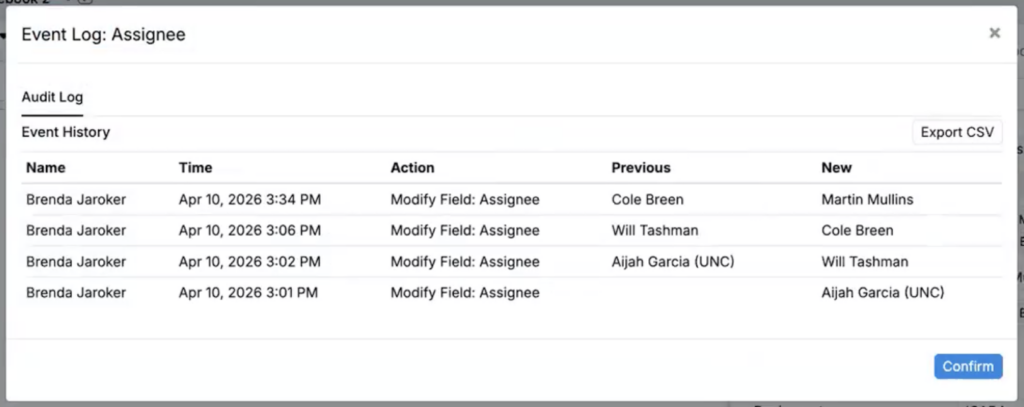
- To revert, choose a prior version and select Restore edit.
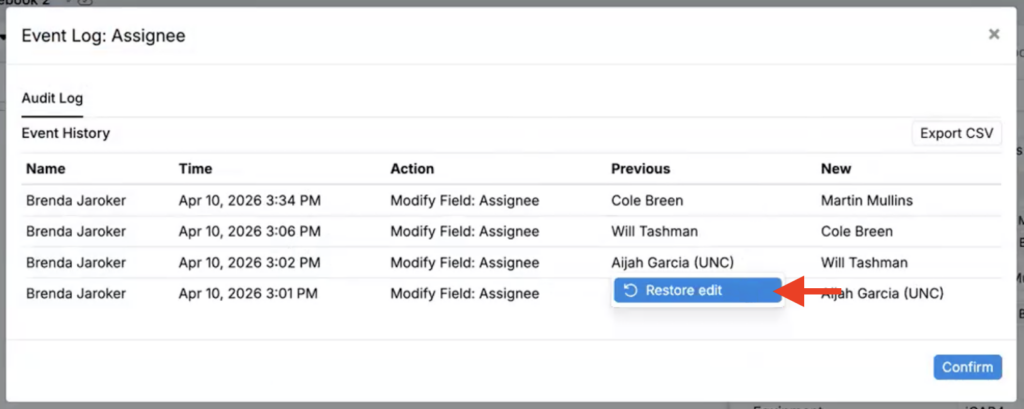
Note:
- Restore respects field permissions. You can only restore values if you have permission to edit that field.
Config Transfer Improvements: Listing Configs + Group Support
The Config Transfer feature, which enables Uncountable users to transfer platform configurations between schemas, now supports exporting and importing more structured configurations, including listing configurations and additional group types.
With this update:
- Listing configs can be now exported and imported with their full structure, including columns and filters.
- All group types on forms can be exported and imported, including List groups.

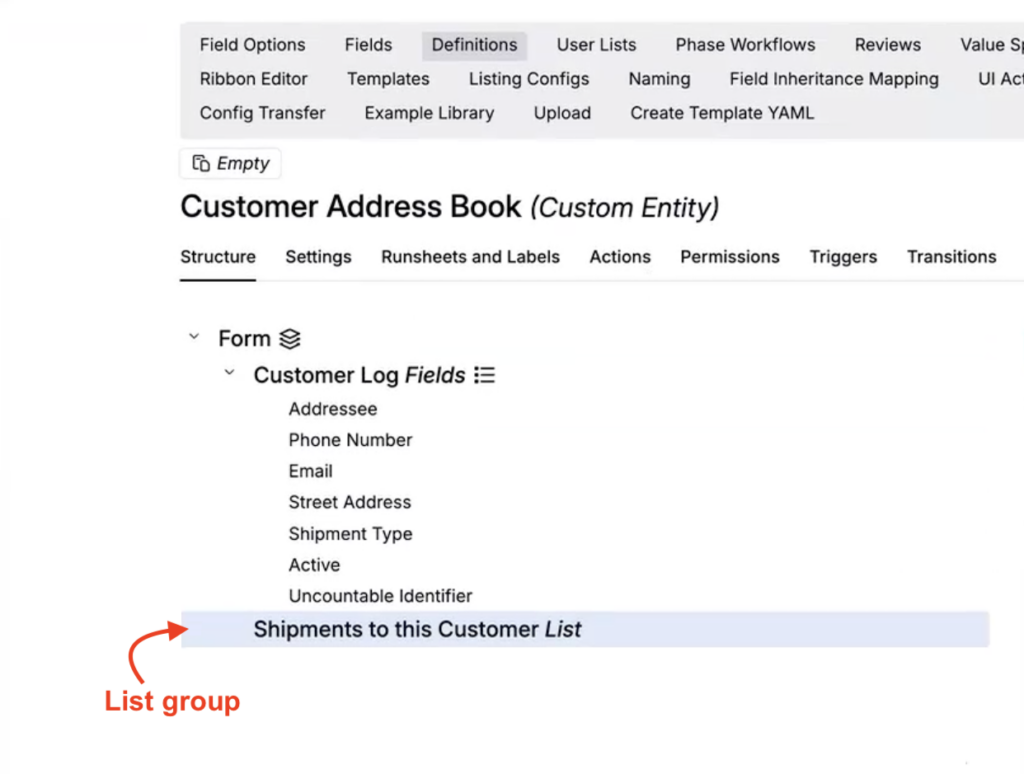
Current limitation:
- Config Transfer does not support transferring listing configs that use date, datetime, or numeric range fixed filters. Future support for these listing types will be added.
Uncountable Assistant: Modify Listings with Actions
The Uncountable Assistant can now perform common listing actions for you, like removing columns, adding filters, and editing listing configurations.
Previously, making listing changes required manually editing the listing in the UI every time. With this update, you can ask the Uncountable Assistant to apply listing changes directly, and it can ask clarifying questions when needed.
Example actions the Uncountable Assistant supports:
- Remove columns
- Add filters
- Remove filters
- Add columns
- Set column values
This listing modification flow is expected to become the primary way to update listings over time.
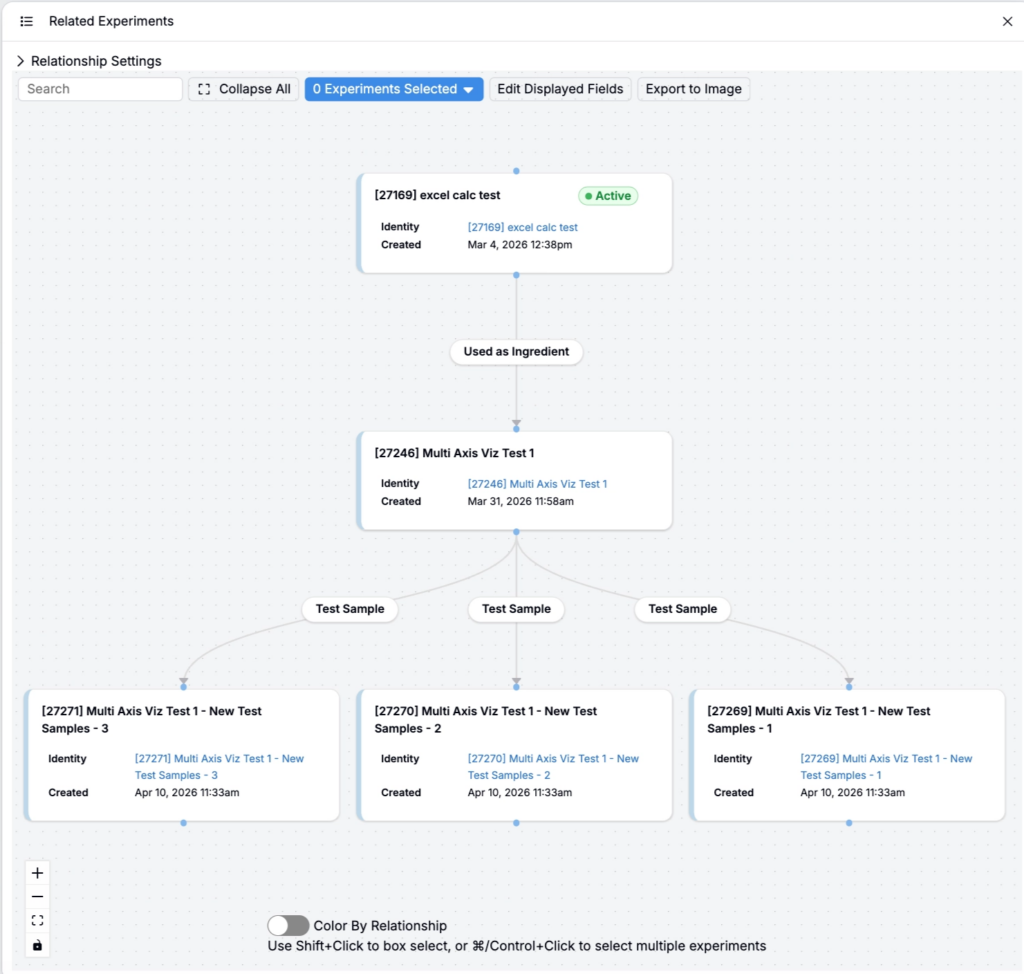
Related Recipes Sidepanel Redesign
We recently updated the Related Recipes sidepanel design with a cleaner, more modern UI. The goal is to make related recipe relationships easier to scan and understand, especially for teams who use this view to navigate recipe and intermediate dependencies.
To view these changes, open the Related Recipes sidepanel from either the Recipe or Measurements view in your experiments.
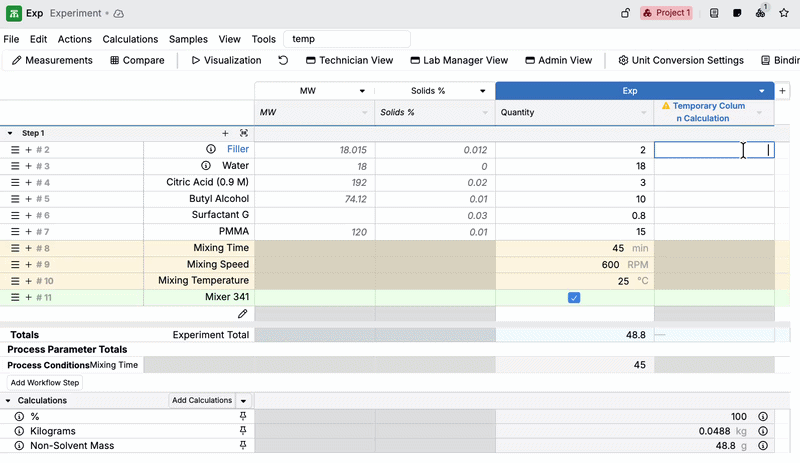
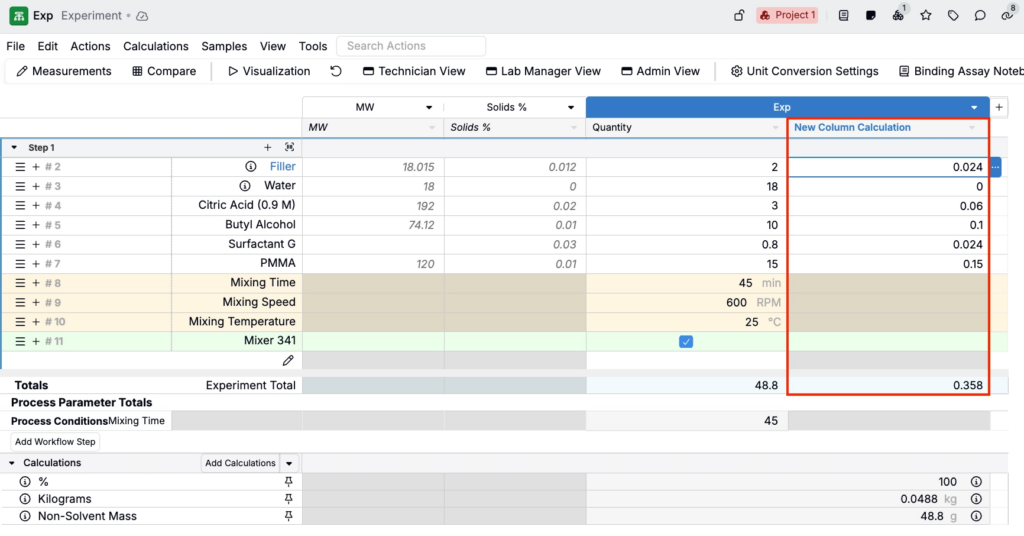
Temporary Calculation Columns
We introduced a new temporary calculation column feature that lets you build calculations interactively with a more Excel-like workflow.
Instead of going through the calculations modal, you can now start a calculation in a temporary column, making the workflow more streamlined and intuitive, similar to familiar spreadsheet tools like Excel.
Temporary calculation columns also make it faster to explore and validate calculation logic before committing it to a permanent configuration.
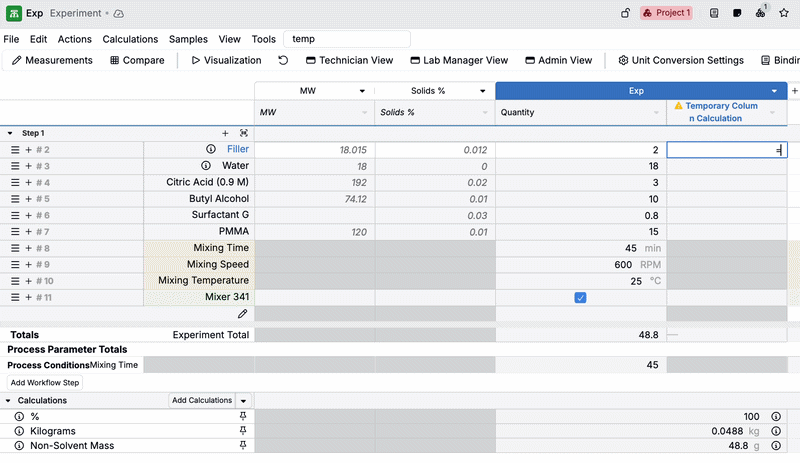
How to use:
- Add a Temporary Calculation Column to your Recipe view.
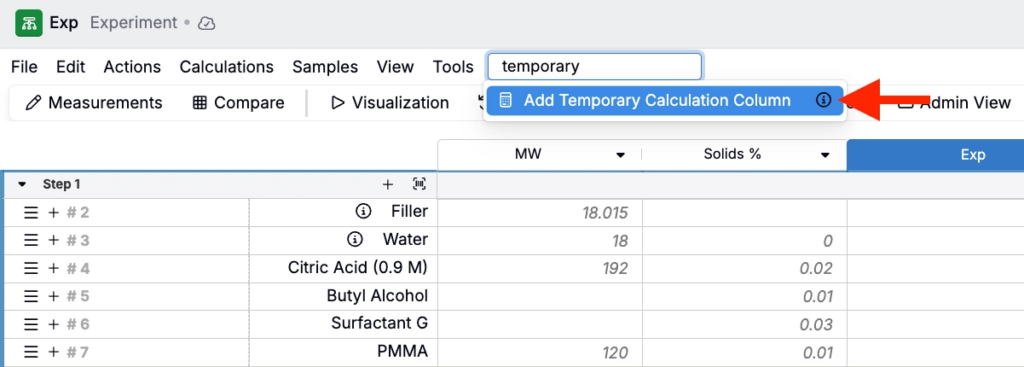
- Click into a cell in the new column and enter
=to start your equation. - Click cells in the data grid to insert references into your calculation, including values like Quantity, Volume, ingredient attributes, and other column calculation results.
- Build and refine the calculation interactively (for example, sums and multiplications).
- When you are ready to keep it, click the column header and select Convert to Permanent Calculation.
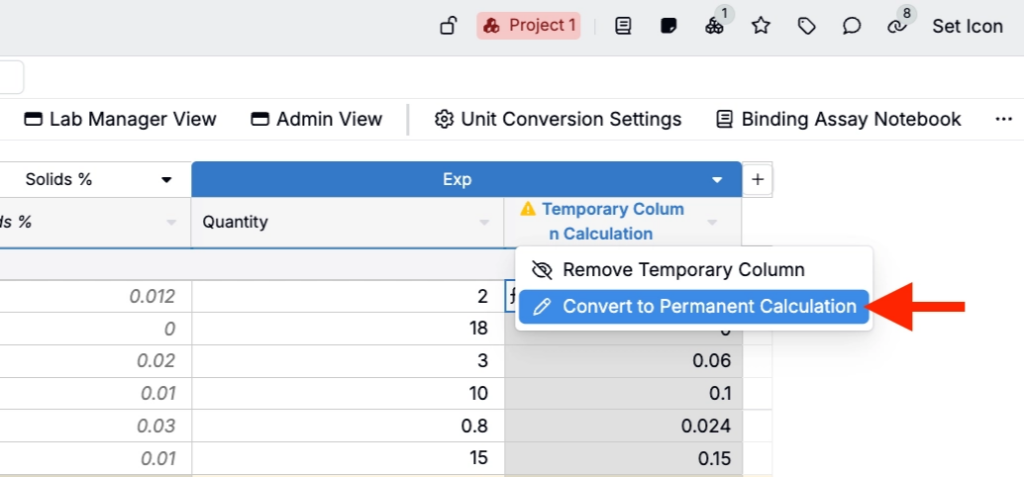
- This will open the new calculation modal, where you can rename and adjust settings.
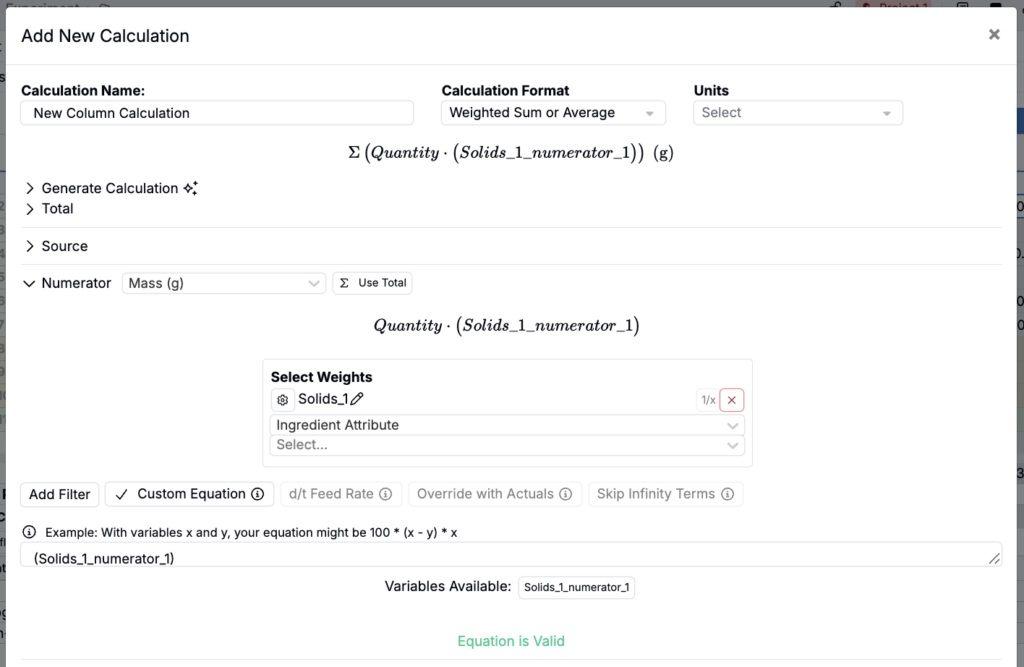
- Once saved, the platform will automatically replace the temporary column with a standard column calculation on your Recipe view.
Also included:
- Support for No Source calculations, such as summing ingredient attribute values. When converted to a permanent column calculation, this will appear as Source = No Source in the modal.