
Notebooks in Uncountable are flexible, collaborative documents that allow teams to organize, analyze, and share project data. They serve as a workspace for combining experiment results, visualizations, notes, and embedded files—all within the context of a project or material family.
Use Notebooks to:
- Summarize experiment findings
- Create shareable dashboards
- Build reports and meeting summaries
- Store and visualize data alongside comments and approvals
Accessing the Project Notebook
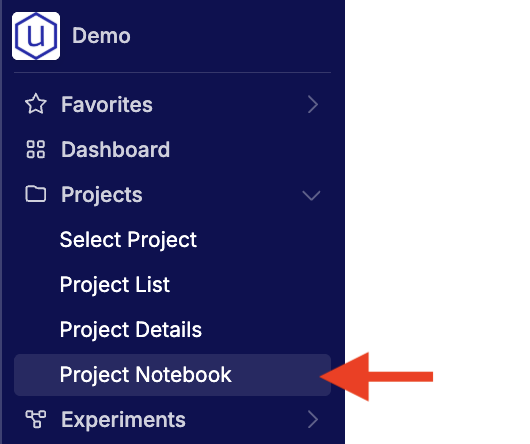
Every project created in Uncountable includes a dedicated notebook. When you have an active project selected, you can access its designated Project Notebook directly from the project’s menu in the navigation bar.
Creating a New Notebook
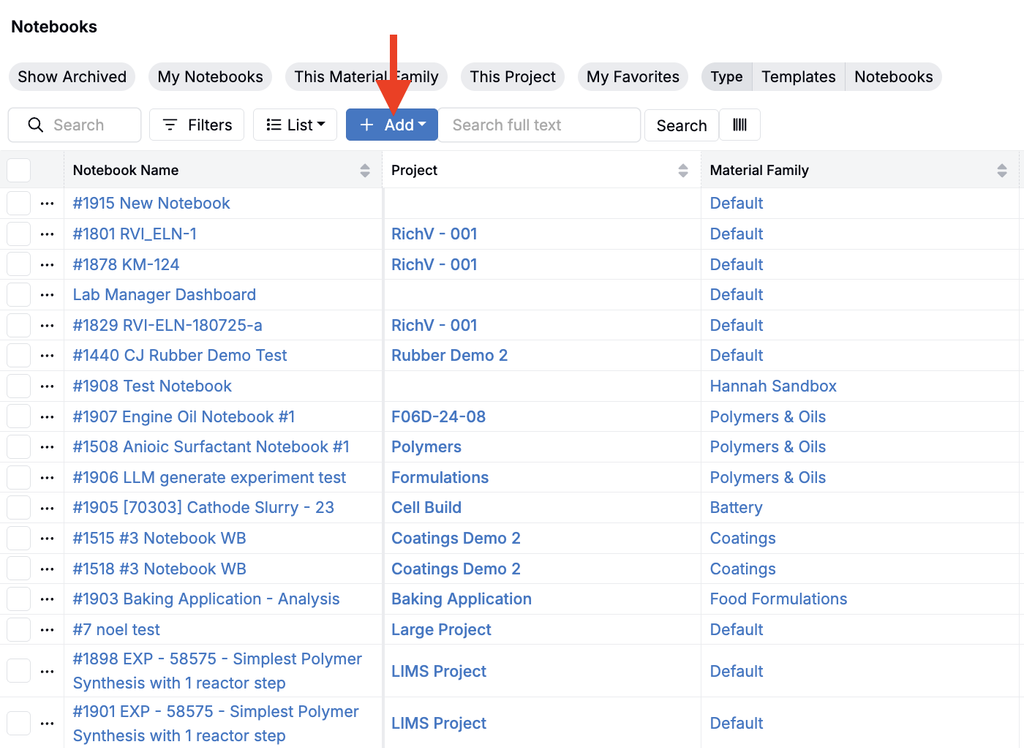
You can also access the Notebooks listing page (Quick Actions > “Notebooks”). Here, you can browse and search across all notebooks created in your workspace or create a new notebook that isn’t scoped to a project by clicking Add.
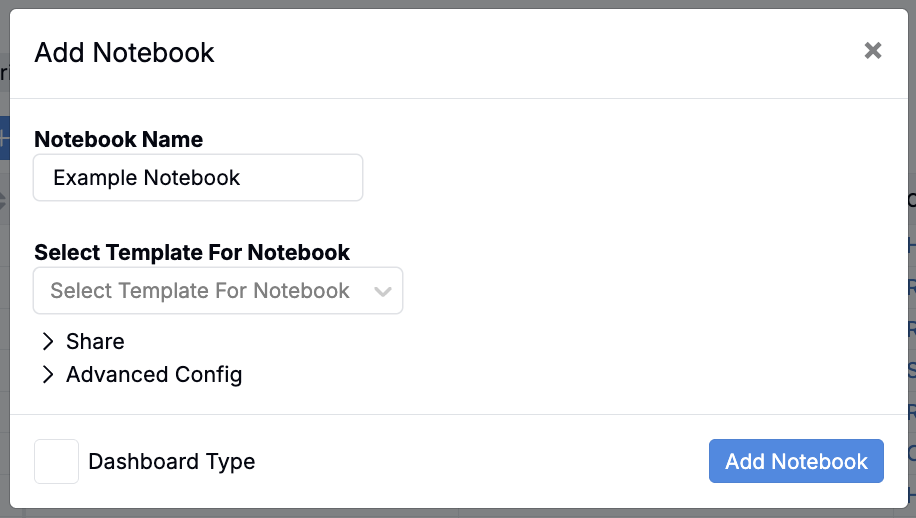
In the modal, fill out the following information:
- Name – Enter a descriptive title for your notebook.
- Template – (Optional) Select a saved notebook template to pre-populate layout, content blocks, or visualizations. Learn more.
- Dashboard Notebook – Enable this option to create an interactive dashboard-style notebook with filters and dynamic plots. Learn more.
Once you’ve completed these fields, click Add Notebook to open and begin editing.
Creating a Notebook from a Word Document
You can also create or update a notebook from a Word document (.docx) while keeping its headings, tables, lists, hyperlinks, styling, and most images.
- Upload the Word document to a file folder.
- Click the uploaded file to open the preview.
- Select Import to Notebook to create or update a notebook with the document’s contents.
- Review the imported notebook and make any final edits.
Importing a File into an Open Notebook
To bring a Word document into a notebook that already exists, import it from the notebook’s File menu. The document’s text, formatting, headings, lists, tables, and images are added to the open notebook; existing notebook content is not replaced.
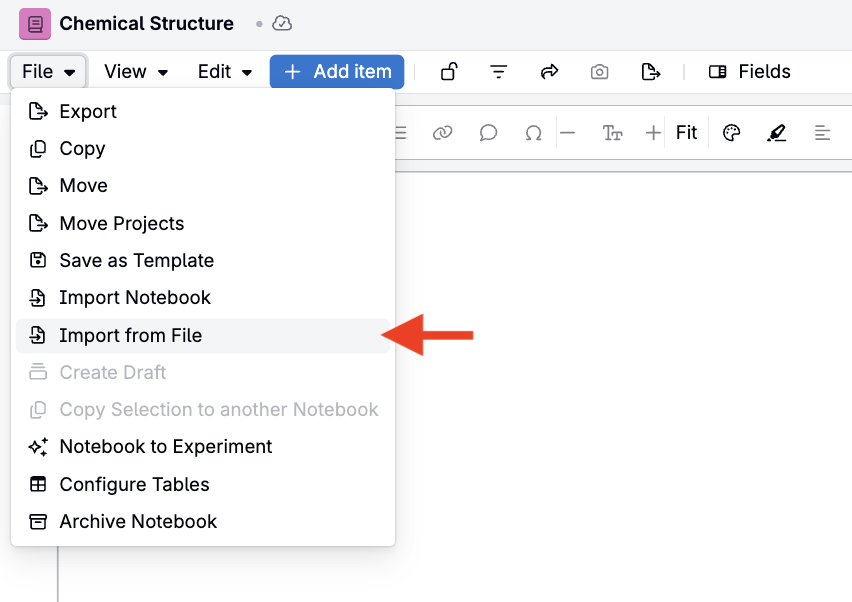
- Open the notebook and select File > Import from File.
- Select Upload File to upload a Word document (.docx, .doc, or .docm), or choose a file that has already been uploaded.
- Click Import.
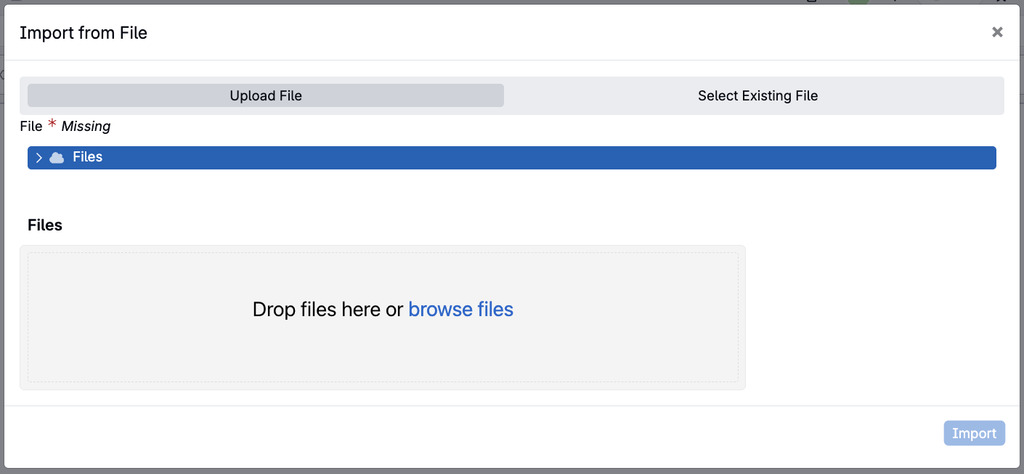
Note: Images are imported when they sit in their own paragraph in the Word document. Images placed inline with text in the same paragraph are not imported. To add a file to a notebook as an embedded item instead, see Adding Items into a Notebook.
Anatomy of a Notebook
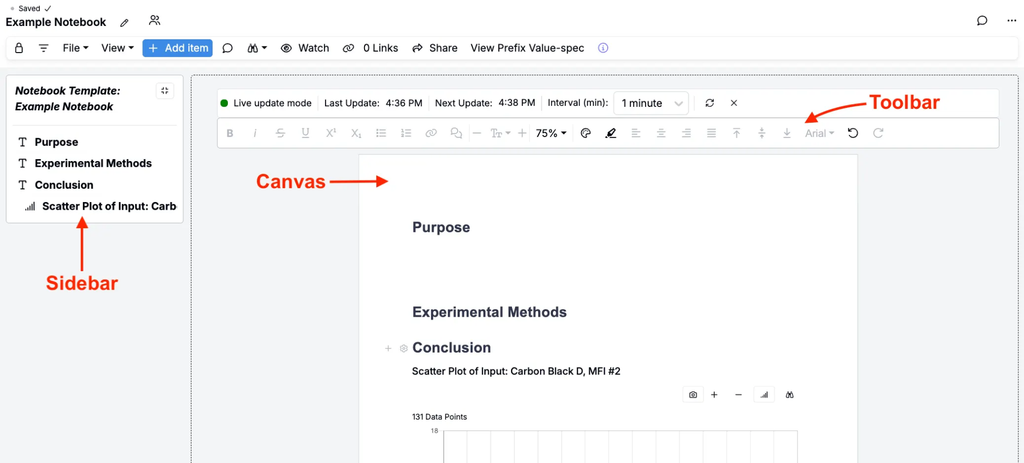
Each Notebook has three key sections:
- Sidebar: Displays Notebook pages and navigation.
- Canvas: The main area for text, tables, plots, and embedded content.
- Toolbar: Options for adding content, commenting, sharing, locking, and managing permissions.
Adding Notebook Content
Adding Items
Begin by adding items, the building blocks of your Notebook page. Items include text, tables, plots, listings, experiment comparisons, Microsoft Office 365 files, and more. To draw or upload molecules and build reaction diagrams, add a Chemical Structure cell.
To add an item:
- Click Add Item in the left sidebar or the gray + icon directly on the canvas.
- From the dropdown, select the content type you want to add.
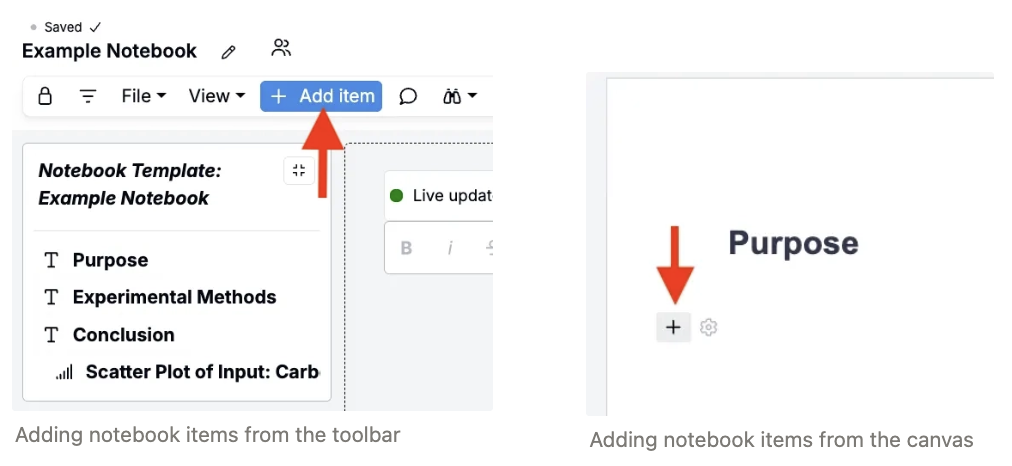
Each inserted block is fully editable and can be moved, resized, or deleted as needed. For a full list of supported item types, see Adding Items to a Notebook.
Adding Pages
Notebooks can contain multiple pages, allowing you to group related content (e.g. background information, methods, results, and visualizations).
To add a page:
- Click Add Item in the toolbar and select Page, or click the + icon in the sidebar.
- New pages appear in the sidebar and the tab bar at the bottom of the notebook.
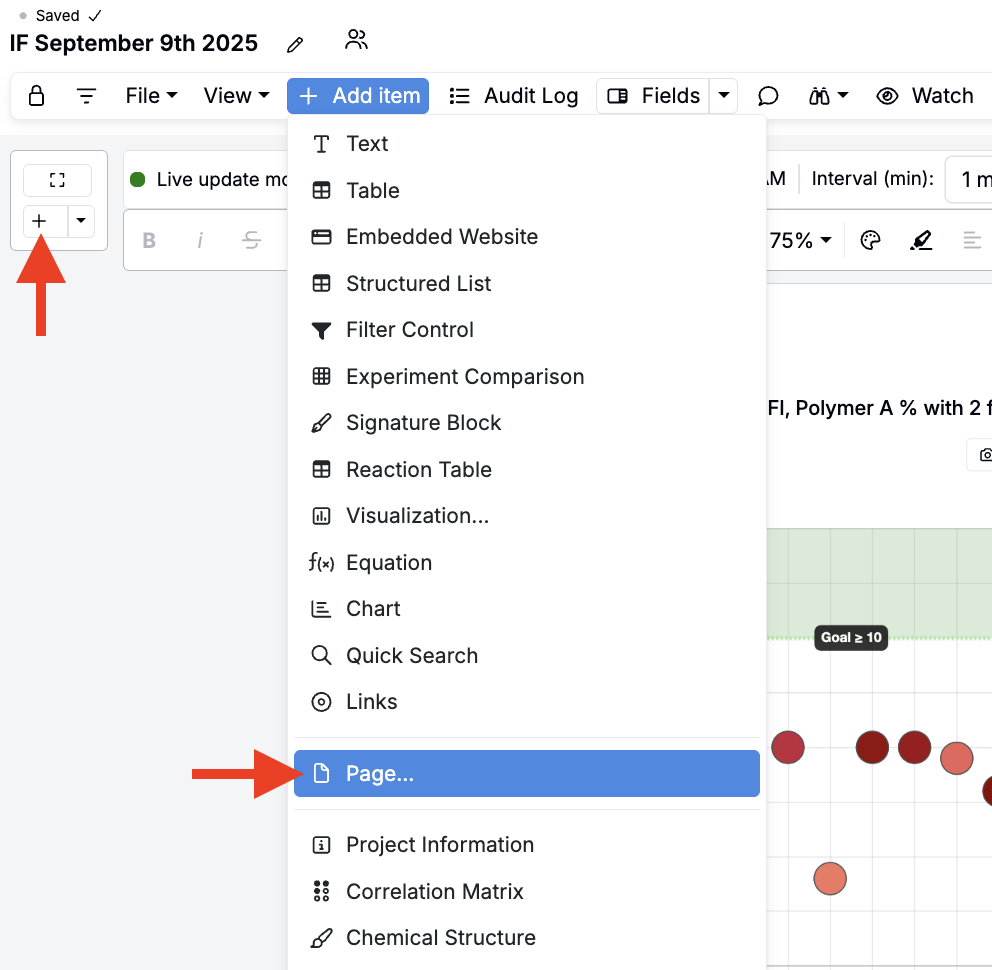
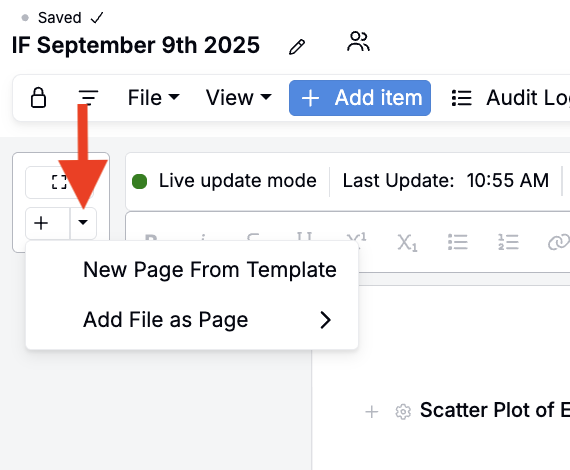
When adding new pages, you can also access the + icon menu to:
- Add or create Microsoft Office 365 files as standalone pages.
- Create new pages directly from a saved template to quickly apply a standard layout.
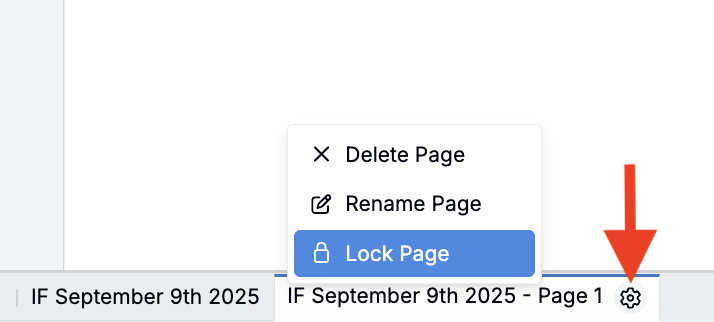
To lock, rename, or delete an individual page, click the ⚙️ in the page tab bar. Any page, including the first page, can be reordered, renamed, or deleted.
To view all pages in a single continuous layout, select View > Display Combined Pages. To return to individual pages, select View > Display Separate Pages.
To move a cell to another page, open the cell’s ⚙️ menu and select Within Notebook > Move to Different Page. The cell is placed below the existing content on the destination page.
Using Bodie in Notebooks
Bodie AI can be used inline in a notebook for quick, in-context edits that don’t need the full side panel:
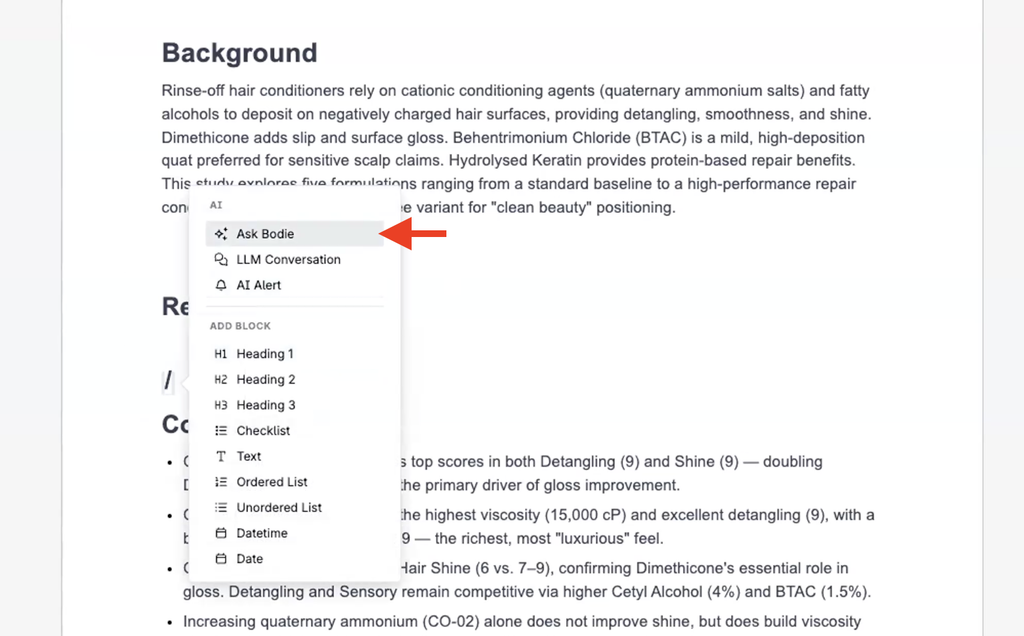
- Slash menu — Type
/and select Ask Bodie to generate text, tables, charts, or listings at your cursor position. Bodie is aware of the current notebook, the pages you have open, and the focused cell. - Cell menu — Open the ⚙️ menu on a text, plot, table, or structured listing cell and select Edit with Bodie, or a quick action such as Summarize, Explain, Translate, or Improve.
Changes are highlighted in the cell, and you can accept or revert them from the cell itself.

Example prompts:
- “Summarize the bullet points above into a table.”
- “Translate this section into Spanish.”
Snapshotting Visualizations
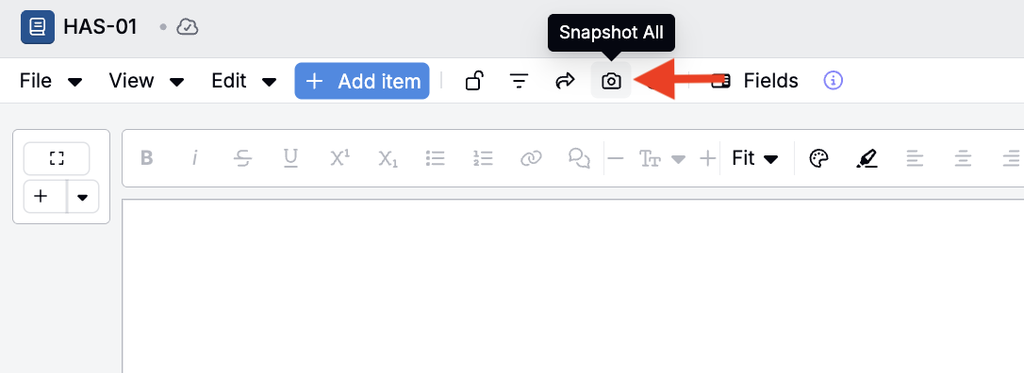
To capture snapshots of every visualization on a notebook page at once, select Snapshot all from the notebook File menu. This is useful when preparing reports or preserving the state of a page.
Copying Notebook Content
Notebook content can be reused by copying cells or entire pages into an existing or new notebook.
Selecting Cells
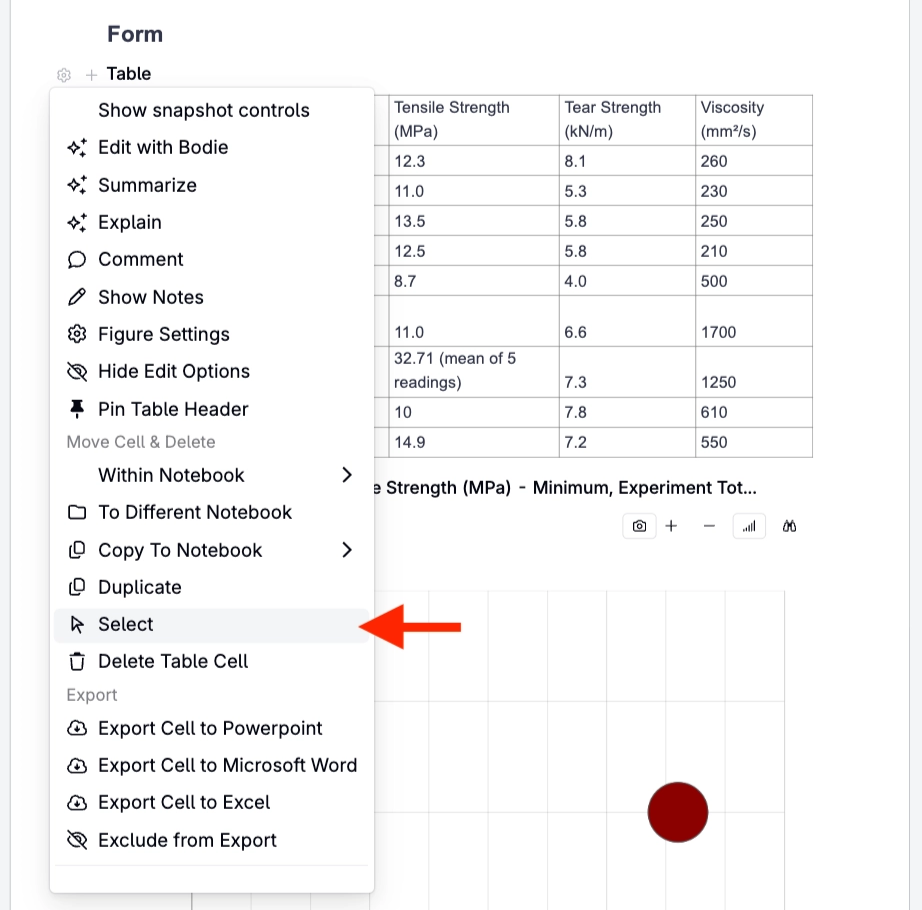
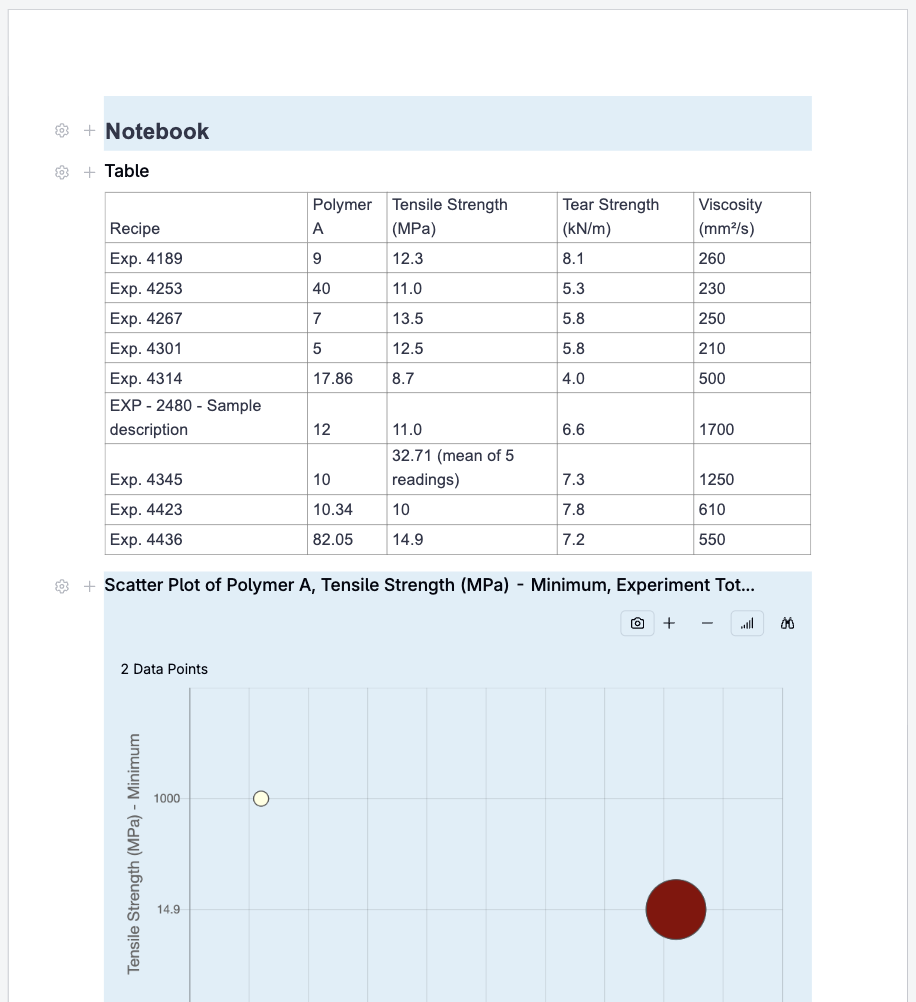
To select a cell, open its ⚙️ menu and choose Select. The selected cell is highlighted in blue. Select any additional cells you want to copy; selected cells do not need to be adjacent.
Copying Cells to Another Notebook
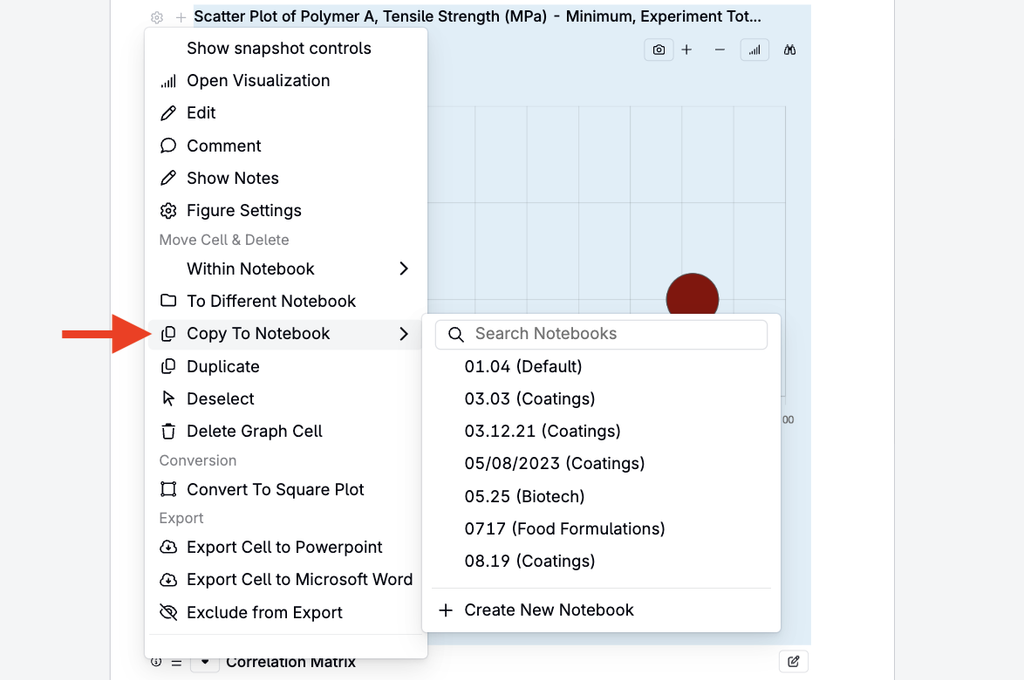
To copy cells, open a cell’s ⚙️ menu and choose Copy to a New Notebook. Then select an available notebook or create a new one. New notebooks can be shared automatically with the same people as the source notebook.
Copying Pages
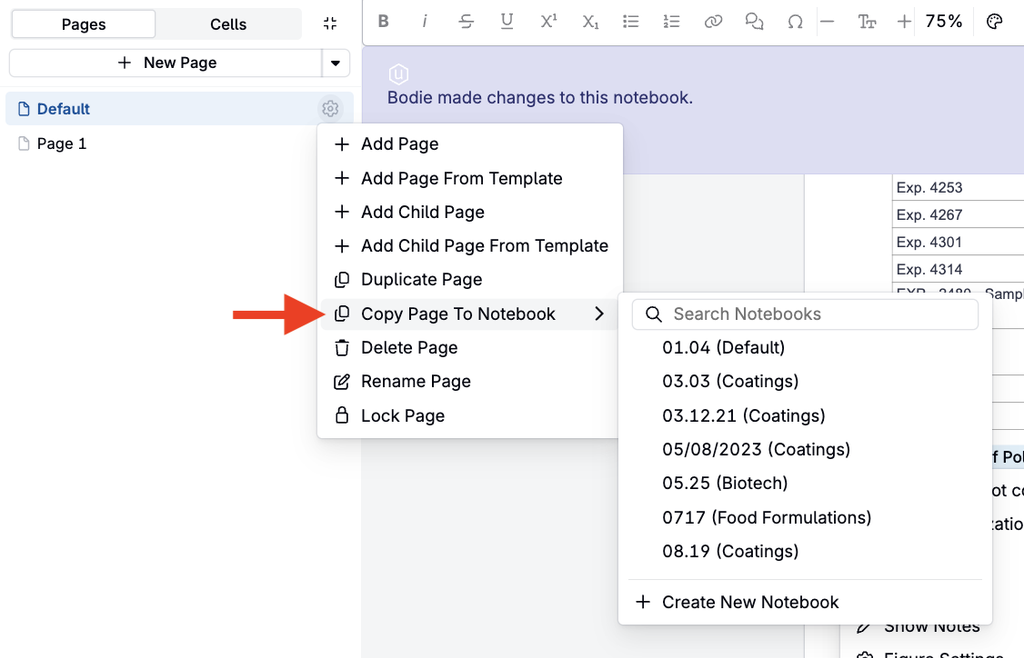
To copy an entire notebook page, use the page menu.
Dependency View
The Dependency View in document version history shows how notebooks are connected when cells are copied or sourced across documents. The view is bidirectional, so you can see both where a notebook gets content from and which other notebooks depend on it.
Note: Dependency View is controlled by a feature flag in platform configuration.
Collaboration Features
Comments
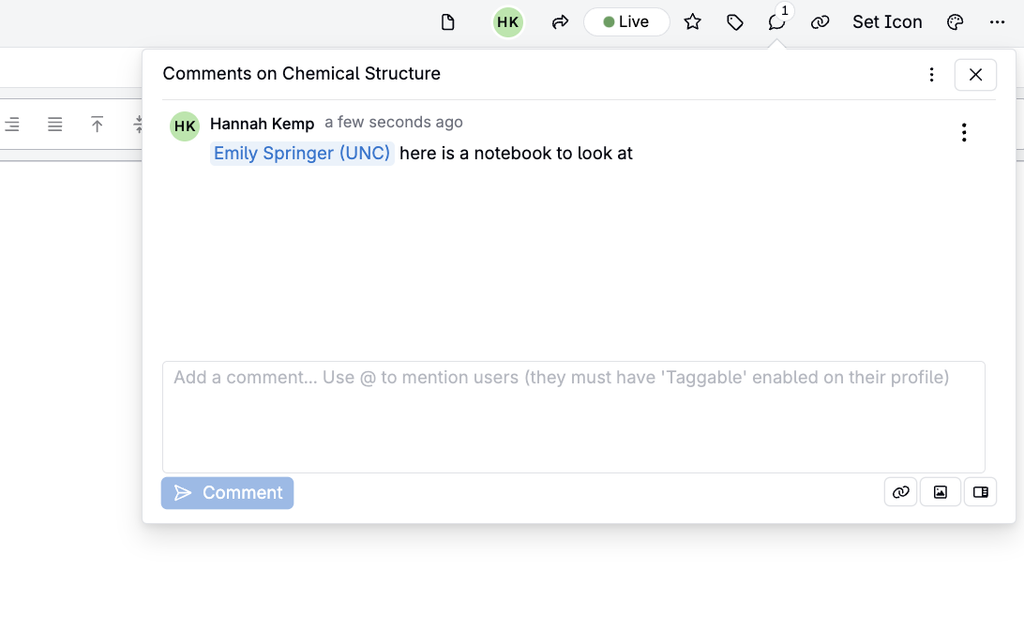
Highlight text or select a block to leave a comment. Use the @mention to tag teammates and notify them by email and within Uncountable.
The comments panel brings every comment in a notebook into one place. To open it, select the comment button (Show Comments Panel) in the notebook toolbar.

The Show Comments Panel button in the notebook toolbar
In the comments panel, you can:
- View all comments — The panel lists comments on the notebook, on cells, and on highlighted text, labeled Notebook, Cell, or Inline. Threads are sorted by most recent comment, and replies read oldest to newest.
- Search and filter — Search comment text, or filter by page, type, author, or Includes me (comments you wrote or that mention you). Select Clear filters to reset.
- Respond to comments — Reply, resolve, reopen, and react directly from the panel.
- Jump to a comment — Selecting a cell or inline thread scrolls the notebook to its location.
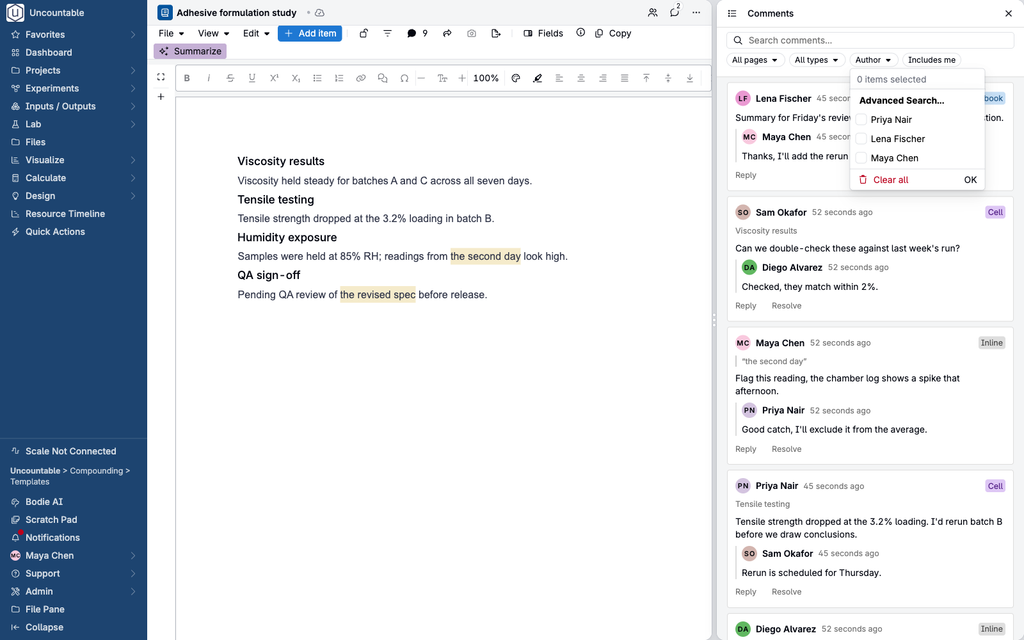
Note: The panel loads the 20 most recent threads and up to 50 comments in total. When comments are hidden by this limit, a notice appears at the top of the panel.
Document Versions
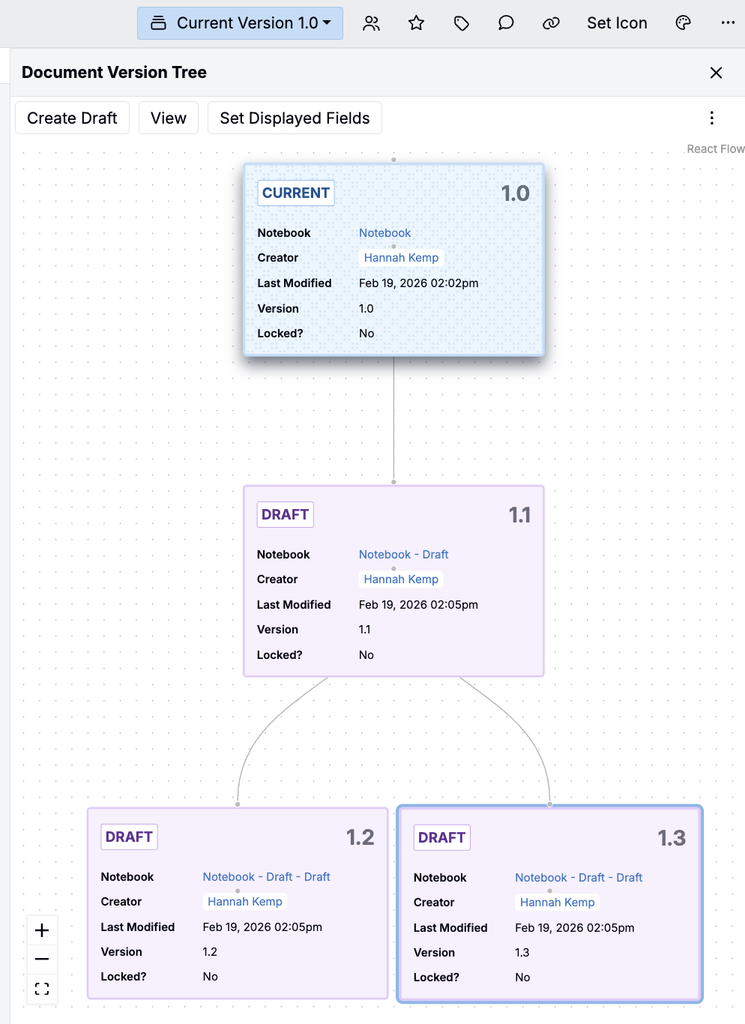
Notebooks support document versions, so teams can iterate on a notebook while keeping a clear record of how versions and drafts relate. In most workflows, the Current version is the approved source of truth; create a Draft to make and review changes before promoting it to Current.
- To open the version tree sidepanel, select View > Document Version History.
- To create a draft, click Create Draft on the current version or any earlier version.
- To view or edit a version or draft, select it in the tree and click View, or click the notebook name in the tree.
- To choose which fields appear in the tree, click Set Displayed Fields.
- To promote a draft, select it and run Actions > Set Current. This action must be configured on your notebook definition; contact your Uncountable team to set it up.
Activity Log
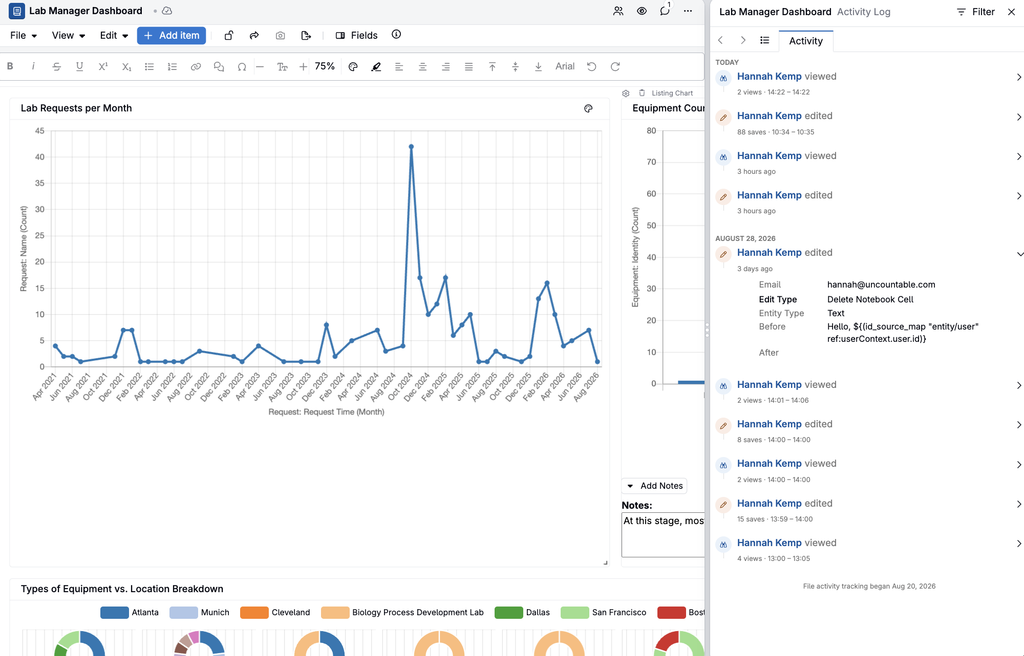
To see what changed in a notebook, select View > File Activity Log. The activity log records content changes, including updates to images and labels, and maps each edit to the page and cell it affected. Edited entries show previous and new values. Comment activity (new comments, edits, replies, resolves, and re-opens) and notebook-level events such as locking and adding pages are also recorded.
Signatures & Locking
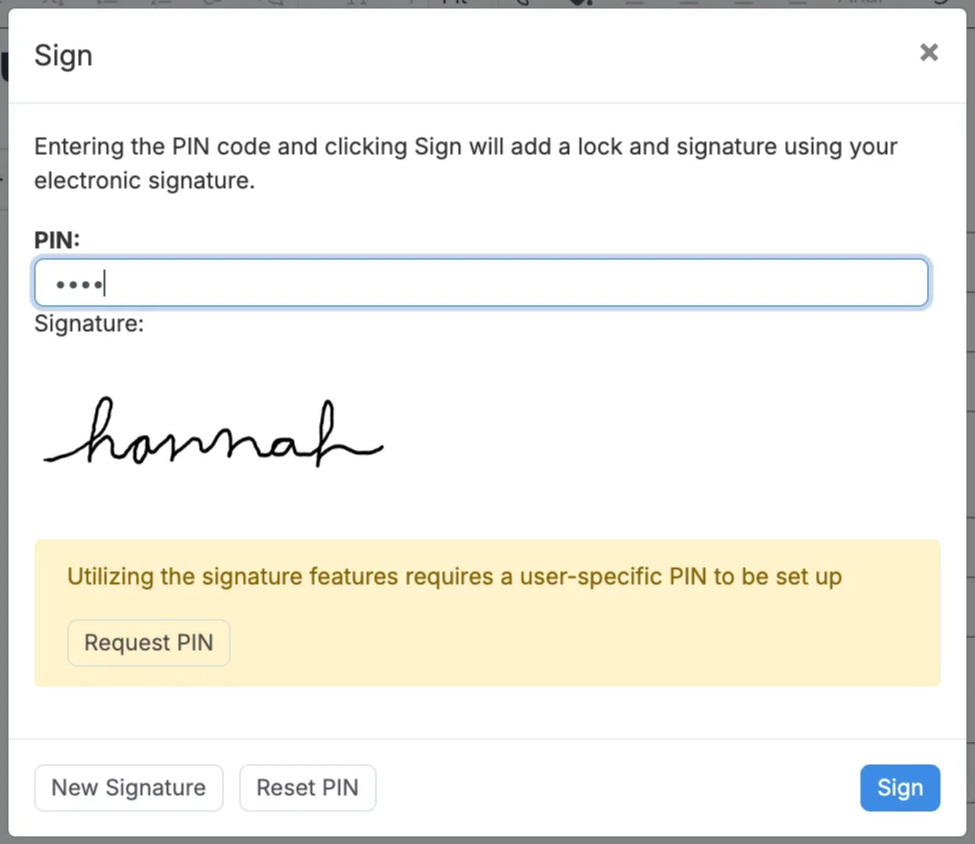
Add a Signature Block to record electronic signatures with a PIN. When finalized, select Sign to add a lock and signature. Locked notebooks are read-only until unlocked by an editor.
Sharing & Permissions
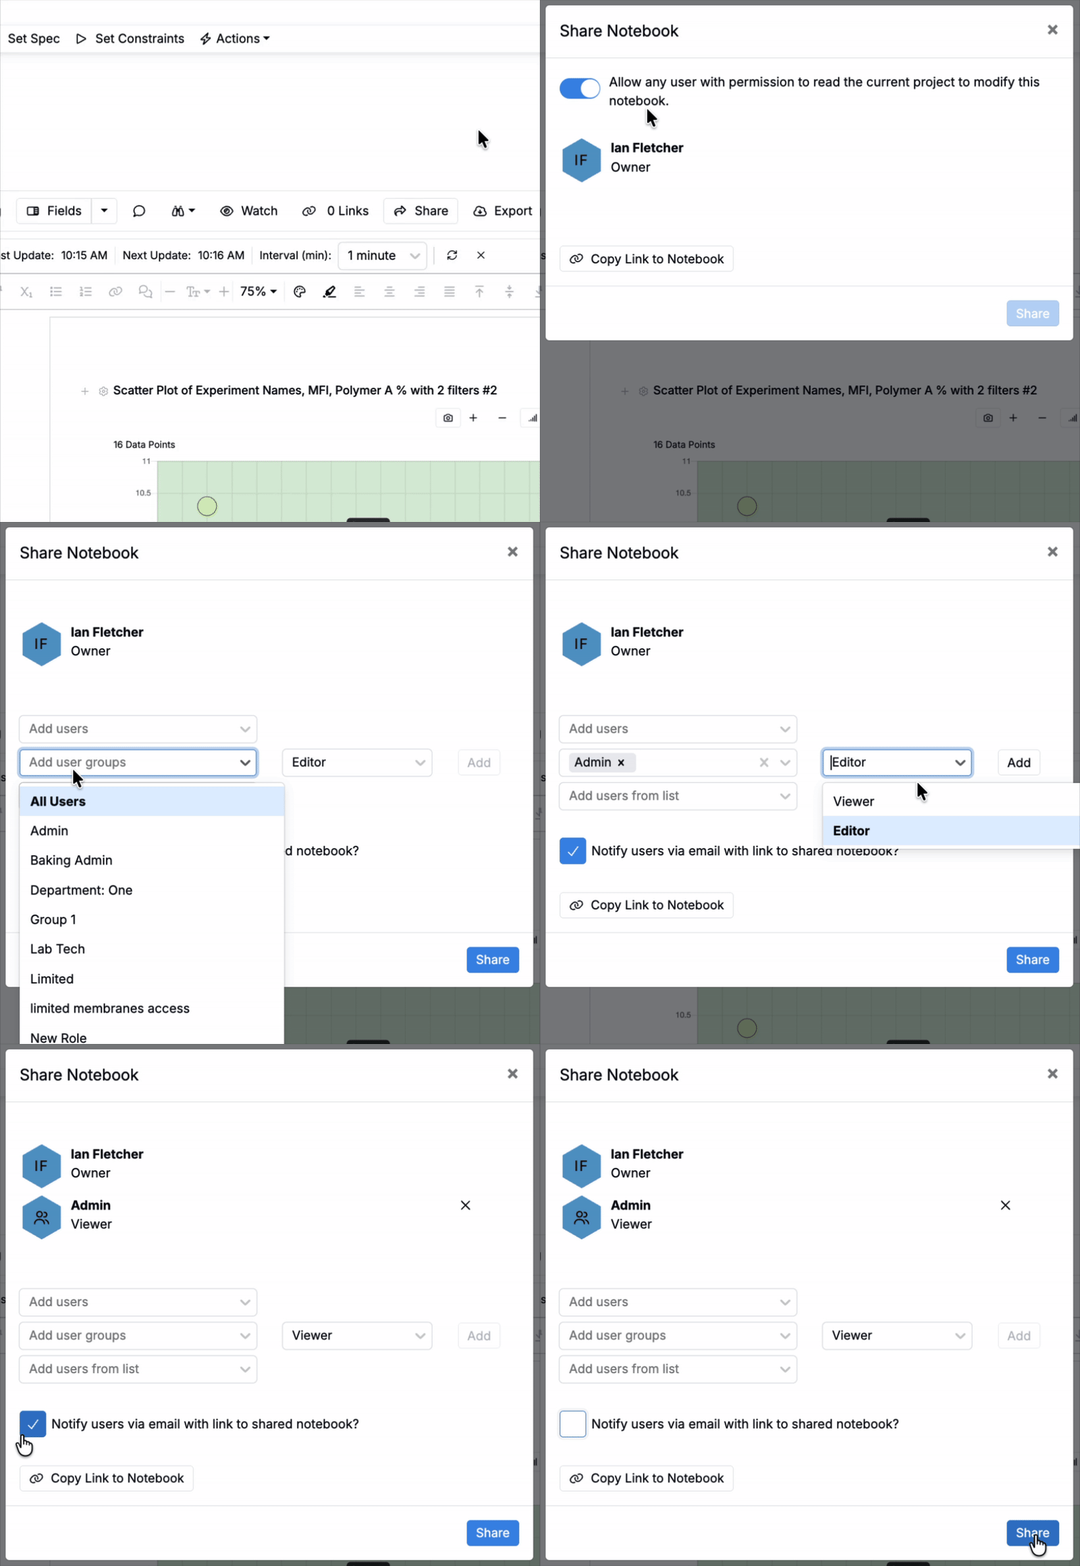
By default, Notebooks inherit project permissions. To override and manually configure permissions to view and edit the notebook:
- Click Share in the notebook toolbar.
- In the modal, toggle off Allow any user with permissions to read the current project to modify this notebook.
- Select users or user groups to add a permissions set for.
- Select the users level of access (Viewer or Editor) and click Add.
- Add additional permission sets, if desired.
- Optionally, enter a message in the Message field. The message is included in the email notification sent to recipients.
- Click Share.
Requesting Access
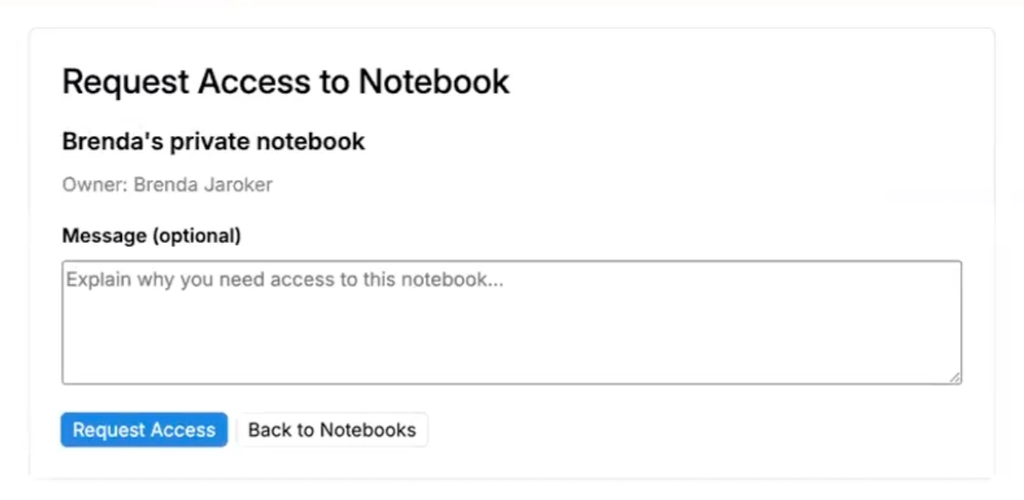
If you open a notebook you don’t have access to, a Request Access page appears. Enter an optional message and submit the request. The notebook owner receives an in-platform notification and can grant or deny access, choosing the access level to grant (Viewer or Editor).
Moving Notebooks
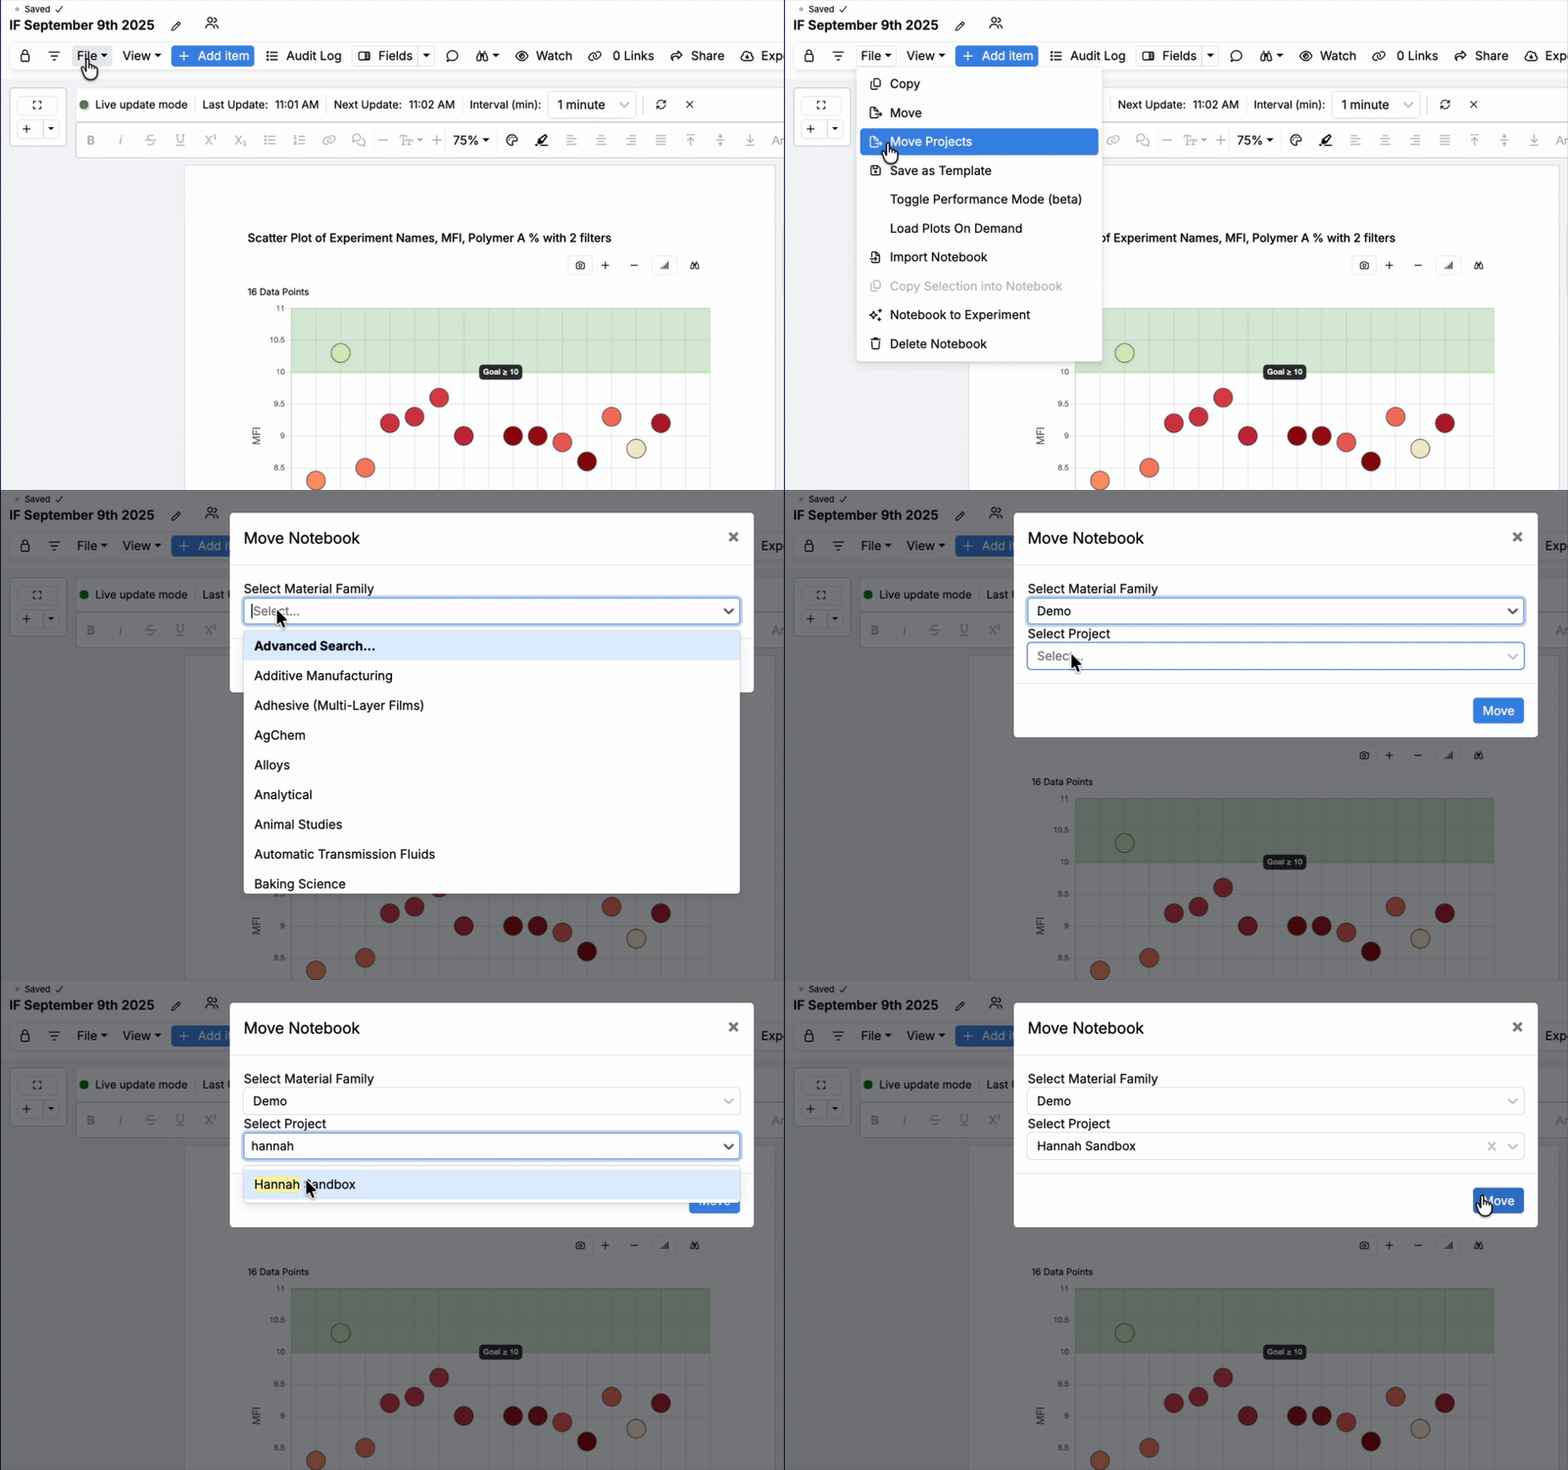
Notebooks can be moved across material families and projects. To do so:
- Select File > Move Projects.
- Choose a new Material Family and (optionally) a Project.
- Click Move.
Once moved, all project-specific notebook cells (e.g. visualizations, listings) will update to reflect the data from the new material family and project.
Changing the Project Data Source
Project-specific cells, such as Explore Data plots, show data from a project data source. By default, this is your current project. To view a notebook with a different source, select View > View Project Data Source and choose one of the following:
- Notebook — the notebook’s own project.
- Current User Project — the project you currently have selected (default).
- All Projects
Cells handle the selected source as follows:
- Explore Data plots pull data from the selected source.
- Radar plots with selected recipes continue to show those recipes, even if the recipes are not in the selected source.
- Experiment Comparison cells set to Manually Select Experiments keep showing the selected experiments. Cells set to Automatically Select Experiments show experiments from the selected source.
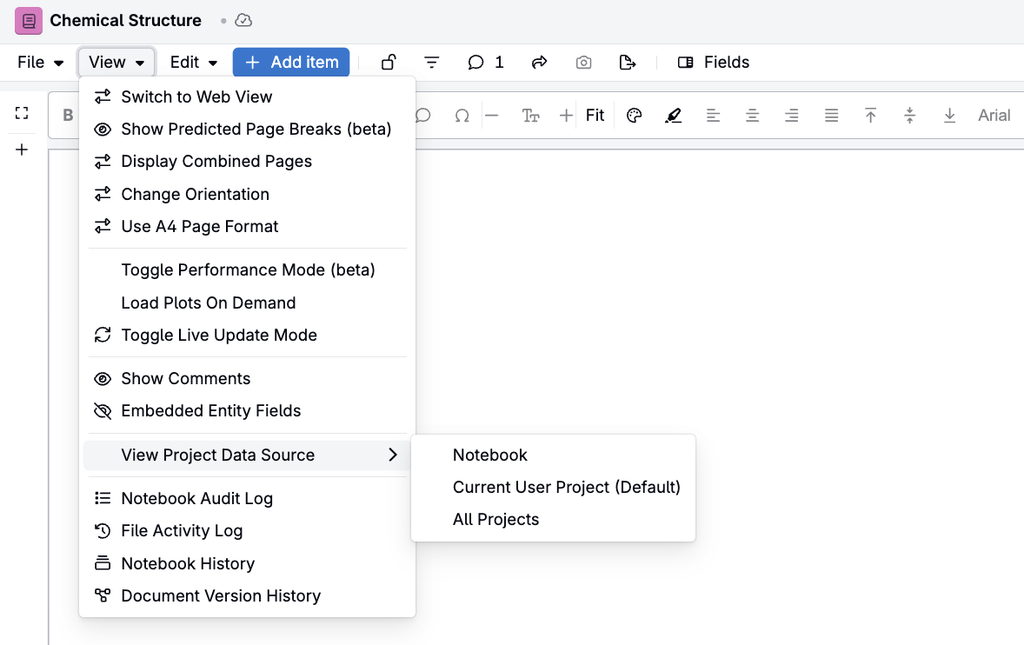
Note: The project data source is a view setting only. It is not saved with the notebook and does not change what other users see. In dashboard notebooks, change it in edit mode.
Exporting Notebooks
Notebooks can be exported as Word documents (.docx) or as digitally signed PDFs using an Export Notebook trigger action on the notebook definition. Exports run in the background, and the exported file is added to an attachments field on the notebook.
- Word (.docx) — Set the trigger action type to NotebookExportFormatDocx, then run the trigger from the notebook.
- Signed PDF — Set the type to NotebookExportFormatPdf and select a Signing Config. When the trigger is set to run on Sign Entity, the PDF is exported when the notebook is locked and signed. The digital signature can be verified in Adobe.
Note: Export triggers and signing configs are set up by admins on the notebook definition.
Best Practices
- Use templates for recurring report or dashboard formats.
- Keep related experiments, plots, and summaries on separate Notebook pages for clarity.
- Use comments and signature blocks for reviews and approvals.
- Lock final versions for governance and traceability.