In Uncountable, a spec (specification) is a set of goals you define for test outputs in a project. Specs represent the performance criteria you want to optimize or check against (e.g. Viscosity between 300-500, Tensile Strength above 15 MPa, or Density within ±0.2 of a theoretical value).
Specs can be set at either the project level or for individual recipes, and they serve several purposes:
- Defining upper/lower limits and goals for project success
- Highlighting measurements on data entry pages (green = within limits, red = outside limits)
- Powering optimization and modeling tools such as Objective Search
- Providing targets for AI-driven experiment design and analysis tools such as Suggest with AI, Analyze with AI, DOE, or Advanced Screening Design
Types of specs
Uncountable supports multiple spec types:
- Project specs — The default spec associated with a project. Project specs define the goals Uncountable uses when evaluating recipes or experiments in that project, unless a more specific spec applies.
- Assigned specs — Specs assigned to specific recipes or experiments. Assigned specs override the project spec when a recipe needs its own targets, limits, or success criteria.
- User assigned specs — Personal spec selections that apply only to your view of the data. User assigned specs let you evaluate recipes against a different spec without changing the project default or recipe-level assignment for other users.
- Relative specs — Specs tied to theoretical calculations. They automatically update when the underlying formula changes and can be used as part of the applicable spec.
Spec priority
When Uncountable evaluates a recipe or experiment, it resolves which spec to use in the following priority order:
- Assigned specs — If the individual recipe has an assigned spec, Uncountable uses that recipe-level assignment first.
- User assigned specs — If there is no assigned spec on the recipe and you have selected a user assigned spec, Uncountable uses your personal selection for your experience.
- Project specs — If there is no assigned spec and you have not selected a user assigned spec, Uncountable falls back to the project default.
Spec visibility and permissions
Each material family has its own spec definition, and a user can view a spec only if they have Read access to that material family’s spec definition (either directly or through a user group).
If a spec is missing where you expect it, contact an admin or your Uncountable representative to review spec definition access.
Accessing the Specs page
To access the Specs page, click Calculate > Set Spec from the navigation bar.
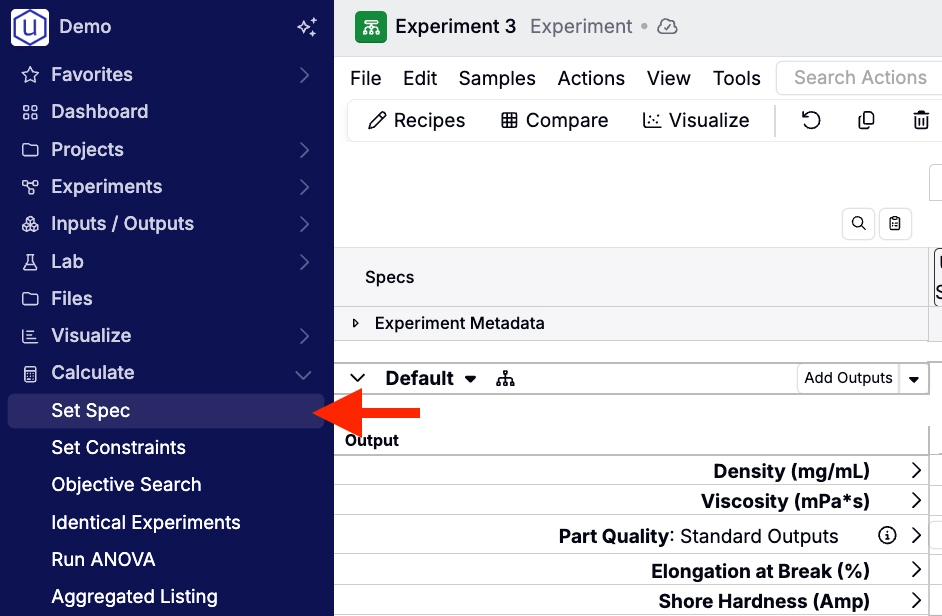
By default, this will load the current project’s project spec. You can also use the Load Spec button to load an existing spec or click Create to create a new one.

Spec configuration
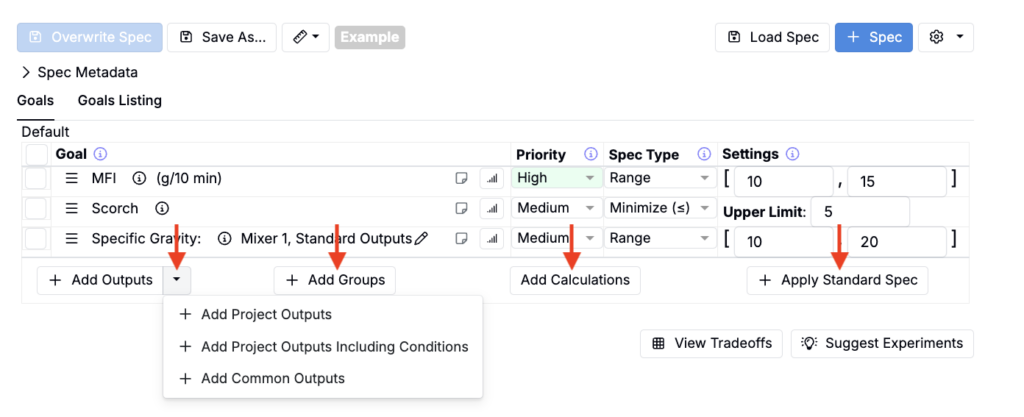
Adding goals
On your spec, use the Goals tab of the spec table to manually add outputs, output groups, or calculations as project spec goals.
- Add Outputs – Manually select outputs to include in your spec. The button menu also contains a few shortcuts for adding outputs:
- Add Project Outputs – Adds all outputs from the project, without conditions.
- Add Project Outputs Including Conditions – Adds all outputs from the project, including conditions.
- Add Common Outputs – Adds the 1–20 most commonly used outputs in the project (excluding condition parameters).
- Add Groups – Add output groups to organize your outputs.
- Add Calculations – Include output or input calculations (e.g., formulation cost). Calculations must be active and part of the project to appear.
When creating specs for the Analyze with AI tool, you may include as many outputs as needed. For Suggest with AI, optimize fewer than ten at once. If you need to optimize many outputs, prioritize a subset first and refine in later rounds.
Configuring goal conditions
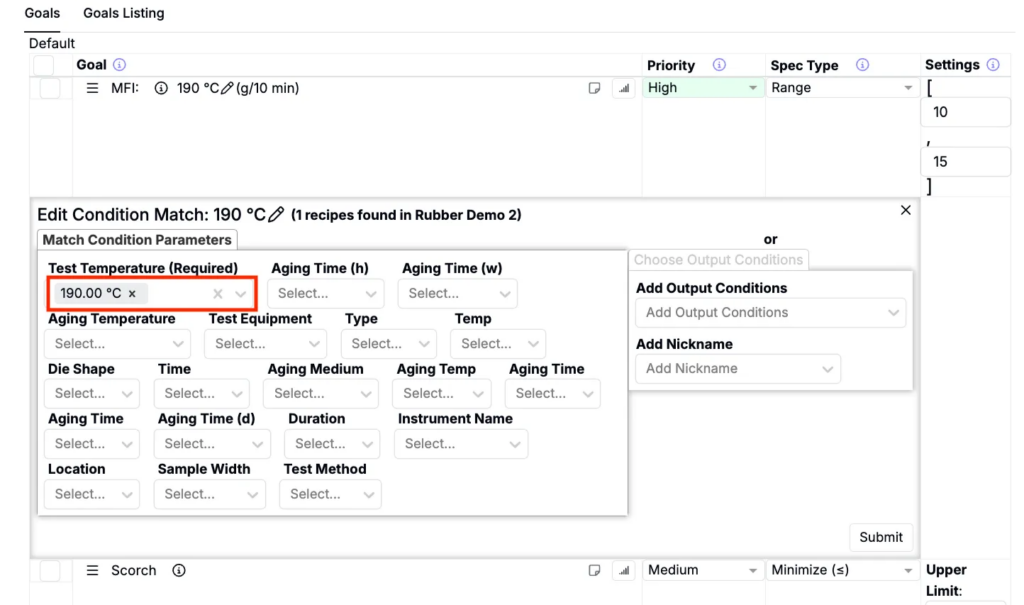
Clicking on an output opens a dropdown menu. Select Configure Condition(s) to add goal conditions.
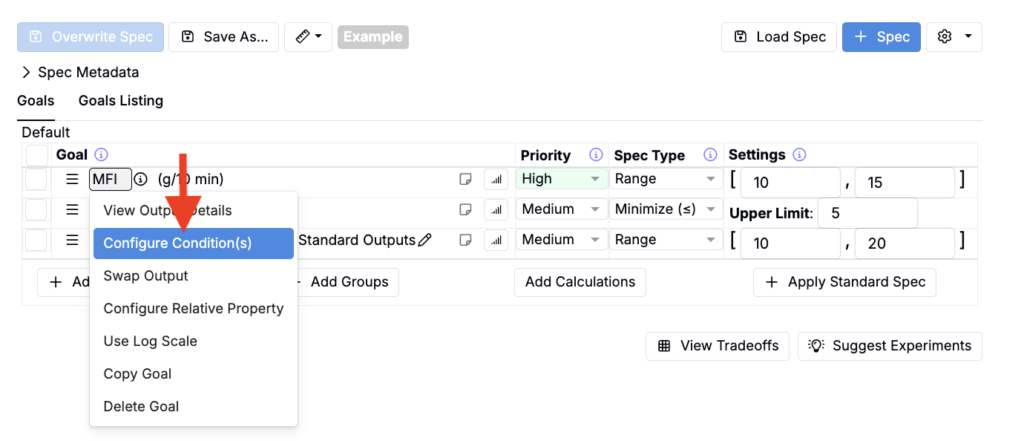
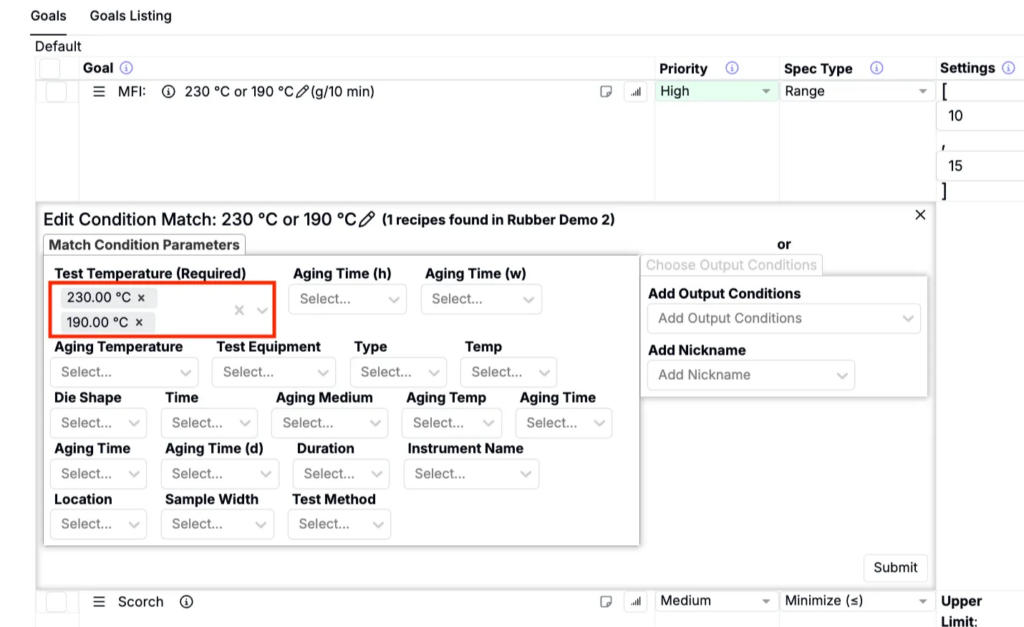
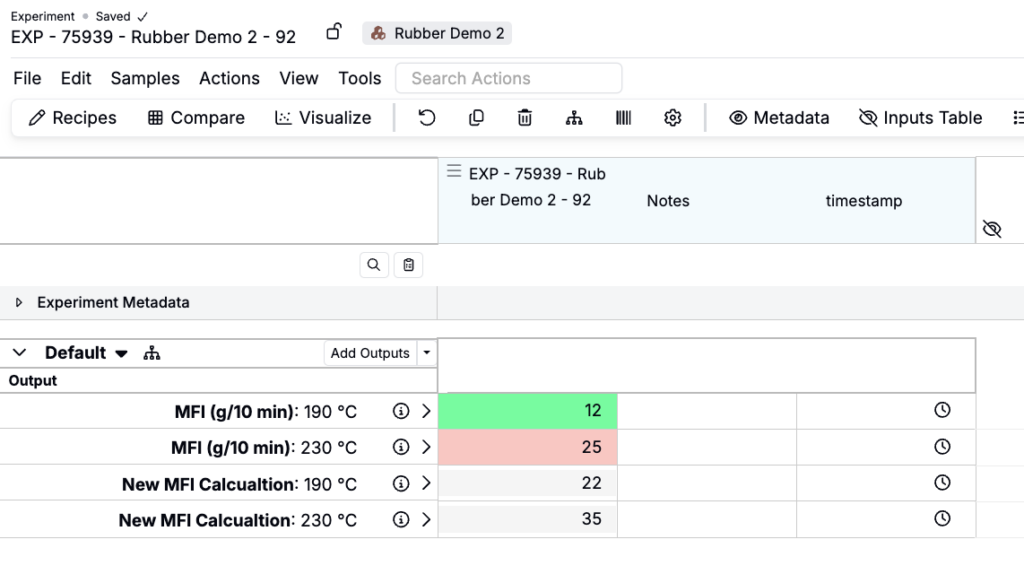
Goal conditions allows you to either focus on the test conditions most relevant to your process. For example, if MFI is measured under different test temperature conditions (e.g., 190 °C and 230 °C), you can configure the spec to:
- Select 190 °C only → The model optimizes using just MFI values measured at 190 °C.
- Select both 190 °C and 230 °C → The model averages the two values and uses the combined result.
If no conditions are selected, the model will use all available measurements and collapse them into a single averaged value. This approach works best when test conditions have minimal impact on performance, since it increases the dataset size and improves statistical robustness.
Additional goal settings
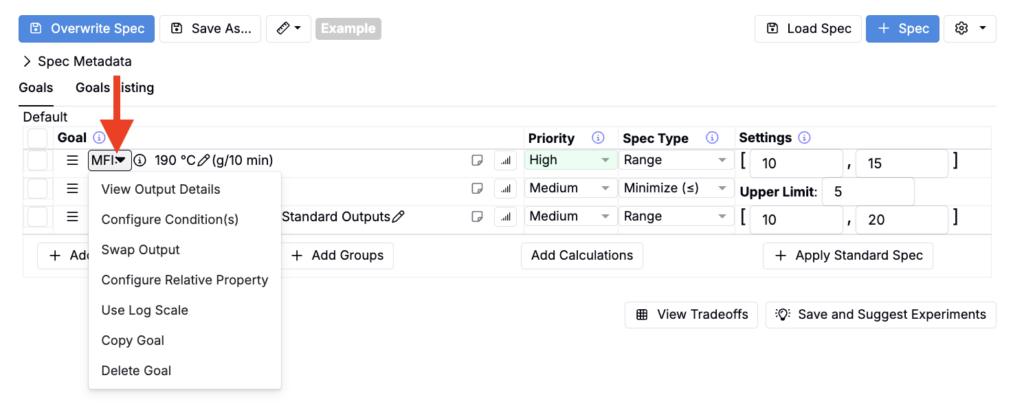
The goal settings menu provides further options:
- View Output Details – Opens the Edit Measurements page for the output.
- Swap Output – Replace the output while preserving priority, type, and goals.
- Configure Relative Property – Create a relative spec that updates dynamically with formula changes.
- Use Log Scale – Switch to a logarithmic scale for properties that vary widely (e.g., viscosity).
- Copy Goal – Duplicate the goal to configure alternate conditions.
- Delete Goal – Remove the goal from the spec.
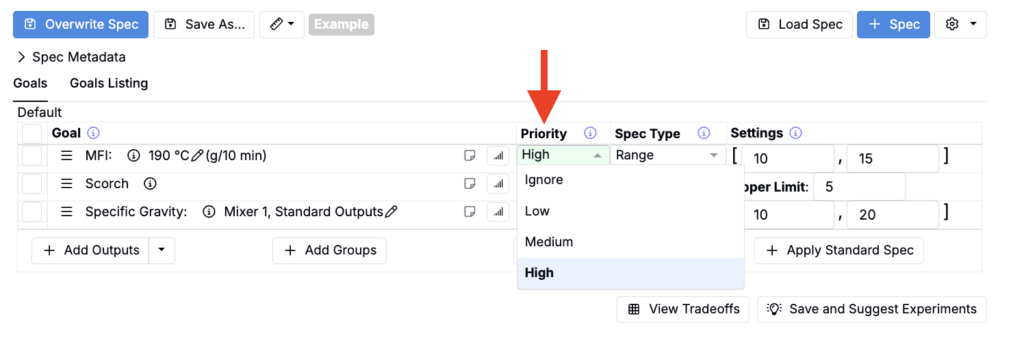
Setting goal priorities
Priority defines an output’s importance in optimization:
- Ignore – Excluded from optimization (same as not adding it).
- Low – Included but not emphasized.
- Medium – Given considerable weight.
- High – Critical to success (recommended limit: 1–3 per spec).
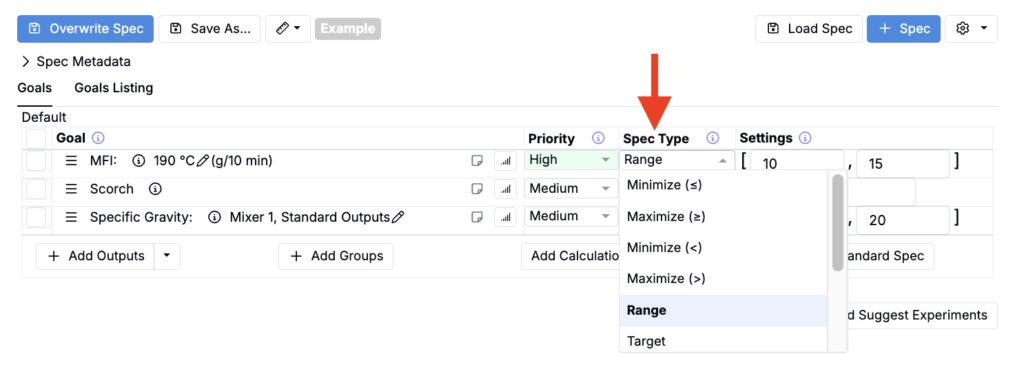
Setting spec type
Spec Type defines how an output should be optimized:
- Maximize – Aim for the highest value.
- Minimize – Aim for the lowest value.
- Range – Keep values within a range, both bounds inclusive
- Range (a,b) — Keep values within a range, both bounds exclusive
- Example: (10, 20) — Value must be strictly between 10 and 20
- Range [a,b) — Keep values within a range, lower bound inclusive, upper bound exclusive
- Example: [10, 20) — Value must be ≥ 10 and < 20
- Range (a,b] — Keep values within a range, lower bound exclusive, upper bound inclusive
- Target – Aim for a specific value.
- Range with Target – Define a range and an ideal target value.
- Range with Target Range – Define a range and an ideal target range.
- Exists – Ensure the output is present when measured.
For categorical outputs (e.g., pass/fail), the available spec types are:
- Allowed Options – Specify acceptable values.
- Disallowed Options – Exclude unwanted values.
- Multiclass – For Analyze Experiments with AI, apply a classification model.
- Exists – Ensure the output is present.
Setting goal limits
Under the Settings column, enter upper and/or lower limits to define success criteria.
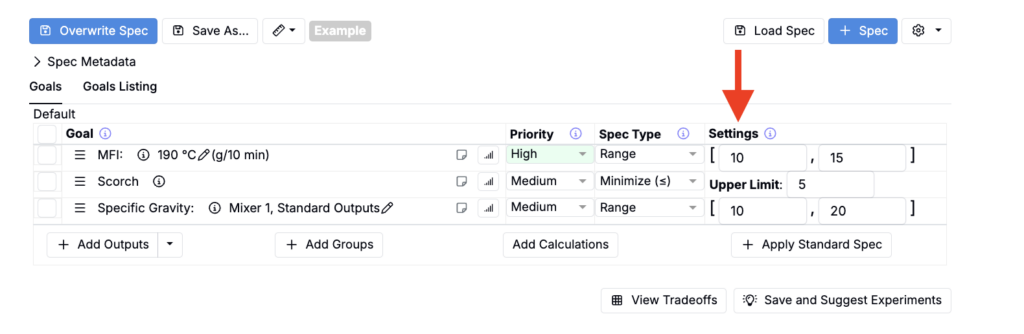
These limits—often based on specification sheets—control how results are highlighted on the Enter Measurements and Compare pages:
- Green– within limits.
- Red – outside limits.
Considerations when setting goal limits
- Align with project requirements — limits should reflect the project’s objectives, whether they come from:
- Customer requests (e.g., improve tensile strength or elongation)
- Internal goals (e.g., reduce formulation cost by 10% while maintaining performance)
- Research objectives (e.g., compare polymer performance before and after aging)
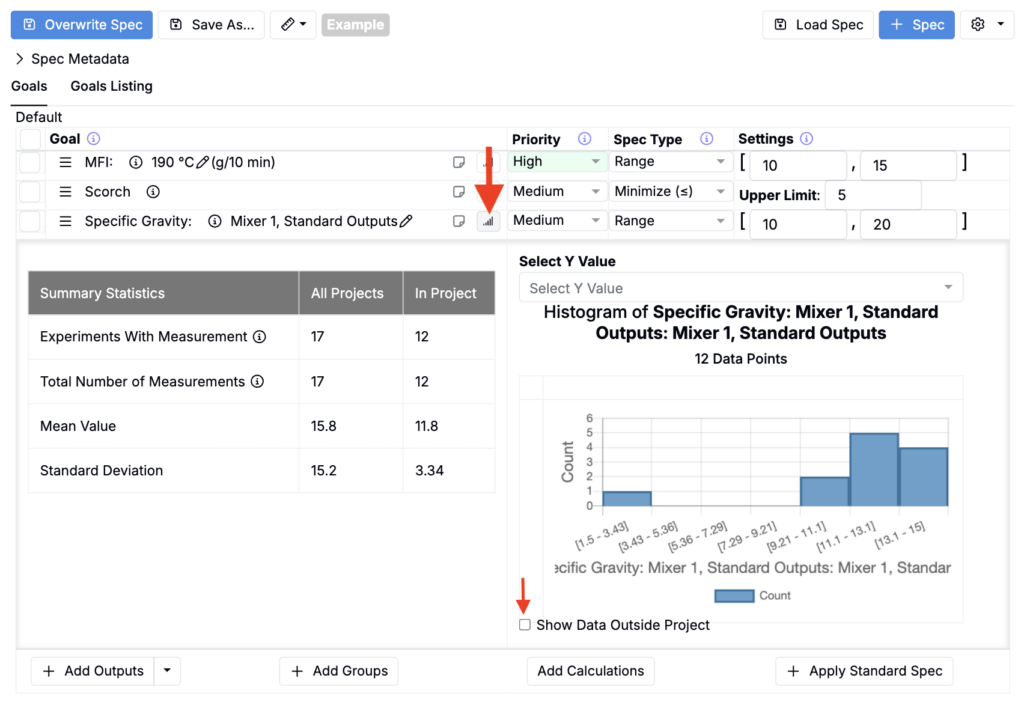
- Use historical data — past data helps set realistic limits. Click the histogram bar next to a goal to view:
- Mean and standard deviation
- Distribution histogram
- Distance to thresholds (if set)
This provides a quick check of what has been achieved before and what may be difficult. You can also enable Show Data Output Project to view results across the entire material family.
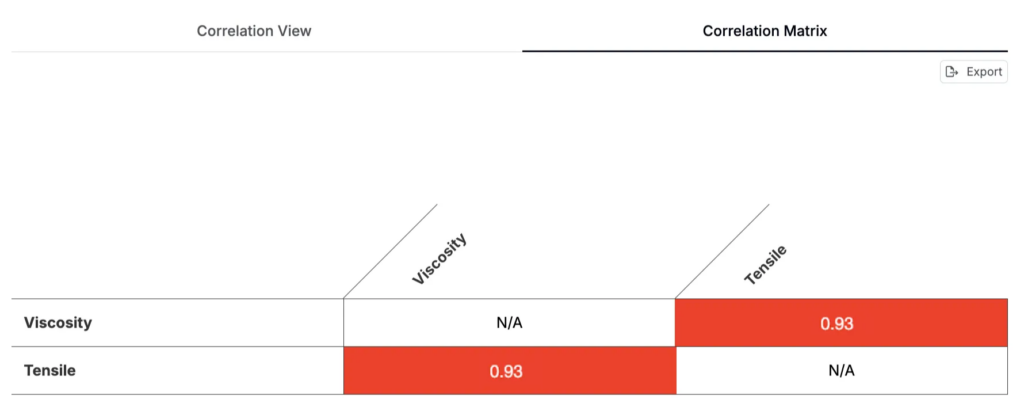
- Account for trade-offs — many outputs are correlated, meaning improving one can affect another. Use the View Tradeoffs button (bottom-right) to open the View Correlations page.

Consider an example where tensile strength and viscosity are highly correlated (r = 0.93), maximizing tensile strength while minimizing viscosity may be unrealistic. Overcoming such trade-offs often requires:
- New ingredients or process parameters
- Exploring new input spaces