Favorite Links by Material Family
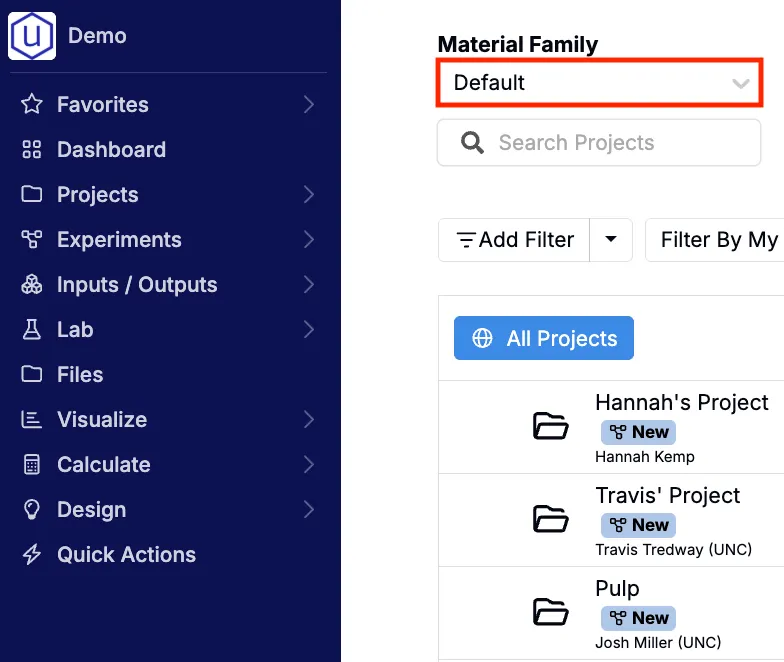
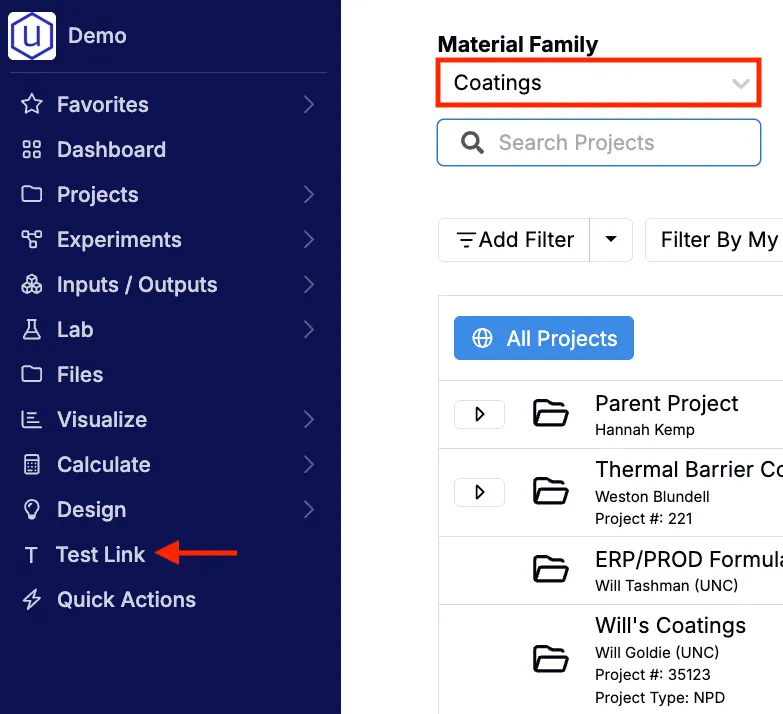
You can now scope Favorite Links by Material Family when configuring them on the Edit Favorites page.
Previously, Favorite Links could only be scoped to specific users or user groups. This could create clutter for users who switch between user groups or work across multiple areas. With material family scoping, you can ensure that only the most relevant links appear in your navigation bar, Favorites page, and mobile landing page.
This update will be especially useful for teams that work across multiple product lines so users can always see links aligned with the current material family, and for users who move between user groups.
How to use:
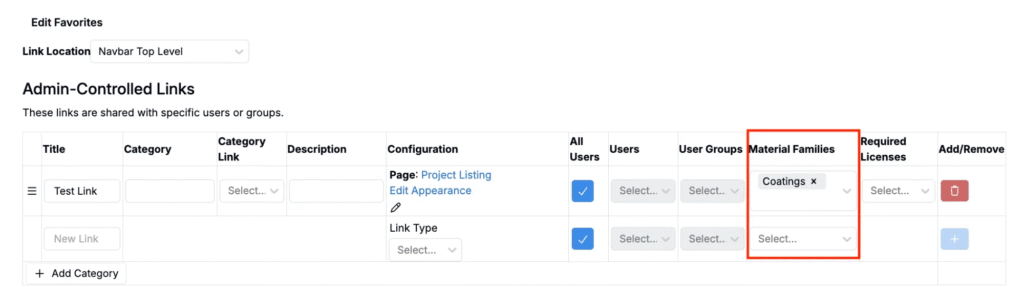
- Go to the Edit Favorites page and create or edit a Favorite Link.
- Use the new Material Family column to specify which material family the link should appear within.
- (Optional) Add User or User Group filters for additional visibility configuration.
- Click the blue + icon to save your changes.
To learn more, refer to Edit Favorites.
DOE Grid Generation with Constraints
Uncountable’s DOE grid generation tool now supports constraints, allowing you to filter which experiment combinations are generated.
Previously, DOE grids included every possible combination of selected factors—even those that were irrelevant or impractical. Constraints let you define logical rules (AND/OR) that filter out invalid pairings while keeping all valid combinations.
This change improves formulation design by preventing the generation of experiments you wouldn’t realistically run (e.g., chemically incompatible ingredient pairings). By filtering out unfeasible trials before scheduling, constraints help teams save both time and resources.
How to use:
- Open the DOE and add parameters.
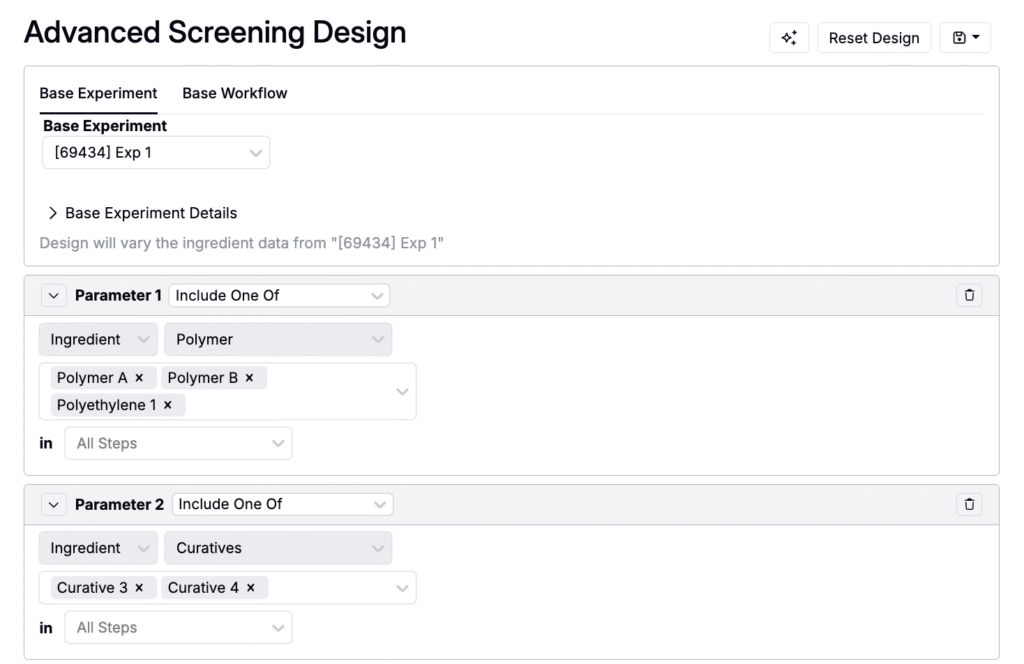
- To add constraints:
- Click Add Constraints.
- Select either AND or OR.
- Add right and left Factors.
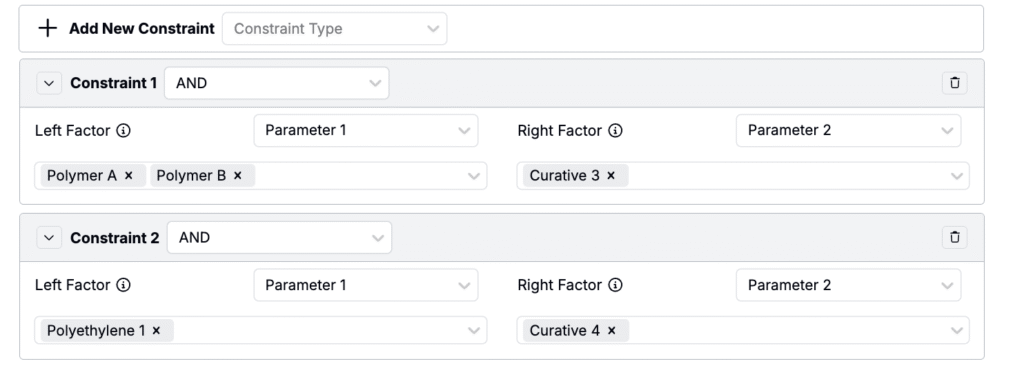
- Generate the grid; only allowed combinations are created.
- In this example, the unconstrained DOE would have produced six total polymer/curative pairings. With constraints applied, three invalid pairings are filtered out, leaving only four feasible experiments in the final grid.
To learn more, refer to Advanced Screening Design.
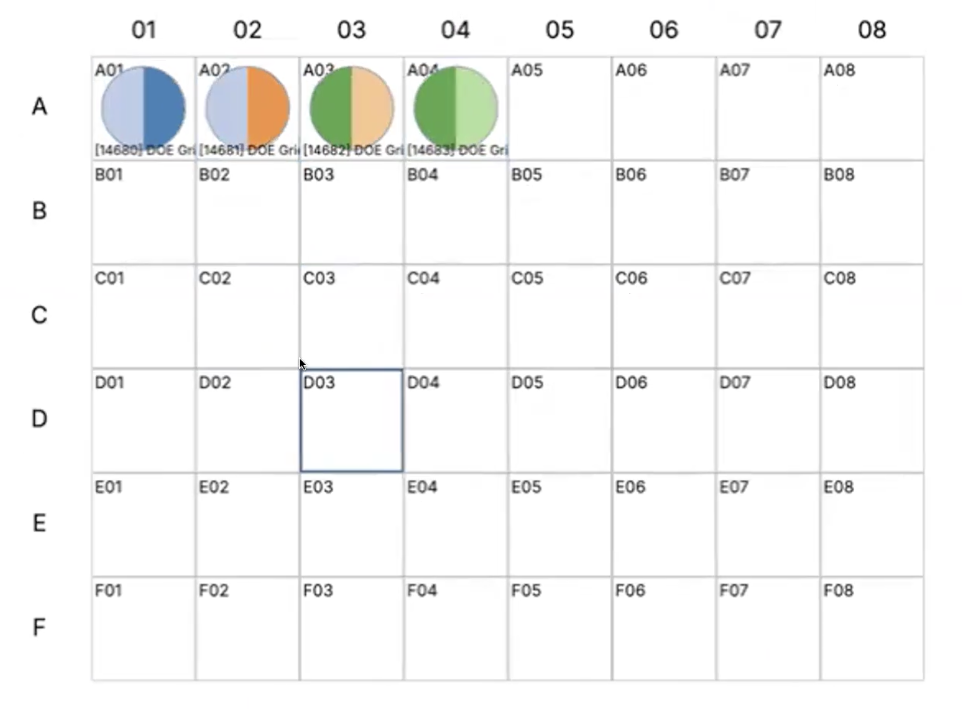
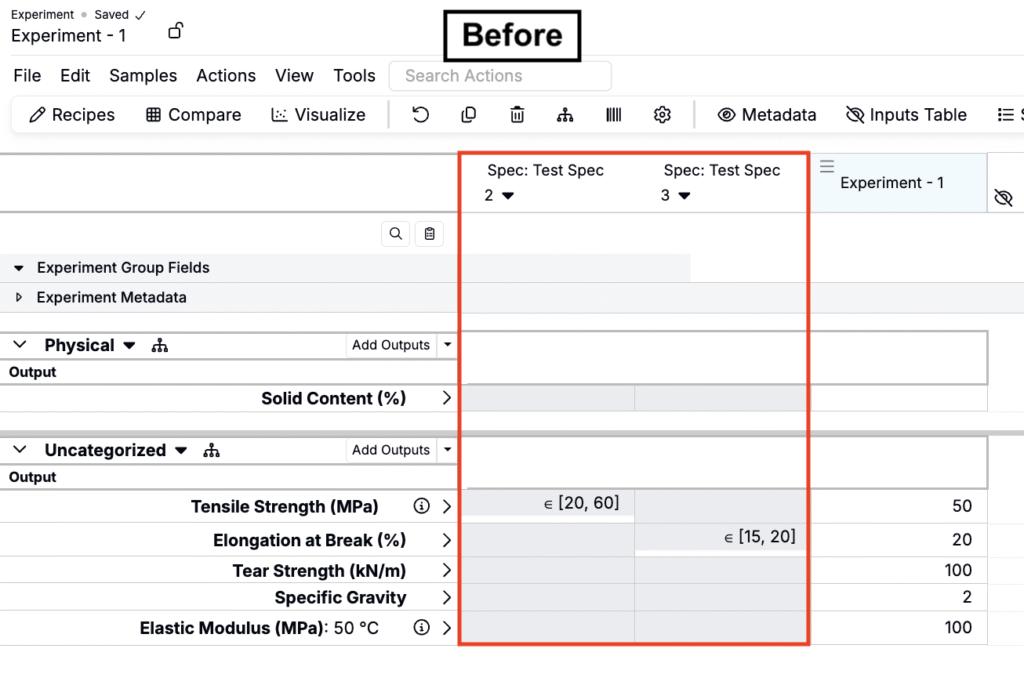
Multiple Assigned Specs
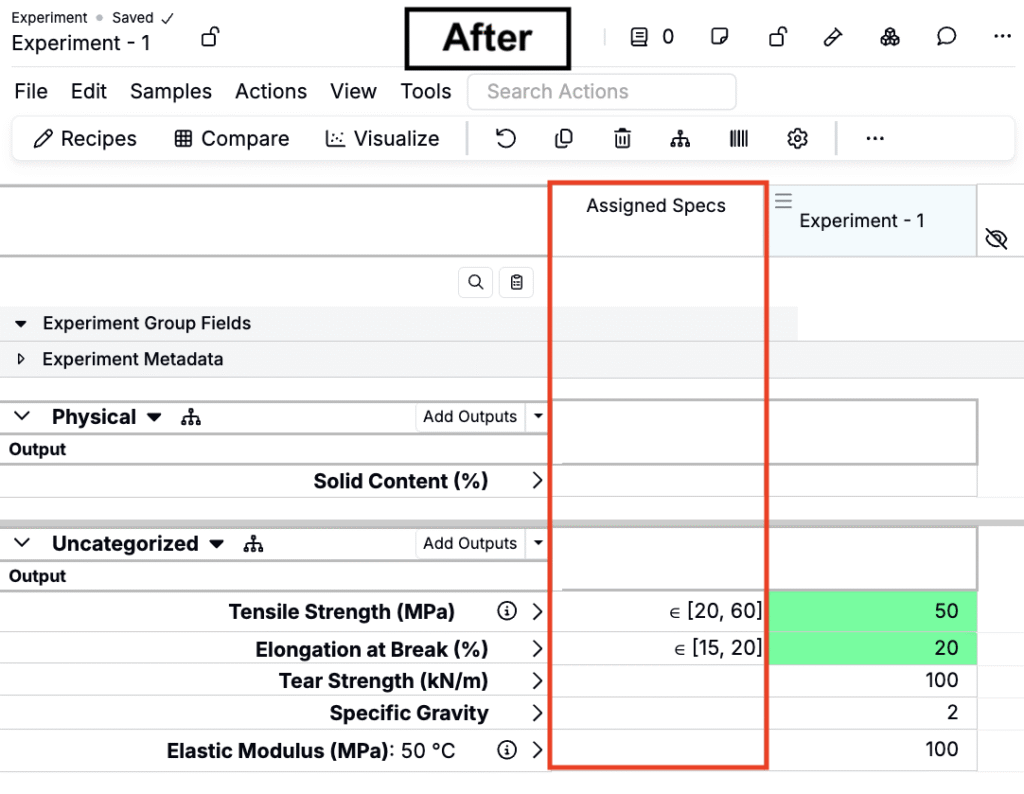
The measurements view of experiments now supports multiple assigned specs, with a redesigned Assigned Specs Panel.
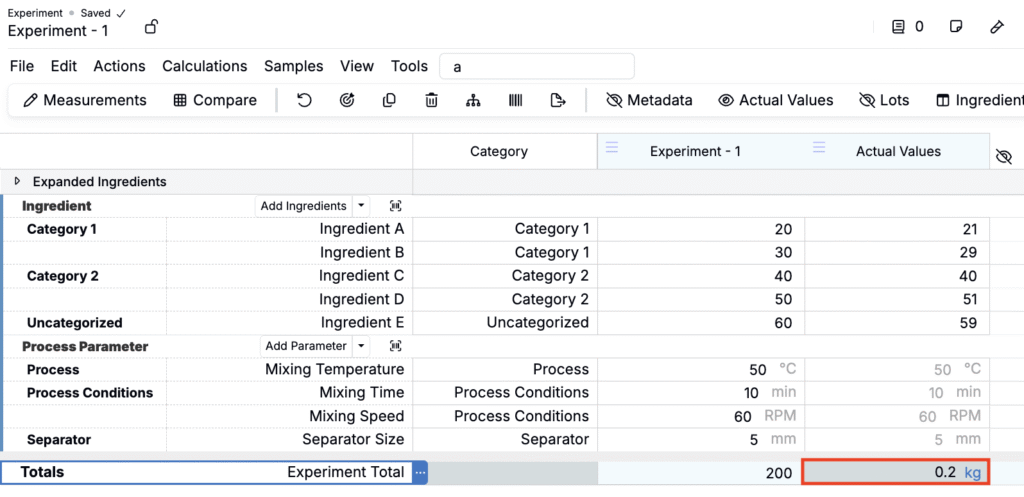
Previously, outputs and specs appeared as separate columns. Now, specs can be combined into a single Assigned Spec column. Measurement values also now display spec validation colors (green when satisfied, red when failed), previously not possible in the old multi-column layout.
This change provides a cleaner interface and makes it easier to track results when experiments reference multiple specs—such as applying different criteria at separate stages of a multi-stage test or checking whether results meet distinct specs at lab, pilot, and production scale.
How to use:
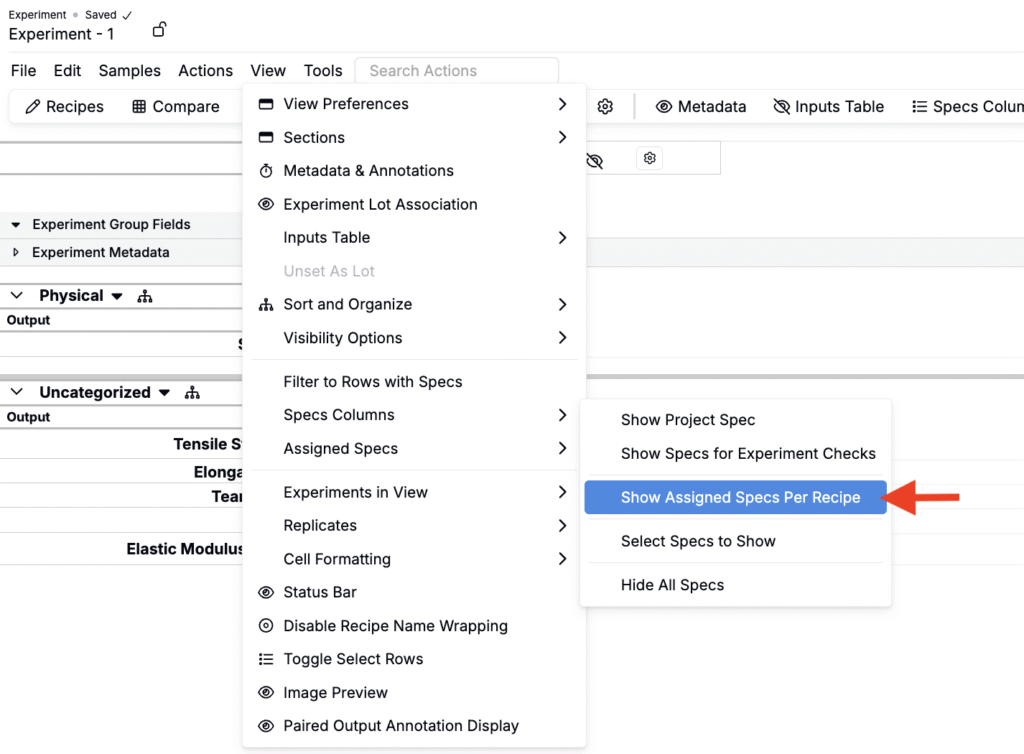
- In the measurements view of an experiment, go to View > Specs Columns > Show Assigned Spec Per Recipe. This adds a single Assigned Spec column to the grid.
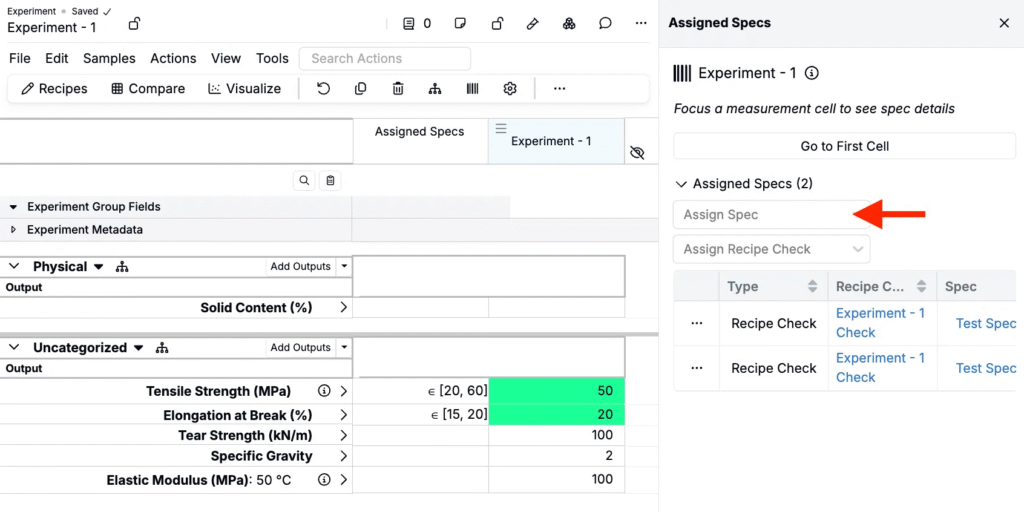
- Click the Assigned Spec column header and select Open Sidepanel to manage spec assignments.

- In the sidepanel, use the Assigned Spec field to select and assign one or more specs to the experiment.
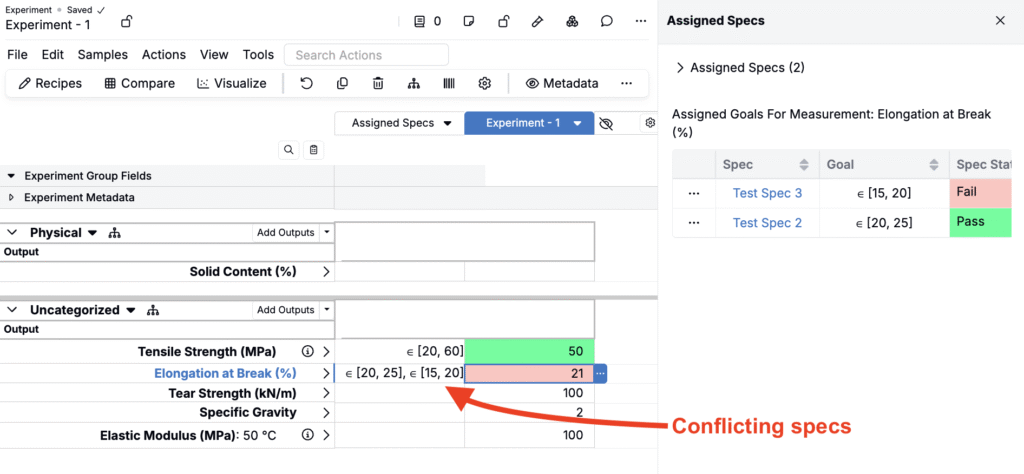
If multiple specs apply with conflicting ranges, all of them are shown in the Assigned Spec column. A measurement is highlighted red if it fails any one of the assigned specs.
Triggers from Calendar Events
Triggers can now be configured to run automatically at the time of a platform calendar event.
Previously, triggers were tied only to entity changes or manual actions. Now, by linking triggers to calendar events, you can schedule workflows to happen at precise times—like generating daily test samples, sending expiry reminders, or assigning shift-based tasks.
This new feature gives lab managers a reliable way to automate time-based workflows.
How to use:
- Configure a trigger.
- Enable as an entity action.
- Set Entity Action Allowed Entity Types to Calendar Event.
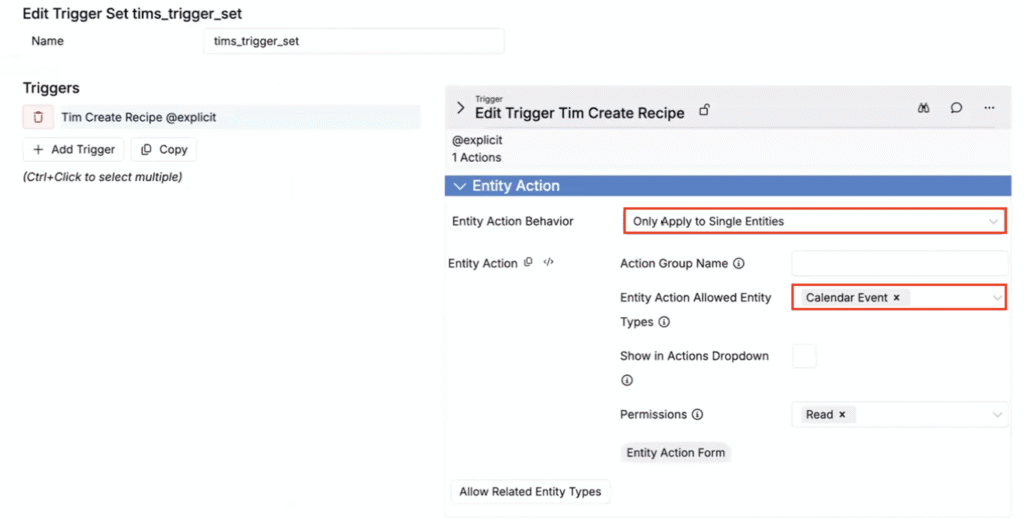
- Create a calendar event and set the Trigger field to your desired trigger.
- In this example, a trigger was configured to create a new recipe at the time of a recurring calendar event. At the time of each event, the trigger will run and automatically generating a new recipe.

Similar Curve Search in Objective Search
A new Similar Curve Search helps you find outputs with curves that resemble a selected reference curve using the Objective Search tool.
Previously, curve comparison relied on exact matches or manual comparison. The new shape-based similarity algorithm highlights curves that look alike even when peaks are shifted. This supports workflows in spectroscopy or thermal analysis, where curves can shift due to processing but still reflect similar underlying behavior.
How to use:
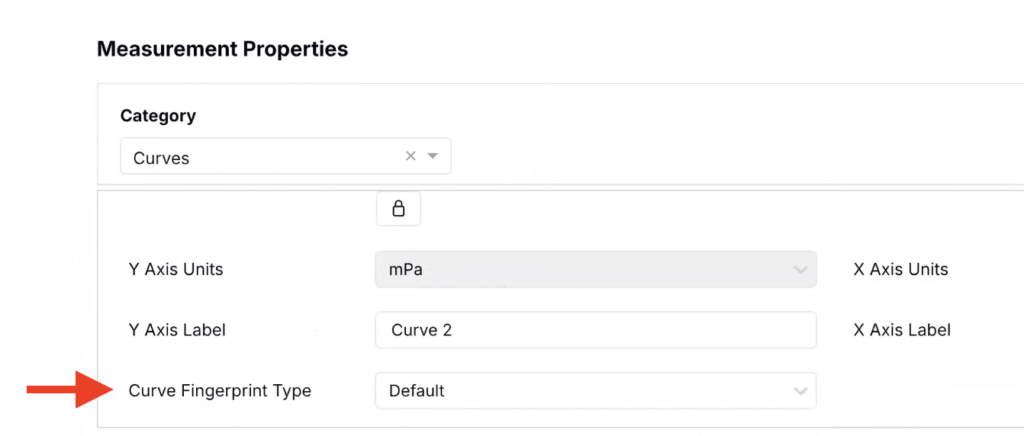
- Access the output details page of a curve output.
- Under Measurement Properties, set Curve Fingerprint to Default.
- Open Objective Search.
- Select a the output as a target output.
- Set Spec Type to Curve Similarity and select a Target Curve.
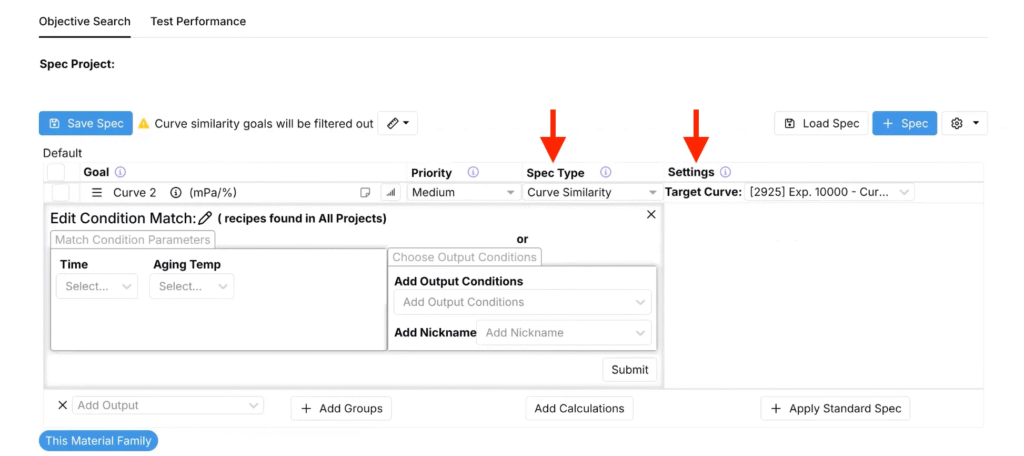
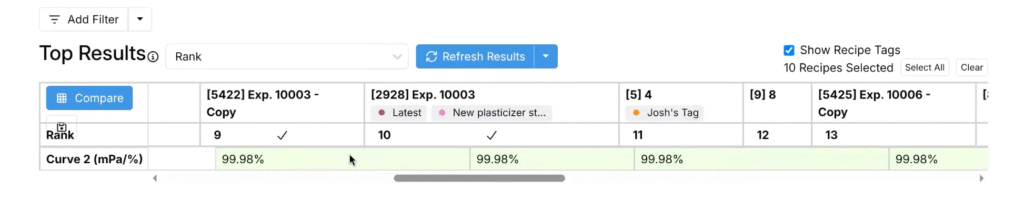
- The Top Results table below will display all experiments with similar curve outputs.
- Note that similarity is shape-based; wavelength/axis shifts may still be considered similar in this version.
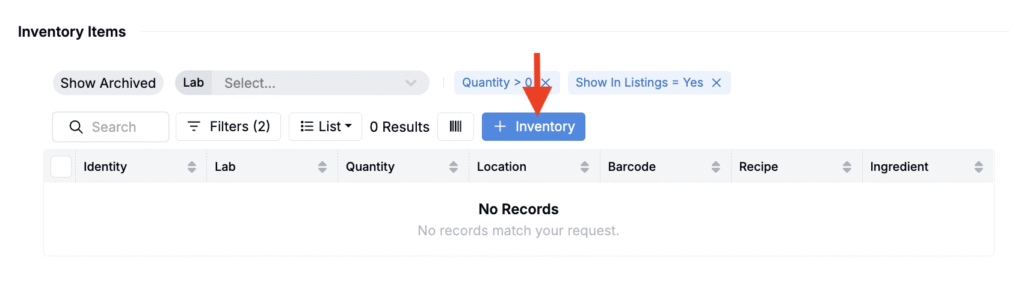
Quick-Create Inventory from Ingredient Details Pages
Ingredient pages can now include a + Inventory button that lets you create a new inventory item directly from the ingredient you’re viewing.
This update streamlines new inventory creation by pre-filling ingredient information. It will be especially useful for lab managers logging stock after new material orders and for technicians registering materials as they arrive.
How to use:
- In Form Admin > Inventory Definition, open the Settings tab and set Create Behavior to Custom.

- Open an ingredient’s details page.
- Under Inventory Items, click + Inventory.
- In the modal, add amount, unit, substrate, and location, then save.
Convert Files to Experiments (LLM)
Two weeks ago, we introduced a new feature that allows users to convert notebooks into experiments. Building on that capability, you can now also convert files in Uncountable directly into experiments.
This update is especially useful when working with technical data sheets (TDS) or other structured documents that describe test methods and results. Instead of re-entering outputs, condition parameters, and replicates manually, Uncountable can now extract both text and tables from files to create structured experiments automatically.
How to use:
- From the Files page, click the … menu next to a file and select Convert to Experiment.

- Choose the workflow and generate the experiment.
- Once generated, review the experiment. Outputs, condition parameters, and replicates are pre-populated where detected.
- If an output does not have an exact match, it may not be included. Future updates will capture unmatched items as unstructured rows.
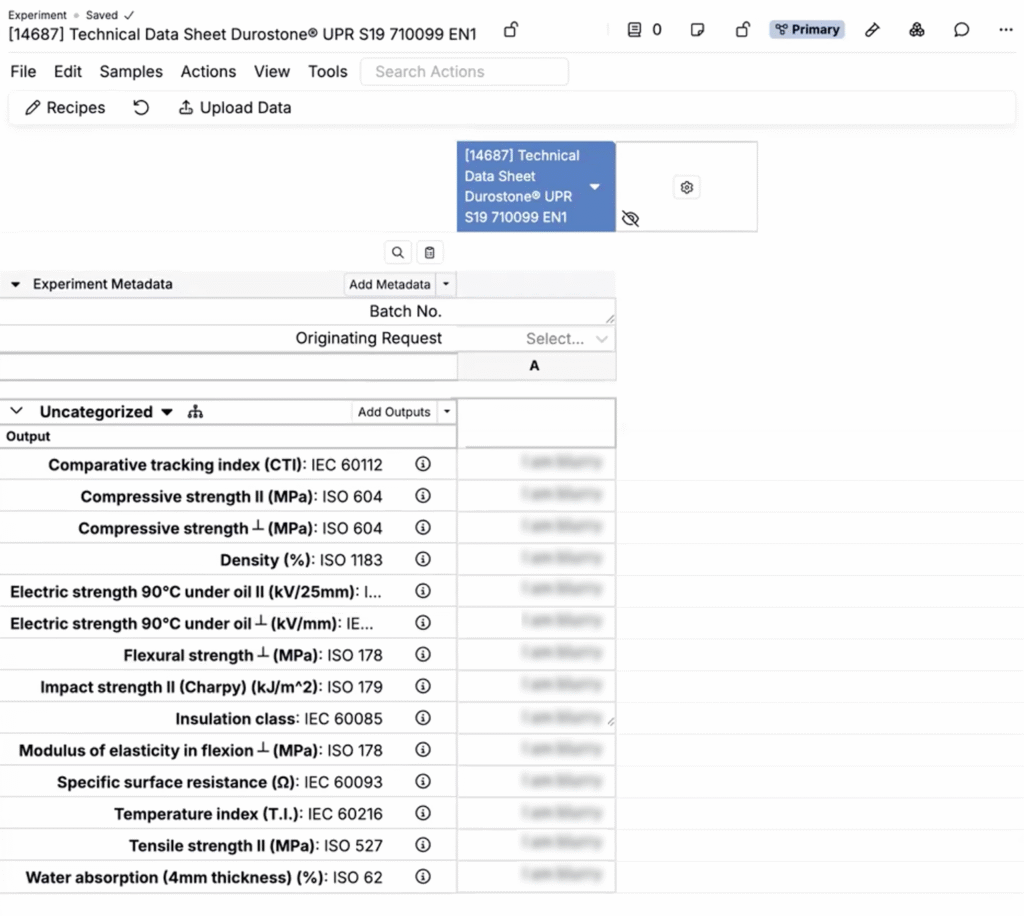
Basis Unit Overrides at the Recipe Level
Uncountable users can now set quantity basis default units for experiment and step totals at the recipe level. These overrides take precedence over defaults set at the workflow or material family level.
Previously, teams could only define basis defaults at broader levels, which sometimes meant a recipe displayed in units that didn’t fit its context. With this update, you can lock in the most appropriate mass, volume, or mole units for a specific recipe.
How to use:
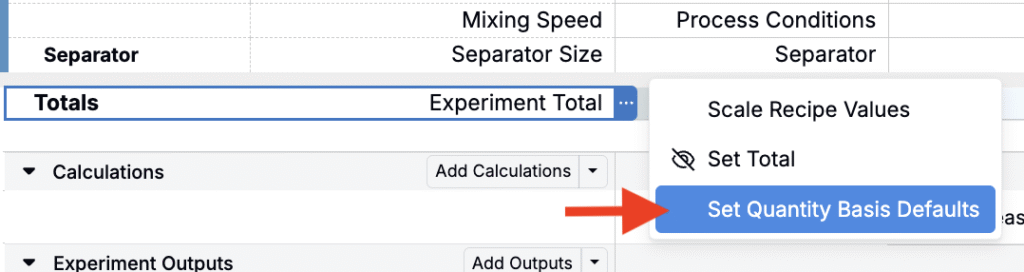
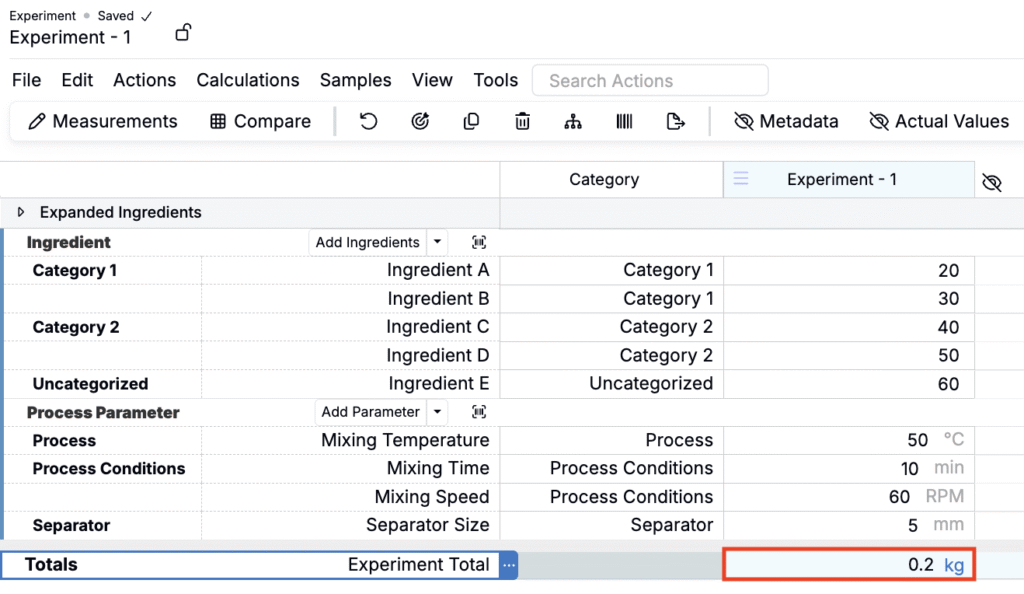
- Open an experiment and locate the Experiment Total or a Step Total row.
- Click on the row and select Set Quantity Basis Defaults.
- In the modal, choose the default mass, volume, or mole basis units you want to apply, then save.
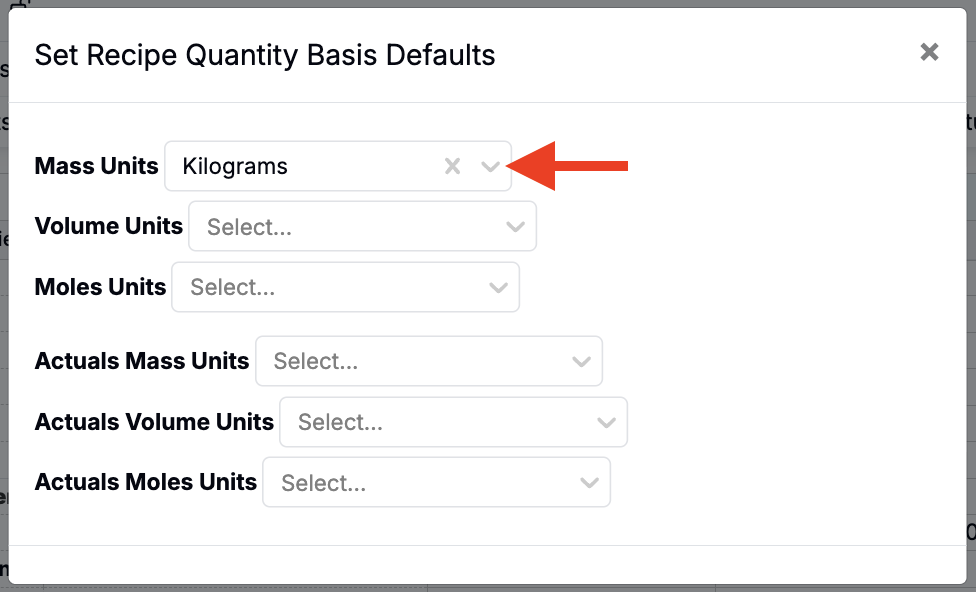
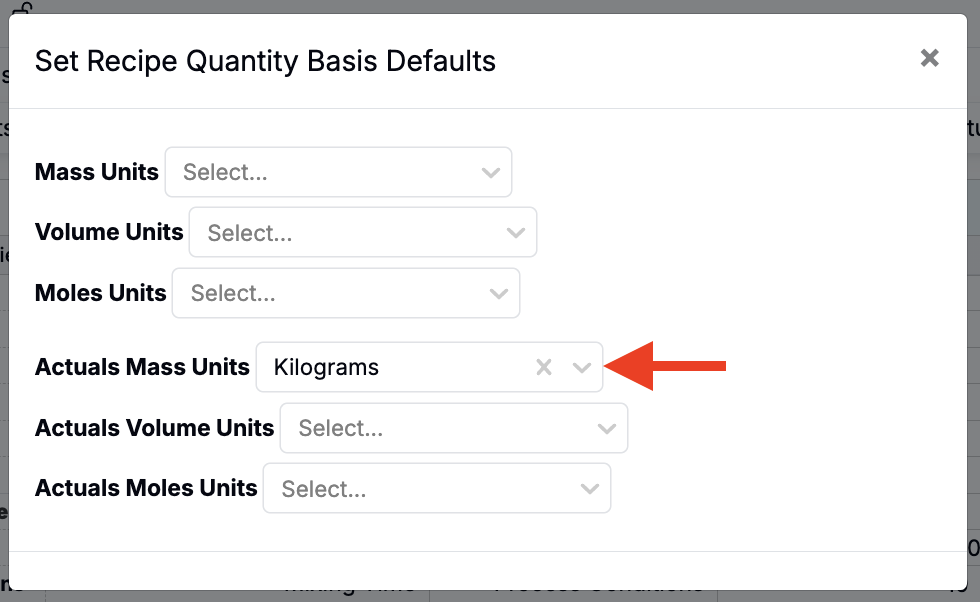
- The new defaults will apply only to that recipe’s total or step total and will override any workflow-level or material family defaults.
To learn more, refer to Basis Units.
Create New Ingredients Using the Chemical Structure Drawer
You can now use Uncountable’s chemical structure drawer tool when creating new ingredients.
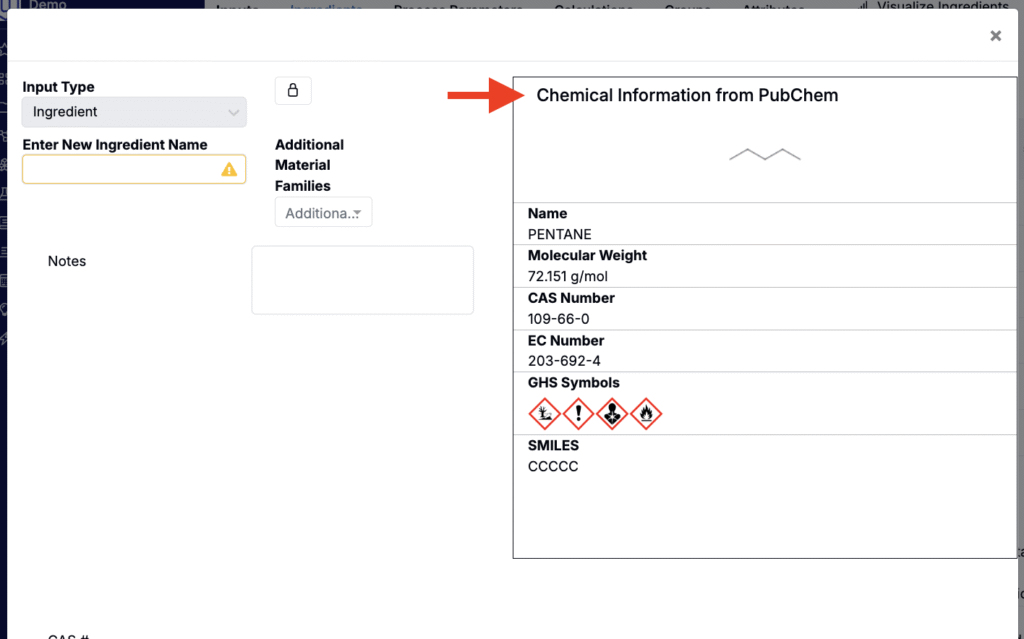
Previously, molecular structures and the drawing tool were only available on the Ingredient Details page. With this update, you can draw a structure when creating a new ingredient. The system automatically surfaces PubChem information, including chemical name, CAS number, and SMILES string .
This improvement speeds up onboarding for new chemicals and gives teams working with molecular structures a smoother, more integrated workflow.
How to use:
- Create a new ingredient.
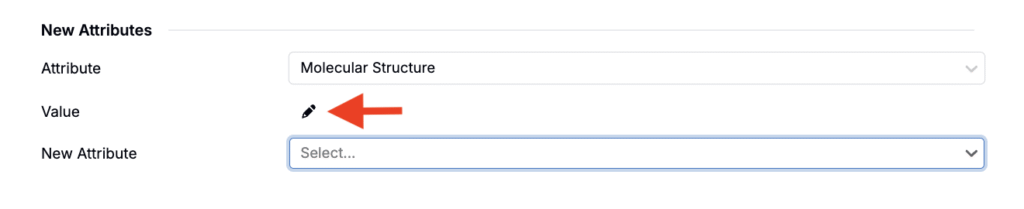
- Add a Molecular Structure attribute.
- Click the Draw icon to open the structure editor.

- Use the tool to draw your chemical structure.
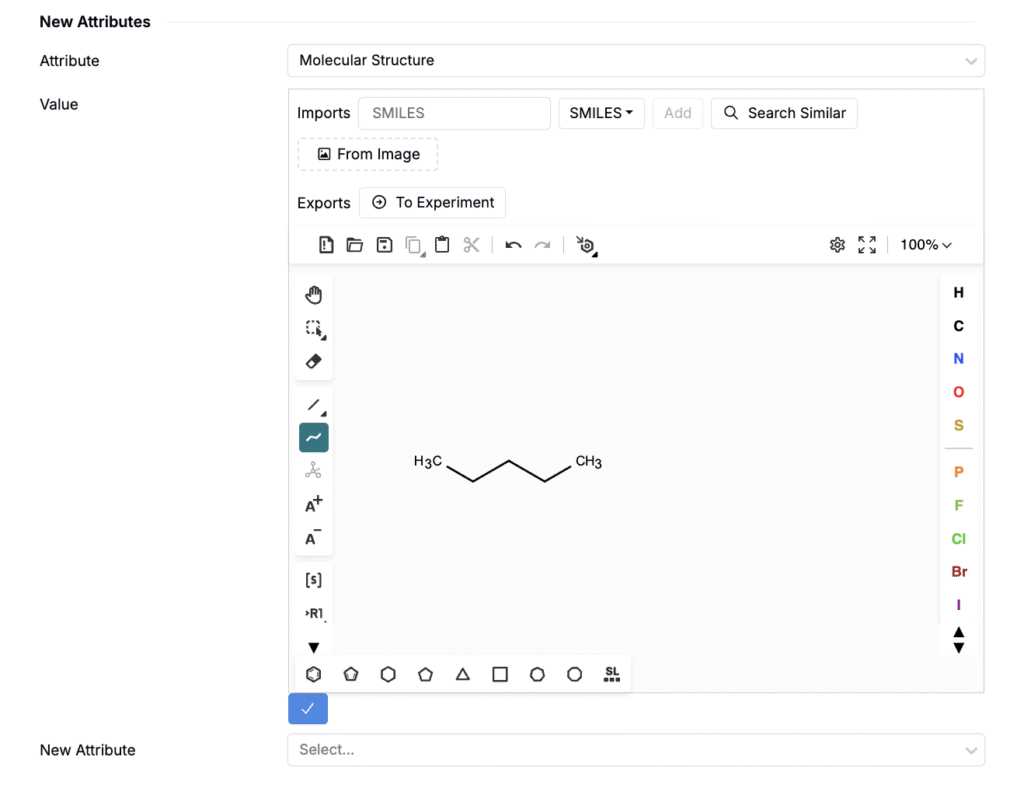
- PubChem information will automatically appear at the top of the modal.
In future updates, you’ll be able to auto-populate the ingredient name and other ingredient attributes from PubChem directly in the New Ingredient modal.
Copolymer & S-Group Support in the Chemical Structure Drawer
The chemical structure drawer tool also now supports more complex structures, including copolymers with monomer brackets and additional S-groups (special groups) for monomers, mixtures, and components.
Previously, monomers and certain special-group annotations could not be represented. With these additions, you can capture real-world polymer structures more accurately for when creating or managing chemical ingredients in Uncountable.
How to use:
- Add a Molecular Structure attribute to your new or existing ingredient.
- Click the Draw icon to access the chemical drawer.
- Use the S-group tools ([S]) to select molecules.
- In the modal, specify the S-group property Type and any additional details.
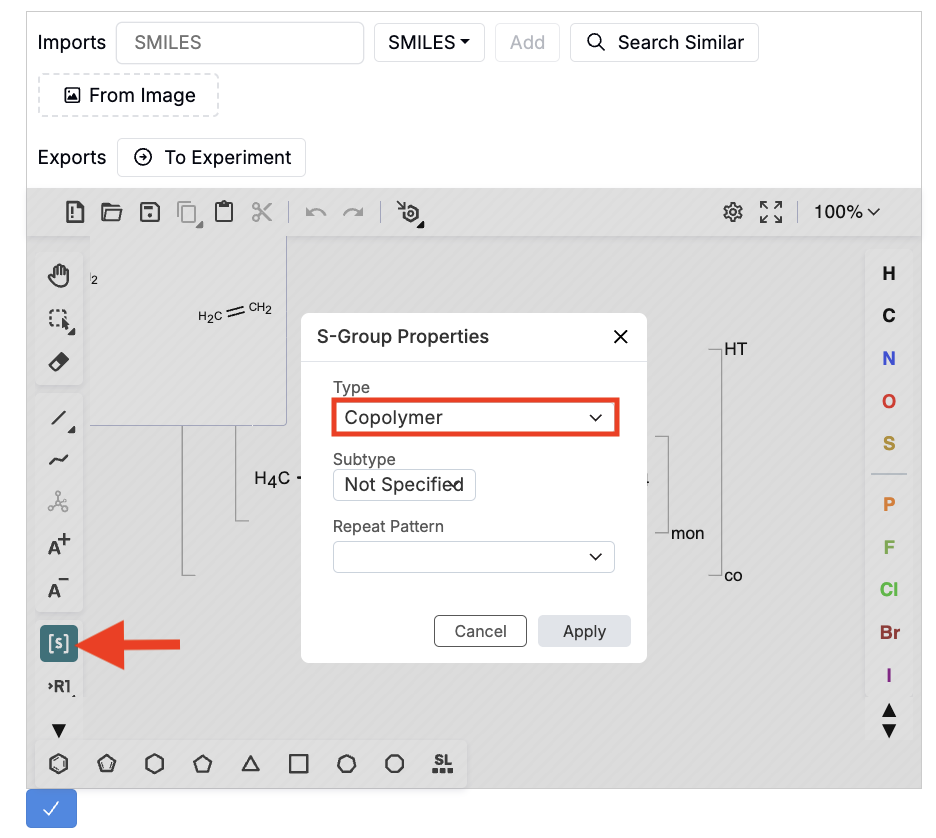
- Save to store the full annotated structure on the ingredient.
Copy Button on Text Fields
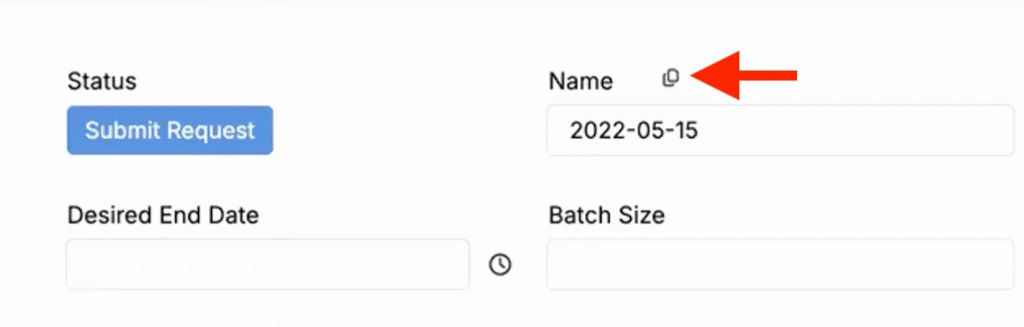
Text fields defined across the platform (e.g., Lab Requests, Approvals, custom entities) can now include an inline Copy button for one-click copying.
Previously, copying required manual highlighting. With this update, users can copy values to the clipboard in a single click—ready to paste anywhere inside or outside Uncountable.
How to configure:
- Open the Form Admin page and go to the Definitions tab.
- Create or select a text-based field.
- In Format Override, click Add Decoration.
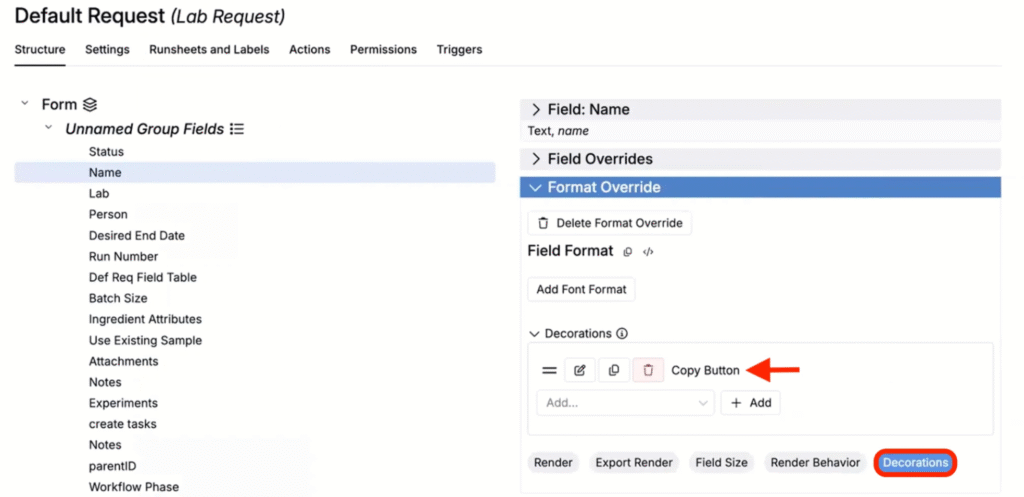
- Choose Copy Button and save.
On any entity created from that definition, a copy icon appears next to the configured field. Clicking the icon copies the field’s current value to the clipboard.
Note: This decoration applies to text fields. ID fields aren’t supported.
Import Amino Acids into the Chemical Structure Drawer Tool
You can now import amino acids directly into the chemical structure drawer tool by entering either their three-letter code or full name.
Previously, components could only be added via SMILES strings or manual entry. This update speeds up peptide library creation and ensures standardized naming across your workspace.
How to use:
- In the chemical structure drawer, set the Imports selection field to Amino Acid.
- In the field, enter the amino acid’s name (e.g. Arginine) or 3 letter code (e.g. ARG).
- Click add to add the acid to the drawer.
Notebook Auto-Refresh Intervals
You can now manually set notebooks to automatically refresh at defined intervals. When enabled, the notebook will refresh on the schedule you choose — keeping your all associated plots and data up to date in real time.
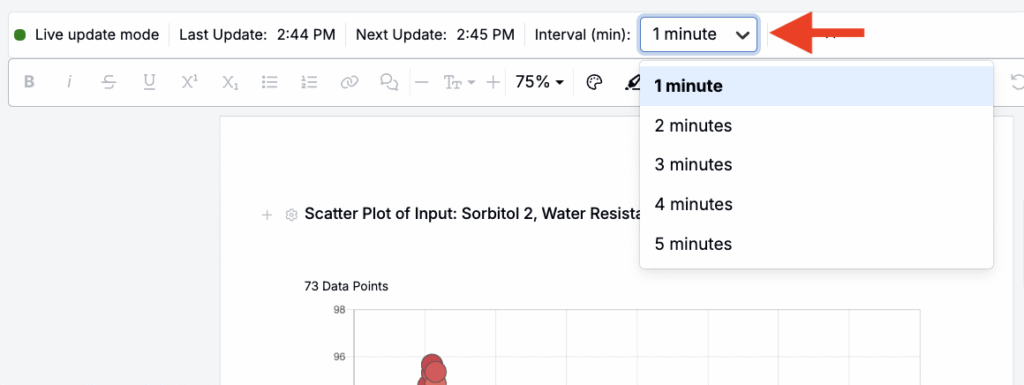
You can select refresh intervals of 1, 2, 3, 4, or 5 minutes, and each notebook can have its own unique setting. Once configured, the interval is saved with the notebook and applies for all viewers.
How to configure:
- Open the notebook and go to the View menu.
- Select Toggle Live Updates to add the refresh toolbar at the top of the page.
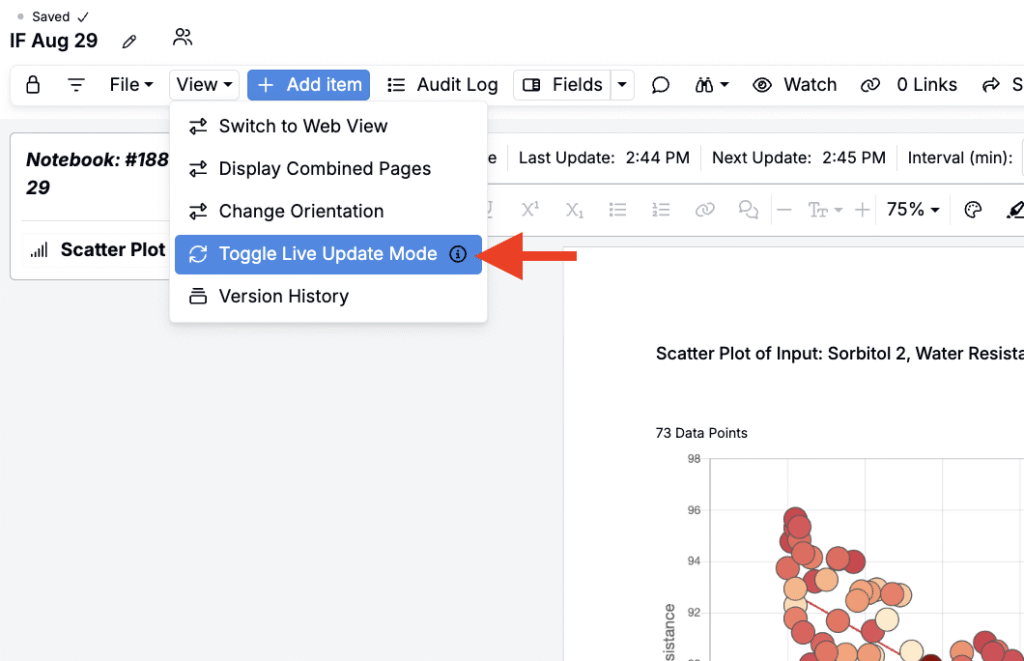
- Use the dropdown to choose a refresh interval (1–5 minutes).
Measurements on the Recipes Page
You can now view and edit measurement data directly on the recipe view of an experiment by adding a Measurements section to the data grid. The section appears beneath the recipe information in a distinct area, allowing you to review and update data without navigating away from the page.
Measurement data is fully editable inline, and replicates can be added by expanding an output and entering additional data points beneath the measurement value. This streamlines recipe-centric workflows, reduces page-switching, and makes it easier to compare results or enter data during active experimentation.
This update is part of an ongoing effort to provide a more consolidated recipe-and-measurements view of experiments, helping you work from a single, unified page.
How to use:
- Open the Sections Sidepanel.
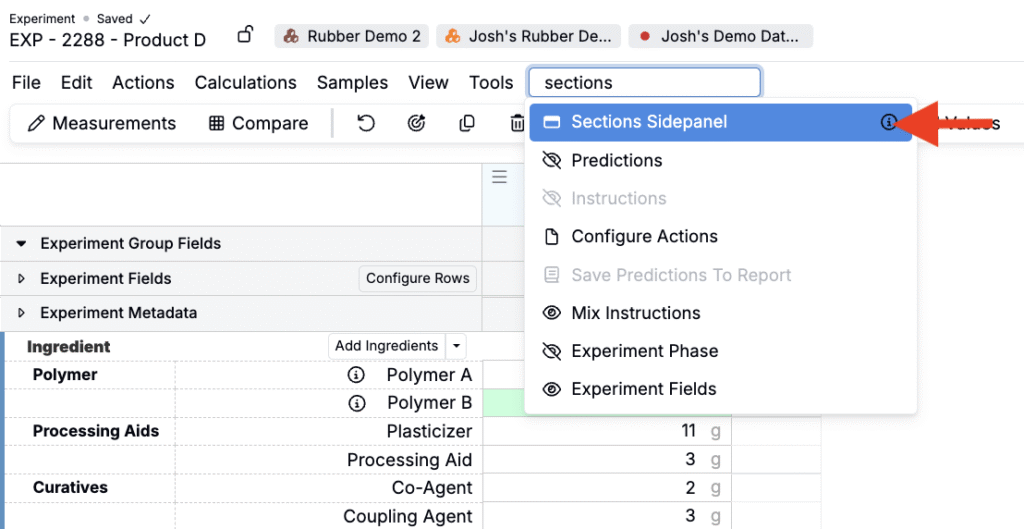
- Toggle on the Measurements section. The section will appear beneath the recipe data grid.
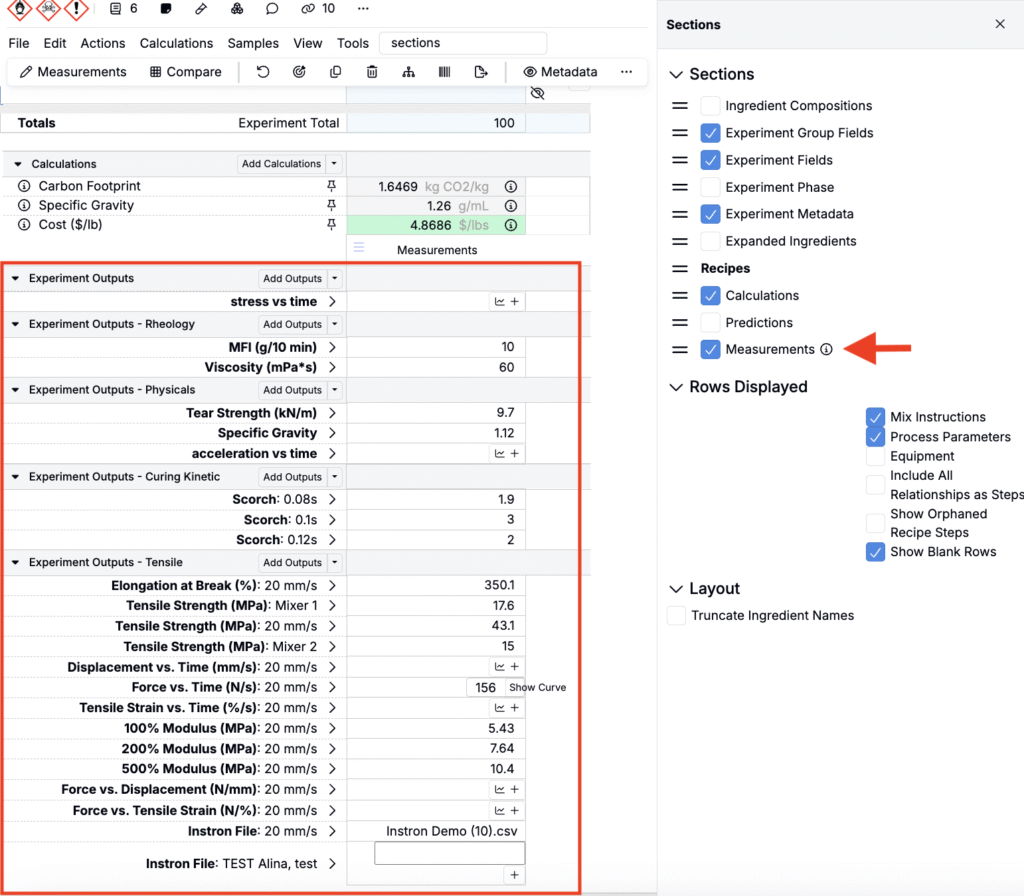
- Enter measurement values directly in the section.
- To add replicates, expand an output and add additional data points below the measurement value.
Experiment Links for File-Based Navigation
Several updates have been introduced to improve how users can organize experiments, projects, and notebooks using a file-and-folder structure in the Files sidepanel — an alternative to traditional project-based navigation. This approach makes it easy to group related experiments into collections and quickly open them without switching between projects.
Using the Files sidepanel, users can now:
- Create links to specific experiment sets as files.
- Add or remove experiments from an existing file.
- Click a file link to instantly open all linked experiments in the experiment view.
- Merge experiment files to consolidate multiple sets into a single curated file.
- Organize files into folders.
To learn more, refer to Experiment Links for File-Based Navigation.
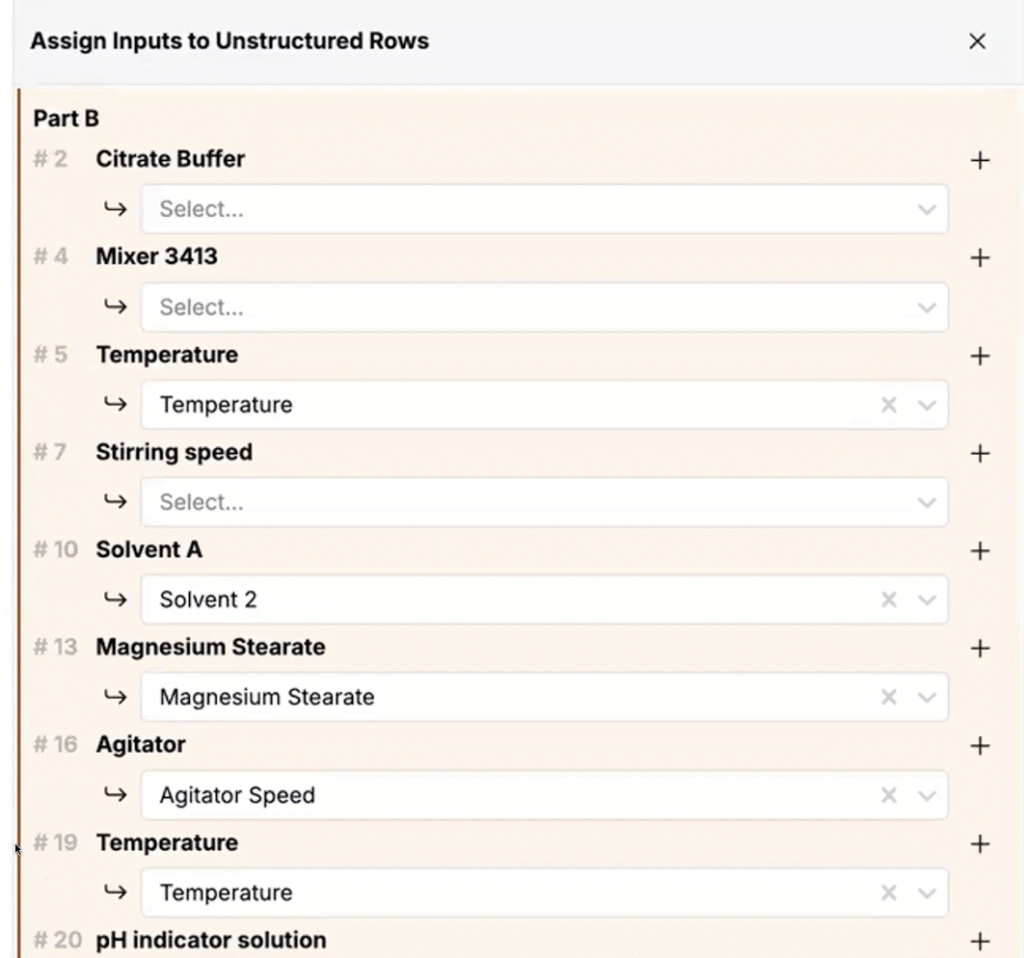
Convert Notebook Text to Structured Experiments (LLM)
A new LLM-powered tool converts natural language in notebooks into structured experiments.
The system analyzes notebook text, creating structured rows when a confident mapping exists and unstructured rows when it does not. Units are also respected wherever possible; if unit bases conflict (e.g., grams vs. milliliters against a fixed basis), the tool leaves items unstructured for review.
How to use:
- Open a notebook containing experiment procedure notes.
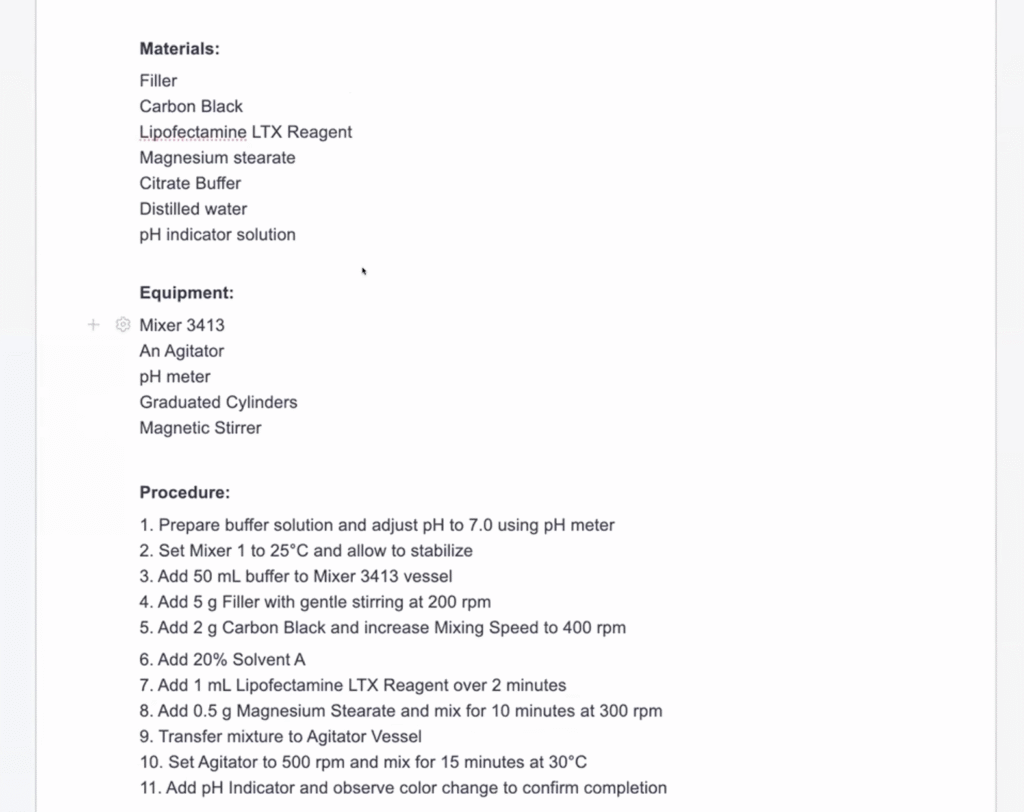
- Select File > Notebook to Experiment.
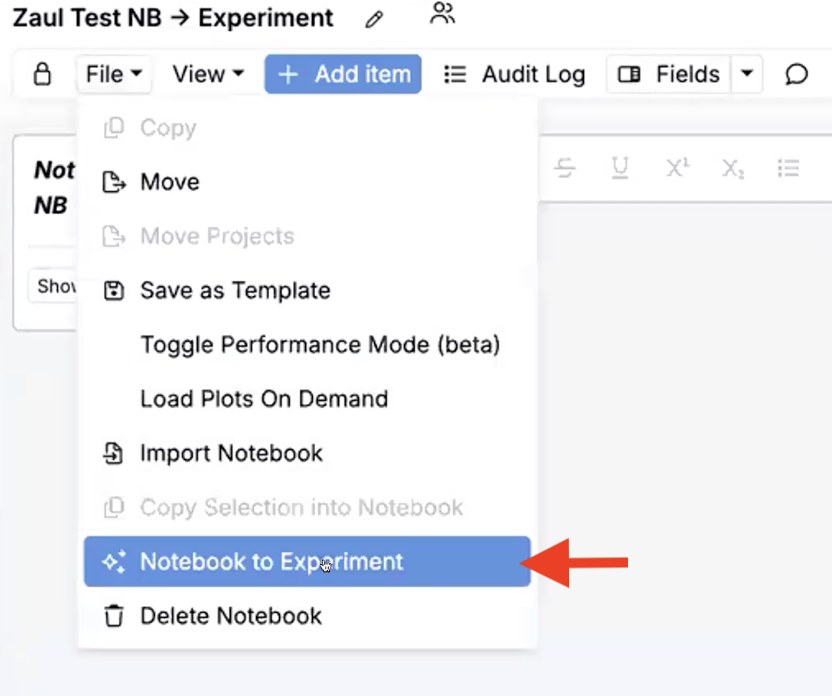
- In the sidepanel, select a notebook page and Workflow.
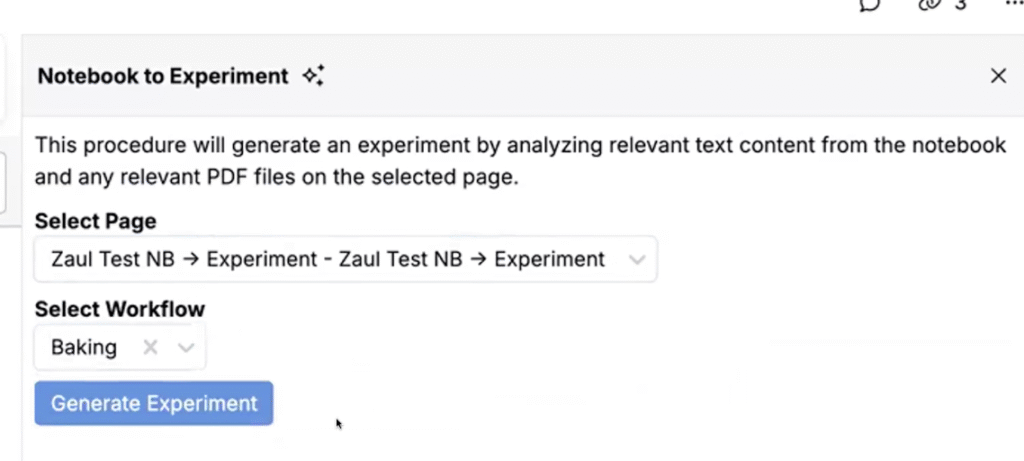
- Click Generate Experiment. You’ll be redirected to the new experiment with structured and unstructured rows clearly indicated.
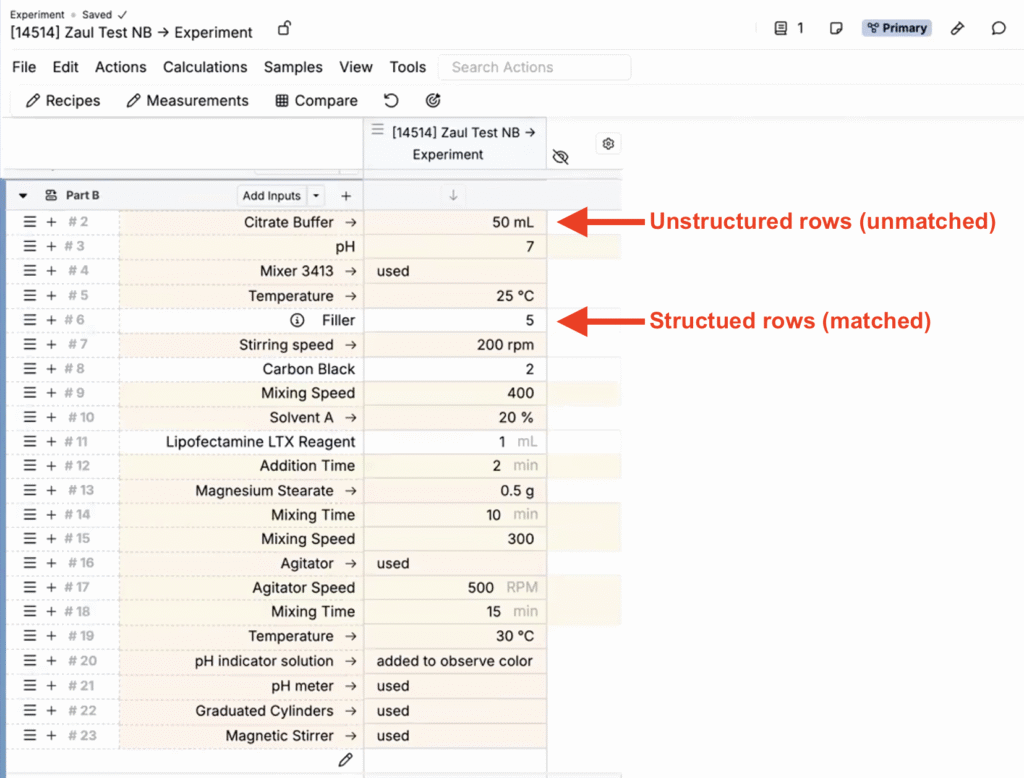
- Search for and select Assign Inputs to access the Assign Inputs sidepanel to finalize mappings.