Config Transfer Improvements
We’ve improved our Config Transfer feature to make it easier to understand what will be exported, where imported entity, trigger, or field is coming from, and why an export might be blocked.
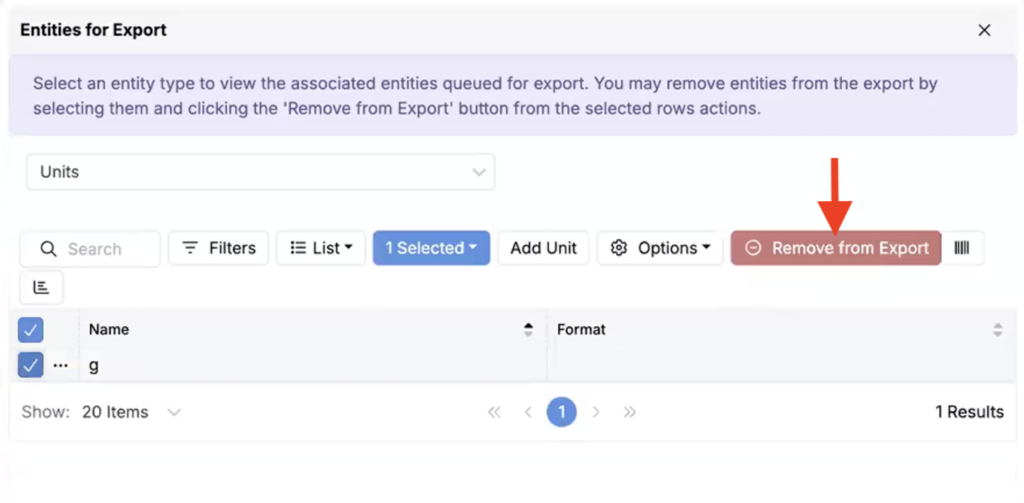
- Entities Listing — While reviewing an export, you can now click See Entities Listing to see everything that will be included. Use the field to select from different entity types. On the entities listing, review all entities of that type that will be exported.
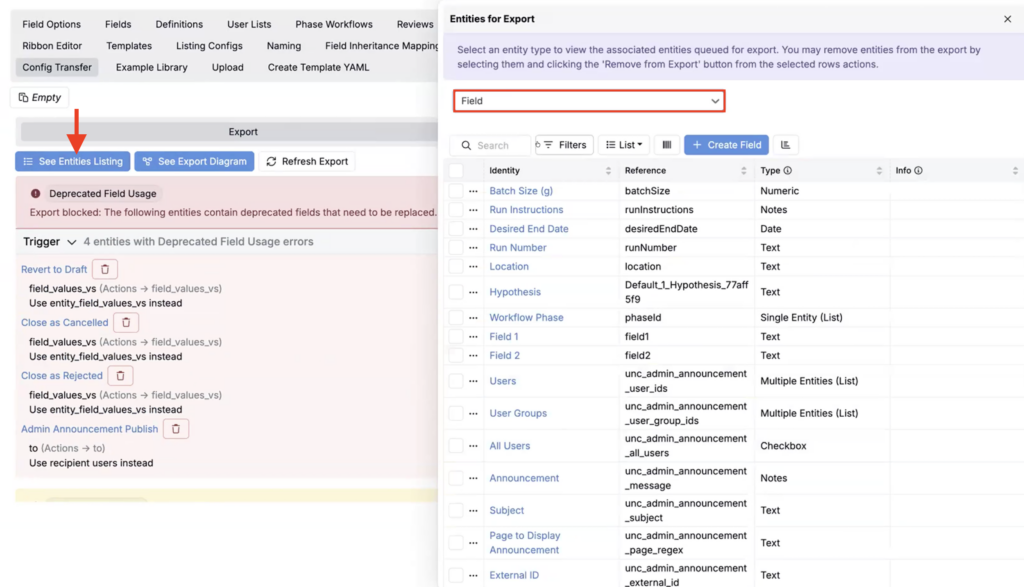
To remove an entity, select it from the listing and click Remove from Export.
You can also remove entities directly from the export page by clicking the red trash icon. Removing an entity creates an unbound reference, which can then be removed on import.
- Export Diagram — While reviewing the export, you can also now click See Export Diagram to visualize relationships across entities.
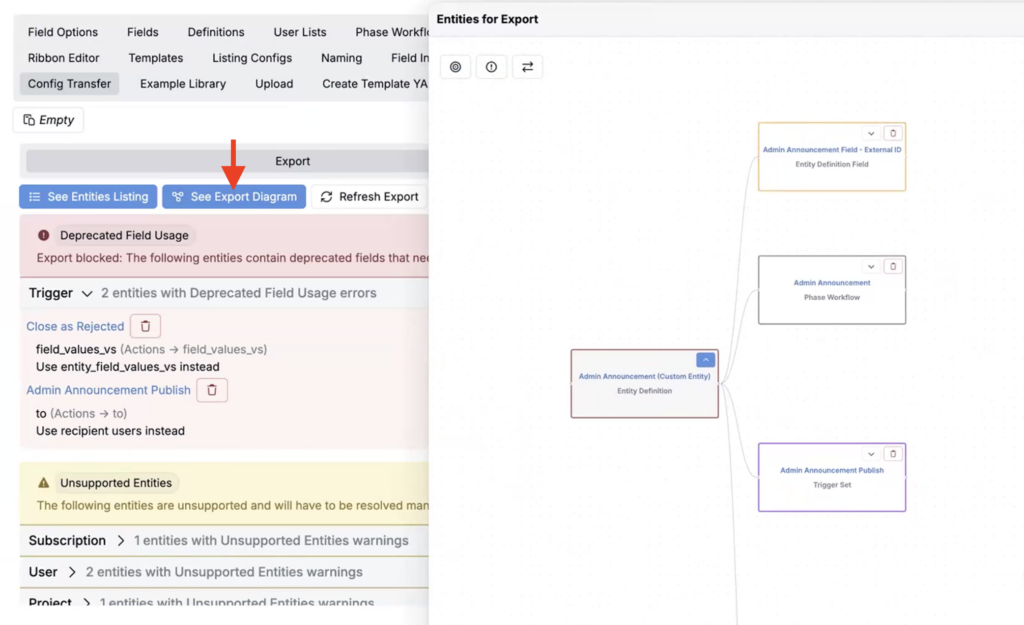
- Click the 🔼 icon to expand definition subtrees and view sub-entities (e.g. Phase Workflow > Phase > Phase Transition). Click the trash icon on a sub-entity to remove it entirely.

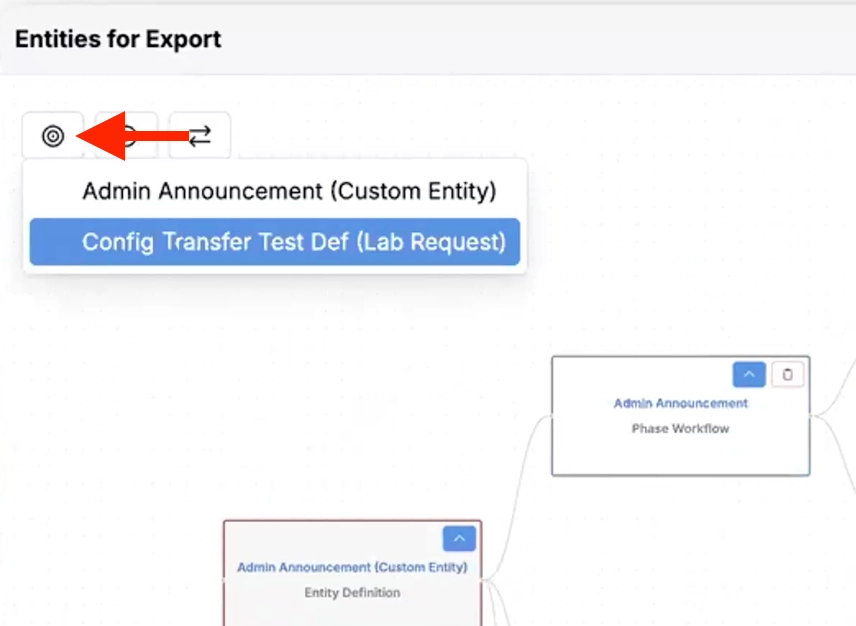
- Click the target icon to switch between source entities.
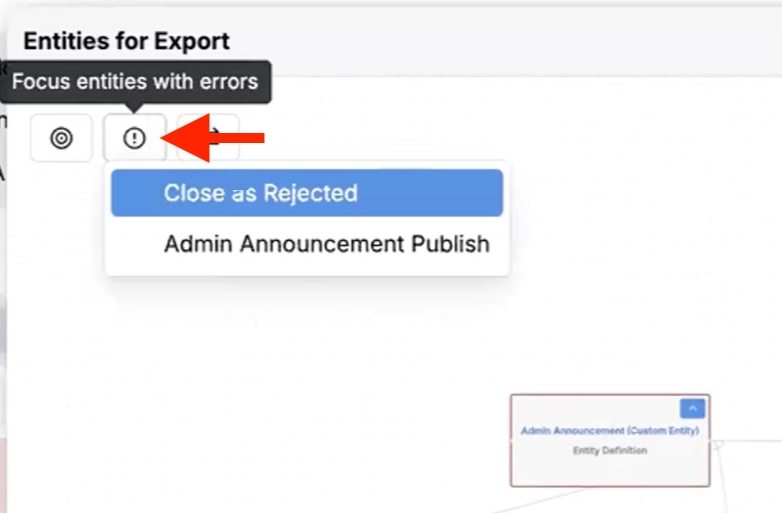
- Click the information icon to focus on entities with errors.
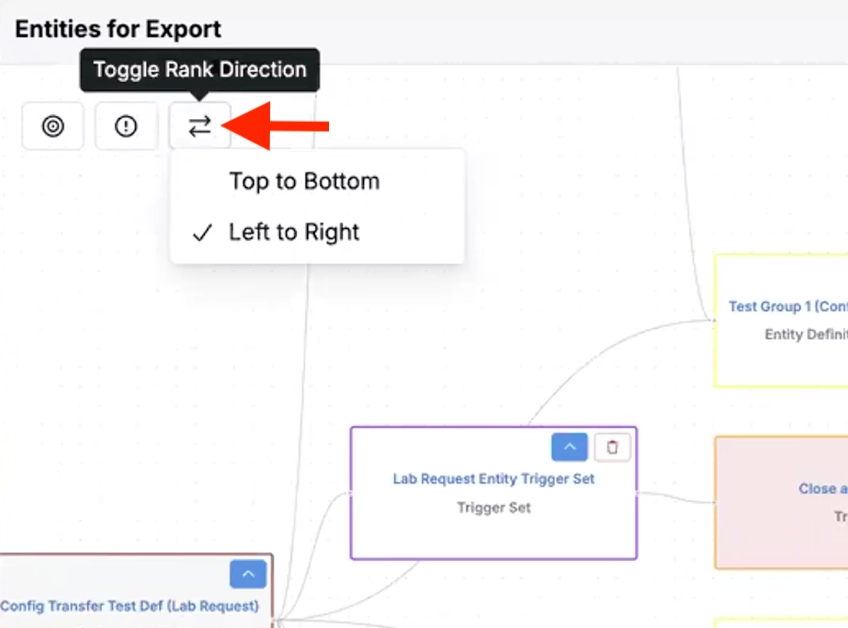
- Click the arrows icon to change the direction of the graph (Top to Bottom or Left to Right).
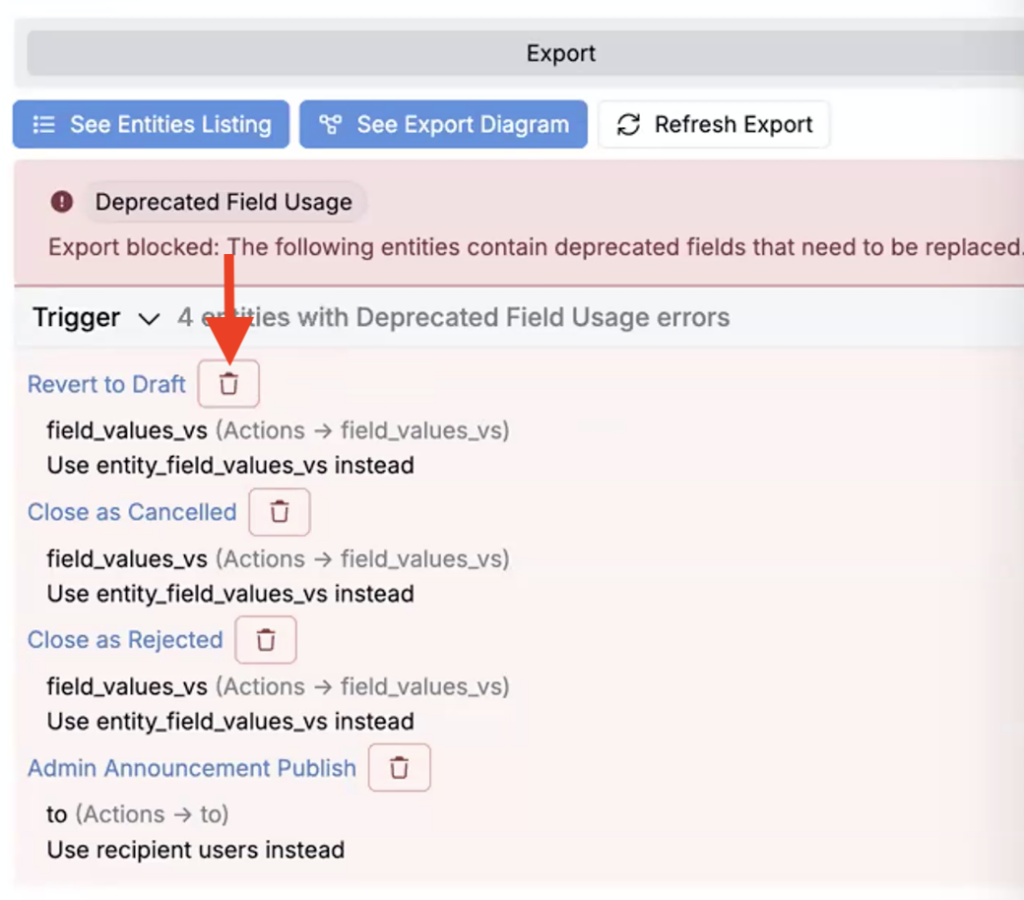
Previously, config transfers could be hard to debug because missing references or blocking errors were only surfaced late in the process. With this update, you get clearer visibility up front, plus tools to remove or resolve issues directly in the transfer interface.
Technician Entry Form Enhancements
We’ve improved technician entry forms, our technician-friendly experiment review entities that help techs validate outputs more quickly and reduce back-and-forth between detailed views. Updates include:
- Editable Quantity outputs column — On the outputs listing, we added an Editable Quantity column that technicians can use to enter or update output values. Updating values dynamically adjusts spec highlighting in the Goals column, making it easy to see how recorded values align with the configured spec ranges.
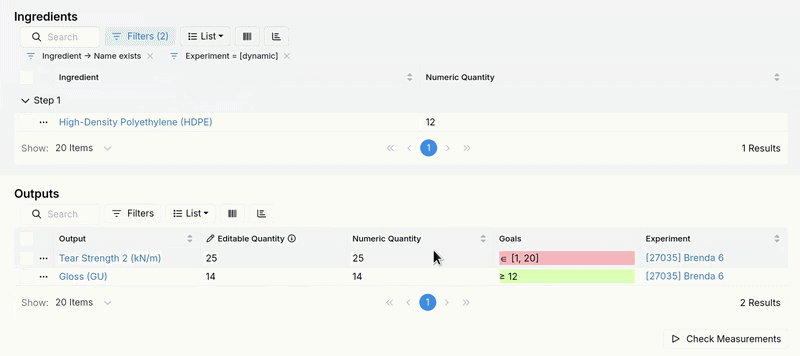
- Check Measurements trigger — We also added a Check Measurements button beneath the outputs table. Clicking it checks the spec and displays a pass or fail indicator beneath the table based on the recorded outputs.
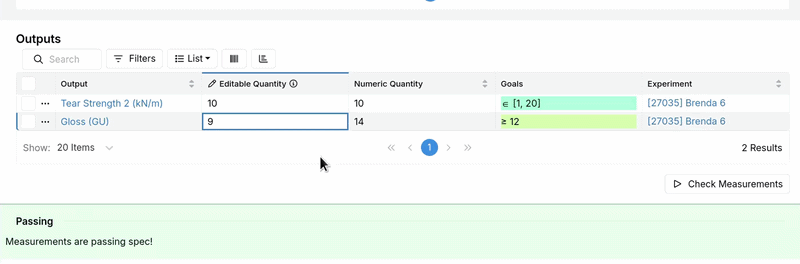
Previously, the simplified outputs table made it harder to compare values against specs without opening individual records or doing manual visual checks. With this update, you can bring more of that validation workflow into the listing itself.
This is especially helpful for high-throughput testing workflows, where technicians need quick visual confirmation that results are within expected ranges, and where “at-a-glance” pass/fail feedback reduces time spent rechecking or escalating issues.
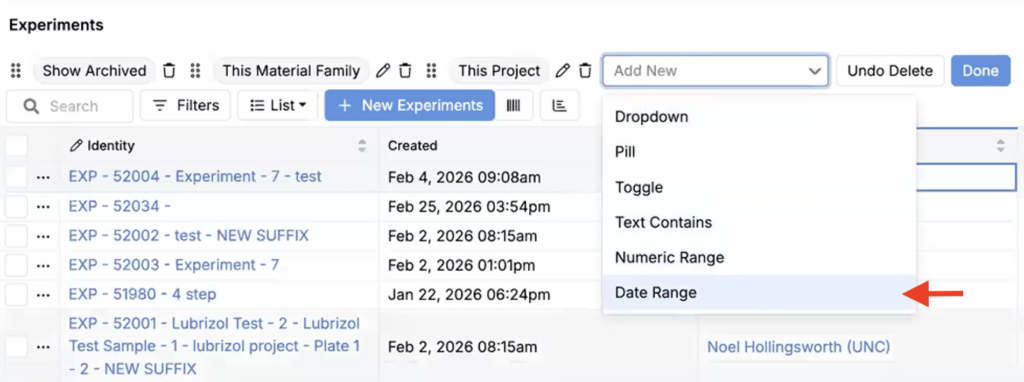
Date Filtering Updates (Week Filters)
We’ve added a new Weeks filter option to our existing date range quick filtering, so you can filter data by week number without manually selecting date ranges.
Previously, reviewing work on a weekly cadence required either custom date ranges or repeatedly adjusting start and end dates. With week filtering, it’s easier to jump to week-based slices of time, especially for recurring reviews and reporting.
This is useful for teams that track experiments, reviews, or production activity by week, and for anyone who needs consistent weekly comparisons across the current year.
How to use:
- On a listing, add a new Date Range quick filter.
- In the modal, select columns to filter.
- Within Extra Settings, toggle on the Select Weeks checkbox.
- Enter the start week week number and year.
- Enter the end week week number and year.
- Choose the week number you want to filter to.
- Save the filter to update the listing.

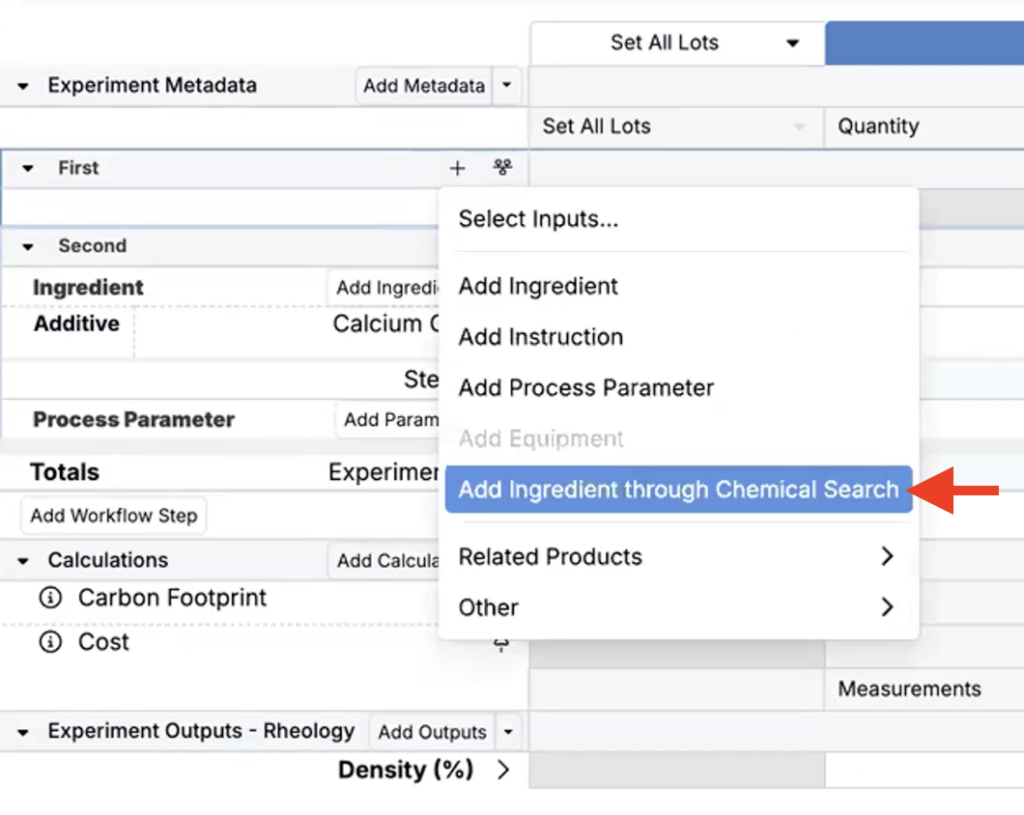
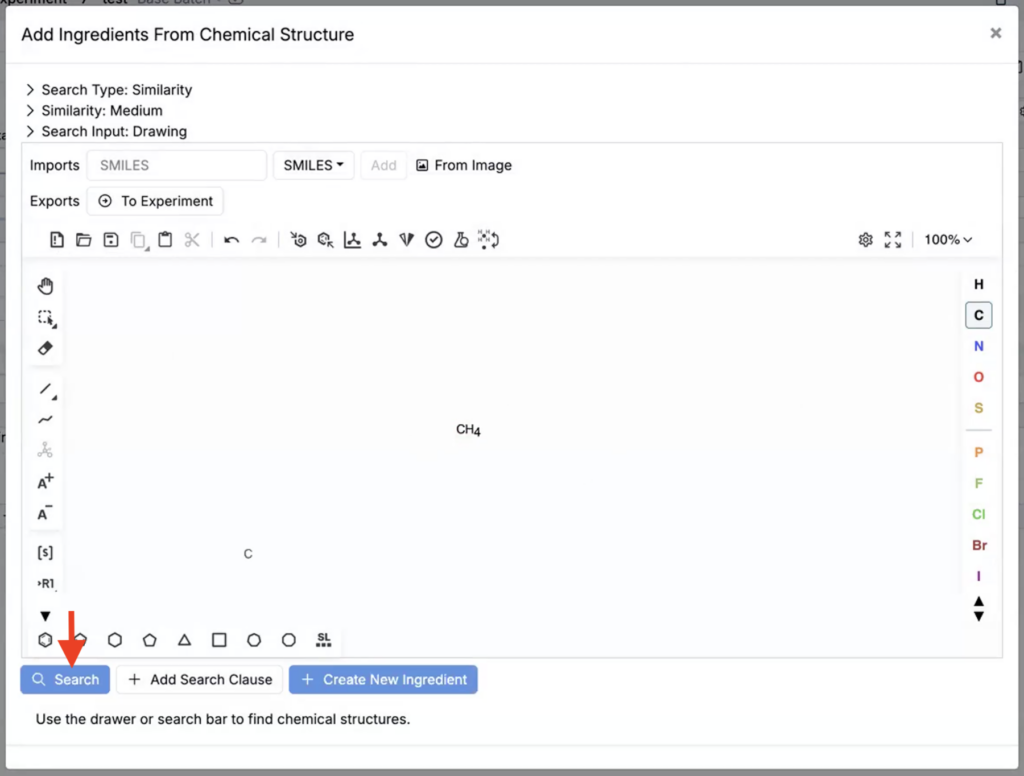
Add Ingredient Through Chemical Search (Chemical Structure)
We’ve added an Add ingredient through Chemical Search option to the Add ingredient dropdown on the Recipe view of experiments. This new tool allows chemists can draw a chemical structure to find an existing ingredient or create a new one when they do not know the ingredient name.
Previously, teams had to search by name or create an ingredient first, even when they already knew the chemical structure. With this update, you can start from a structure and move faster through ingredient selection and creation.
This is especially useful for chemistry-heavy workflows where ingredient names are unknown or ambiguous, and where consistency improves when ingredients are created from the same structure source.
How to use:
- On the Recipe view of an experiment, access the Add ingredient dropdown.
- Click Add ingredient through Chemical Search.
- In the modal, draw or paste the chemical structure in the structure box and click Search.
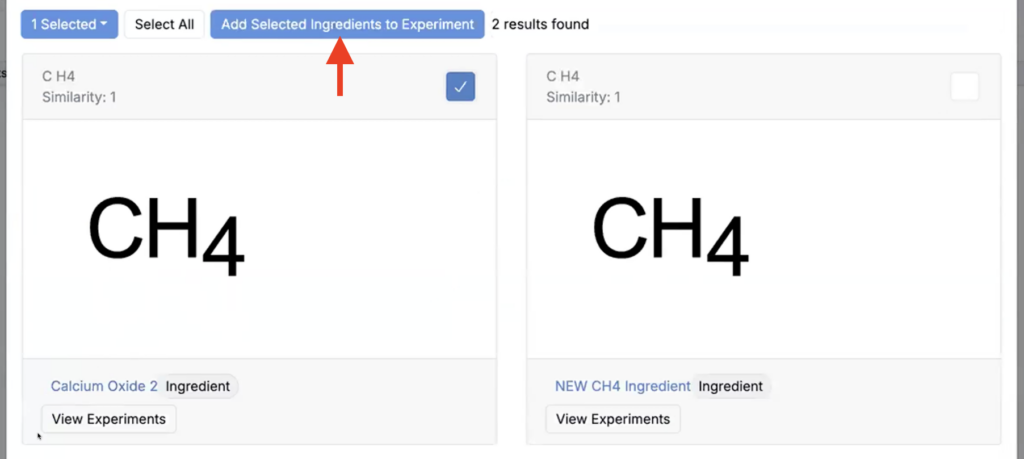
- If matching ingredients are found, you can select one or more and click Add Selected Ingredients to Recipe.
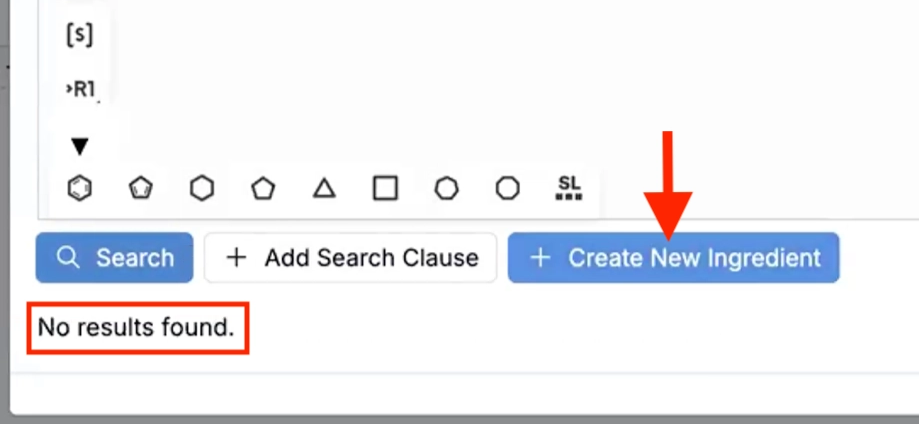
- If no matches are found, you will see a “No results found” message. You can then click Create New Ingredient to open the create ingredient modal, with fields auto-filled based on the drawn chemical structure.
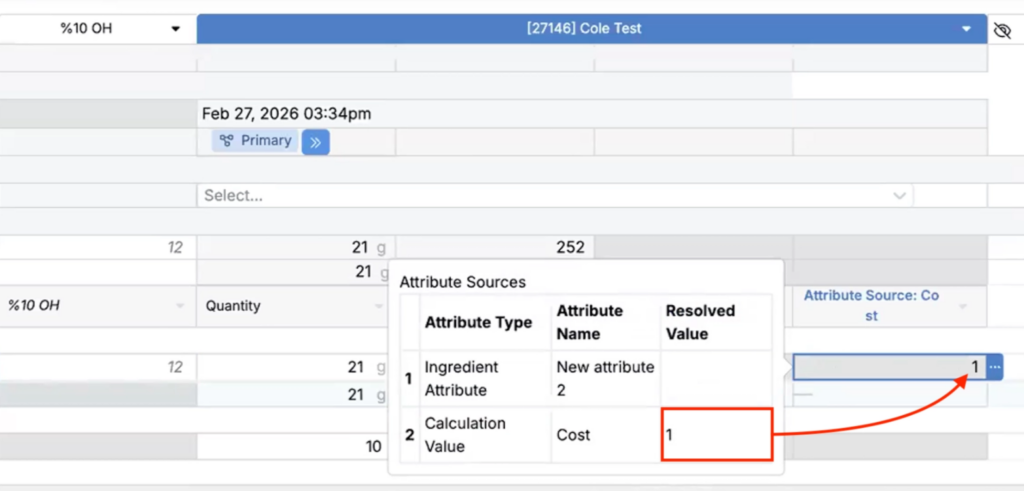
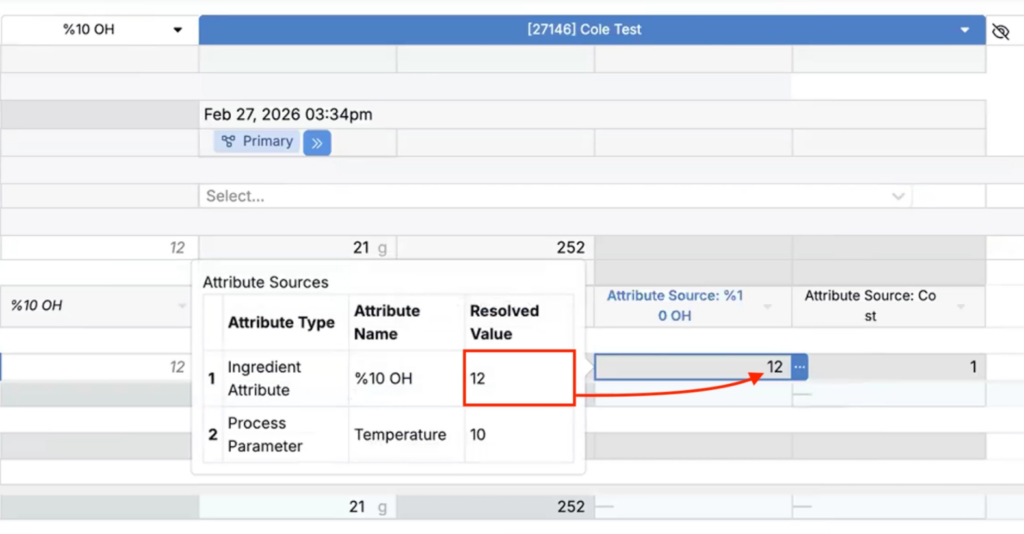
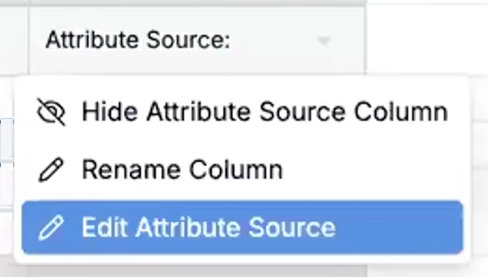
Attribute Source Columns
We’ve recently added support for attribute source columns on the Recipe view of experiments. This new recipe column type makes calculation debugging more transparent by showing which value was used after applying an attribute fallback stack.
Many input calculations resolve values by trying a prioritized list of sources for each recipe ingredient cell. For example, a calculation might try an ingredient attribute first, then fall back to a lot output, then fall back again to a recipe input attribute. Previously, that resolution was hidden within the Edit Calculation modal, which made it hard to audit and explain results at a glance.
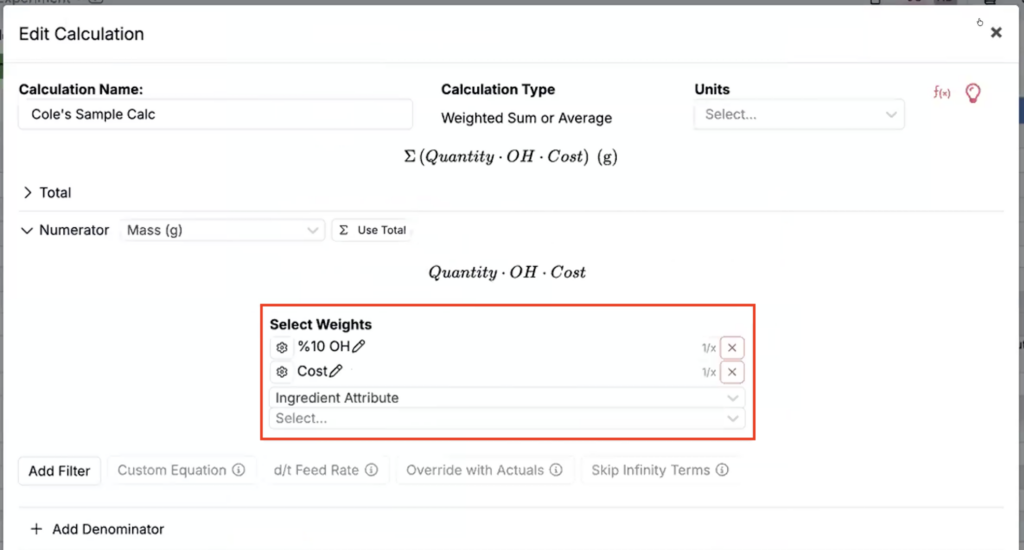
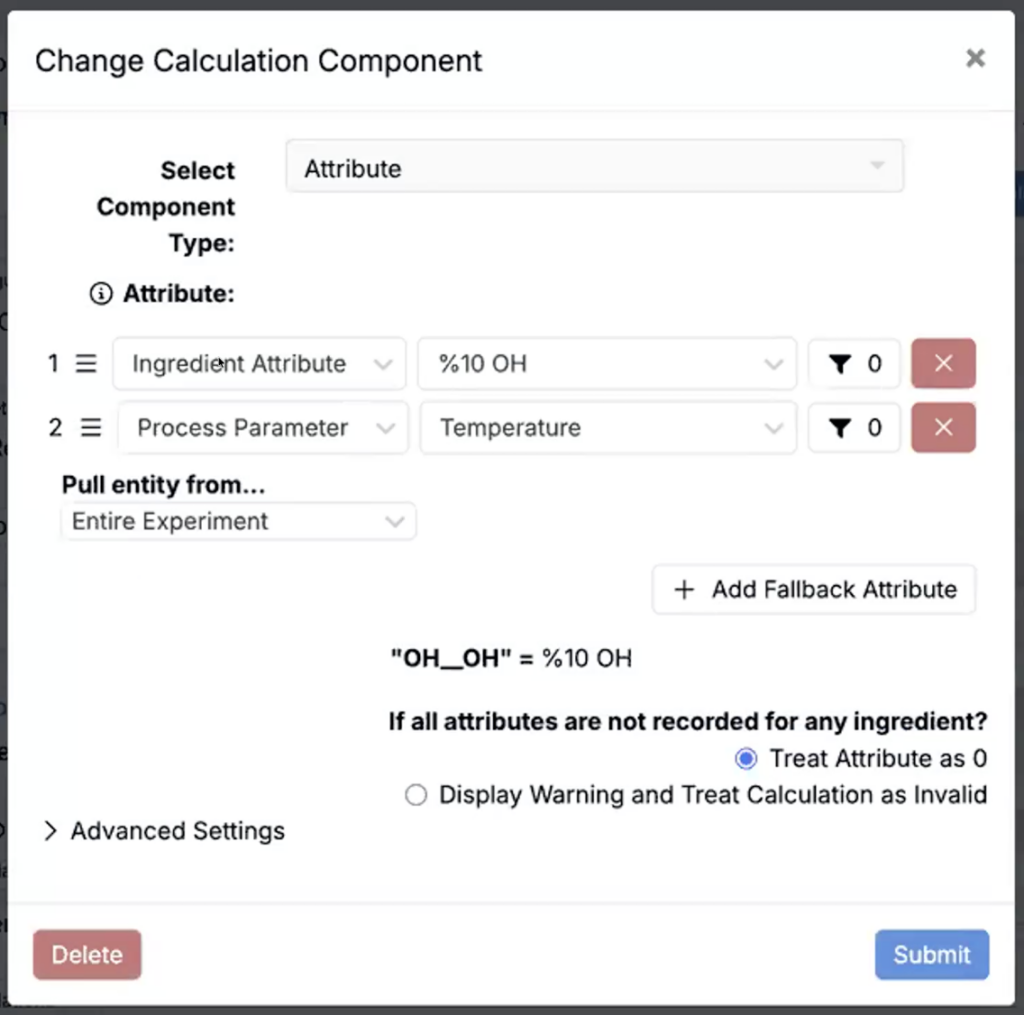
With this update, you can now display attribute source columns by clicking the input column calculation header and selecting Display Attribute Source Columns for Calculation.
Once added, the column header defaults to the calculation attribute, and the column contains the resolved values for each recipe ingredient after applying the fallback stack.
You can also add a blank attribute source column by selecting View > Columns > Add Attribute Source Column.
Once columns have been added, you can:
- Click the three dots on a cell to open the popover and review the full fallback breakdown to see how the attribute was resolved.
- Use the attribute source column header menu to:
- Rename the column.
- Edit attribute sources to change the fallback order or sources.
- Remove the column if it is no longer needed.
Attribute source columns are especially helpful for audit-friendly workflows and for troubleshooting cases where a calculation result looks surprising due to missing values, unexpected overrides, or recent configuration changes.
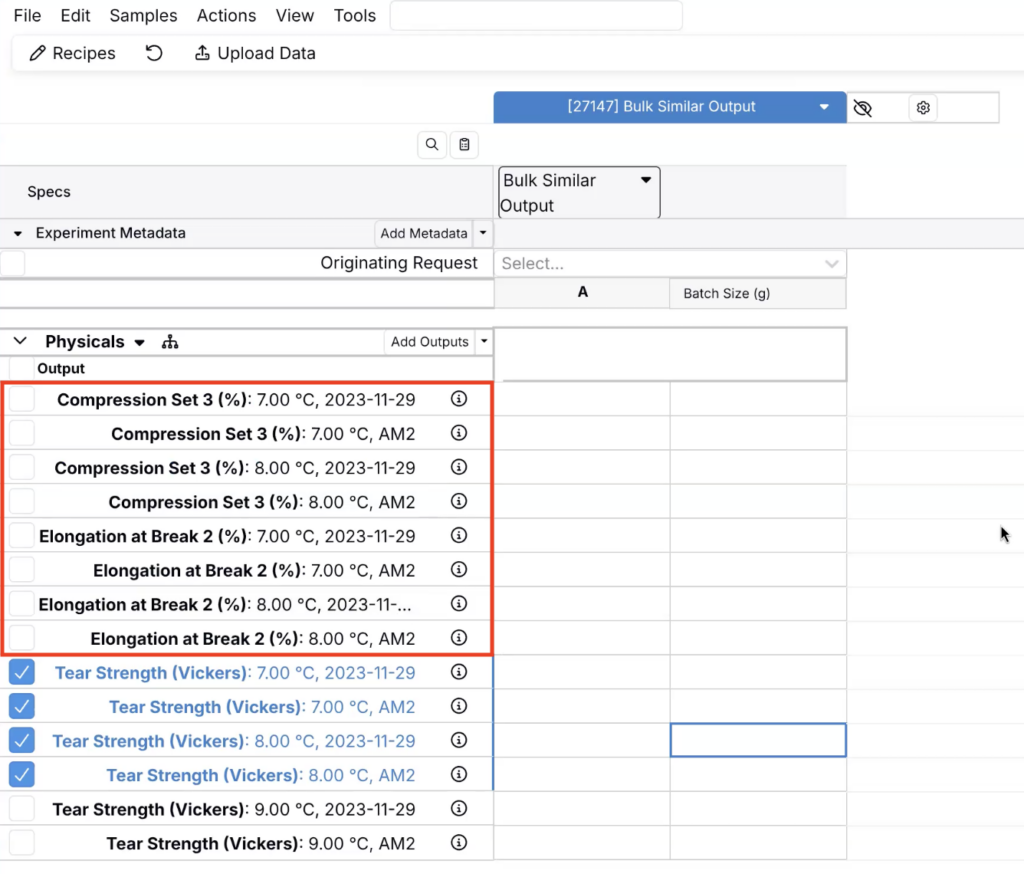
Add Similar Outputs with Condition Parameters
Uncountable users can now quickly add outputs to an experiment with a new Add similar outputs option, which creates new outputs using the same condition parameters as outputs already added to the experiment.
Previously, when you needed several output sets that shared the same condition parameter, you had to recreate those sets and reselect conditions manually. With this update, you can select a group of outputs and generate new output sets with the relevant condition already pre-selected.
This is useful for workflows with repeated measurements under consistent conditions, and for reducing setup time when building out standardized output structures.
How to use:
- On the Measurements view of your experiments, search for and select Toggle Select Rows.
- Select outputs that share the condition parameter you want to reuse.
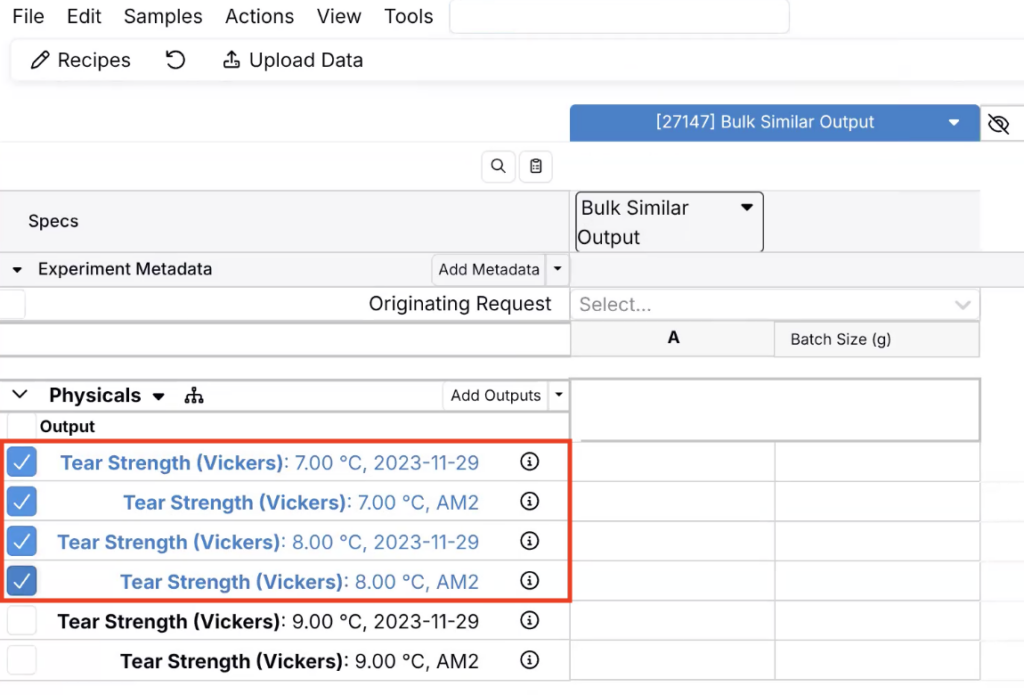
- Within the Operations on Row sidepanel, use the Add Similar Outputs section to select new outputs to add.
- Click Add Outputs.

- Review the new outputs and condition parameters.
Move Notebook Cells Between Notebook Pages
We’ve made a couple updates to improve notebook organization and configuration workflows.
Previously, reorganizing notebook content across pages could require manual copy/paste or rebuilding content. With this update, you can now move notebook cells between pages more directly, and cells will be placed below existing content on the destination page.
To do so, click any notebook cell’s ⚙️ icon to access its cell menu. Within the menu, select Within Notebook > Move to Different Page. Then select a notebook page to move to.
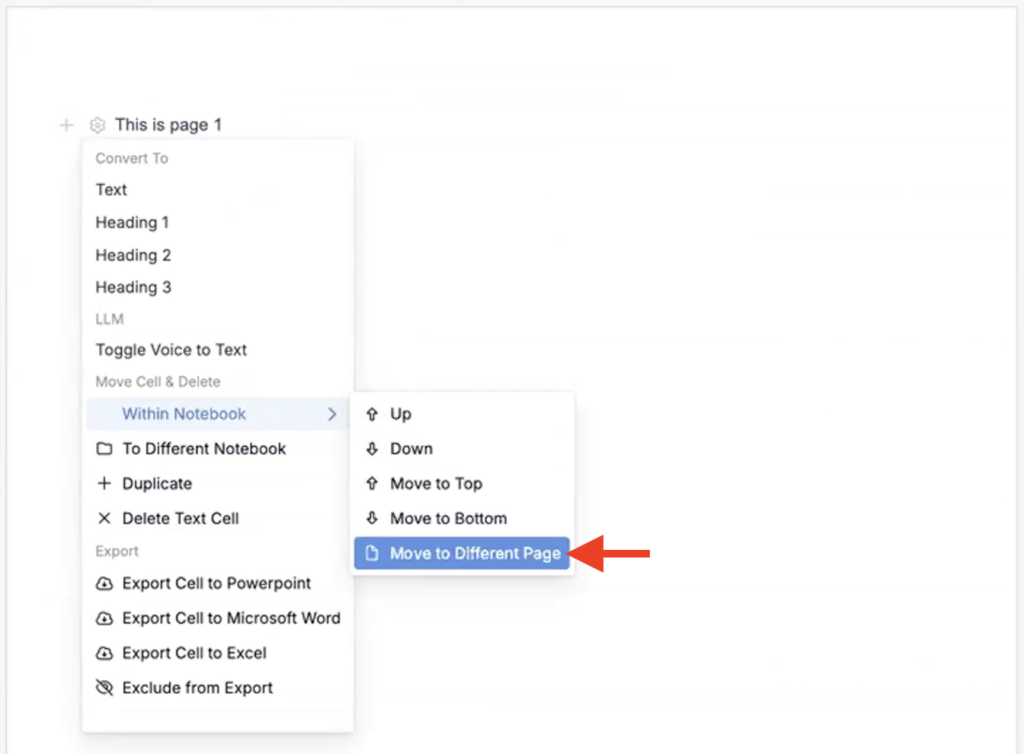
This is useful when standardizing notebook structure, cleaning up pages after experiments, or reorganizing content for reporting and review.
Recipe Data Sidepanel Improvements
We’ve made a couple improvements to the Recipe Data sidepanel to make recipe workflows faster to navigate and easier to use on smaller screens.
- Pagination — The sidepanel now supports pagination at both the experiment and workflow level, so you can move through longer experiments without excessive scrolling. Use the left and right experiment arrows to navigate between experiments in view. Use the left and right workflow step arrows to navigate between experiment workflow steps.
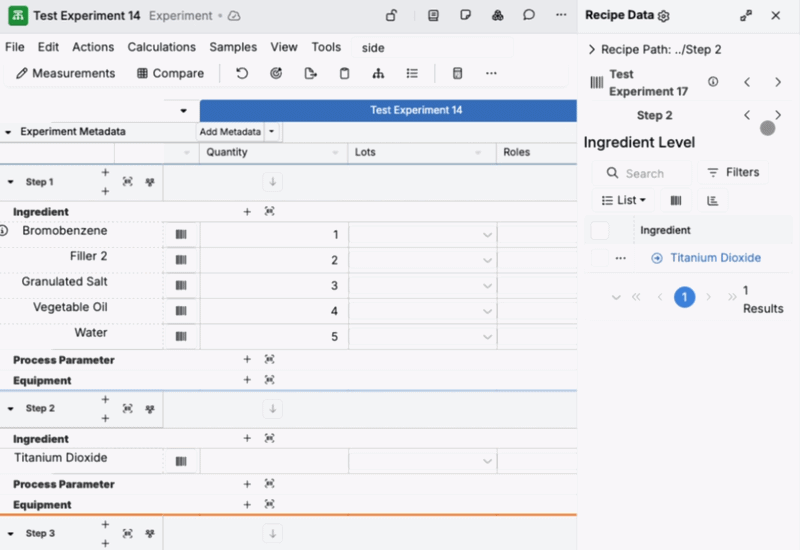
- Add ingredient by inventory barcode — When you enter or scan an inventory barcode in the sidepanel, you can now automatically add that item as a new ingredient. To do so, select a workflows step and confirm. After adding it, the sidepanel automatically navigates you to the newly added ingredient.
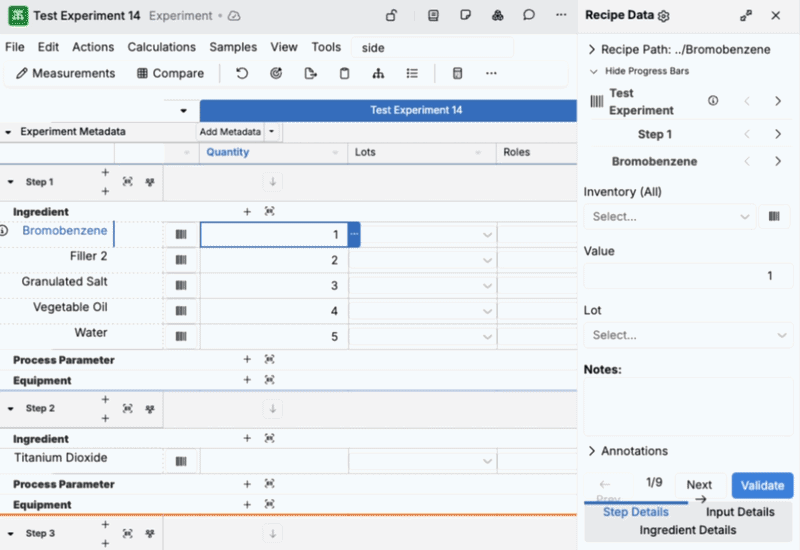
These updates are especially useful for teams that rely on the side panel for day-to-day recipe edits, including mobile-heavy workflows (e.g. scanning barcodes on the go).
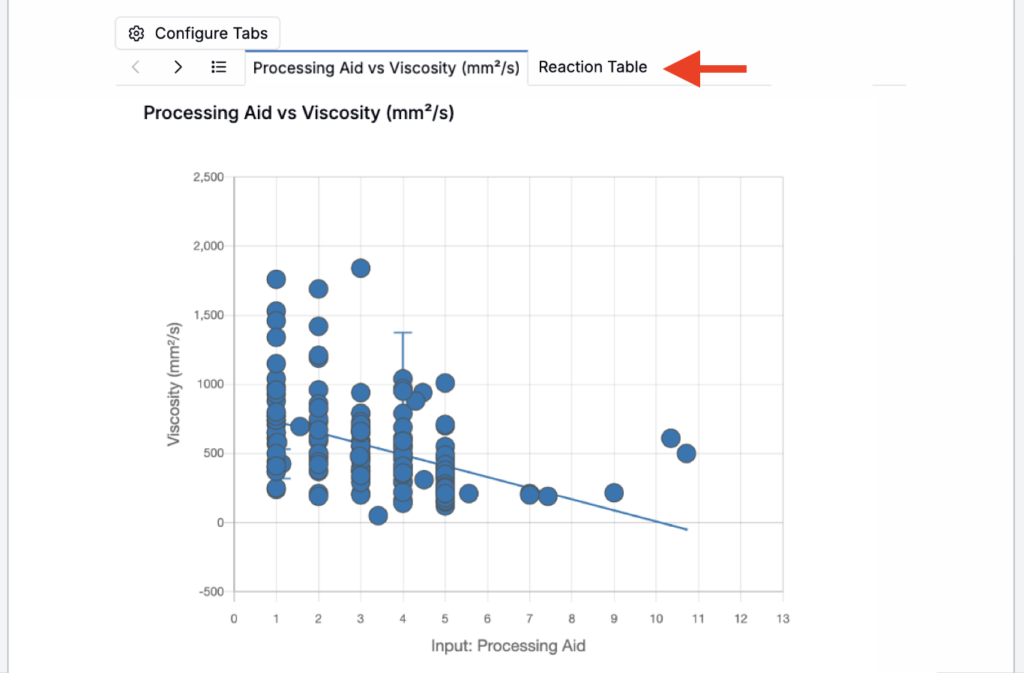
Stacked Cells in Notebooks
You can now combine multiple notebook cells into a single stacked cell, where each element appears as a tab within one cell.
Previously, if you wanted to keep related notebook content together (e.g. a chart and the supporting table), you had to place separate cells one after another, which made notebook pages longer and harder to scan. With stacked cells, you can group those elements in one compact unit while still keeping each element easy to access.
How to use:
- On a notebook page, add a new cell.
- From the cell menu, select Stacked Cell.
- Click Configure Tabs.
- In the modal, select the elements you want to stack into the same cell.
- Click Submit.
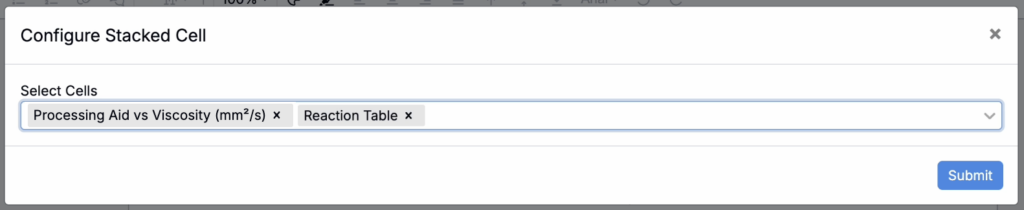
- In the notebook, use the tab headers to switch between the stacked elements.
Refresh Notebook Tables
We’ve added new ways to refresh notebook table content so it stays in sync when underlying data changes.
For example, if a table references a field through value spec and that field value changes, the notebook table can refresh so the updated value appears. Or, if a notebook table points at recipe data, and the underlying recipe content changes, the notebook table can refresh to reflect the new recipe values.
This helps for reporting and review notebooks, where tables need to reflect the latest underlying values without extra manual cleanup.
How to refresh:
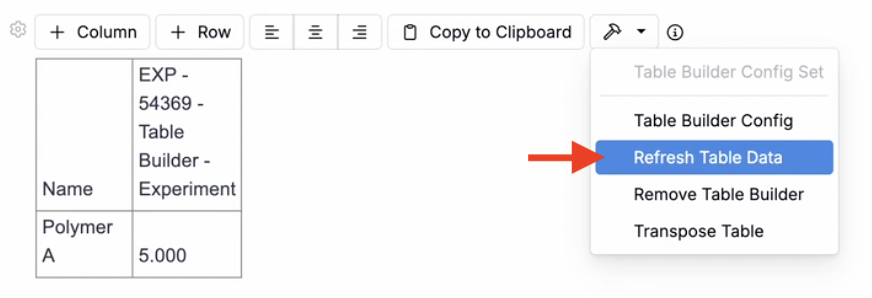
- In the notebook, click the 🔨 icon.
- Select Refresh Table Data.
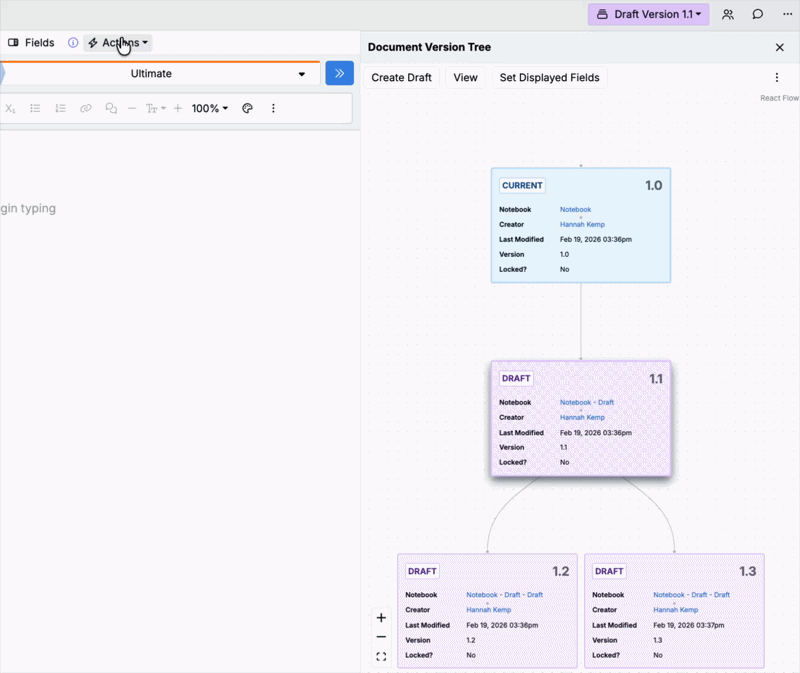
Document Versions for Notebooks
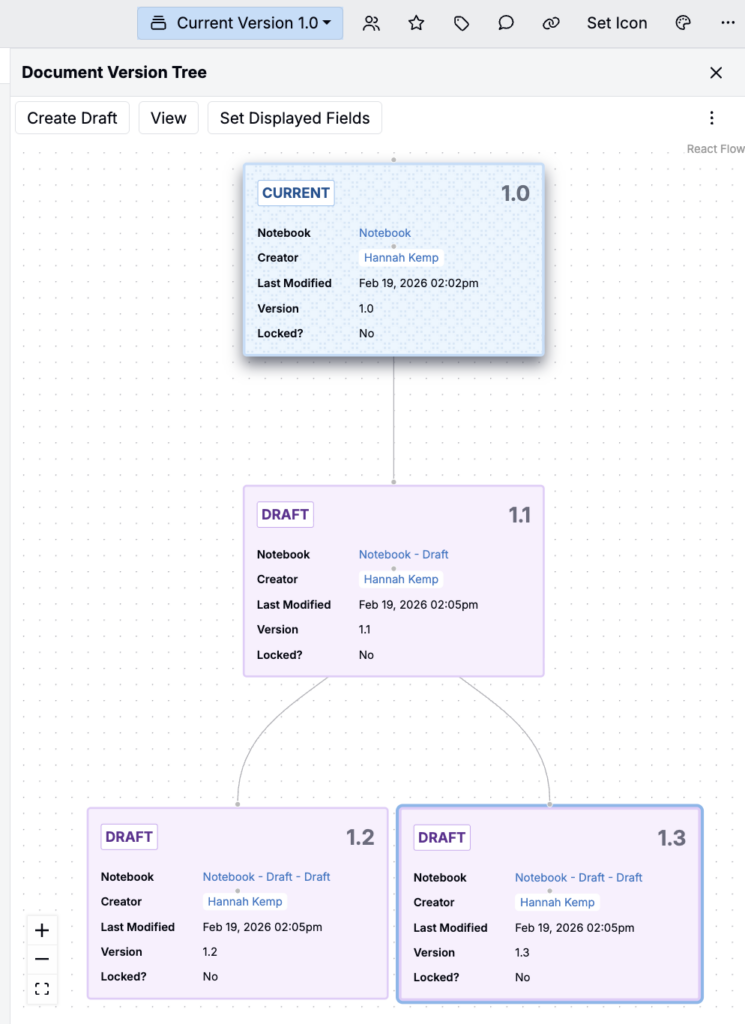
We’ve introduced document versions for notebooks, giving you a document version tree sidepanel with a flowchart view of how versions and drafts relate. This makes it easier to iterate on notebooks and it supports review-heavy workflows where teams need a clear audit trail of changes made over time.
In most workflows, teams should treat the Current version as the approved source of truth, then create a Draft to make changes and review updates before promoting that draft to Current. Drafts can also be created from any prior version when you need to branch from an older baseline.
How to use:
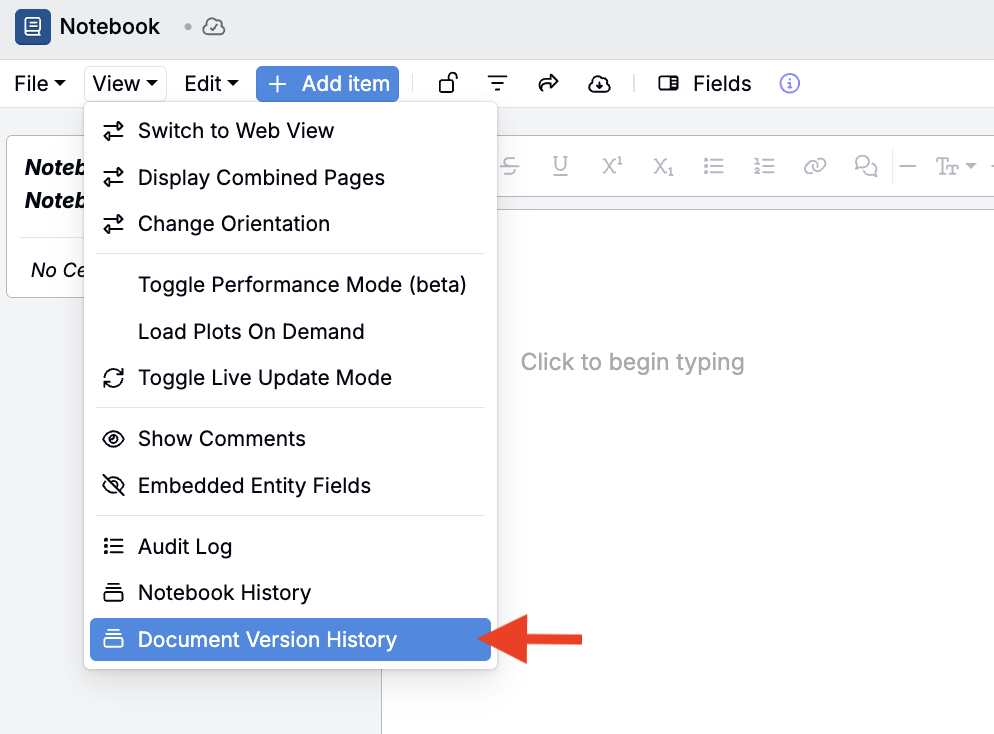
- To open the Document Version Tree sidepanel, click View > Document Version History.
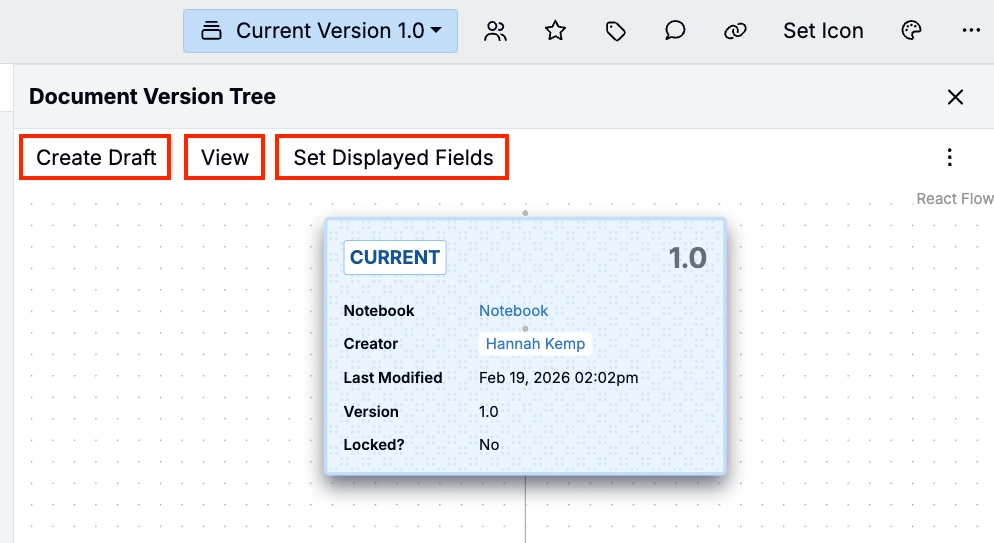
- To create a new draft, click Create Draft on the current version (or any version).
- To view and edit a version or draft, select it from the tree and click View or click the notebook name in the tree.
- To change which fields are displayed within the tree, click Set Displayed Fields.
- To set a draft as current, select the draft and run the Set Current action (Actions > Set Current). Note that this entity action must be configured on your notebook definition. To request this set up, contact your dedicated Uncountable team member.
Entity Definition Transitions
You can now change the definition of an entity using entity definition Transitions, allowing supported entities to move from one definition to another. This reduces rework when a project evolves, since teams can keep the same entity (and its history) while moving it into a new workflow or structure.
Previously, definition changing was limited to experiments and ingredients. With this update, any entity type with multiple definitions can support transitions if configured in Form Admin.
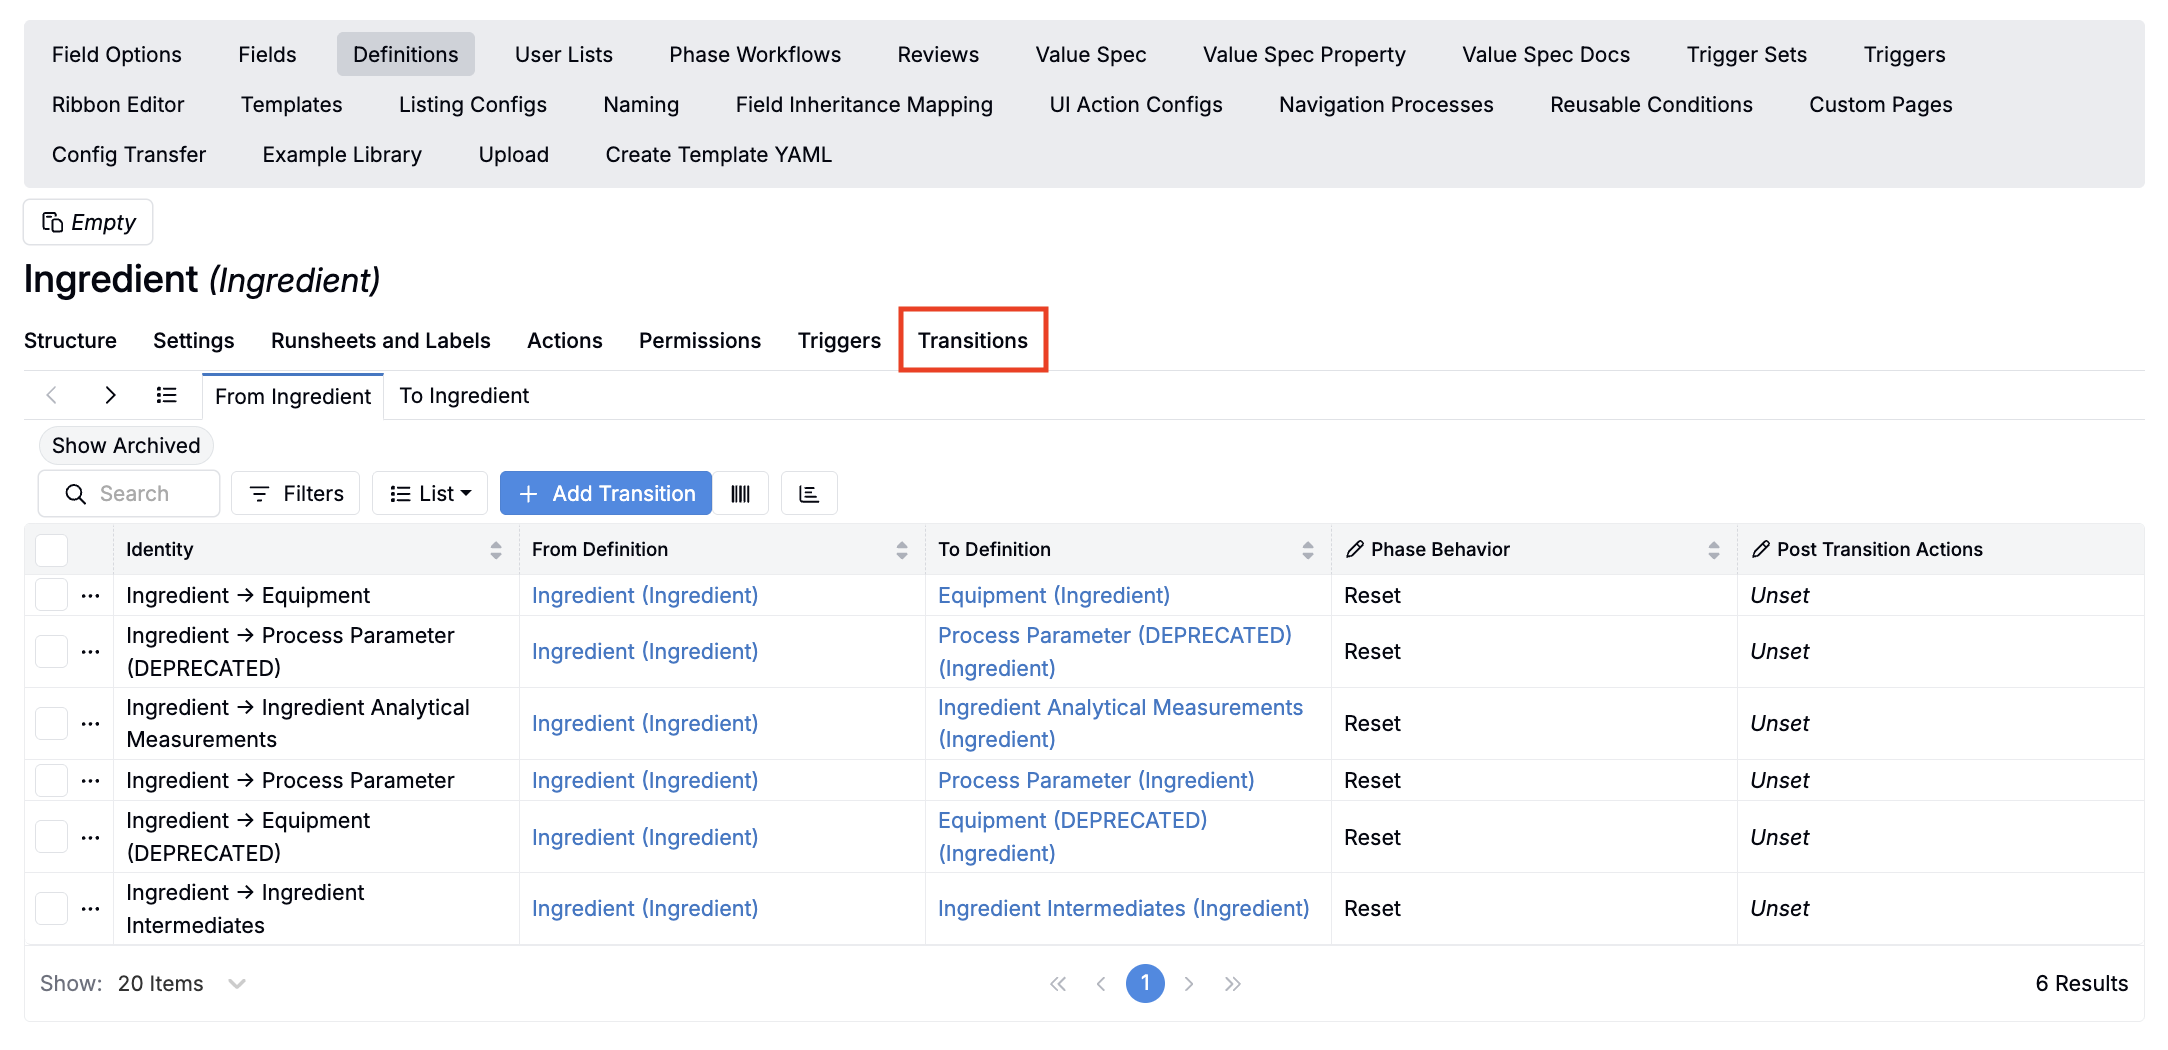
Setting up an entity definition transition:
- Create a new “To” definition (e.g. Hannah Ingredient) in Form Admin.
- Navigate to the “From” definition (e.g. Ingredient) in Form Admin and open the Transitions tab.
- Click Add Transition.
- In the modal:
- Add a transition Name
- Select the To/From Definition (depending on the type of transition you are making).
- Select a Phase Behavior:
- Reset resets the entities phase workflow to the first phase
- Initiate attempts to match the entity’s current workflow phase to a similarly named workflow phase on the new entity (if it cannot be matched, it will reset to the first phase)
- Add optional trigger actions (e.g. notifications, set values)

Running an entity definition transition:
- From the entity’s header, click the entity name.
- In the popup, select Change Definition (pencil icon).
- In the modal, select from available entity definition transitions.
- Click Save.
- Choose a configured transition.
Process Parameters: Single Select and Multi-Select
We recently deprecated the Categorical type for process parameters. Now, to create categorical parameters, users should choose between the Single or Multi-Select parameter type. This requires ID source configuration during creation, which is useful when you want standardized centrally managed option sets.
This change improves consistency across filtering, reporting, and downstream tooling, and it makes process parameter values easier to reuse across experiments. Existing categorical process parameters are still supported, but users can no longer create new ones.
How to create single/multi-select parameters:
- Create a new process parameter.
- Set type to Single Select or Multi-Select.
- Select the ID Source (pencil icon) button.
- Choose an existing options set or create a new one.
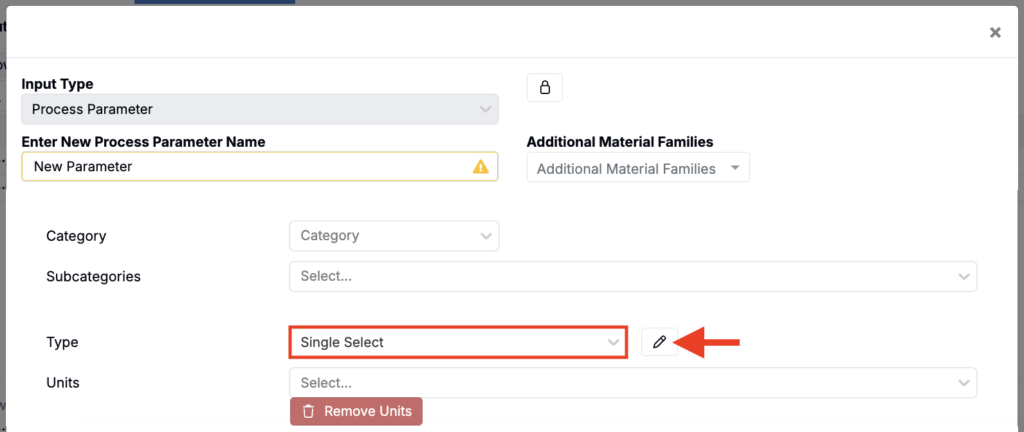
- To create a new options set:
- Add a name and create the parameter.
- Open the parameter’s details page.
- Under Type, select the new options set name.
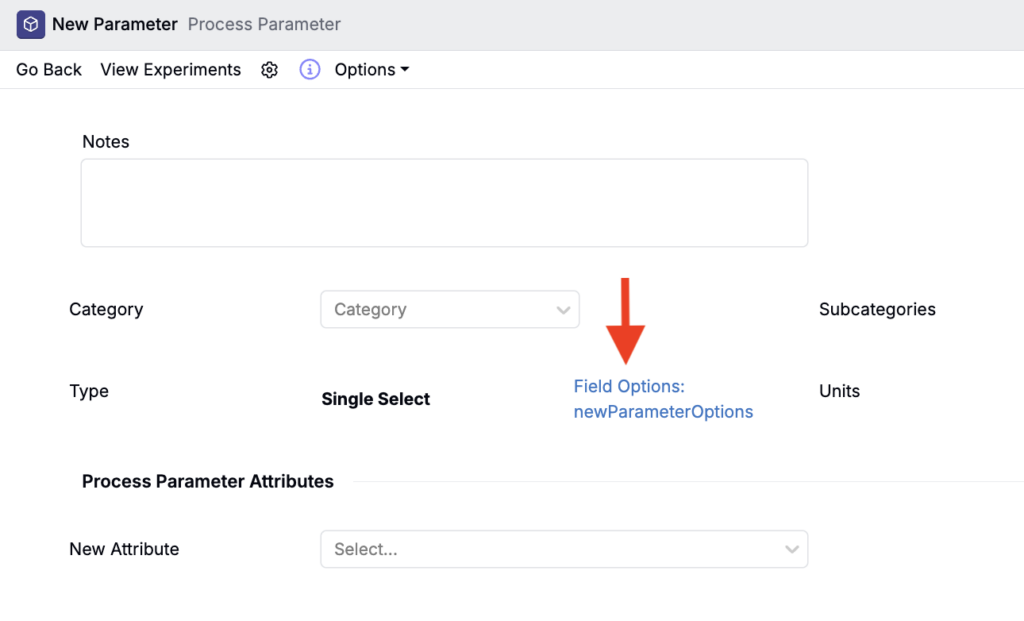
- On the Options Set page, under List Options, add all necessary parameter options. Learn more.
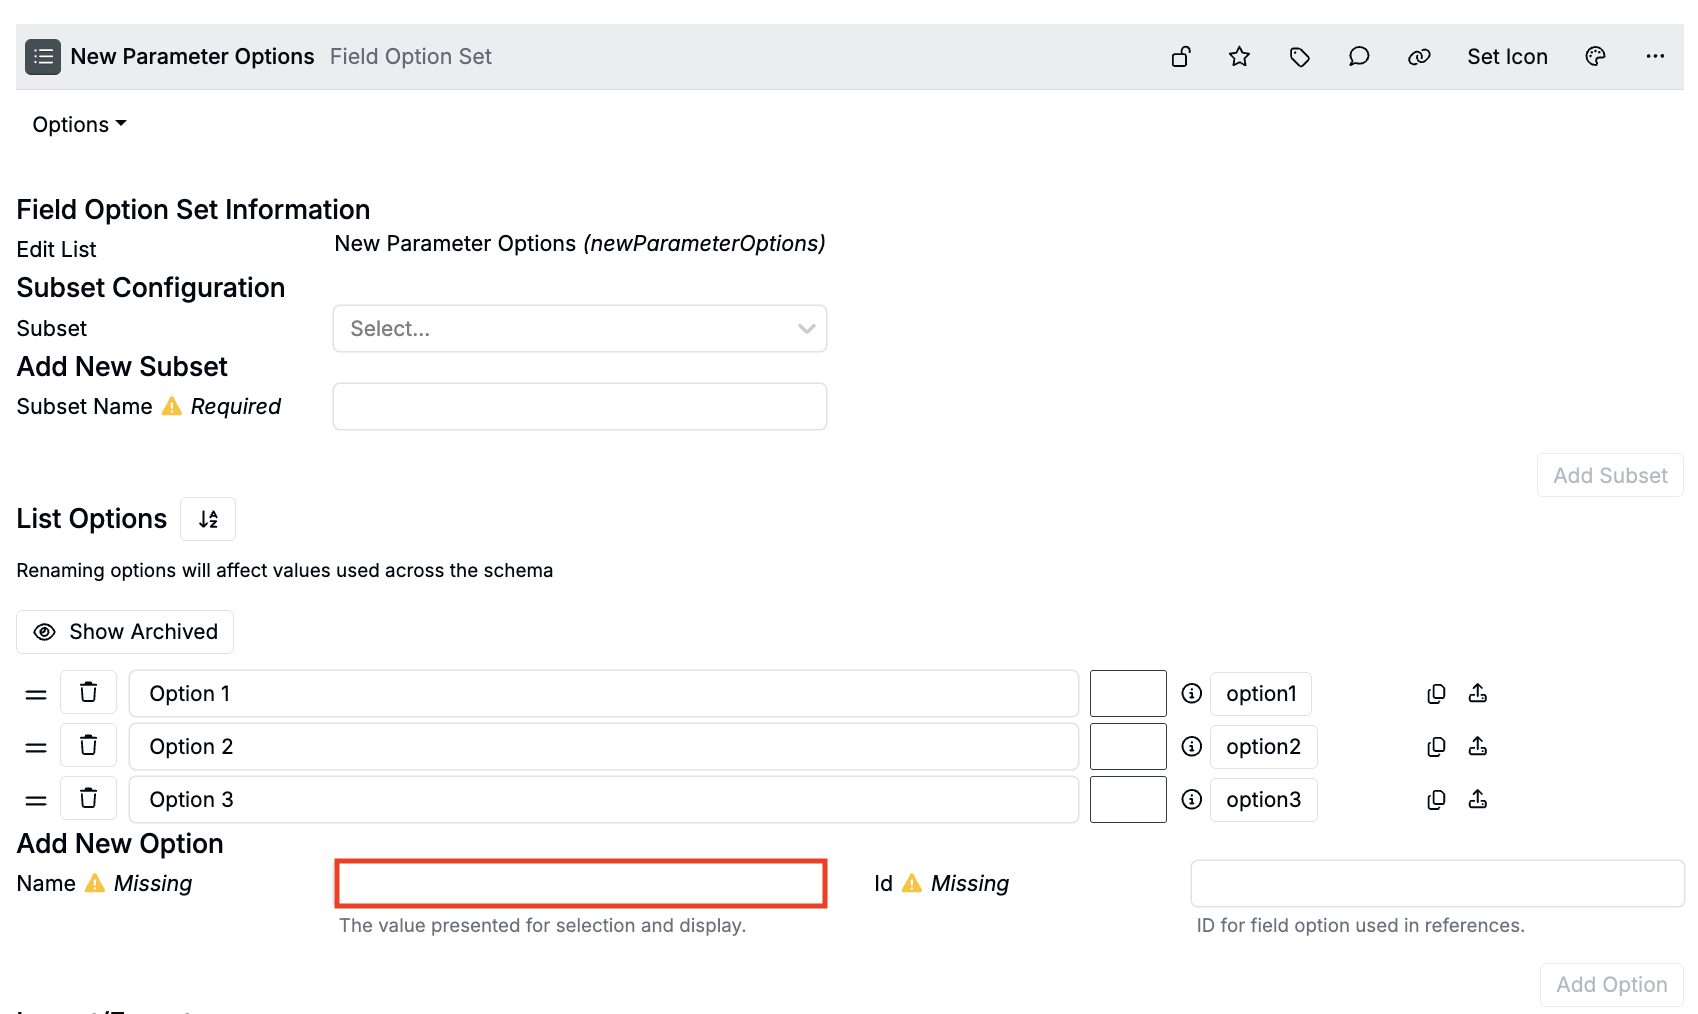
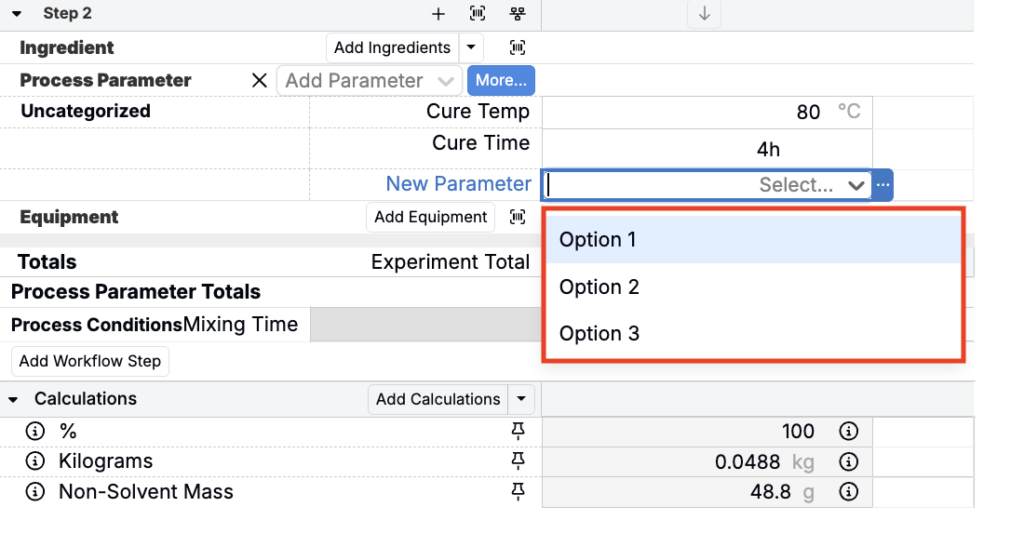
Once created, you can add the parameter to your experiment recipe as normal. Once added, use the dropdown to select from options added to the selected options set.
Note: To bulk migrate existing categorical parameters to the new Single/Multi-Select type, you can use the new Migrate Categorical Inputs Bulk Modify action.
Solver Mode: Lockable Totals
You can now lock totals more directly while working in Solver Mode, making it easier to iterate on large recipes without losing track of which values are meant to stay fixed.
Previously, typing into the experiment total in Solver Mode would update the value but would not create a lock, forcing teams to add a separate “total” calculation when they needed the total to remain constrained. This update makes total locking behave the same way users already expect for other solver-compatible cells.
What’s new:
- When Solver Mode is on, after editing an experiment total (and workflow step totals) a Solver lock (≠) is automatically added once you click out of the total cell.
- The total cell also no longer normalizes other values in the experiment, which makes it safer to adjust totals without unintentionally changing other entered values.
Archiving Migration (Notebooks and Files)
We’ve migrated from deletion to archiving for notebooks, file folders, and file folder members. This helps reduce accidental data loss and makes it easier to recover content when users clean up folders or notebooks.
Note that legacy archived notebooks (older than ~one month) will not resurface into current views. File folder archiving also works recursively, archiving contents within the folder, which is helpful when retiring an entire project folder.


Resource Scheduling Calendar: Default Scope Save
Calendar views in Resource Scheduling now support saving a view as a default scope. This helps admins publish a consistent “starting view” for a team, reducing setup time for new users and keeping everyone aligned on the same default schedule lens.
When a view is saved as default, it becomes the default view for all users in the same material family. Users can also still create personal views that do not override the default, which supports personal workflows without disrupting shared defaults.
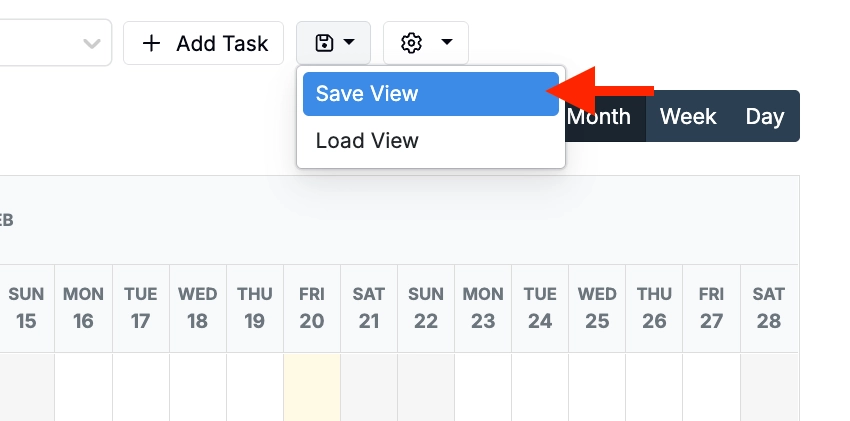
How to set up a default view (admin):
- Access the Calendar and select Resource Scheduling.
- Create a default calendar view.
- Click Save > Save View.

- In the modal:
- Add a save Name.
- Set Save Scope to Default.
- Click Save.
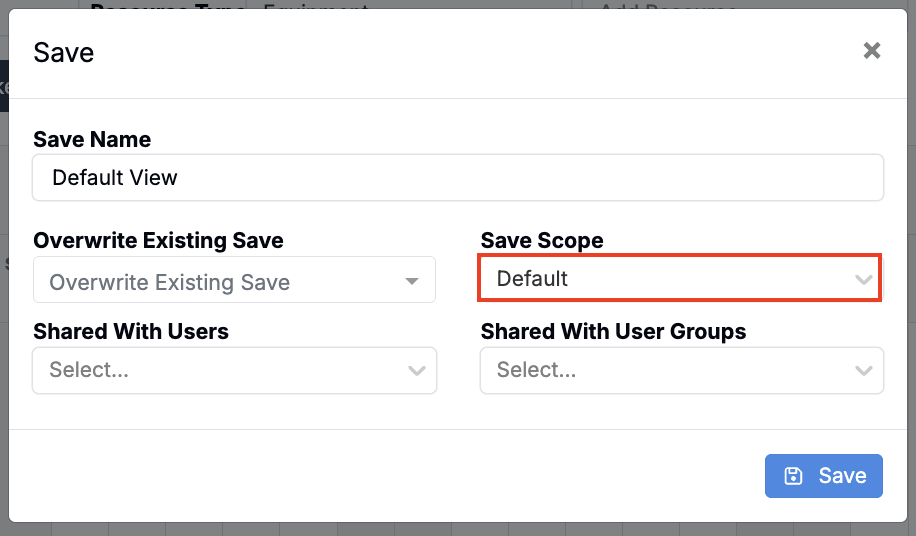
The Save Scope dropdown is only visible to users with the appropriate permissions, preventing confusion for users who cannot publish defaults.
How to set up a personal view:
- Access the Calendar and select Resource Scheduling.
- Create a default calendar view.
- Click Save > Save View.
- In the modal:
- Add a save Name.
- Set Save Scope to User.
- Share the view with other users or user groups (optional).
- Click Save.
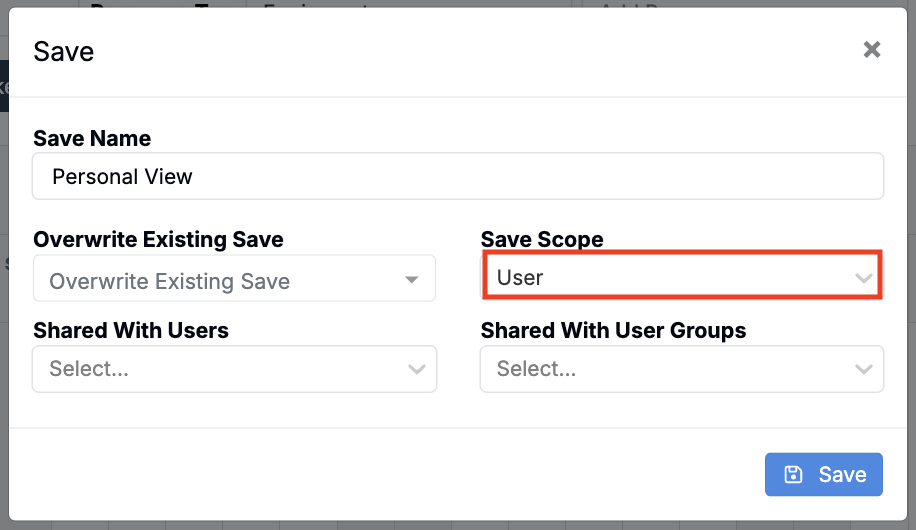
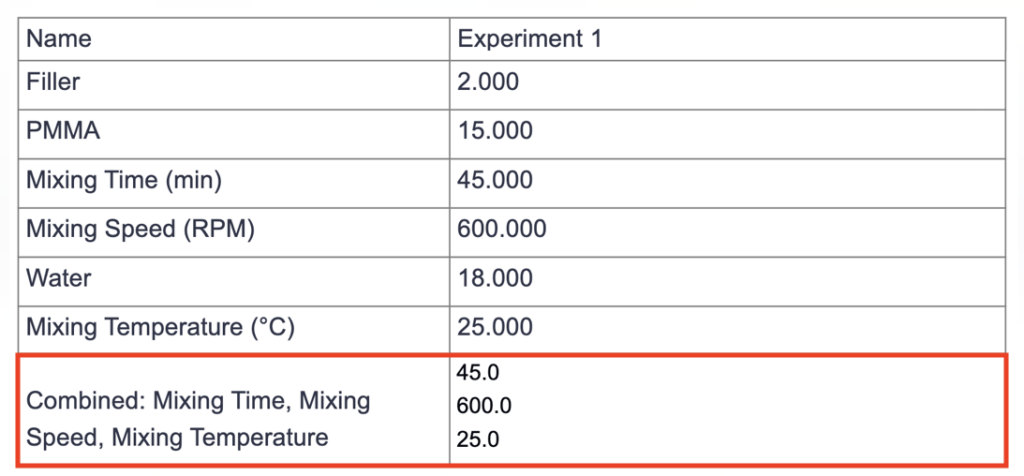
Table Builder: Combined Rows
Table Builder now supports combined rows, similar to “layout columns” on listings. This is useful when you want a more compact table for dashboards or reports, where reviewers need to see several related values together without scrolling across many columns.
This makes it possible to display multiple values in a single cell, such as combining a specific input row with all output rows.
How to use:
- In Table Builder, choose Combined Row.
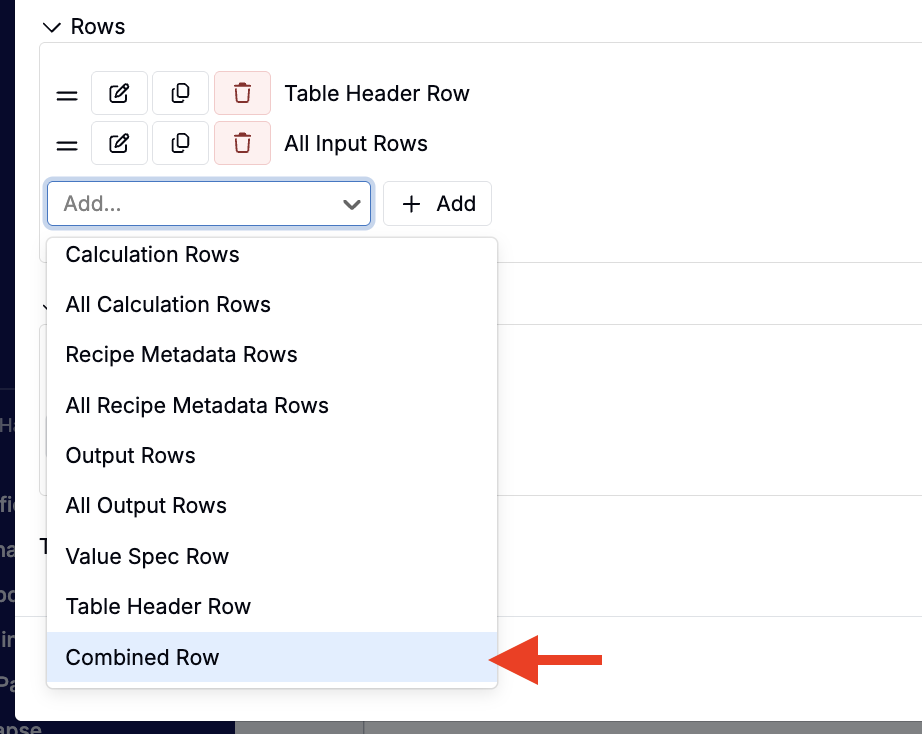
- Select which rows to combine (inputs, outputs, metadata, etc.)
- Add the table to a notebook table cell or a custom table builder table.