
Global Scale Connection
You can now maintain a USB scale connection across the entire platform.
Previously, scale connections had to be enabled per page (e.g. in the Recipe Data Sidepanel or when adjusting Inventory amounts). With this update, once connected, the scale remains active globally—so you can move between recipes, inventory listings, and other pages without reconnecting.
This update makes recording weights more reliable and efficient by eliminating repeated setup and fully integrating scales across all Uncountable pages.
How to connect a scale:
- Open Quick Actions > Connect Scale.
- The system will detect the scale via USB connection.
- Select the scale and click Connect.
- Once enabled, the scale can be used to input weights into fields across the platform (e.g. Inventory amounts, Actual Values)

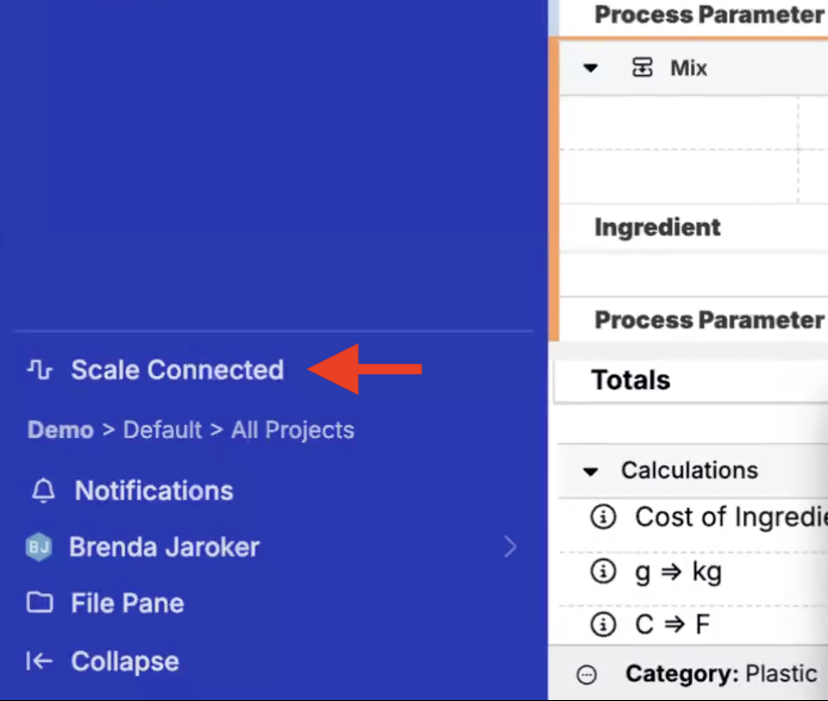
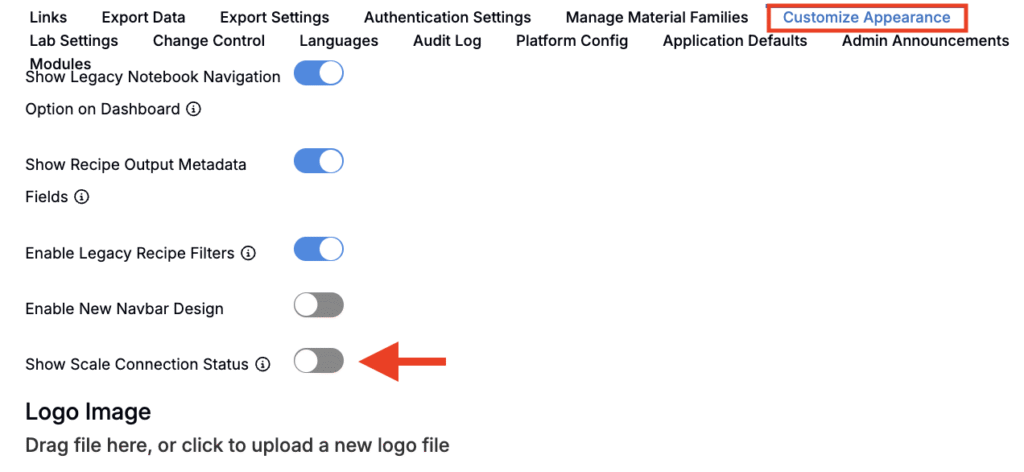
You can also view scale connection status in the Uncountable navigation bar. This setting is enabled by default. To hide connection status, navigate to Company-Wide Settings → Customize Appearance and toggle off Show Scale Connection Status.
Normalize Input Calculation Denominators
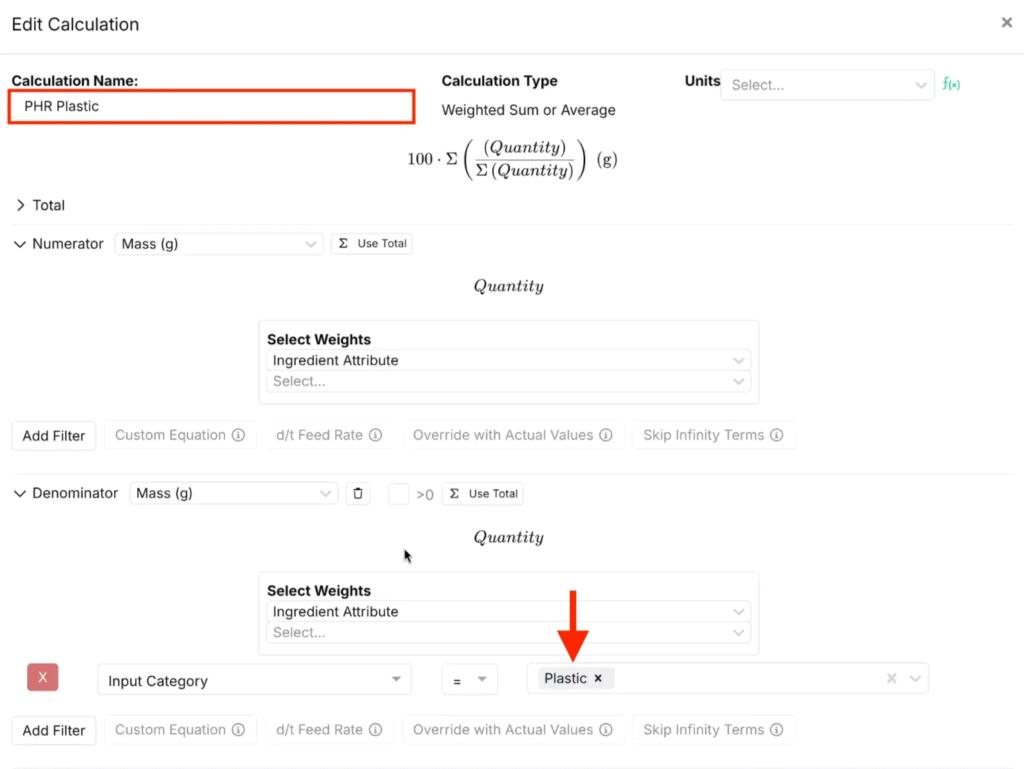
A new calculation setting allows Weighted Sum or Average calculations to maintain a specific ratio of ingredients when one ingredient is edited.
Previously, maintaining ratios between inputs required manual adjustments. With this new setting, you can now normalize calculations against a denominator so that related ingredients automatically rescale, while all unrelated inputs remain unchanged.
This update improves efficiency in recipe editing. It is especially useful in cases where teams want to preserve ratios within a category (such as plastics) without affecting the rest of the recipe.
How to configure:
- Create and configure a Weighted Sum or Average calculation.
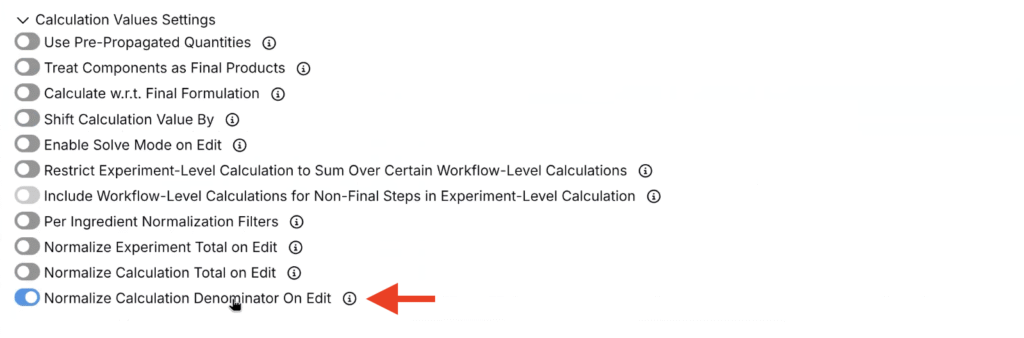
- Under Calculation Value Settings, toggle on Normalize Calculation Denominator on Edit.
- Save the calculation.
When displayed as a column calculation, editing the value of one ingredient will automatically rescale the other ingredients included in the calculation (e.g. plastics), while leaving all unrelated inputs unchanged.

Experiment Listing Quick Filter Update
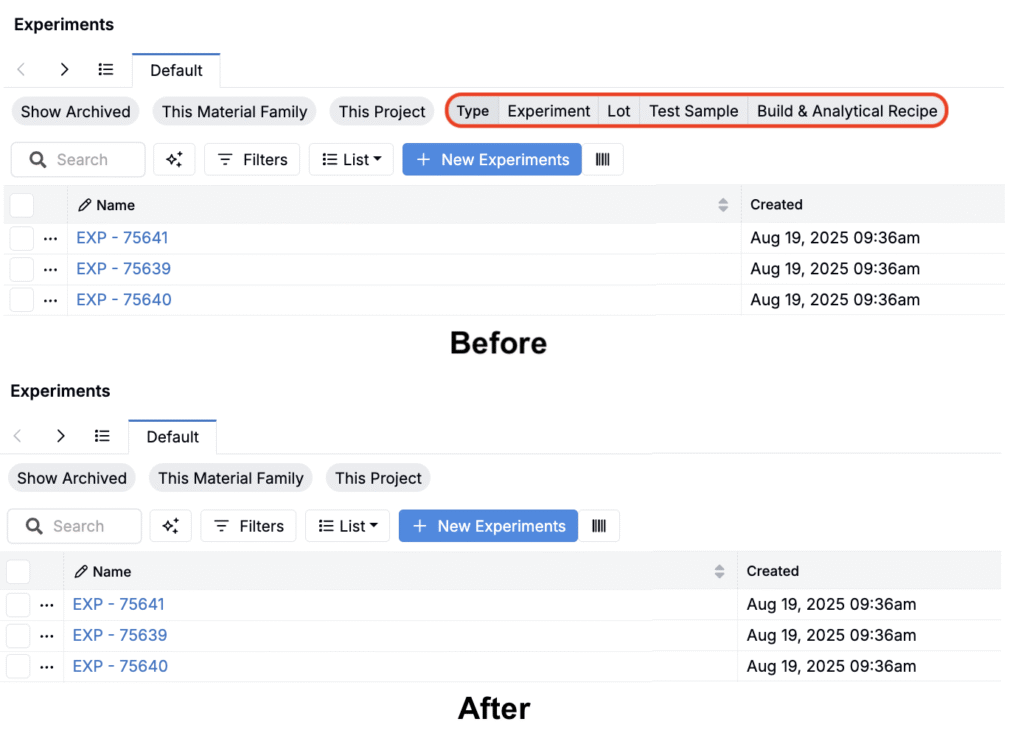
The Type Quick Filter has been removed as a fixed option on the Experiments listing page.
Previously, the Type filter was hard-coded into the listing view and could not be added or removed. With this update, it is no longer shown by default, and users now have full control over whether to include it as a Quick Filter.
This change reduces clutter on the listing page while still allowing teams that use the Type filter frequently to configure it themselves.
To learn more, including how to add the Type filter back to your listing view, refer to the update article covering this change.
Update to View Preferences
When saving a View Preference with the Expanded Ingredient section displayed, the expanded or collapsed state of the section is now included in the save.
Previously, the Expanded Ingredient state could not be saved with the view preference, requiring you to re-expand or re-collapse the section every time. With this update, your preferred layout is preserved automatically.
This improvement makes it easier to keep the Expanded Ingredient section visible when it is a key part of your workflow, or to keep it hidden when it is not relevant.
How to use:
- Open a recipe and display the Expanded Ingredient section.
- Collapse or expand the section as desired.
- Save the configuration in a View Preference:
- Open the View Preferences modal.
- Click Save View Preference.
- Add a name and save.

When you load that View Preference, the Expanded Ingredient section will appear open or closed based on the saved preference.

Chemical Structure Layout Editing
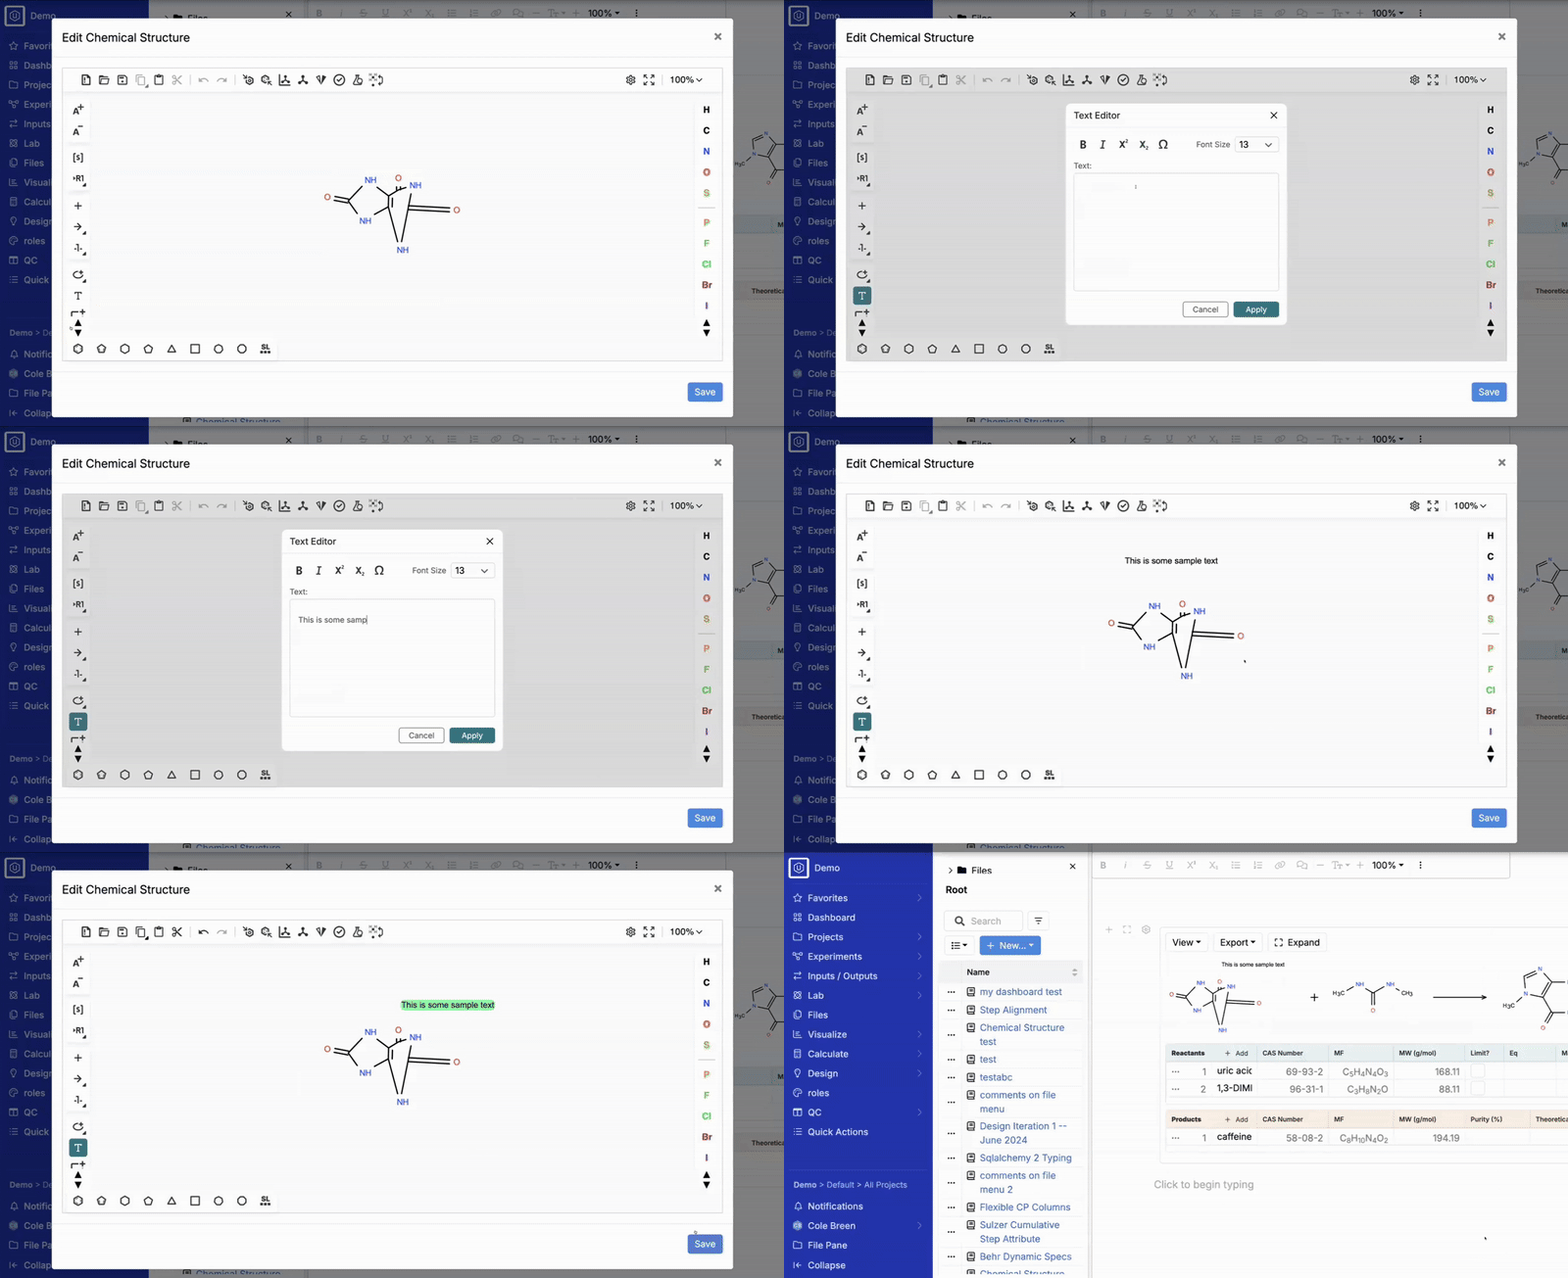
When working with chemical structure diagrams in notebooks, users can now adjust the layout and appearance of molecules using the new Edit Structure Layout tool.
This editor makes it easier to refine how structures are displayed for communication and documentation. For example, you can highlight or label specific components of a reaction to make diagrams clearer.
When editing a chemical structure diagram, you can:
- Reposition molecules within the diagram.
- Adjust how structures are arranged for readability.
- Add and move annotation text.
Note: Structural changes to molecules themselves are not supported — only layout and annotations can be edited. Adding new molecules in the layout editor will prevent the layout from being saved.

How to use:
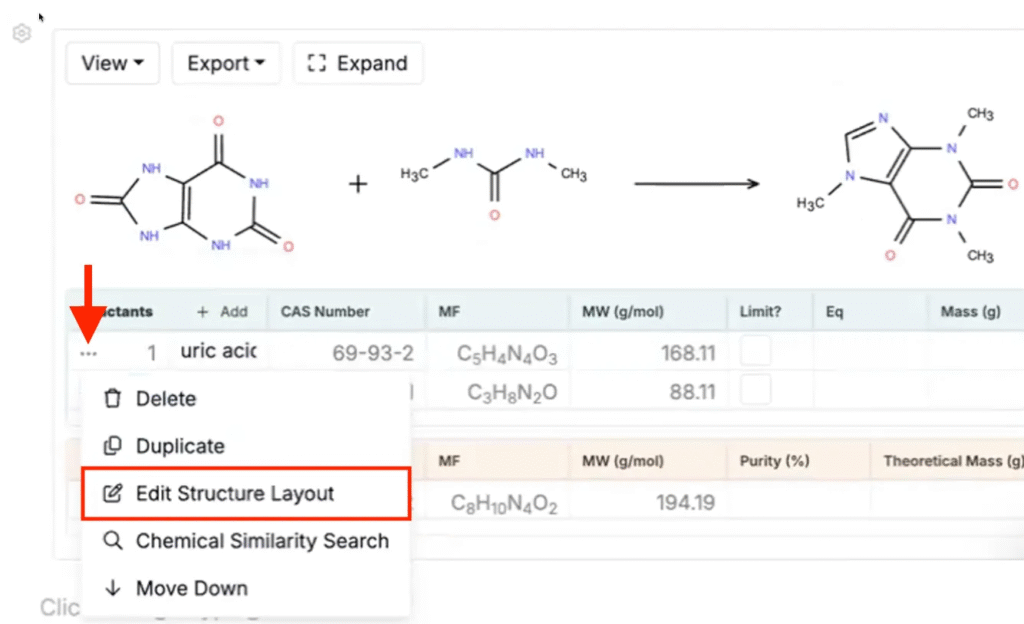
- Open the actions menu (…) for a reactant or product row in the reaction table.
- Select Edit Structure Layout.
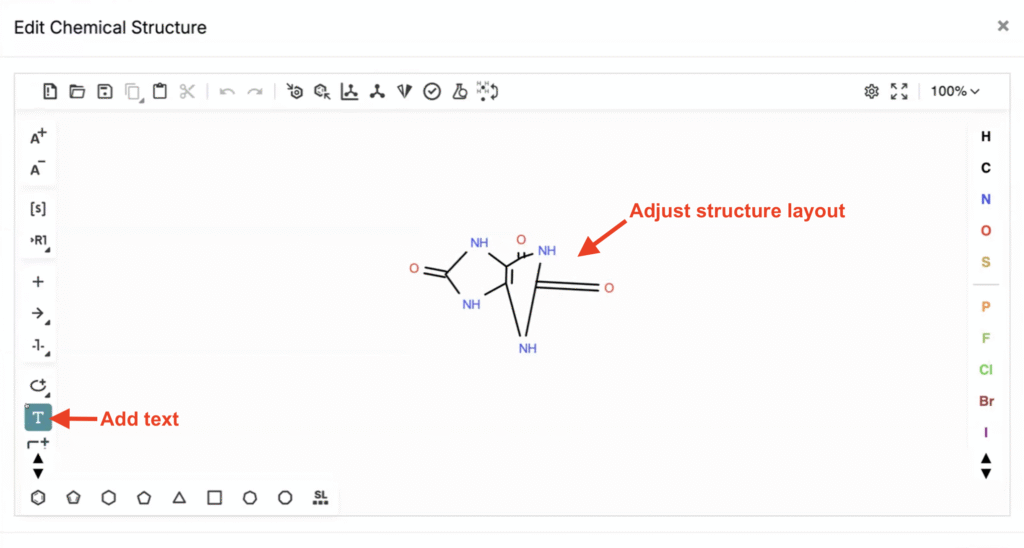
- In the editor modal:
- Drag molecules to reposition them or adjust their layout.
- Use the text tool (T) in the left sidebar to add annotations.
- Save changes.
- Your edits will appear in the reaction diagram.
Resource Timeline View Improvements in the Calendar
The Resource Timeline View of the Calendar has been enhanced to give teams more control over how resources and schedules are displayed.
Previously, the timeline view had limited granularity options, and saving a custom view did not preserve top-level settings like timescale or displayed fields. With this update, the Calendar timeline is more flexible and configurable for planning lab and project work.
These changes improve workflows by making it easier to:
- Plan experiments in half-day increments (AM/PM) for finer scheduling (A).
- Choose granularity independently of the overall timescale (B).
- Display additional event fields (such as experiment owner or lab location) directly on the events on the timeline (C).
- Save custom views that fully capture timeline configuration, so you can return to the same scheduling view without reconfiguring.
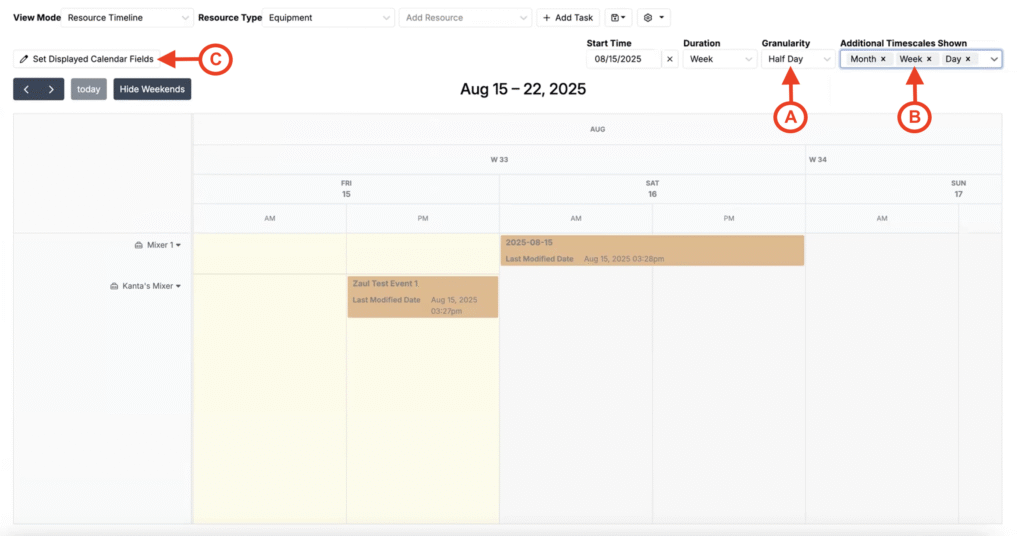
To set displayed calendar fields:
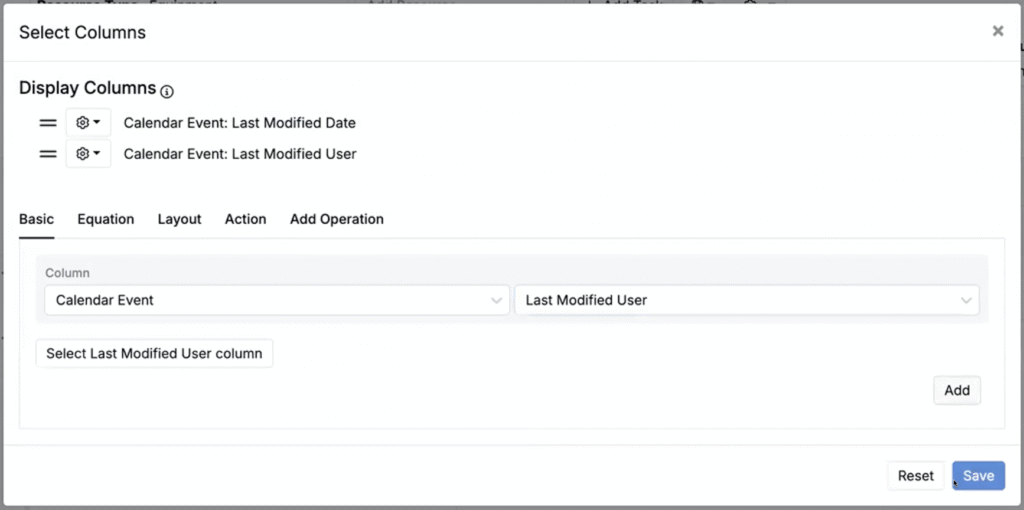
- Click the Set Displayed Calendar fields button.
- In the modal, add or remove calendar event columns.
- Save the configuration.
- Info from all columns added will be displayed on each individual event.
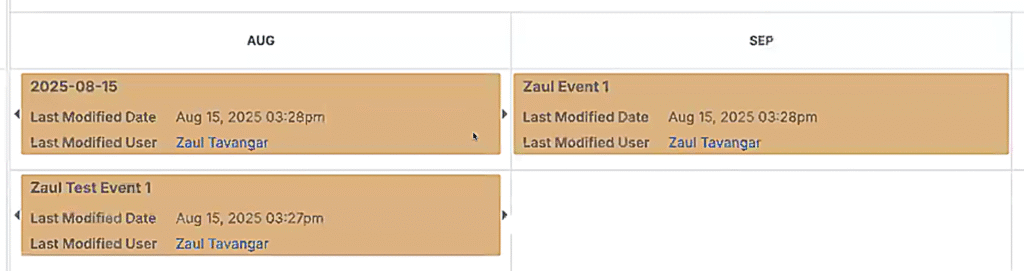
Resource timeline events with new fields added
New Field Grouping Options on Forms
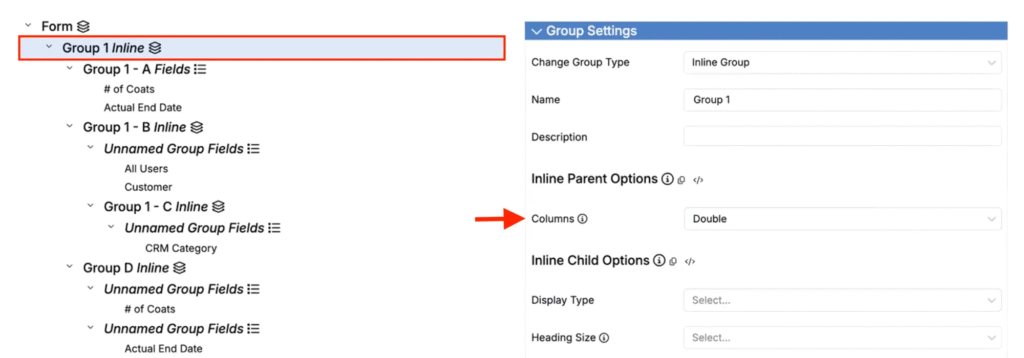
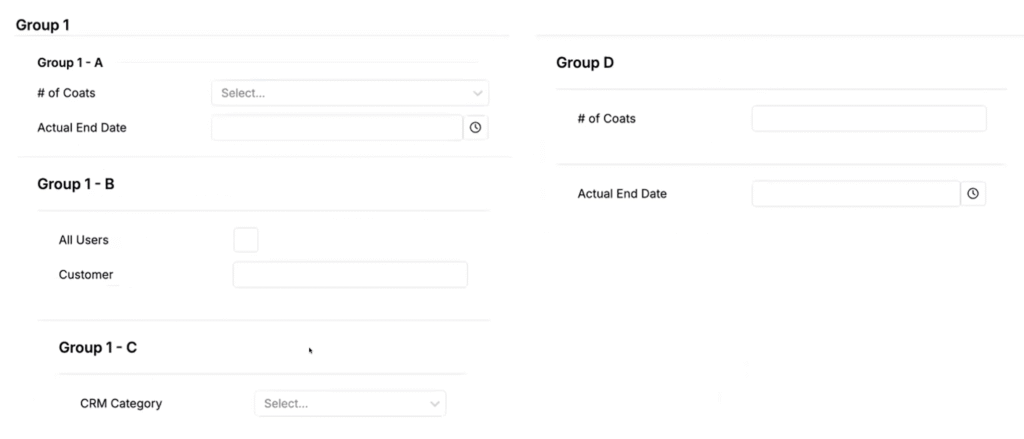
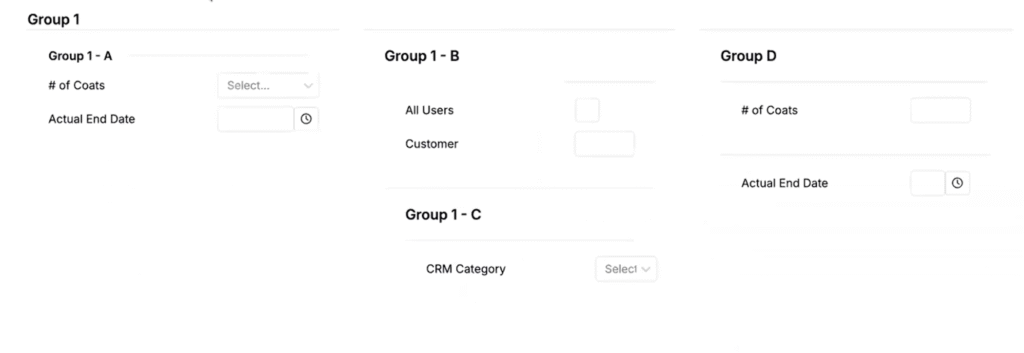
Field groups on forms (e.g. lab requests, approvals, or custom entities) can now be displayed in double or triple column layouts, giving teams greater control over how information is organized and displayed.
This improvement helps reduce unused whitespace on wide screens and makes it easier to view related fields side by side.
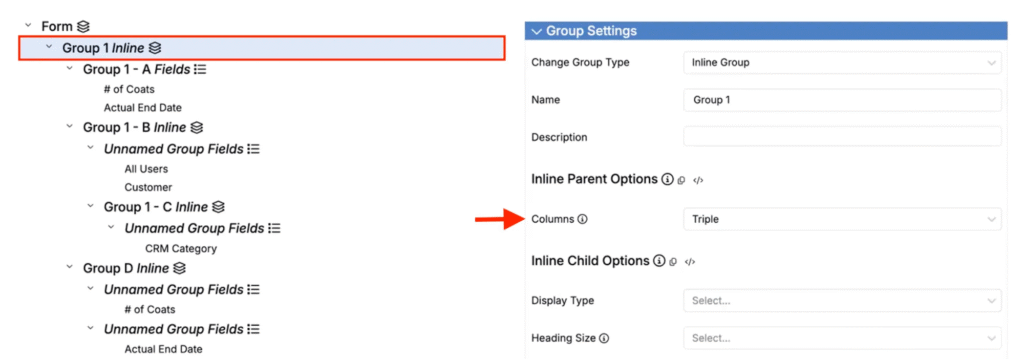
How to configure:
- Open a definition in the Definitions tab of the Form Admin page.
- Select a field group.
- Set the Columns field to Double or Triple.
- All forms created from this definition will display the fields in that group across two or three columns.
Experiment Fields in Calculations
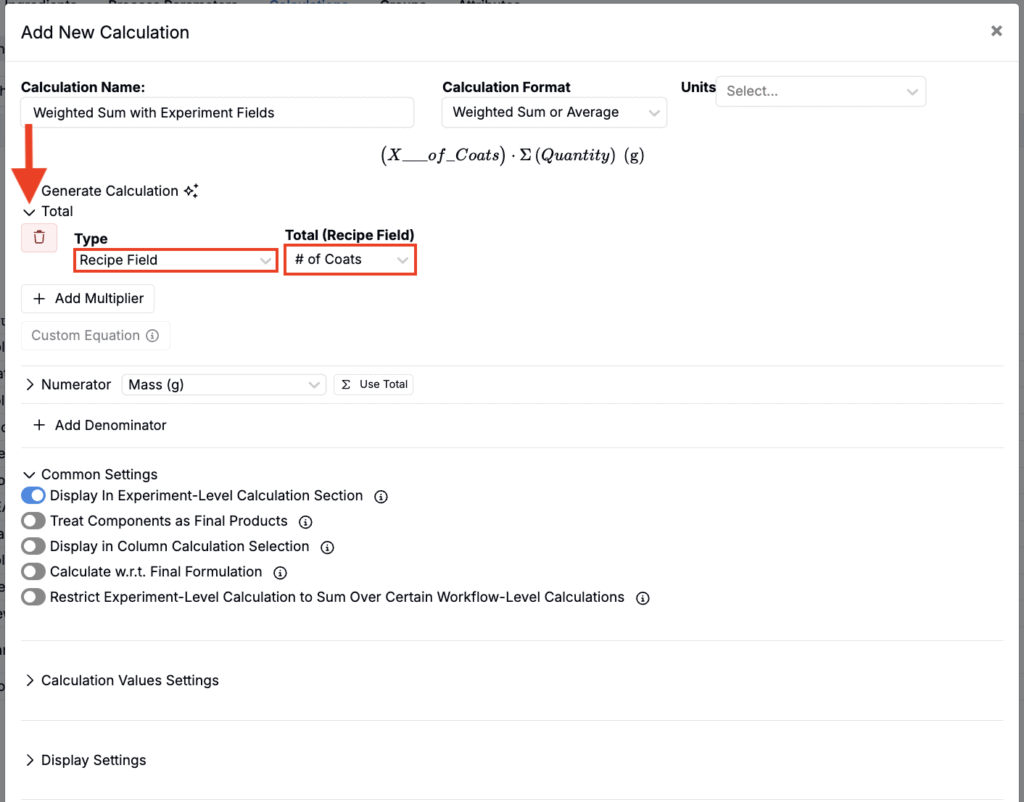
Input calculations in Uncountable now support referencing experiment fields. When configuring a Weighted Sum/Average or Custom calculation, you can now factor in experiment-level information. This makes calculations more flexible in workflows where numeric metadata directly influences outputs.
To configure a Weighted Sum or Average input calculation with experiment fields:
- Create or edit a Weighted Sum or Average calculation.
- Under Total, set Type to Recipe Field.
- Use the Recipe Field dropdown to select an experiment field (e.g. # of Coats).
- Add additional variables and build your equation.
- Save.
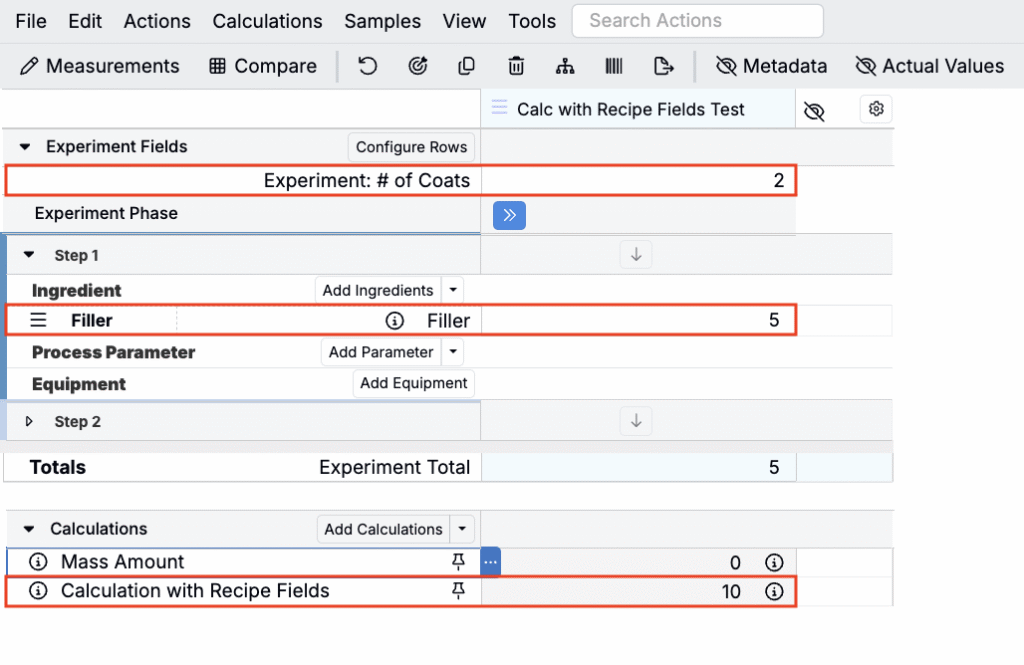
- When added to a recipe, the calculation will factor in the values saved as experiment field values on that recipe.
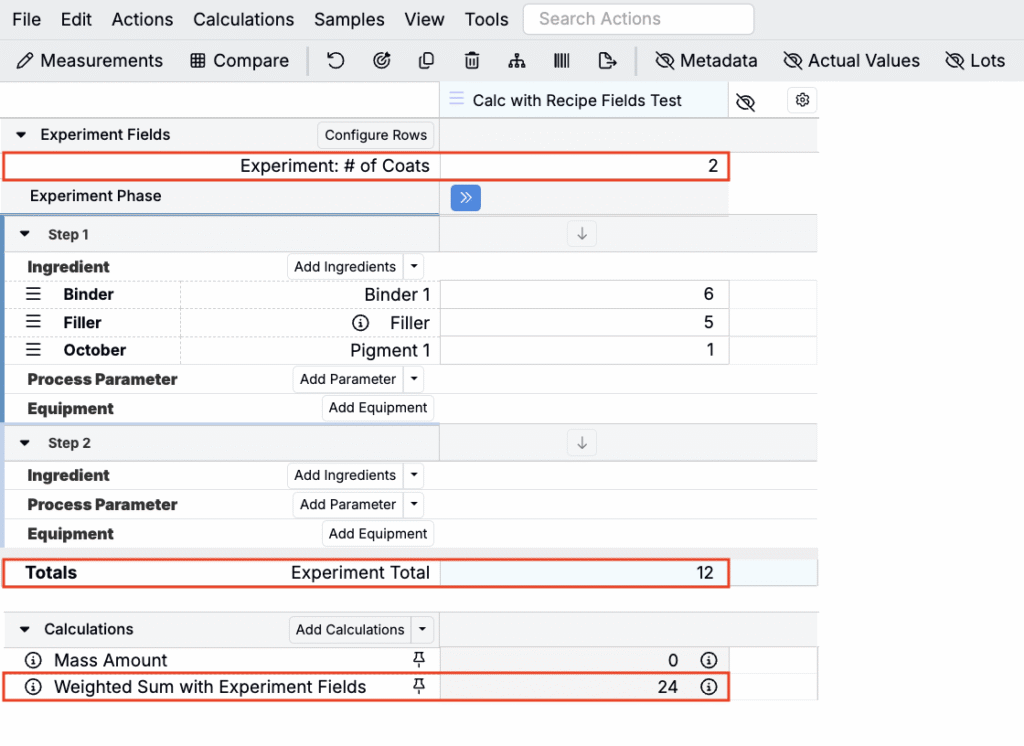
To configure a Custom input calculation with experiment fields:
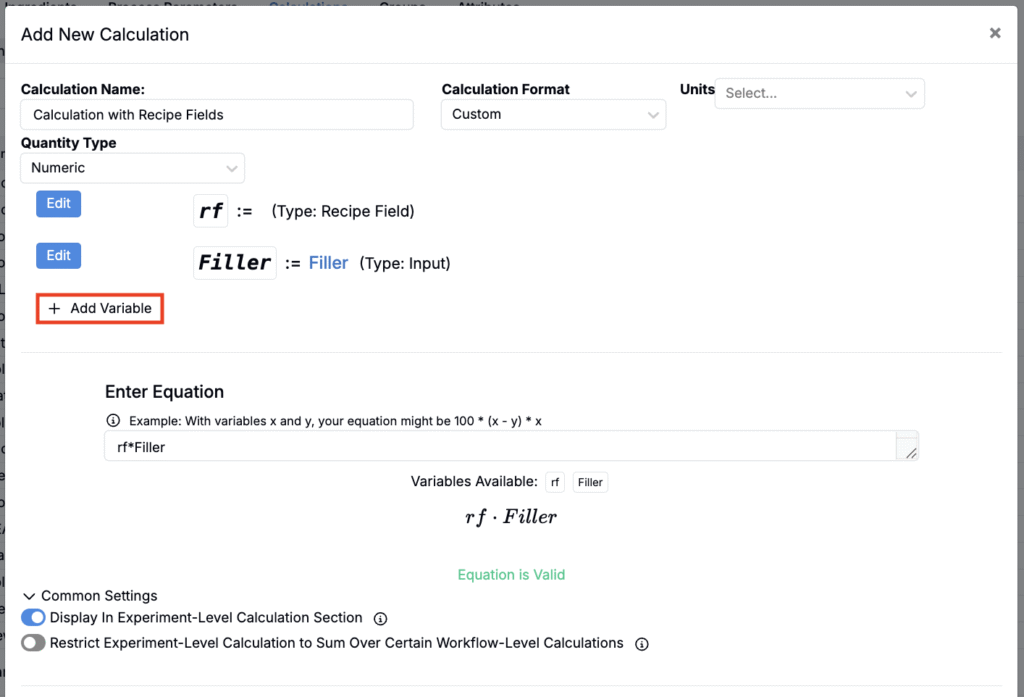
- Create or edit a Custom calculation.
- Click Add Variable to add a variable.
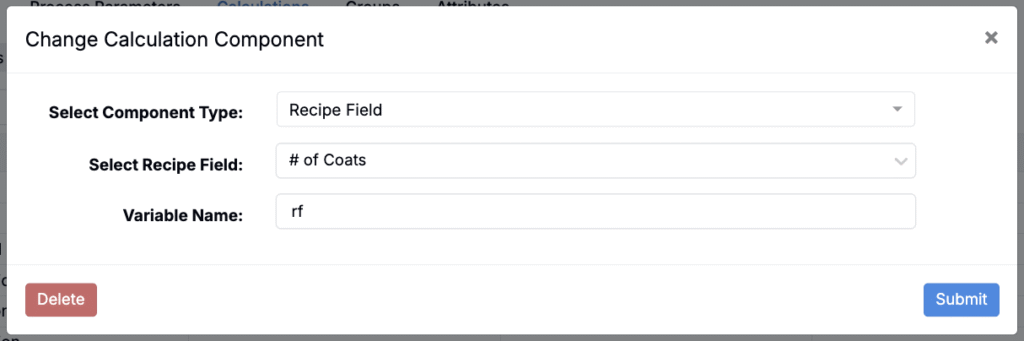
- Set Component Type to Recipe Fields.
- Select the desired recipe field.
- Give the variable a name.
- Add additional variables and build your equation.
- Save.
- When added to a recipe, the calculation will factor in the values saved as experiment field values on that recipe.
View and Edit Outputs on Analytical Measurement-Type Outputs
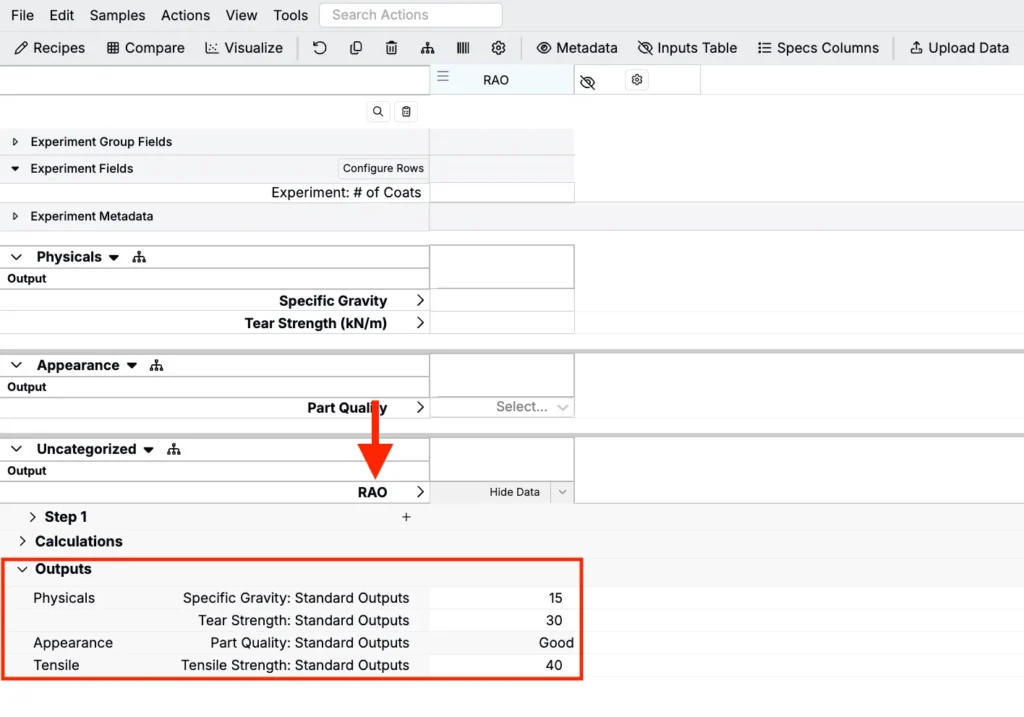
When analytical measurement–type outputs (or “recipes as outputs”) are added to a recipe, the outputs on those AMTOs can now be viewed directly from the parent recipe. This also applies to test samples added as outputs. Previously, the parent recipe only displayed its inputs.
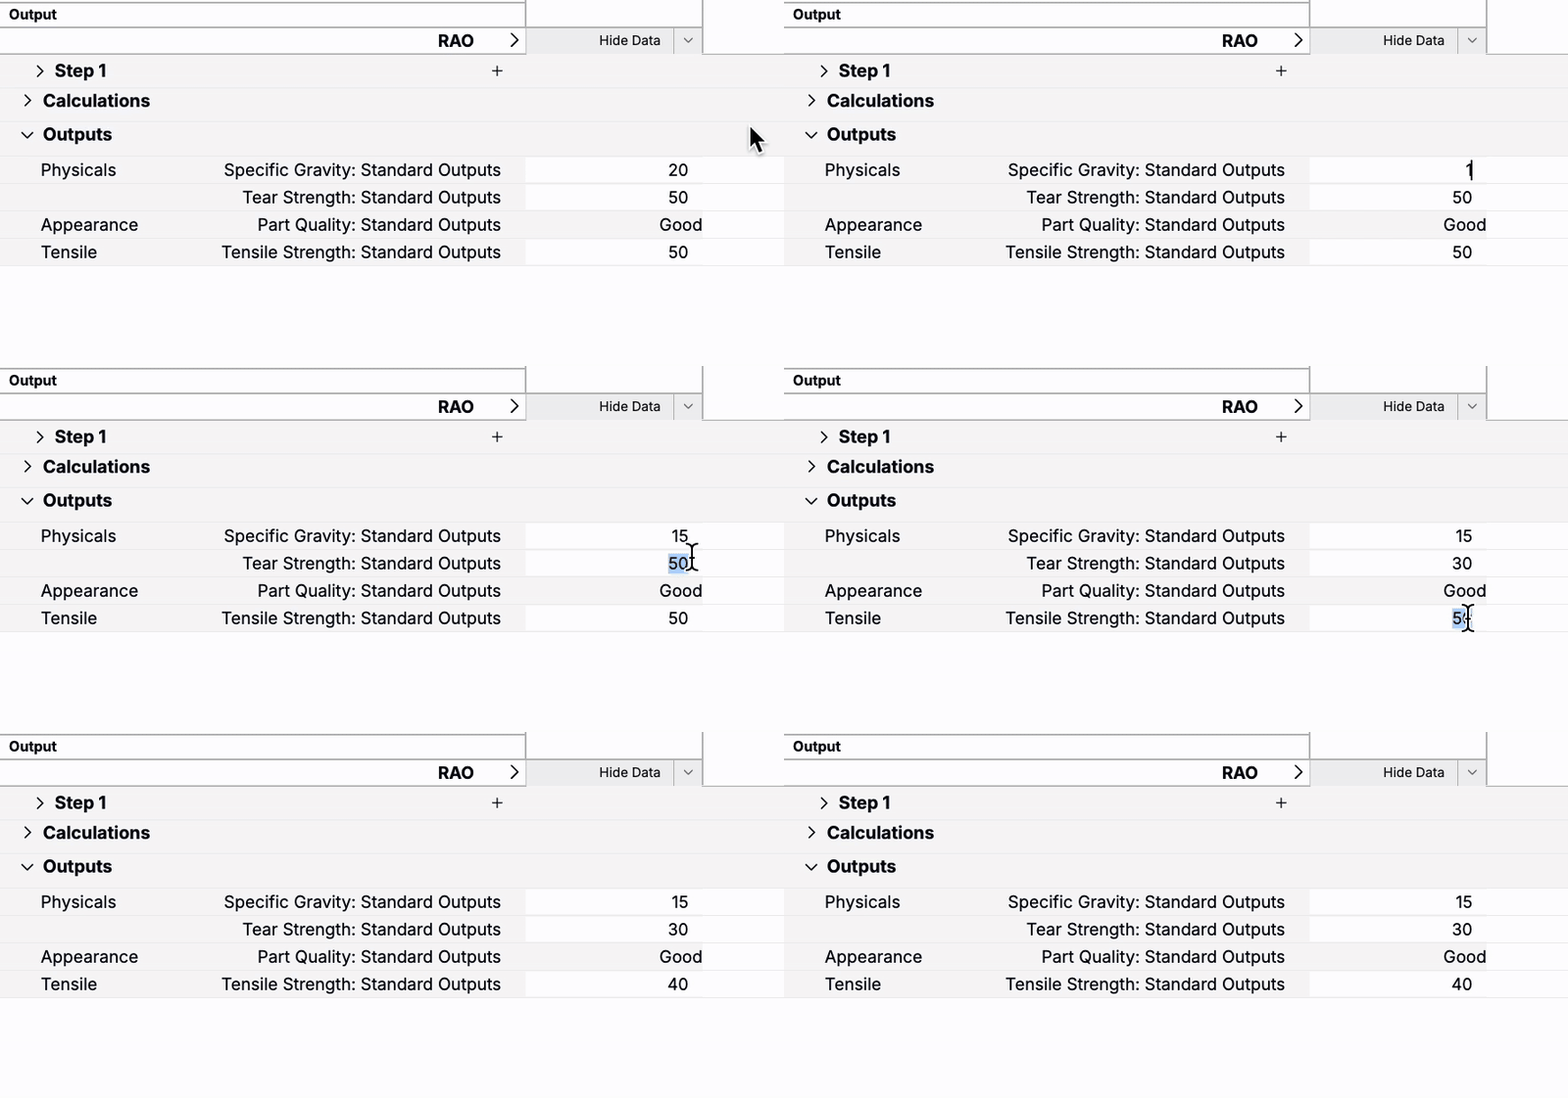
Numeric AMTO outputs are also inline editable at the parent level, so you can update values without opening each individual output or test sample.
This update makes it easier to review and record results from downstream recipes directly on the parent recipe, without needing to navigate away.
DOE Category Constraints
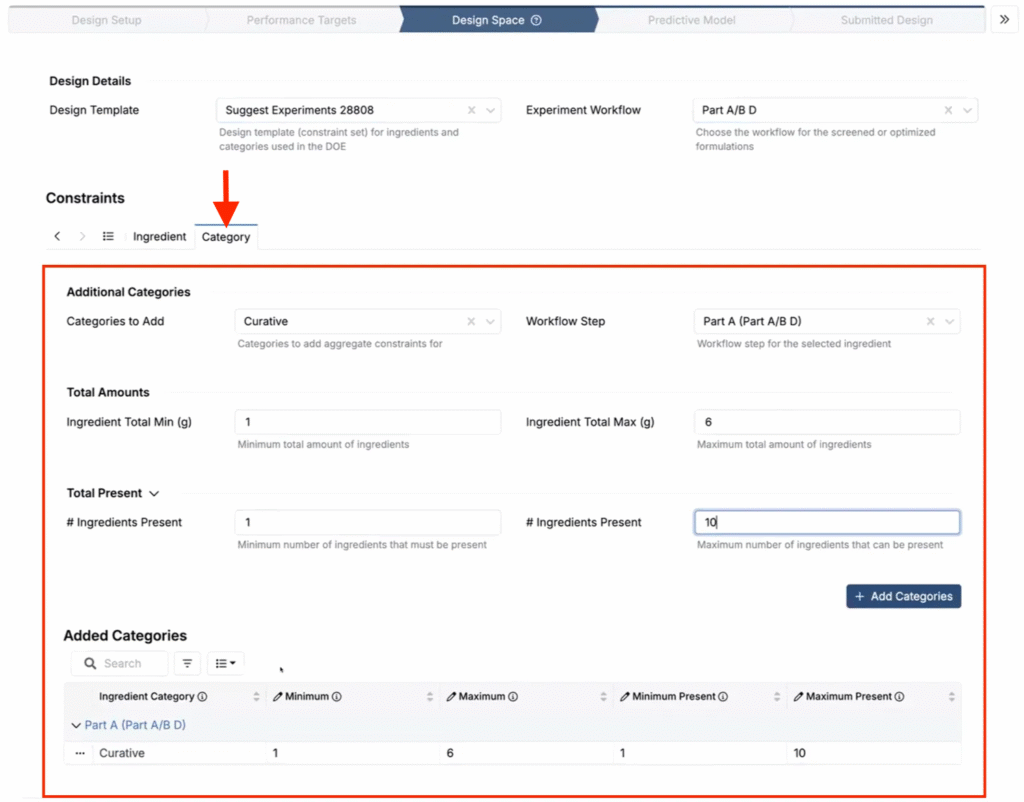
When creating a Design of Experiment (DOE), you can now add constraints on input categories. Category constraints can be applied across the entire workflow or to specific workflow steps. This allows you to restrict ingredient categories based on either the total amount within that category or the number of inputs in that category.
These constraints help keep experimental designs realistic by enforcing category-level rules—for instance, requiring that a formulation include at least one solvent or limiting the total amount of inputs from categories like fillers or stabilizers.
How to use:
- Create or edit a DOE.
- Under the Constraints section, open the Category tab.
- Select a category to constrain.
- Choose whether the constraint applies to the whole workflow or a specific step.
- Define constraint limits for Total Amounts and/or Total Present.
- All category constraints added will appear in a table at the bottom of the page for easy review.
Test Sample Uploader
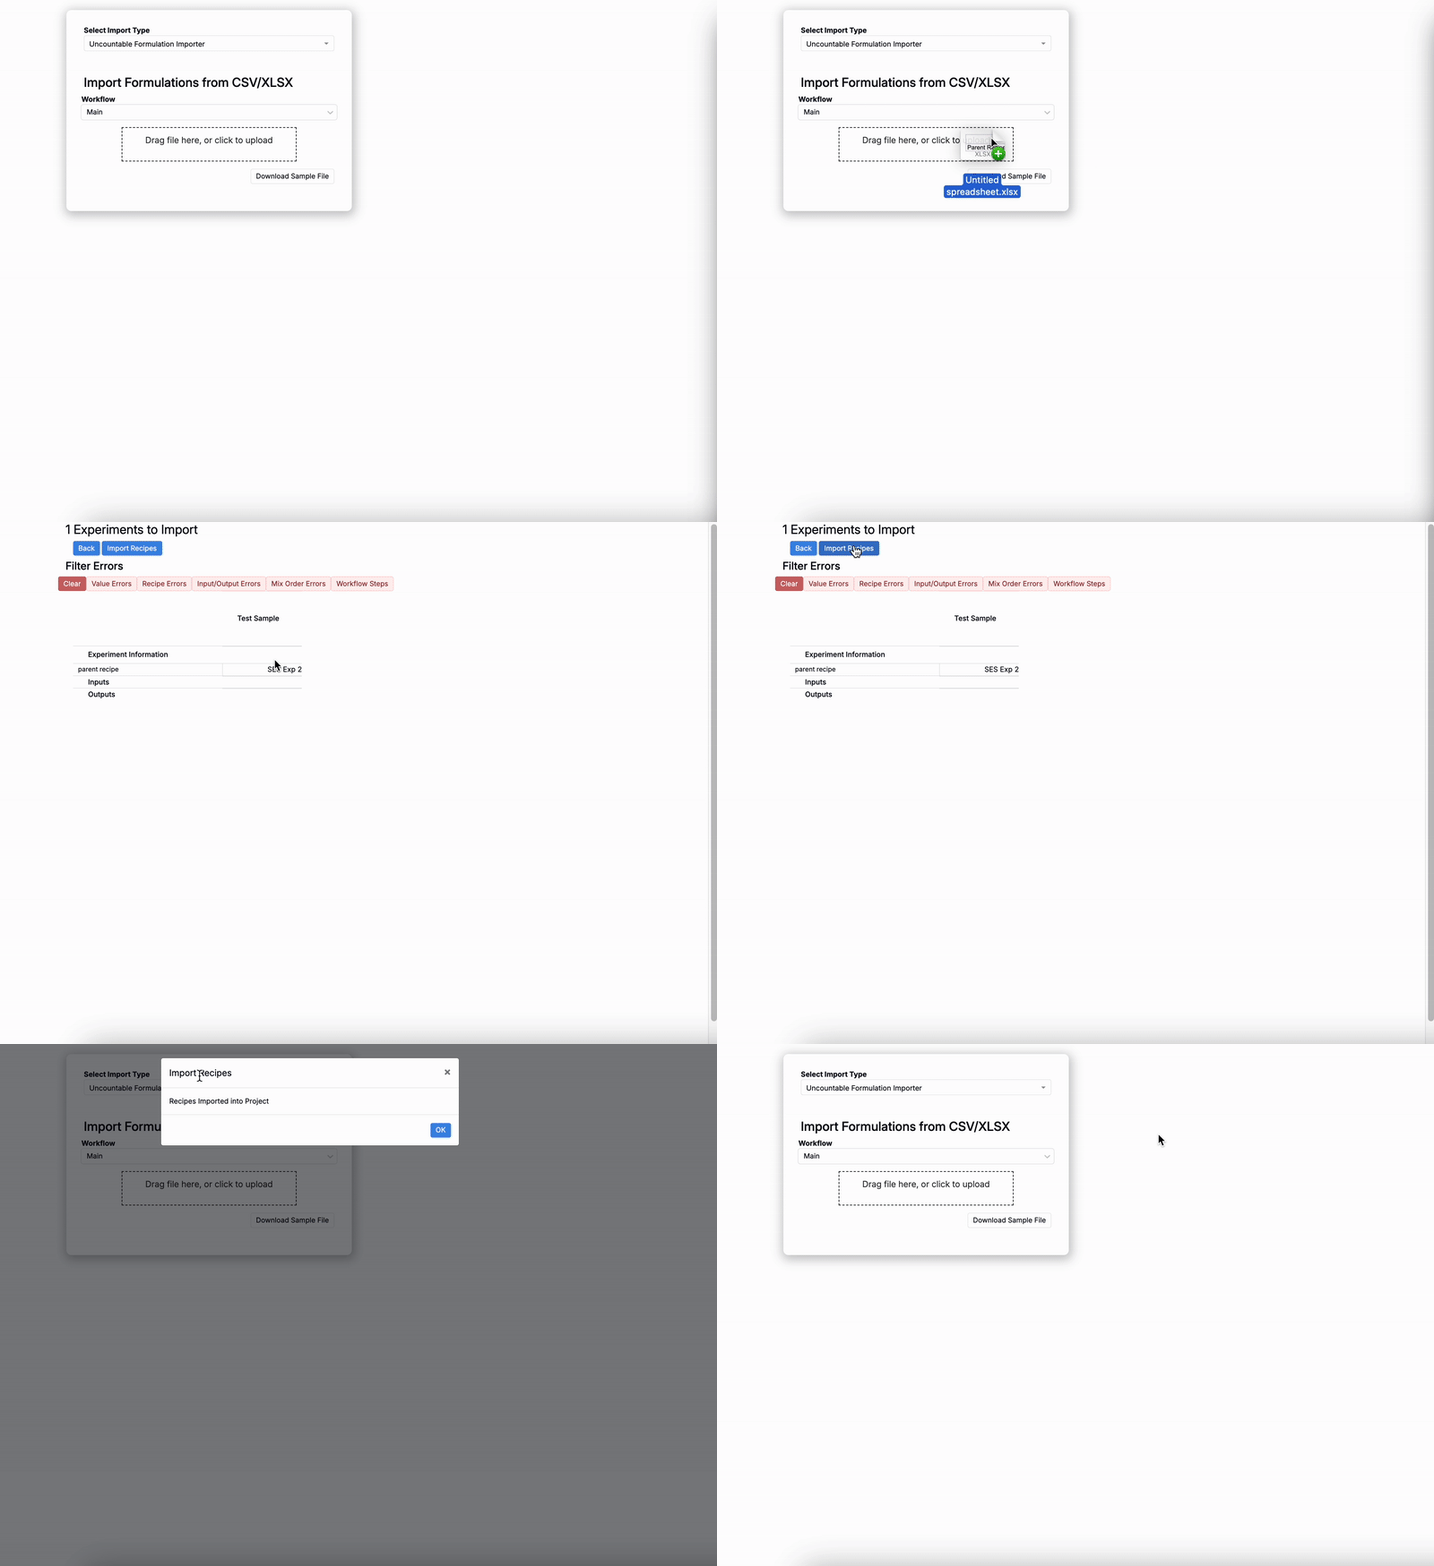
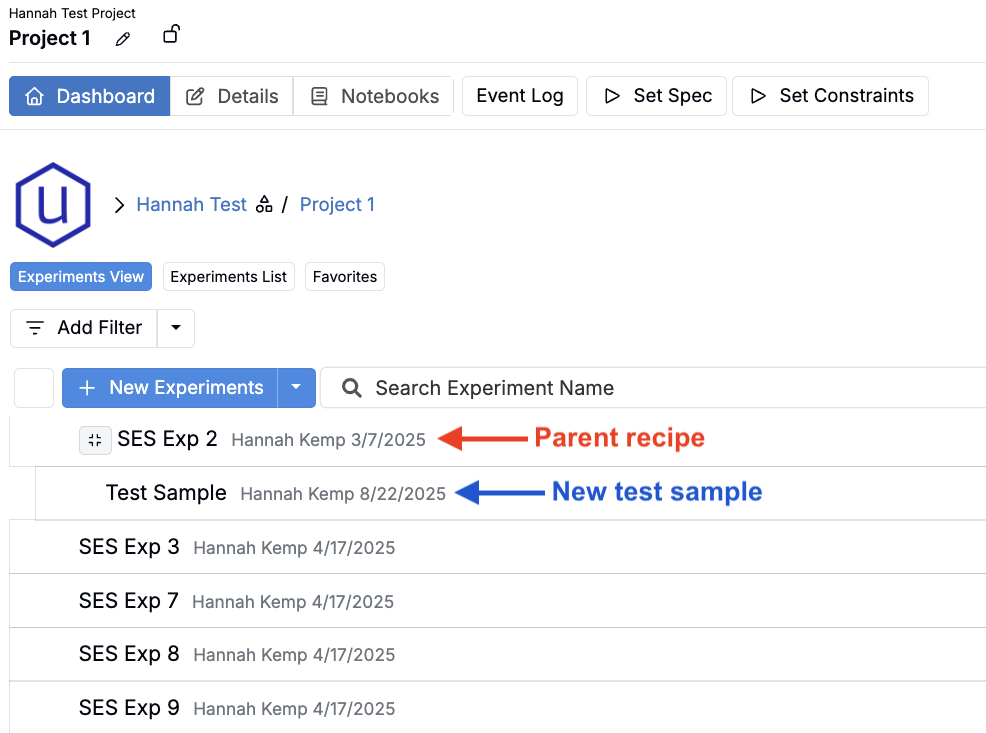
You can now upload test samples through the Uncountable Formulation Importer, making it easier to bulk import lab results and automatically link them to their parent recipes. Uploaded test samples are created as test templates under the correct parent recipes, eliminating the need to add them manually.
This tool is intended only for historical or one-time data uploads, such as when a lab provides a large batch of past results that need to be tied back to recipes. It should not be used for repetitive, ongoing sample entry — for that, continue using standard test sample creation workflows.
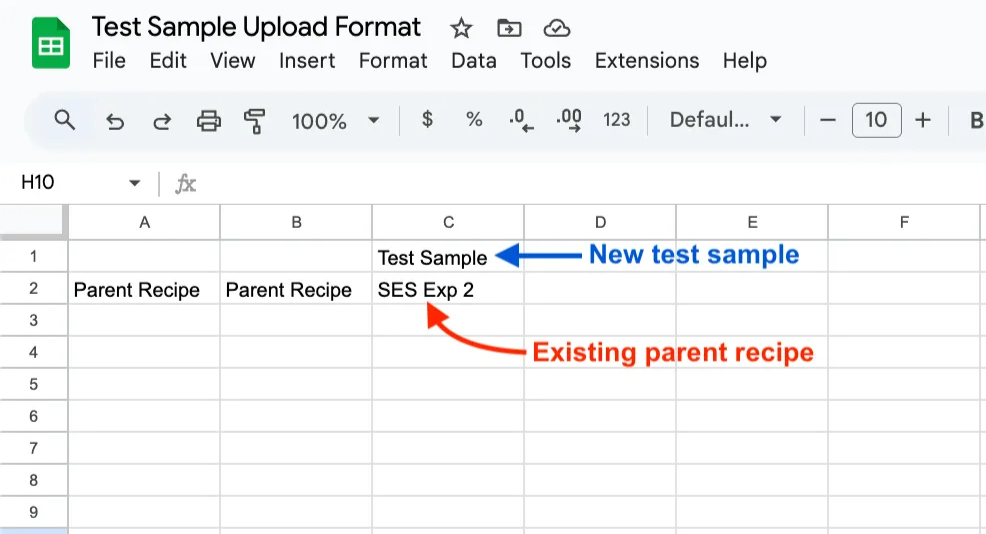
To use the uploader, configure a spreadsheet where the first row contains the names of the new test samples and the second row maps each test sample column to an existing parent recipe.
How to use:
- Once your spreadsheet has been prepared, open the Entities Importer in the project you want to upload into.
- Select the Uncountable Formulation Importer.
- Drag in a file defining test samples and their parent recipes.
- Confirm mappings in the importer.
- Click Import into Recipes.
- Test samples will be created under the correct parent recipes.
Notebook Pages Feature Improvements
We’ve introduced several upgrades to make working with multi-page notebooks in Uncountable more flexible and intuitive. These updates include:
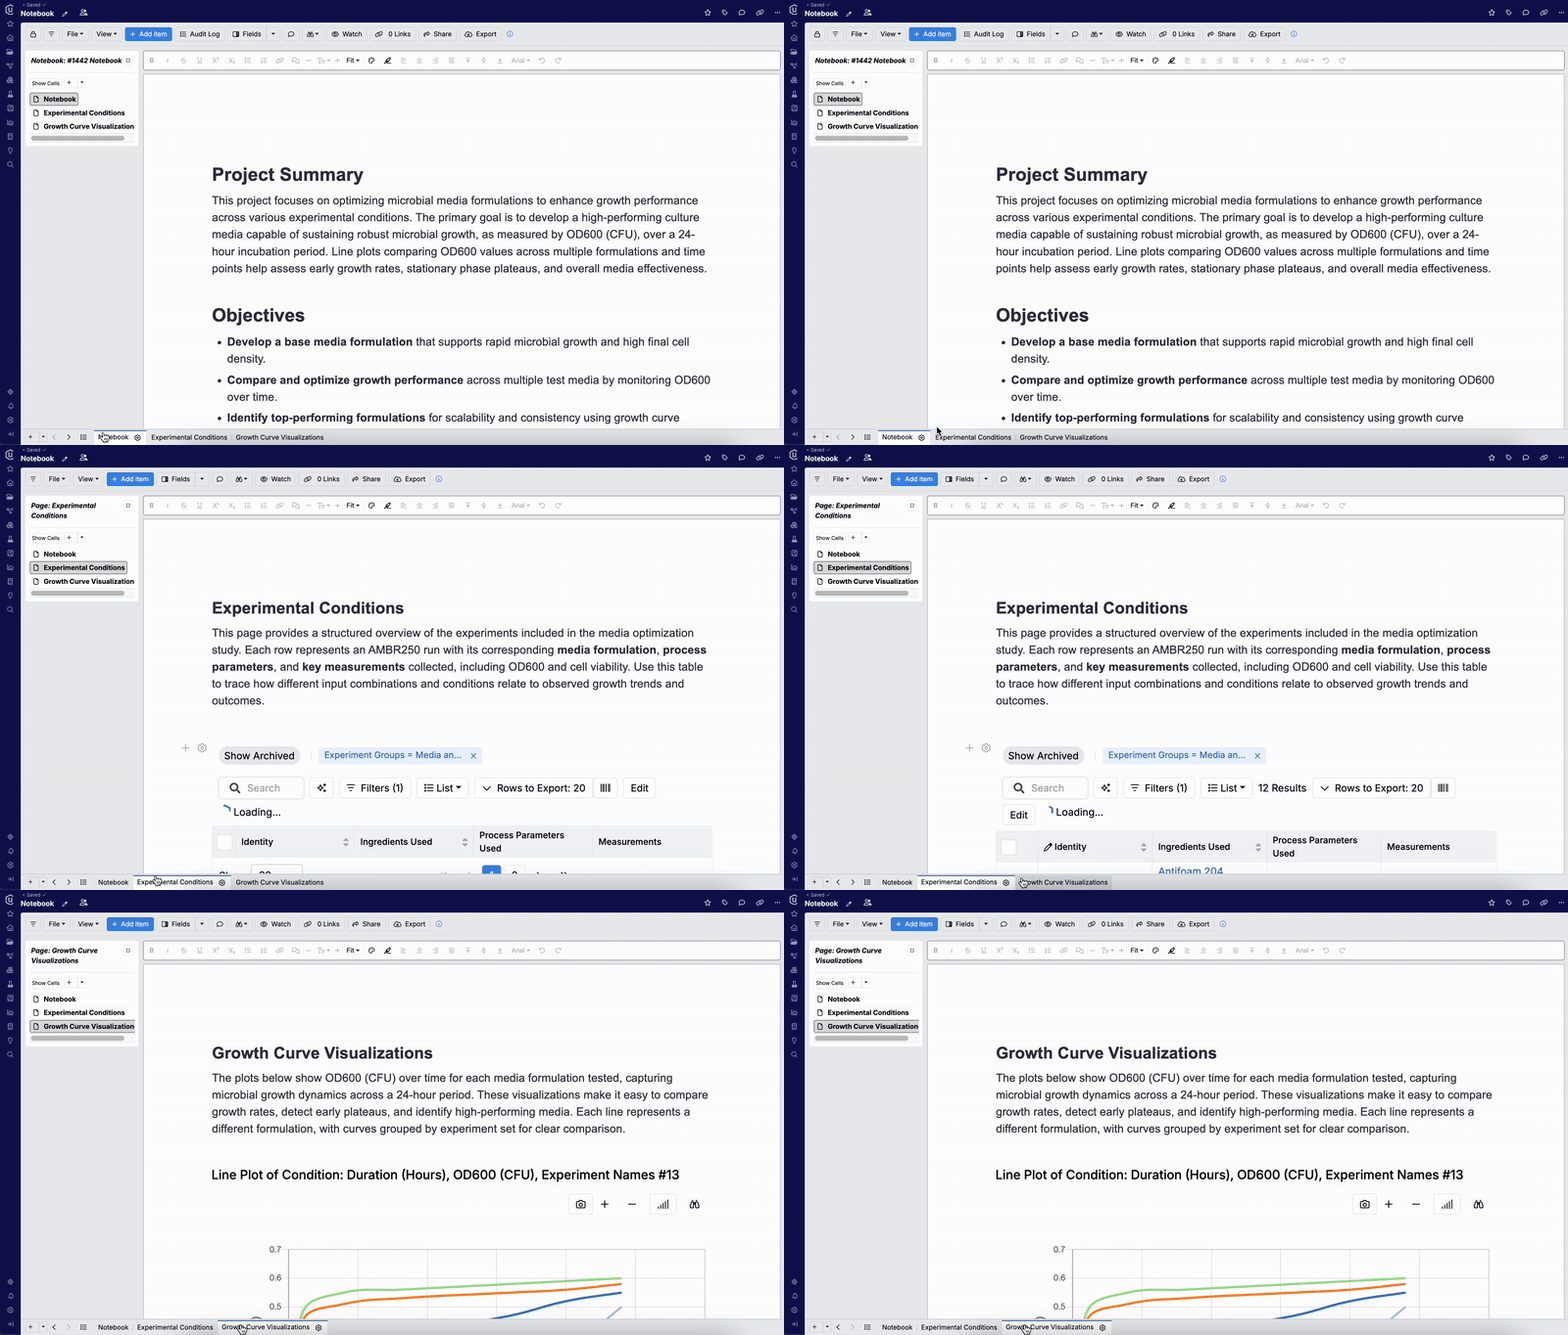
- A new tab bar now appears at the bottom of any multi-page notebook, making it easy to switch between pages.
- You can also now add files as pages directly from the tab interface. Bring in new or existing supporting documents, spreadsheets, PDFs, or images and view them inline as part of your notebook. Note that embedded files are read-only.

- The new Combined View gives you a full, scrollable overview of all notebook pages—ideal for final reviews or sharing.
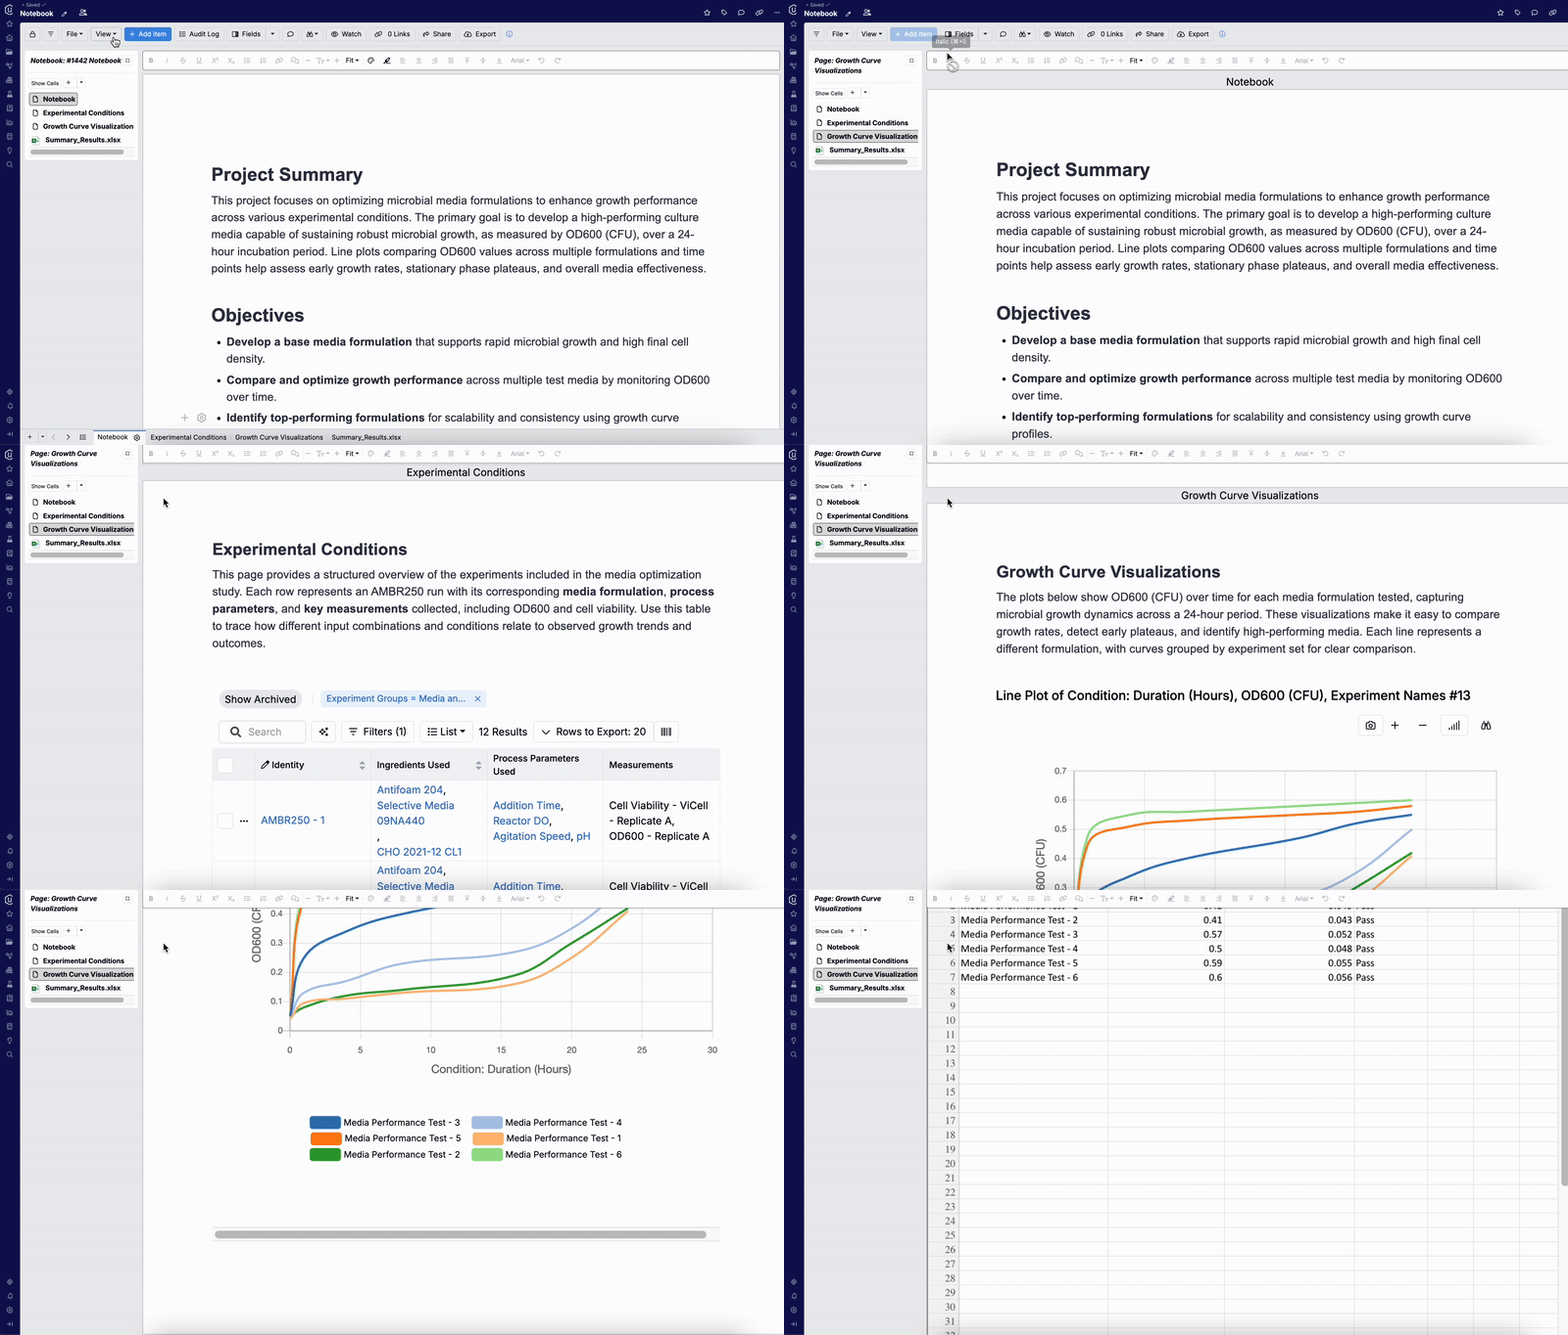
To see a full walkthrough—including how to add and edit files, switch views, and navigate between pages—check out the dedicated help article on multi-page notebooks.
Edit Measurement Values from Experiment Listing
Measurement values displayed as columns on the Experiment Listing page are now editable directly from the listing view. Once configured, entering a value in the listing will automatically update the associated recipe, adding the output if it isn’t already present.
This is especially useful for lab workflows with test samples, where technicians can record output values directly from the listing in the lab request without opening each recipe individually.
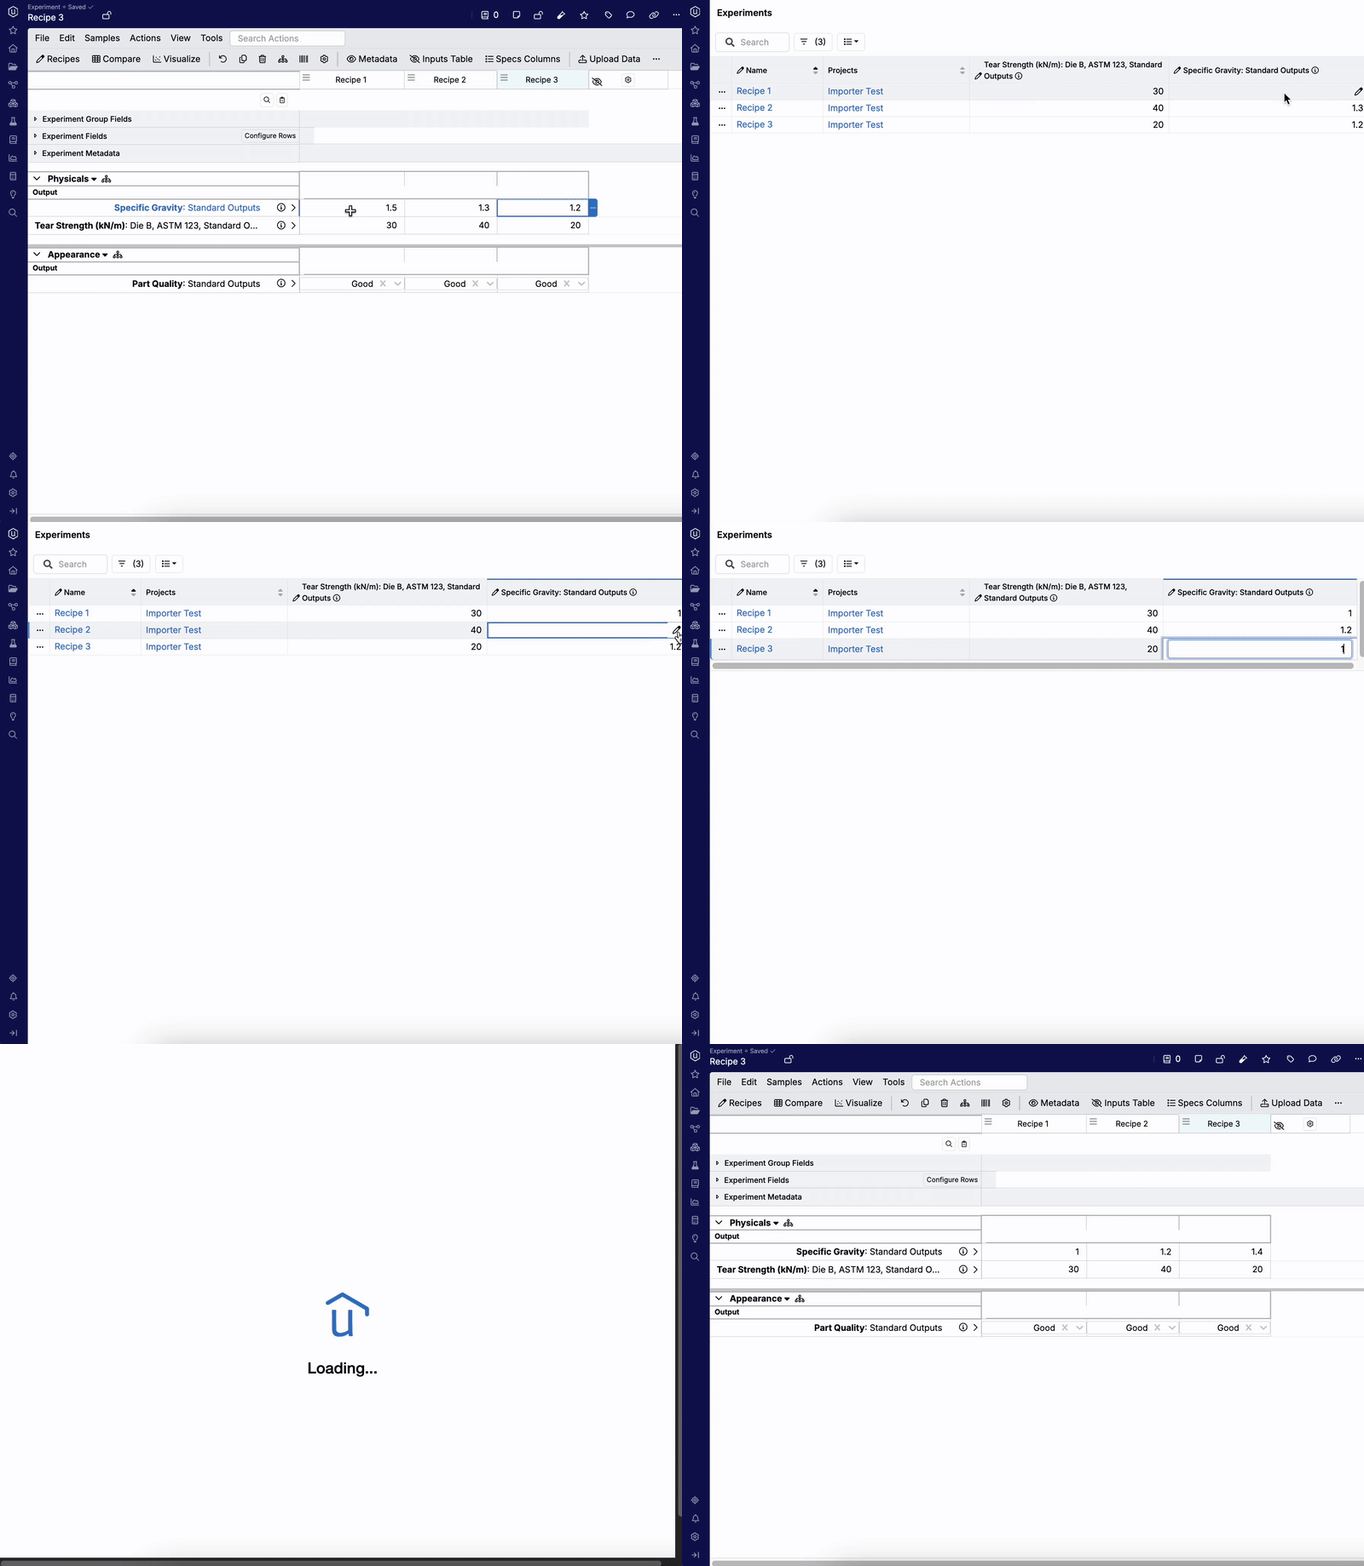
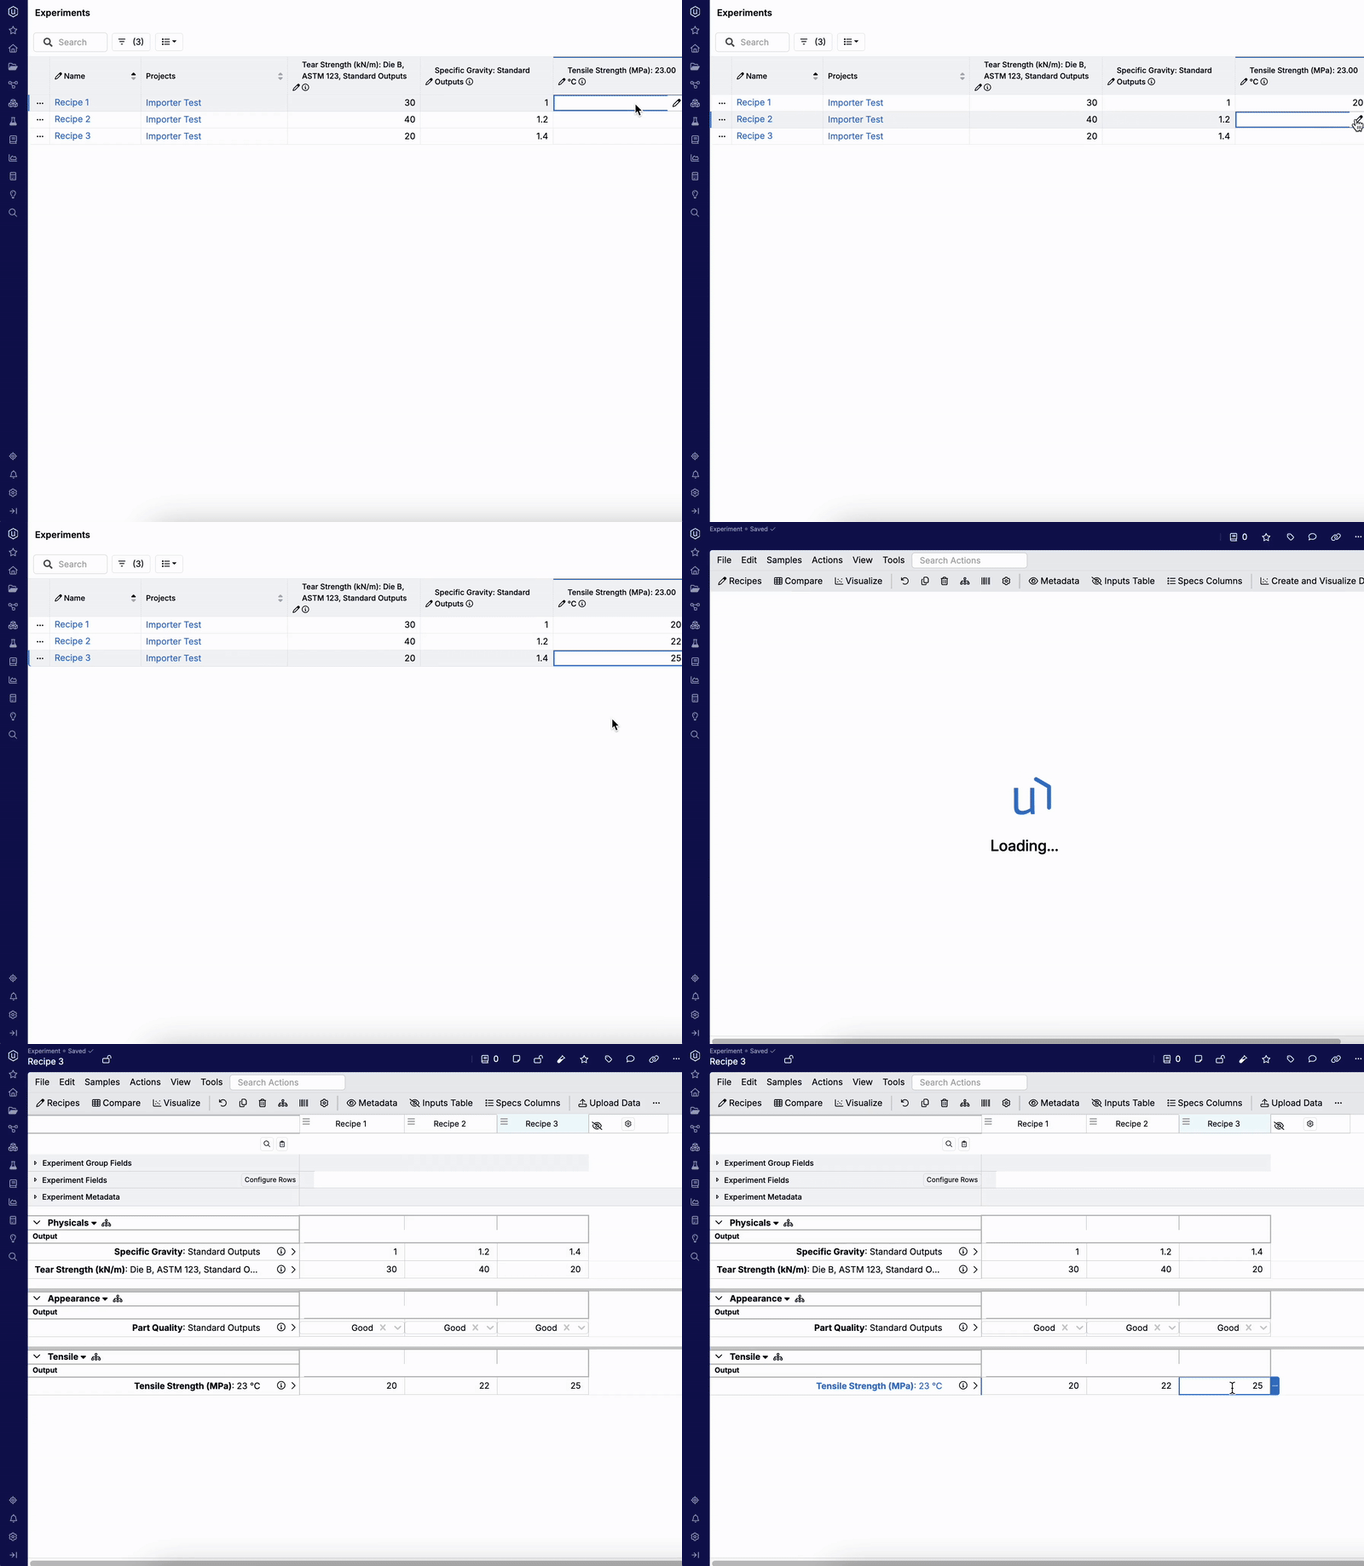
How to configure:
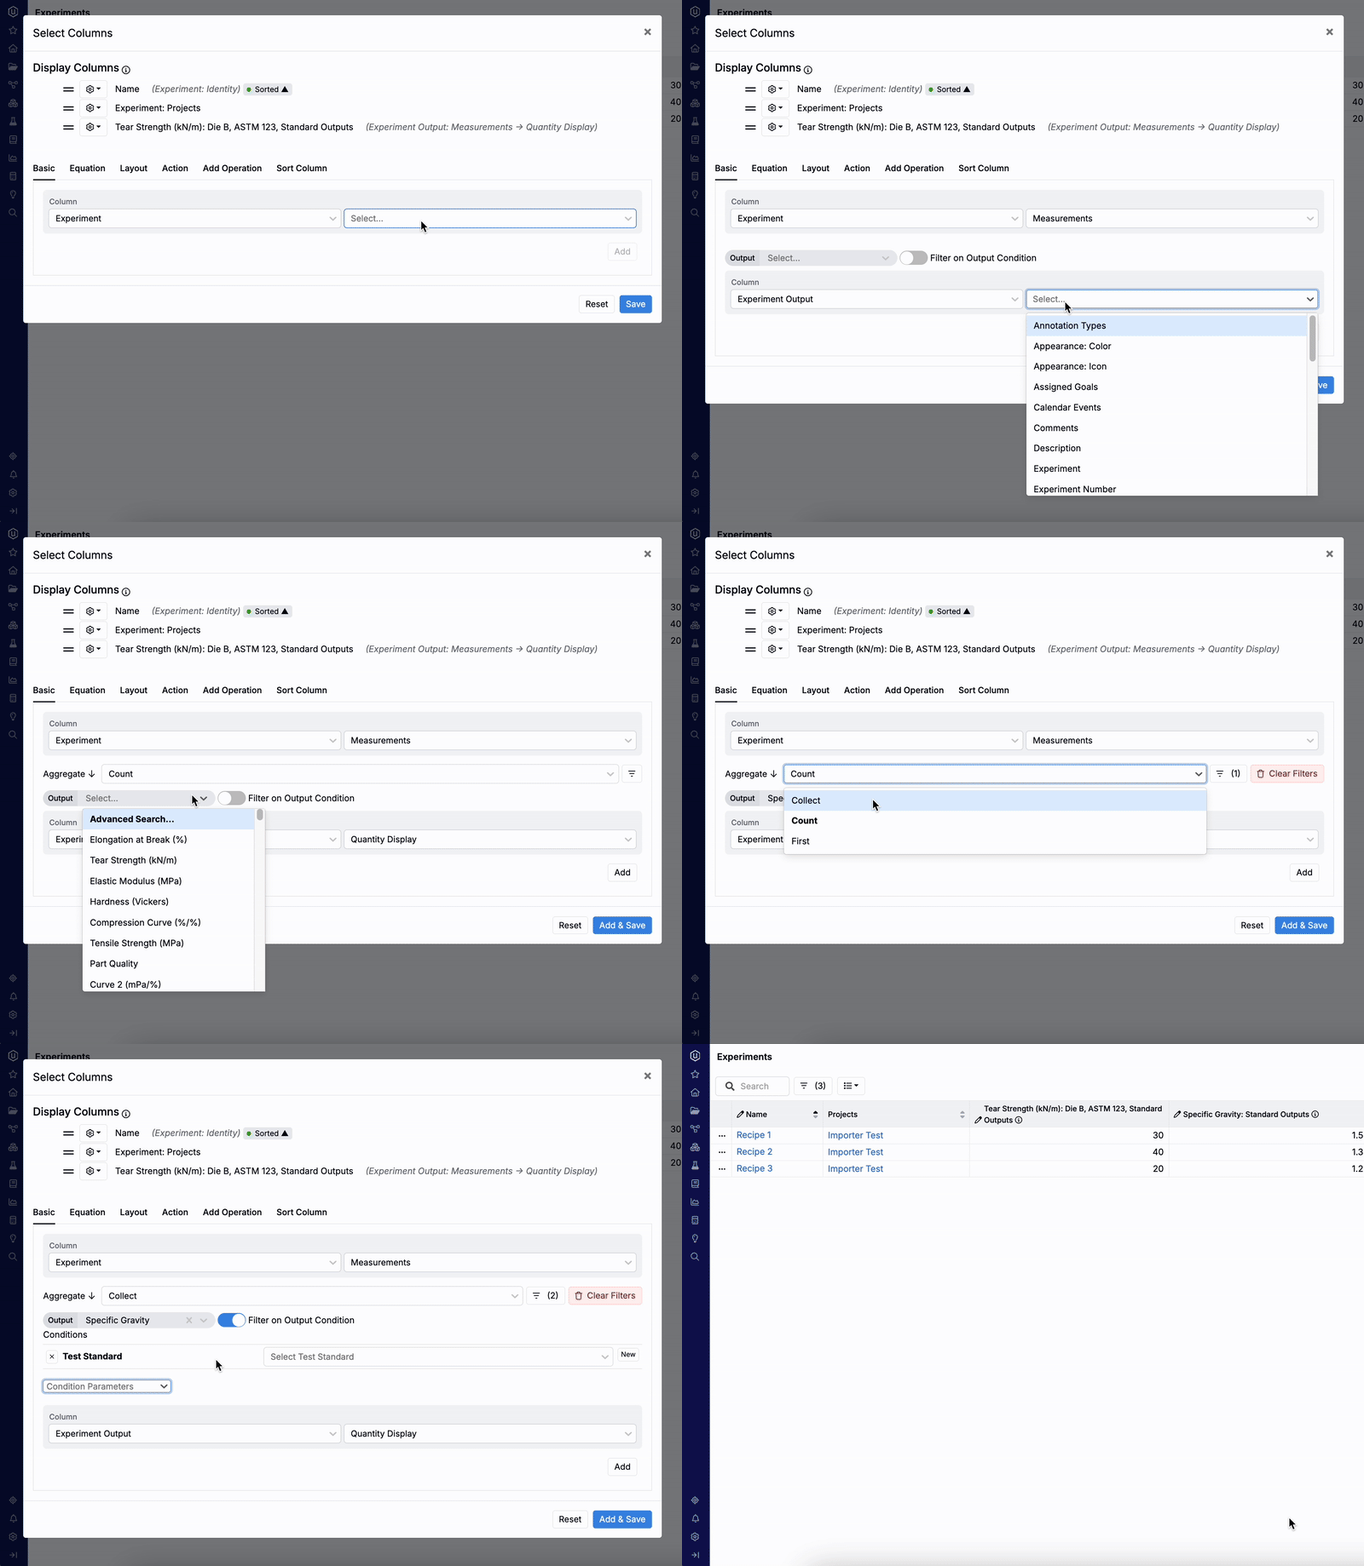
- Go to the Experiment Listing page.
- Open List → Set Columns.
- Add a base: Experiment + Measurements.
- Add a transitive column: Experiment Output + Quantity Display.
- Set aggregation to Collect.
- Use the output field to select an output.
- Toggle Filter on Output Condition to add conditions.
- Save your changes.
User Group Based Terminology Overrides
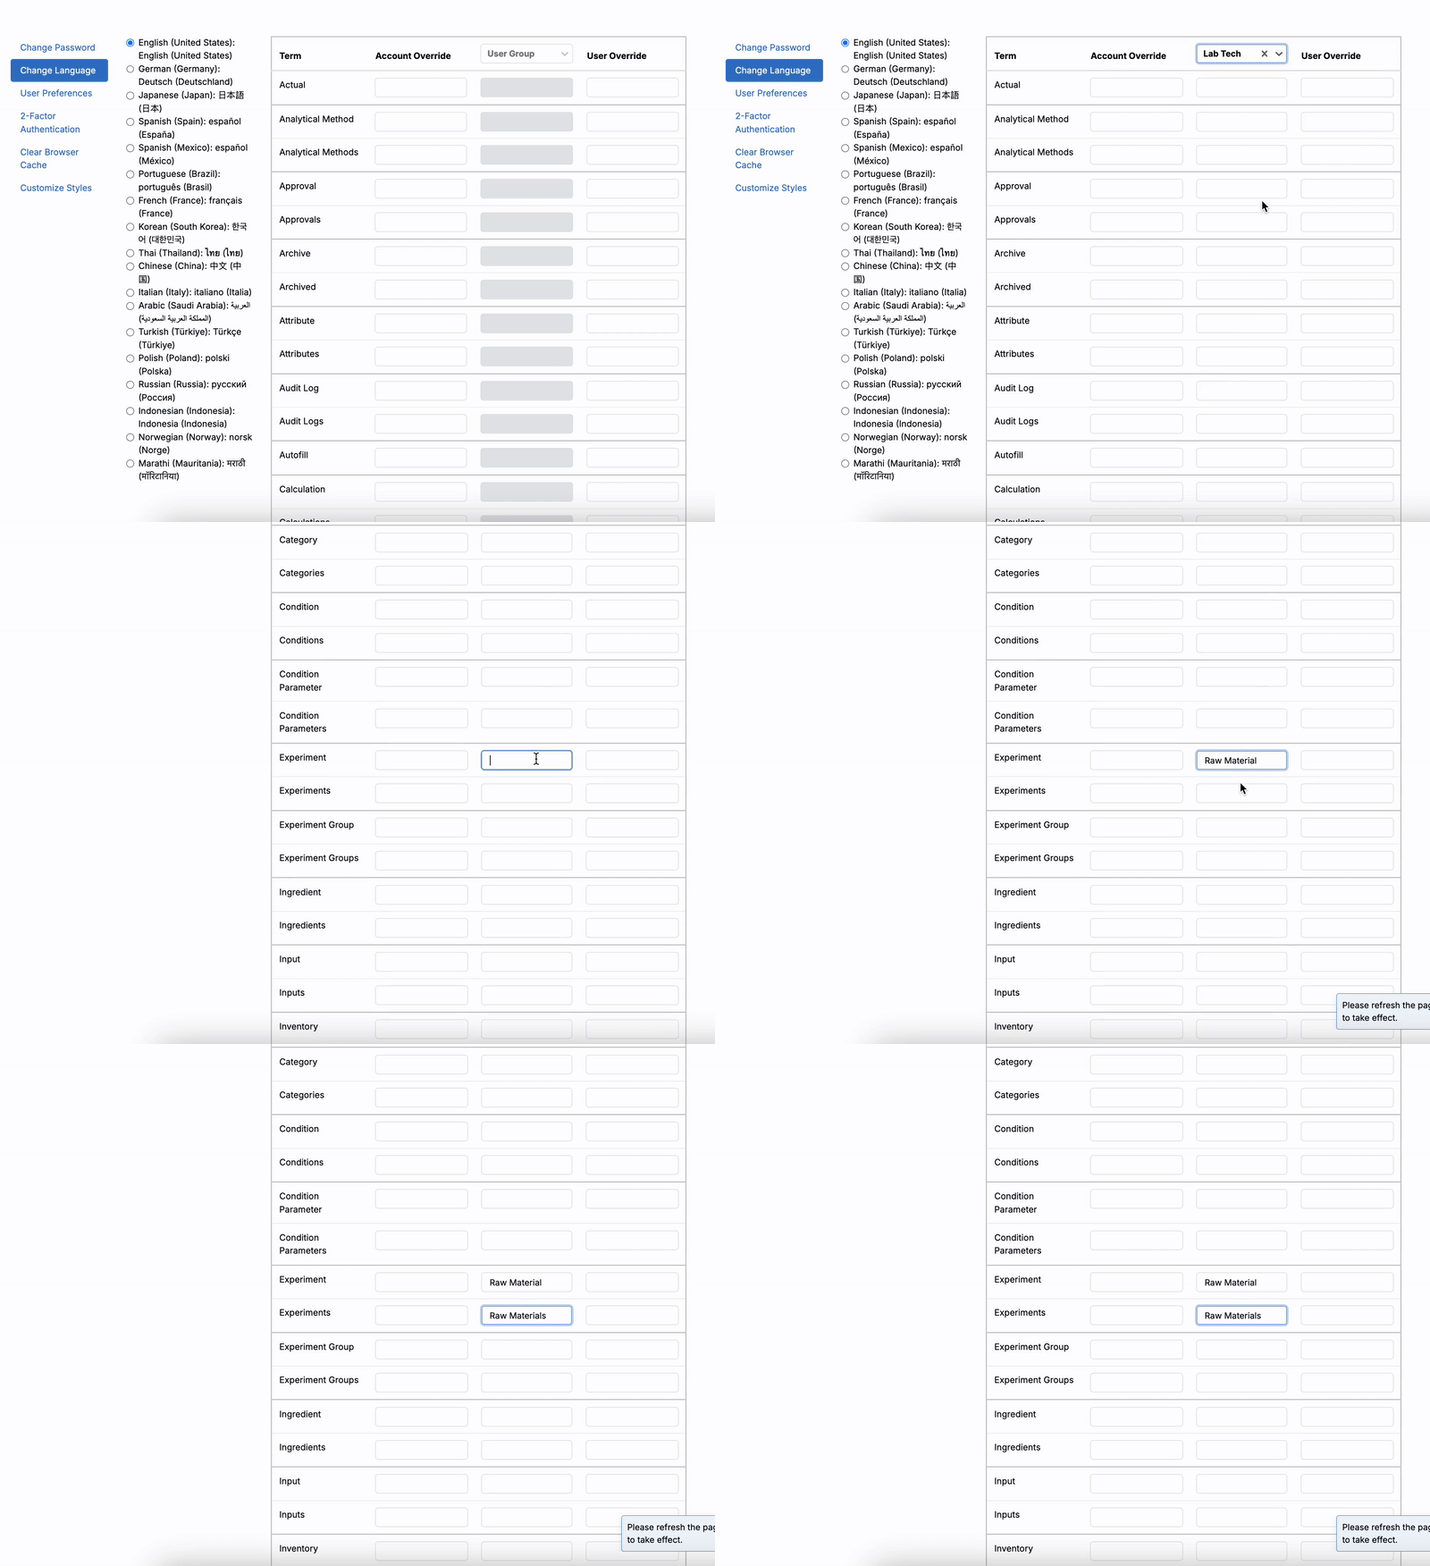
Uncountable now supports terminology overrides based on user groups, allowing translated text on pages to be customized for specific teams.
This was introduced to better support organizations with diverse teams that use different terminology. For example, one group may refer to “experiments” as “formulas” while another keeps the default term. This helps ensure each team sees language that aligns with their workflow and reduces confusion across departments.
When resolving terminology overrides, Uncountable applies them in the following order: account-level, then user group-level, and finally user-level (which takes highest precedence). If a user belongs to multiple user groups with conflicting overrides for the same term, the system uses the override from the group with the lowest group ID, ensuring predictable and consistent behavior.
How to configure:
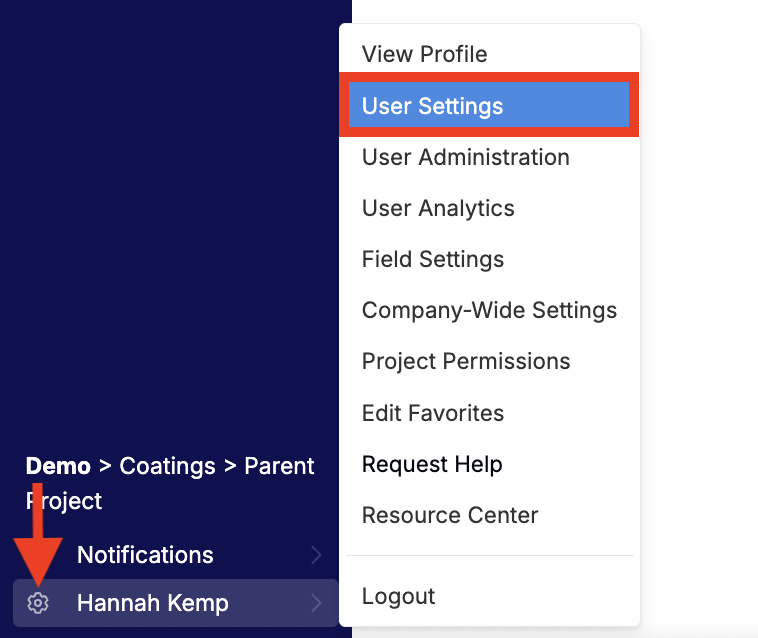
- Navigate to the User Settings page (cog icon in the navigation bar > User Settings).
- Access the Change Language tab within the User Settings page.
- Use the User Group column header to select a user group to apply the overrides for.
- Locate the terms to override in the table. Use the user group column to add the new term (both singular and plural).
- Refresh the page to apply changes across the platform.
Files Sidepanel
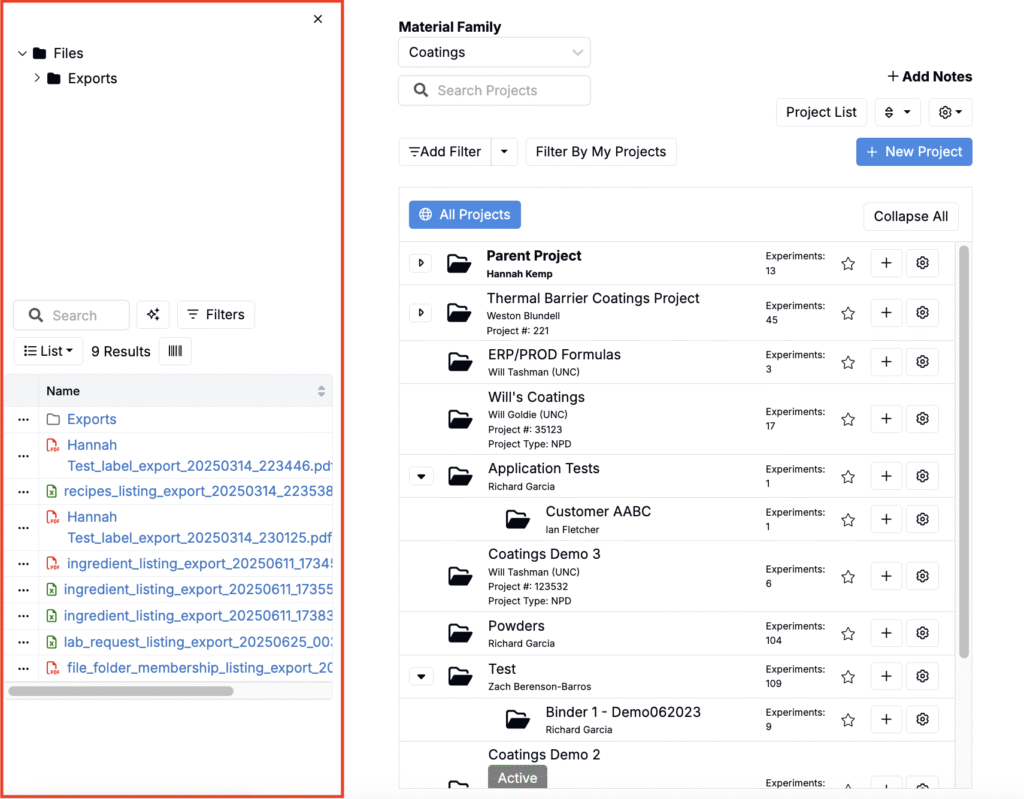
You can now view files in Uncountable through a dedicated Files Sidepanel. When enabled, the panel is displayed on the left side of the screen and contains folders and a listing of all of all files created within the platform.
This update makes it easier to move from project-based workflows to file/folder-based navigation. By viewing all attachments, files, and notebooks in a single pane, users can quickly locate and manage documents without needing to navigate away from their current workflow.
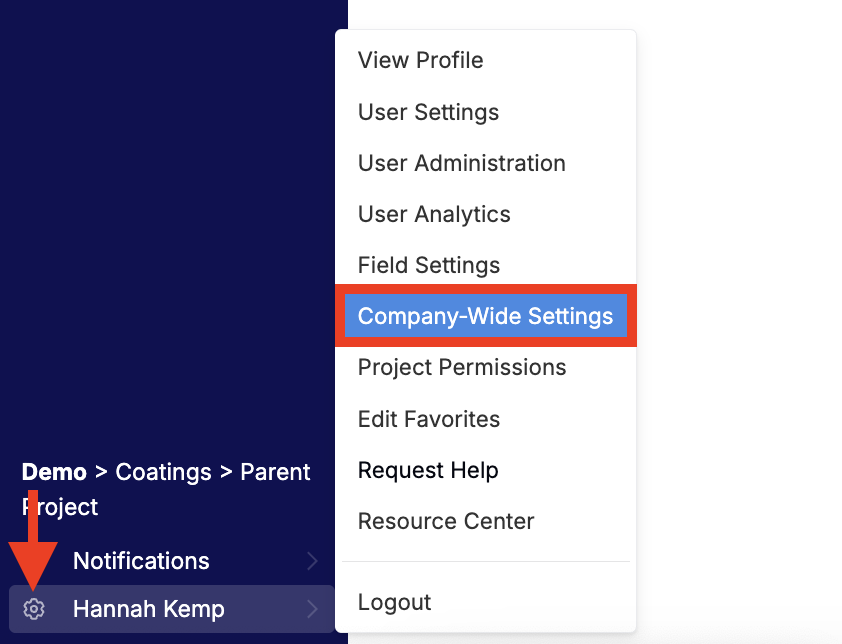
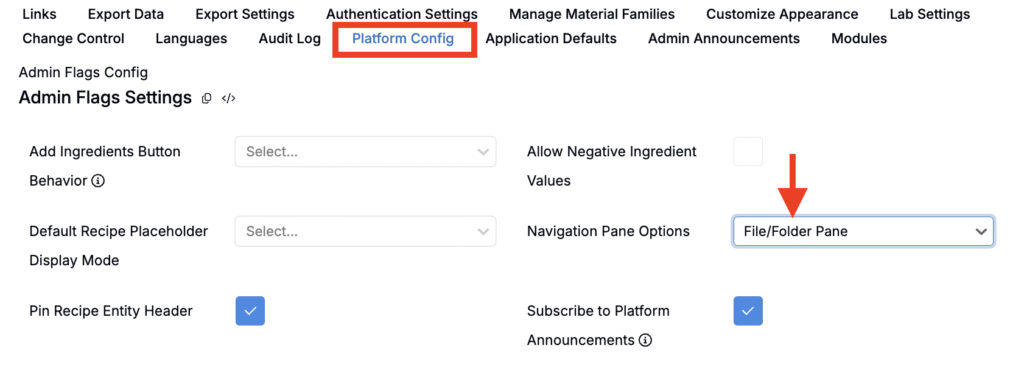
How to configure:
- Access the Platform Config tab of the Company-Wide Settings page ****(cog icon in the navigation bar > Company-Wide Settings > Platform Config).
- Under Navigation Pane Options, select File/Folder Pane.
- The Files Sidepanel will now be accessible across the platform and remain enabled until turned off.
Partial Sorting of Outputs on the Measurements Page
Users can now perform partial sorts on outputs displayed on the Enter Measurements page.
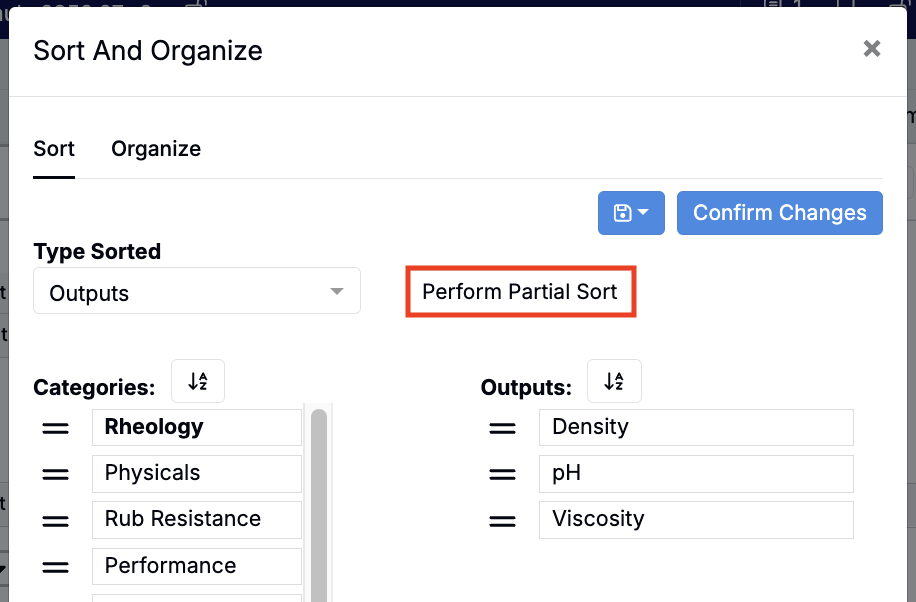
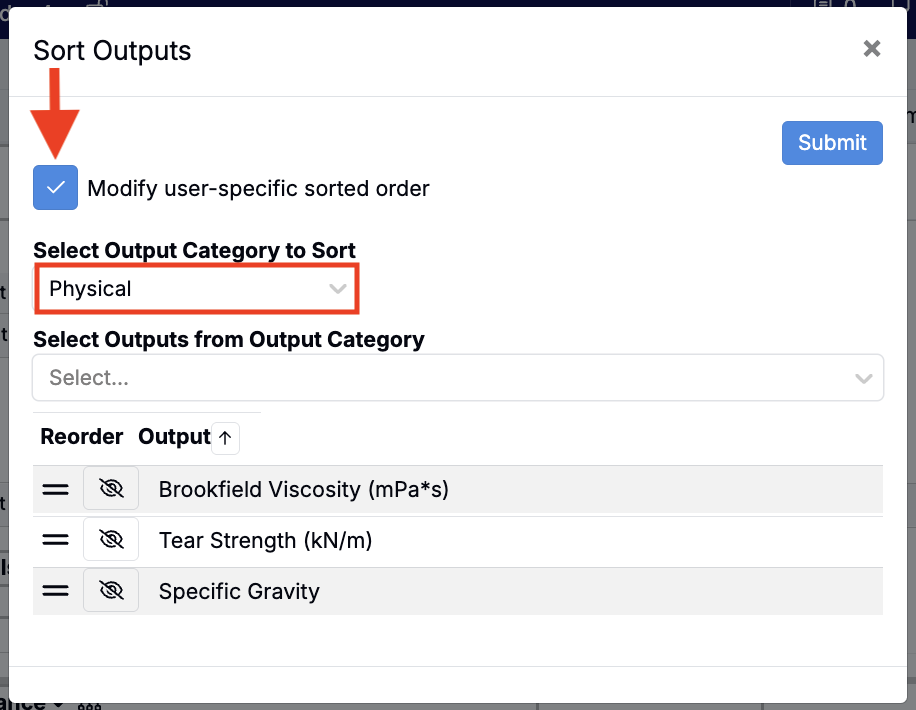
In the Sort and Organize modal, you can create user-specific sort orders for outputs based on output category. For example, you might create a custom sort order for all outputs within the Physicals category to control how they appear on the Measurements page. Previously, partial sorting was only available for ingredients on the Enter Recipe page.
This improvement is especially useful when working with large sets of outputs or when certain outputs need to be grouped or prioritized for review. It allows users to organize outputs in a way that aligns with their testing workflows, making it easier to focus on related measurements or follow a consistent order during data entry and analysis.
To perform a partial sort on outputs:
- Access the Sort and Organize modal from the measurements view of your recipe.
- Within the modal:
- Click the Perform Partial Sort button.
- Toggle on the Modify user-specific sorted order setting.
- Select an output category to sort.
- Use the field below to select outputs.
- Use the drag handles to change the order in which outputs within that category appear.
- Save changes.
Label Editor Improvements
The Label Editor tool has been updated to make the process of label creation in Uncountable more flexible and intuitive. Changes include:
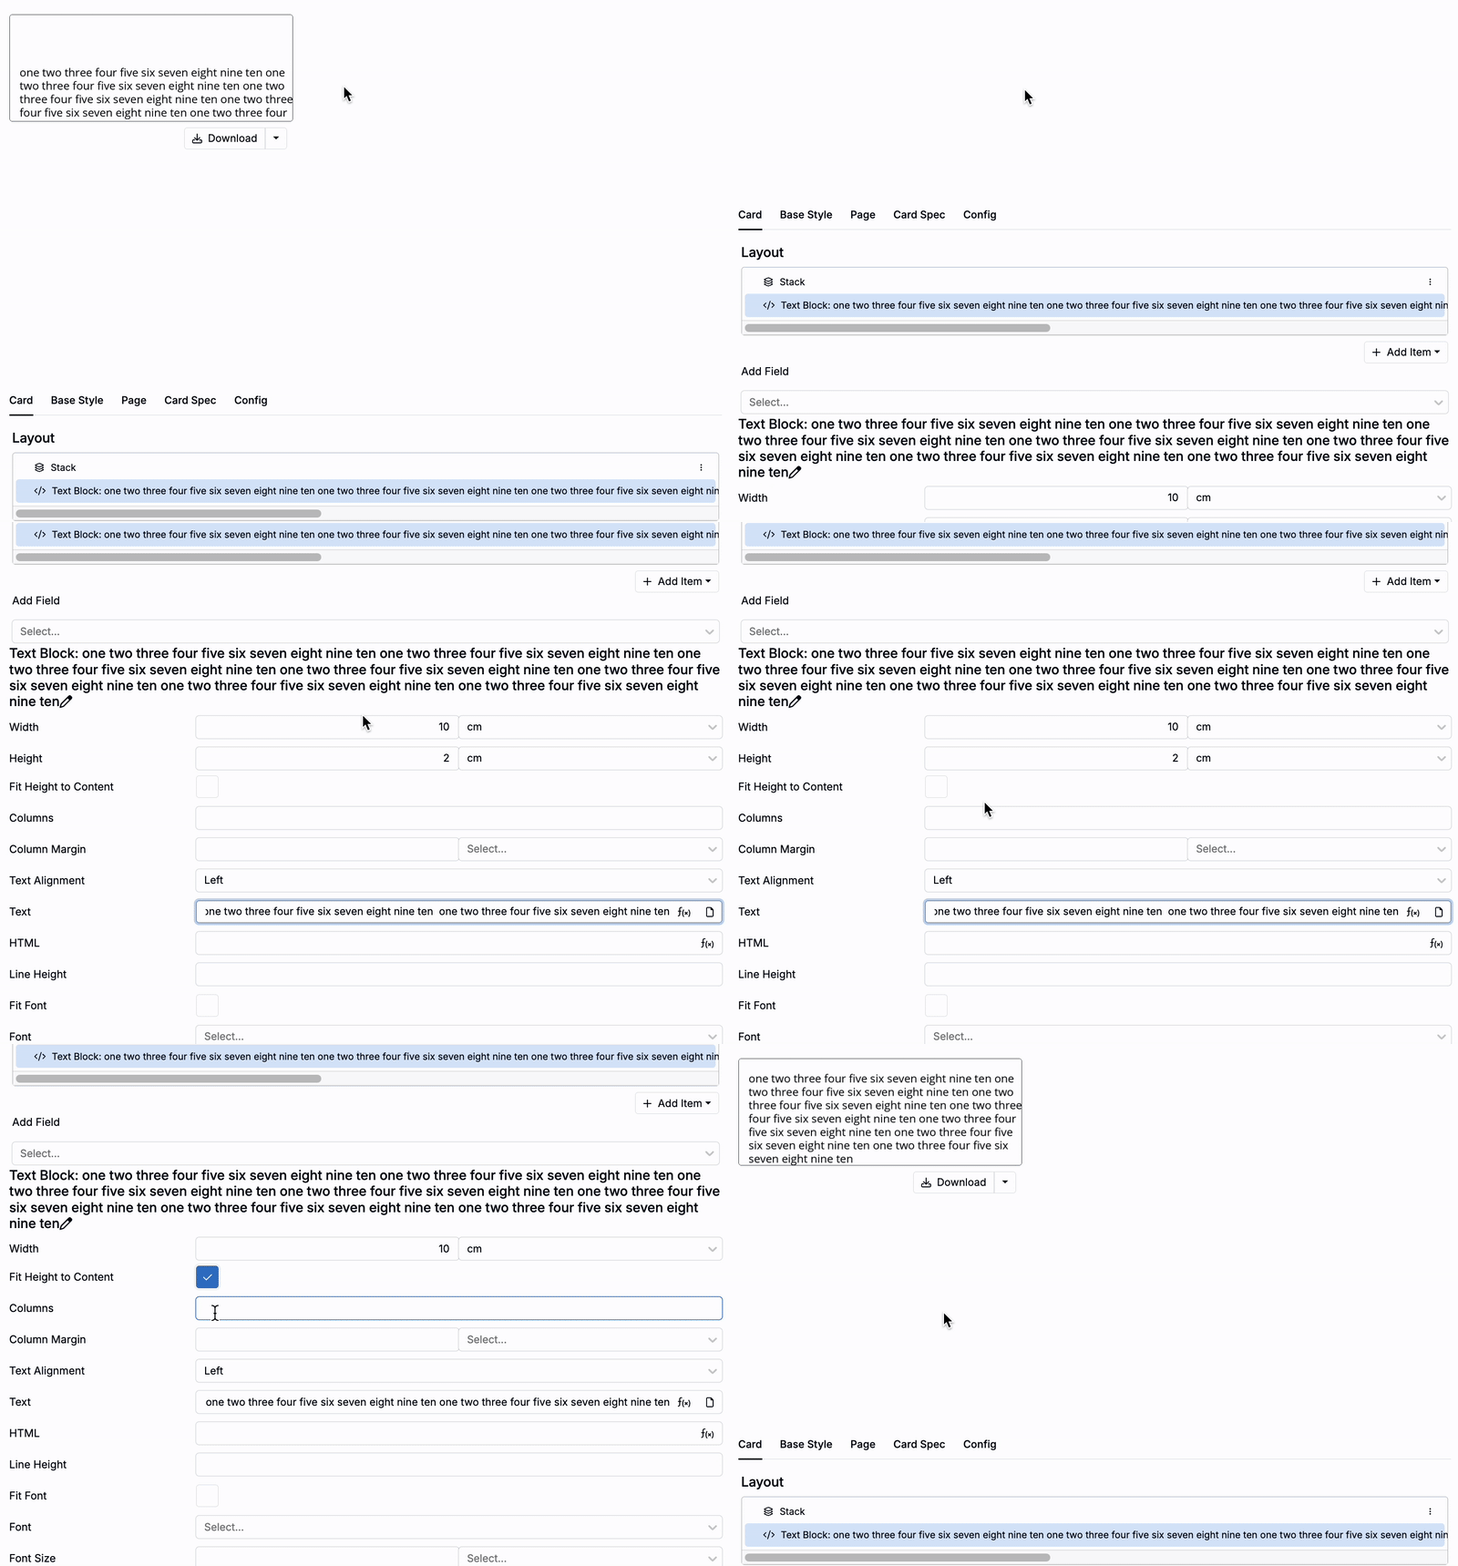
- Dynamic Height for Text Blocks: A new Fit Height to Content setting allows text blocks to automatically adjust their height based on content, reducing the need for manual resizing.
- Copy and Paste Support: Copying and pasting within the editor is now possible. Users can copy label elements by selecting them and using keyboard shortcuts. This is also supported between schemas, making it easier to reuse label designs.
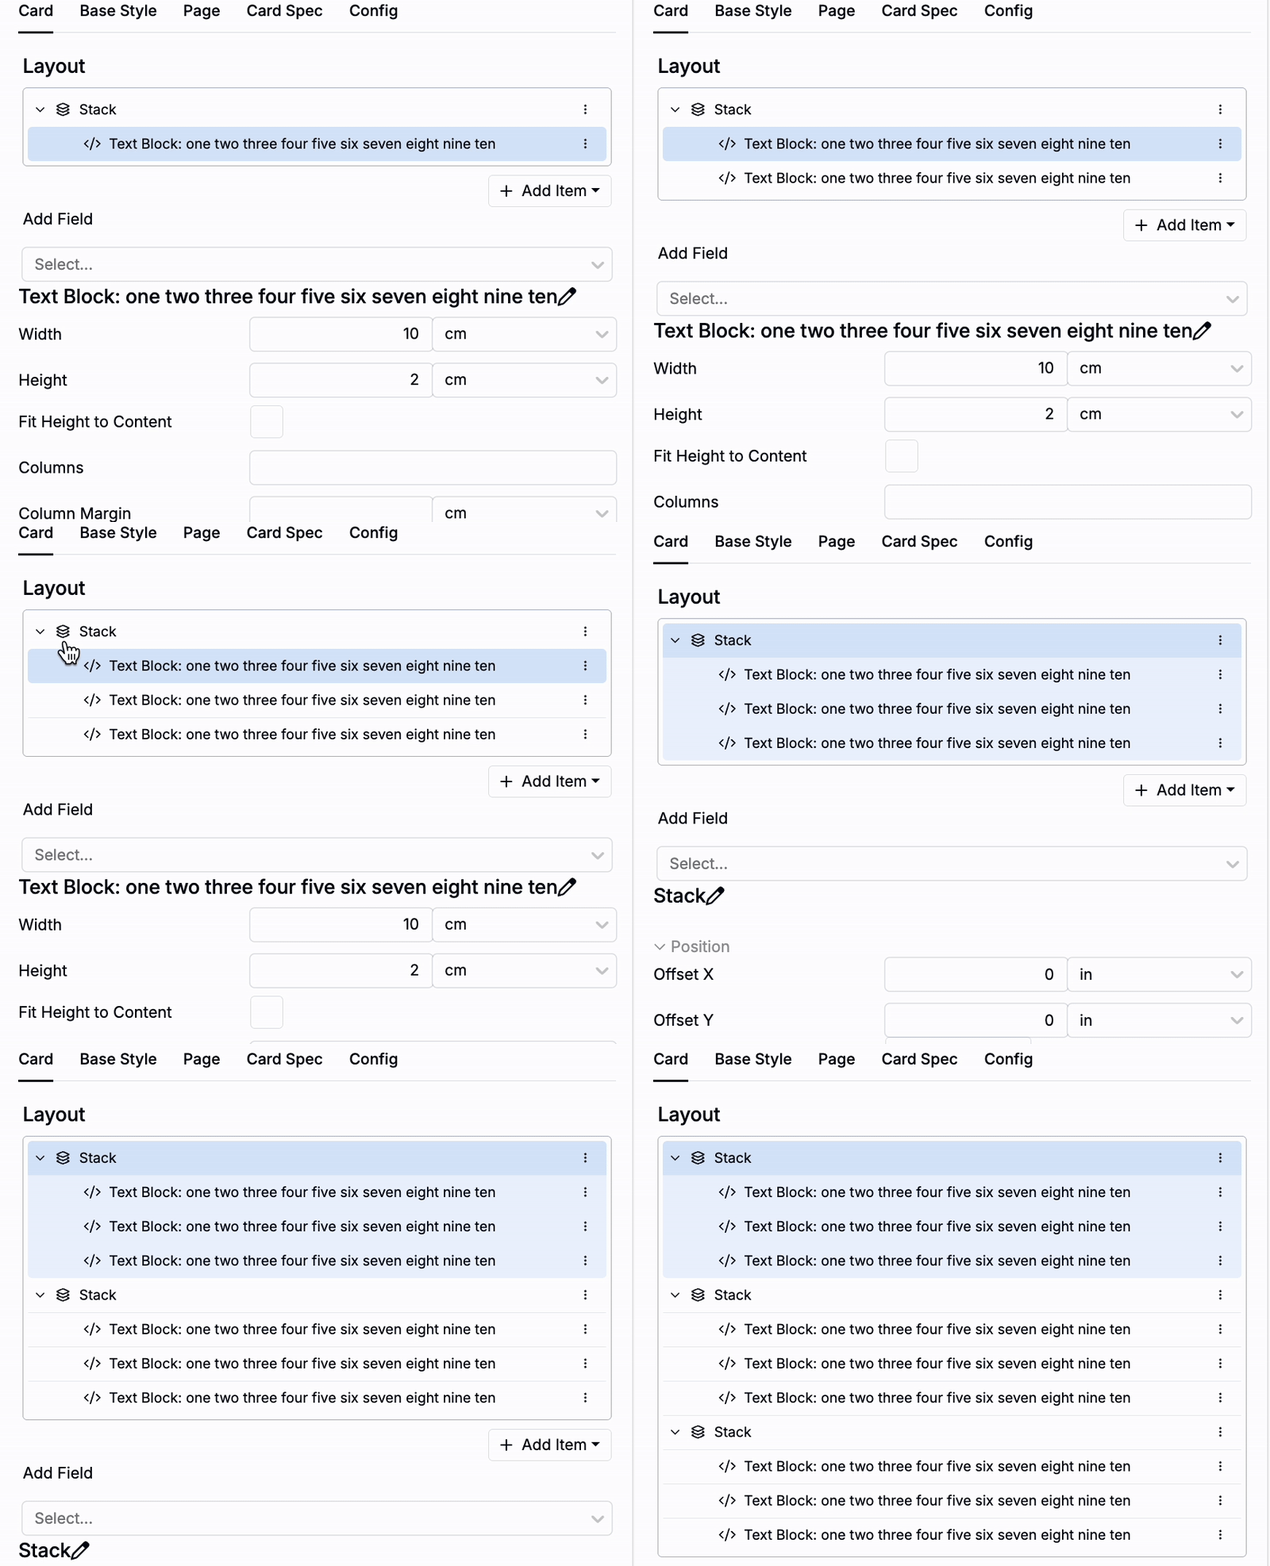
- Undo Support: Support for undoing changes using keyboard shortcuts has also been added, letting you quickly roll back recent edits, similar to standard design tools.
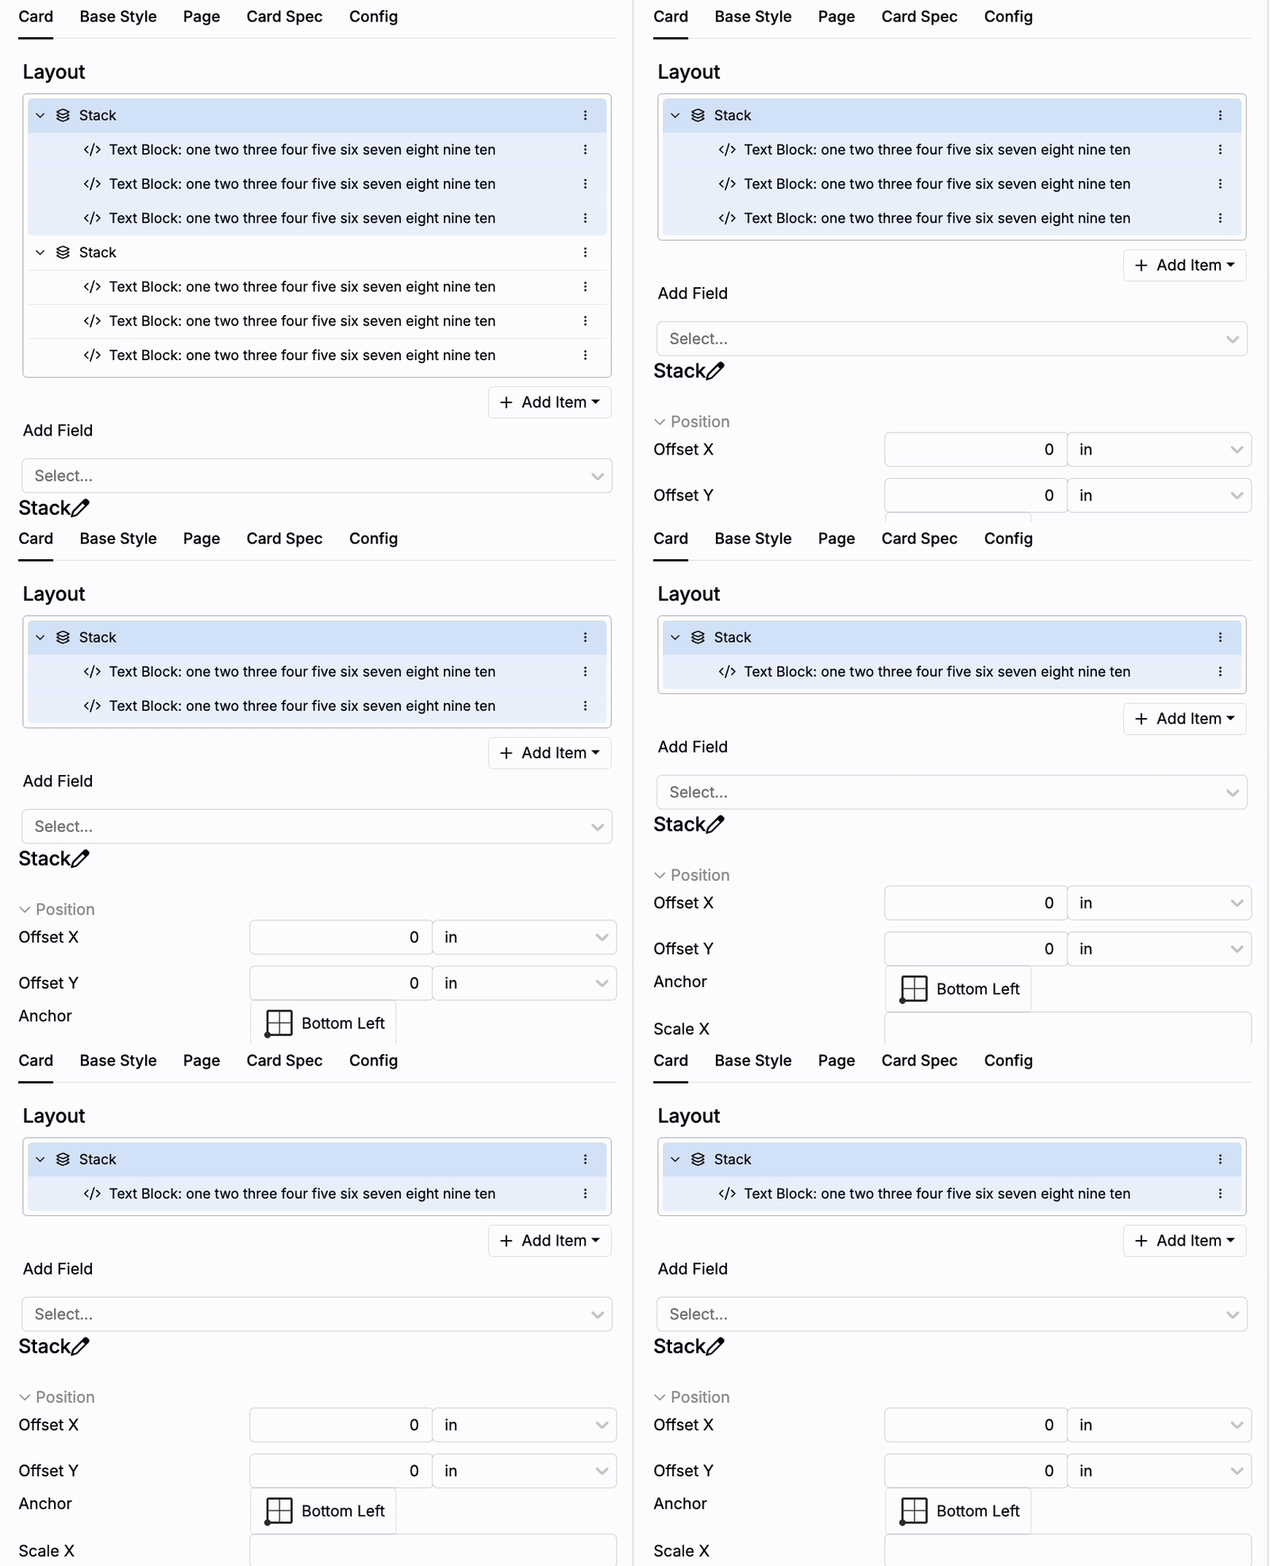
These updates make it easier to maintain consistent label designs across projects and reduce repetitive setup, helping teams work more efficiently and keep labels standardized across different schemas.
New Experiment Comparison Calculation
A new Experiment Comparison calculation type has been added, allowing Uncountable users to compare ingredients and compositions between experiments.
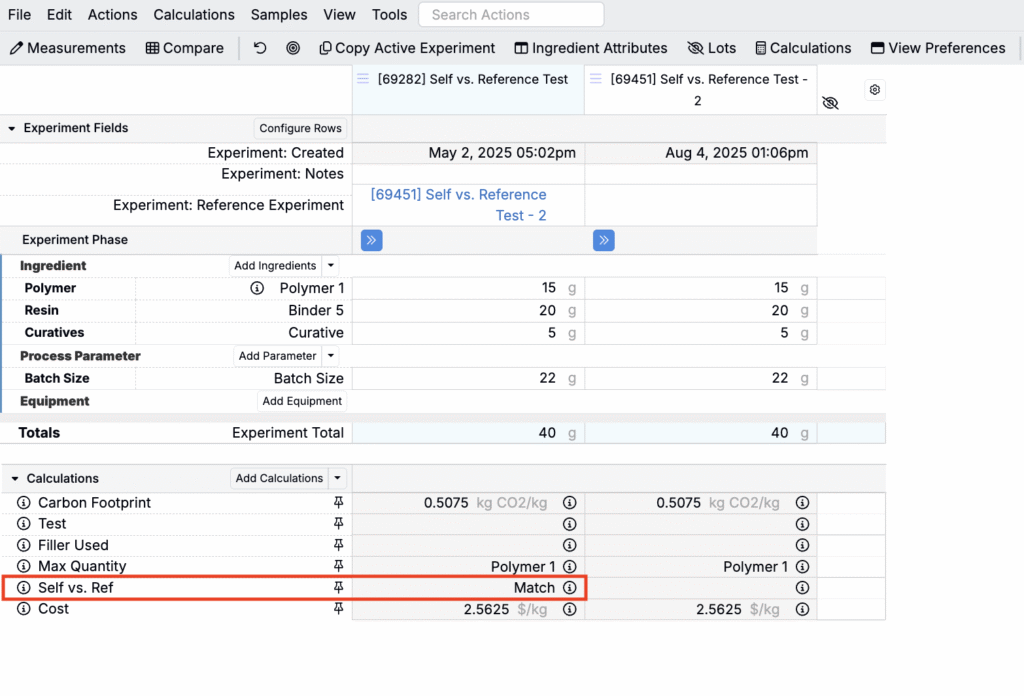
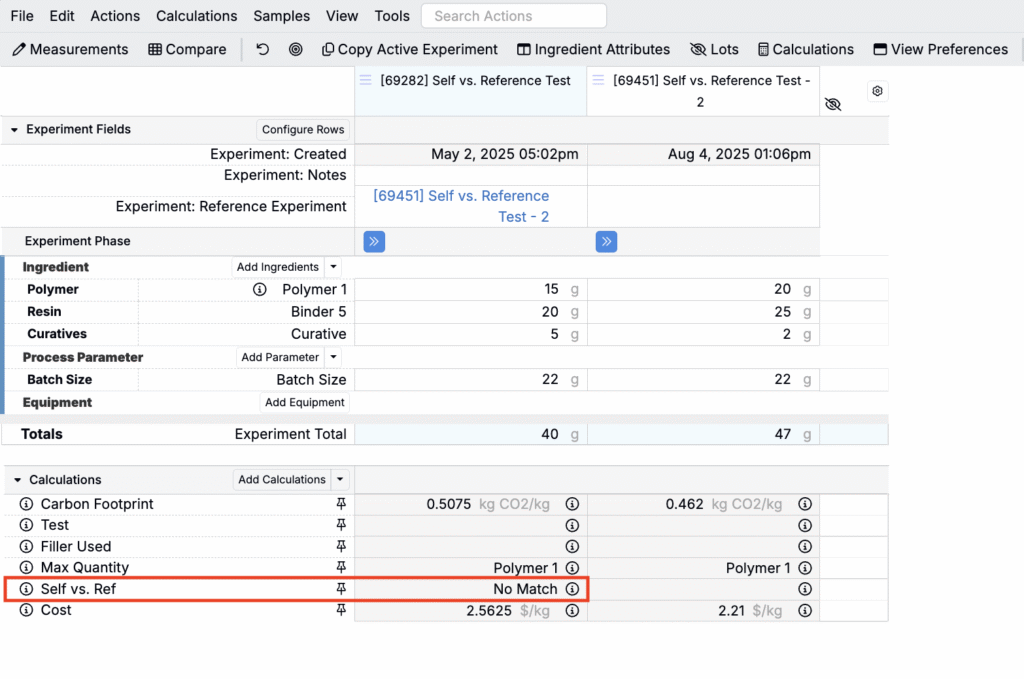
By selecting a reference experiment and setting a comparison threshold, this calculation checks whether all ingredients match between the current experiment and the reference. The result displays a configurable “match” or “non-match” value in the calculation cell.
This new calculation is useful for checking formulation consistency, confirming that experiments match a reference recipe, and quickly spotting ingredient-level differences between related experiments at a glance.
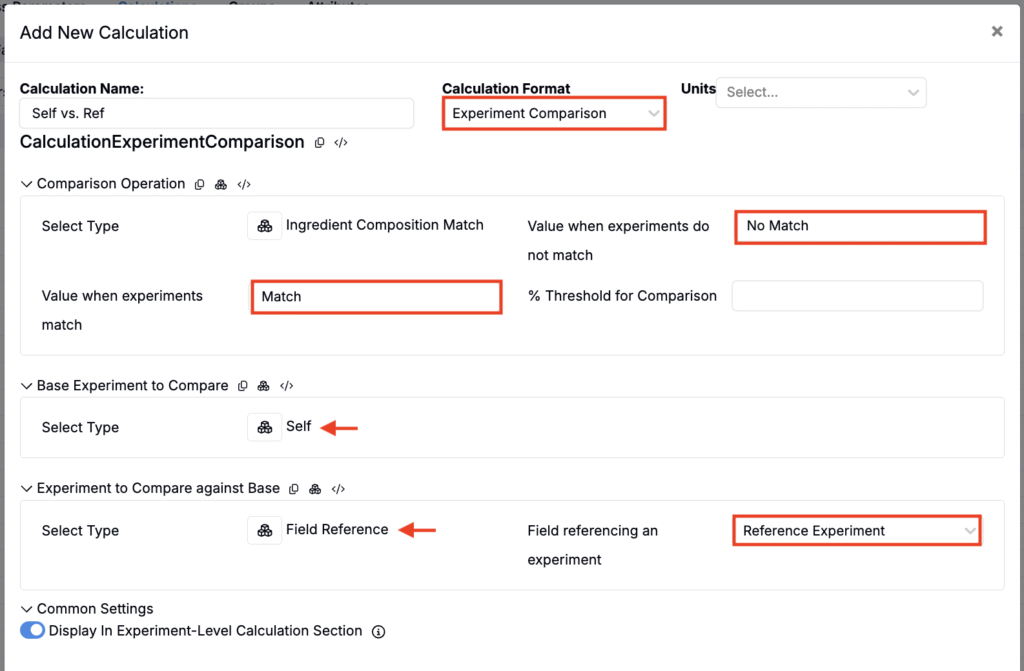
To create an Experiment Comparison calculation:
- Create a new calculation.
- In the new calculation modal:
- Set Calculation Format to Experiment Comparison.
- Set Comparison Operation to Ingredient Composition Match.
- Enter a Value when experiments do not match (displayed if compositions differ).
- Enter a Value when experiments match (displayed if compositions match).
- Set an optional % Threshold for Comparison if minor deviations are acceptable.
- For Base Experiment and Experiment to Compare Against Base, choose either Self or Field Reference.
- When using a field reference, select a experiment field (e.g., a “Reference Experiment” field added to the Experiment definition and linked to the reference experiment).
- Save the calculation.
Once the calculation has been added to your recipe, it will compare the base experiment to the reference and display either the match or non-match value in the calculation cell. Only ingredient compositions are evaluated—process parameters are excluded from the comparison.
Instrument Connection for Recipes
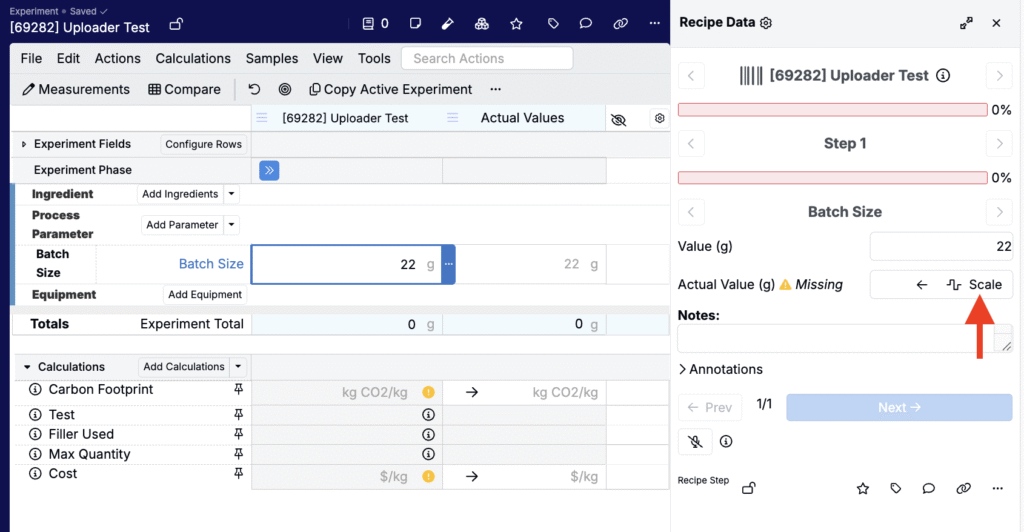
Uncountable now supports real-time streaming of data from lab equipment directly into recipes. Users can connect instruments by selecting the Scale button in the Recipe Data Sidepanel and record measurements instantly without manual input.
This was added to help labs automate routine measurements, improve accuracy, and reduce time spent on data entry. By streaming data directly from instruments, teams can capture results in real time and minimize errors.
In the screenshot below, clicking the Scale will allow you to select from available lab instruments. When the side panel is open, users can also scan the instrument barcode to connect automatically. Once connected, the Actual Values column will automatically update in real time based on scale data.
Admins can enable this feature in Company-Wide Settings > Platform Config by toggling Enable Instrument Connection. To allow for barcode-based instrument selection, ensure Allow Global Barcode Scans is also enabled.
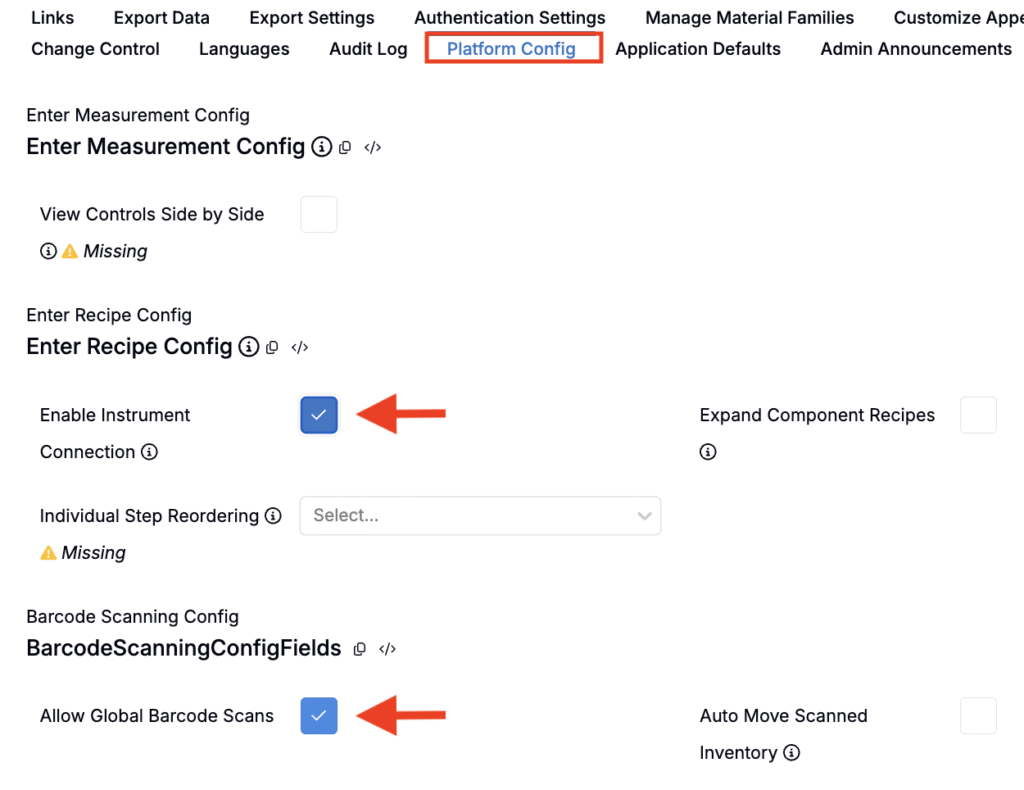
Table Builder Notebook Presets
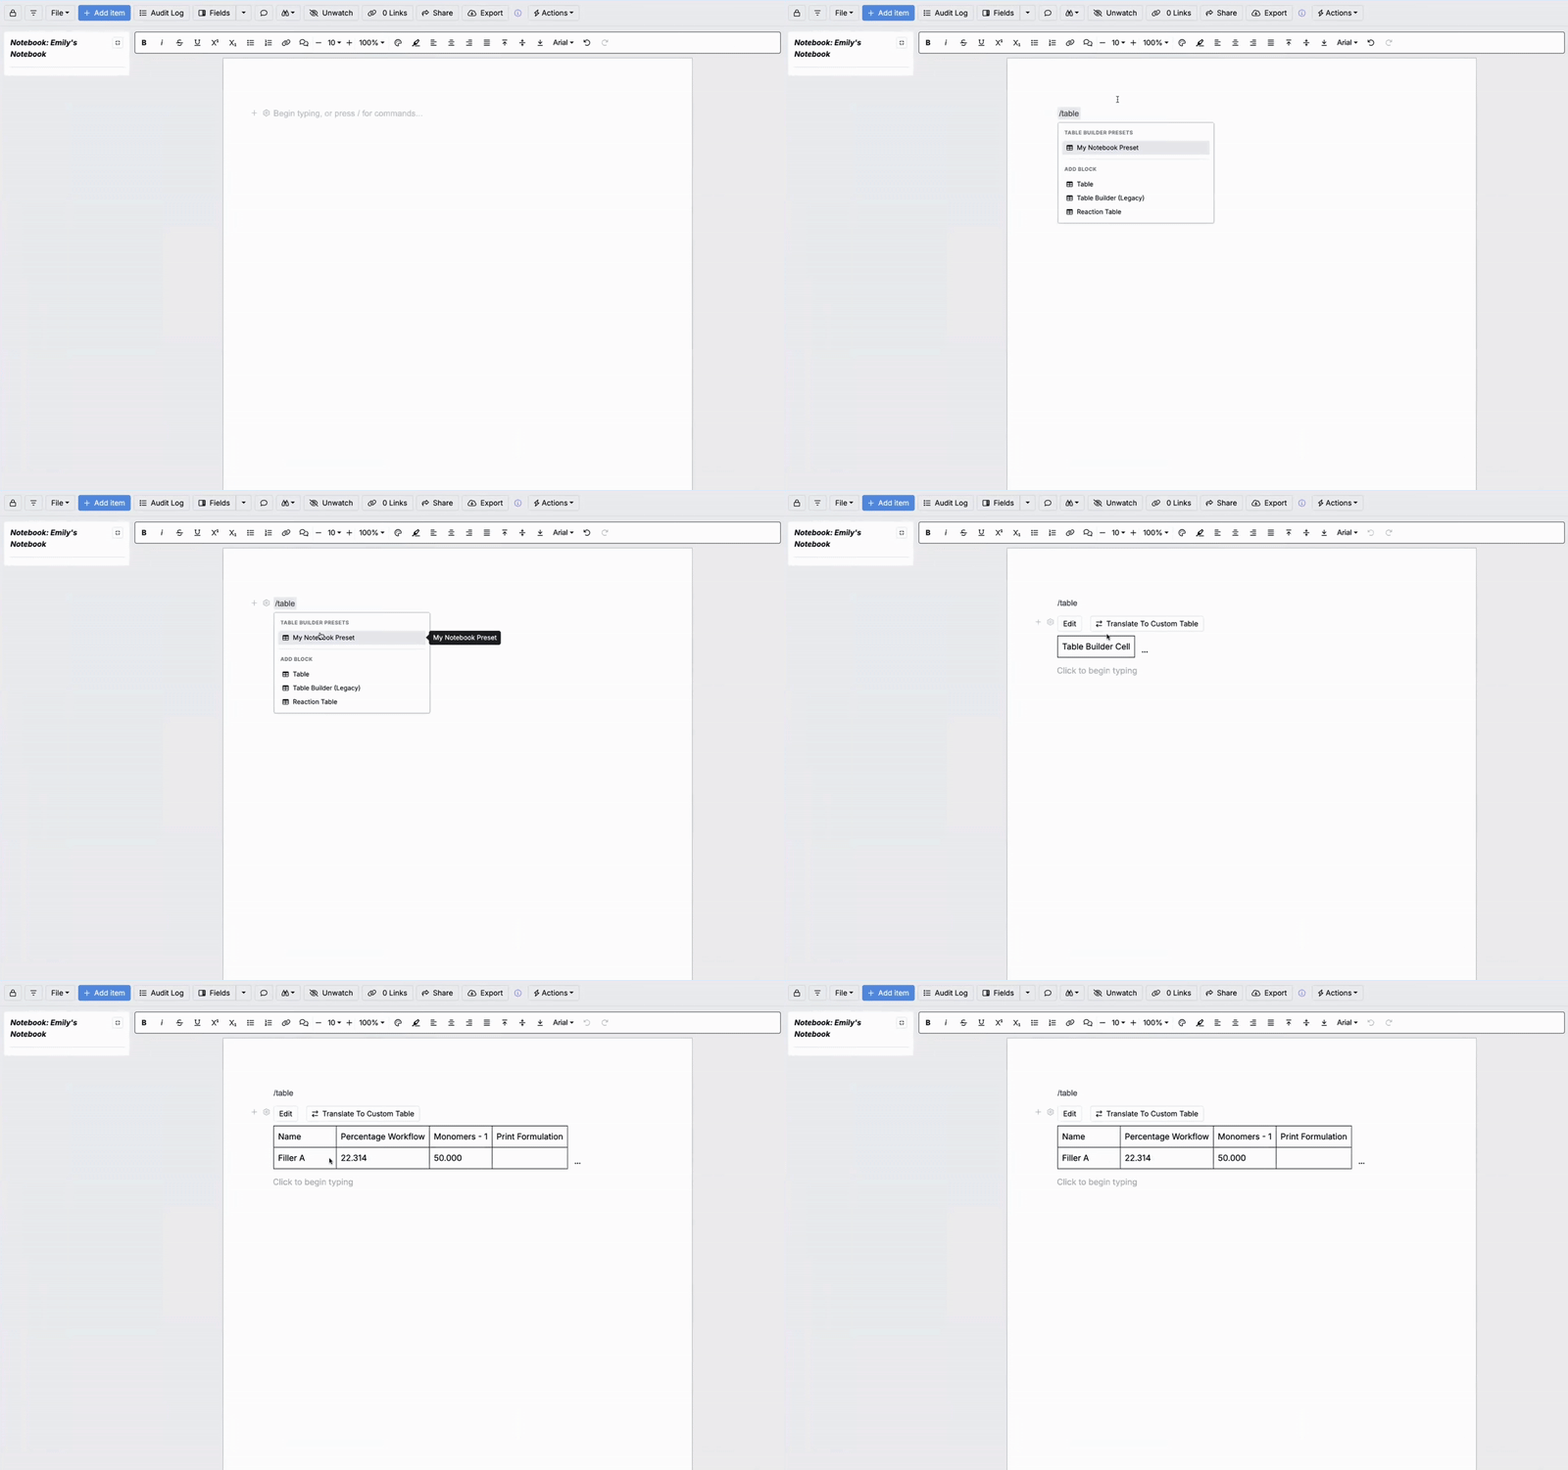
Admins can now create Table Builder presets with preconfigured headers, rows, columns, and cells. These schema-wide presets save time, ensure consistency, and make it easy for teams to quickly insert standardized tables into notebooks without having to rebuild layouts from scratch.
To create a new preset:
- Open the Table Builder tool and configure your table as desired.
- From the Save button menu, select Save As.
- Use the name field to provide a name for the preset.
- Click the new Save as Notebook Preset button (visible only to admins).

To use a preset in a Notebook:
- Type
/tableand select the desired preset by name. The table will be inserted with its predefined structure.
Suggested Options in Explore Data
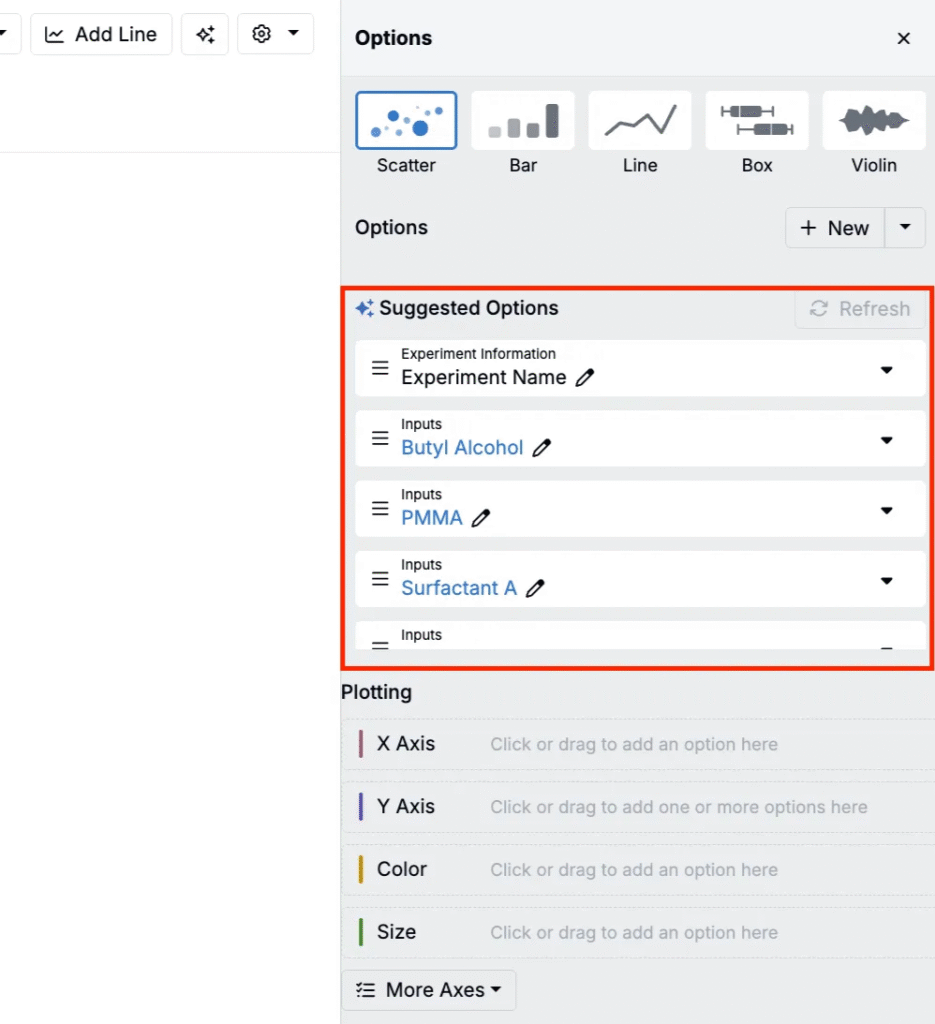
We’ve added Suggested Options to the new Explore Data UI to help reduce the time it takes to build visualizations. This feature automatically surfaces relevant inputs, outputs, and conditions based on your current project or material family, so you can start plotting without manually adding fields.
This change was implemented to make visualization setup faster and more intuitive. To learn more, including how Suggested Options are generated and how to enable them, refer to the update article on Suggested Options in Explore Data.
Quick Access to Saved Entities
Uncountable now allows users to open saved entities, such as Explore Data visualizations, from anywhere in the platform with a single click.
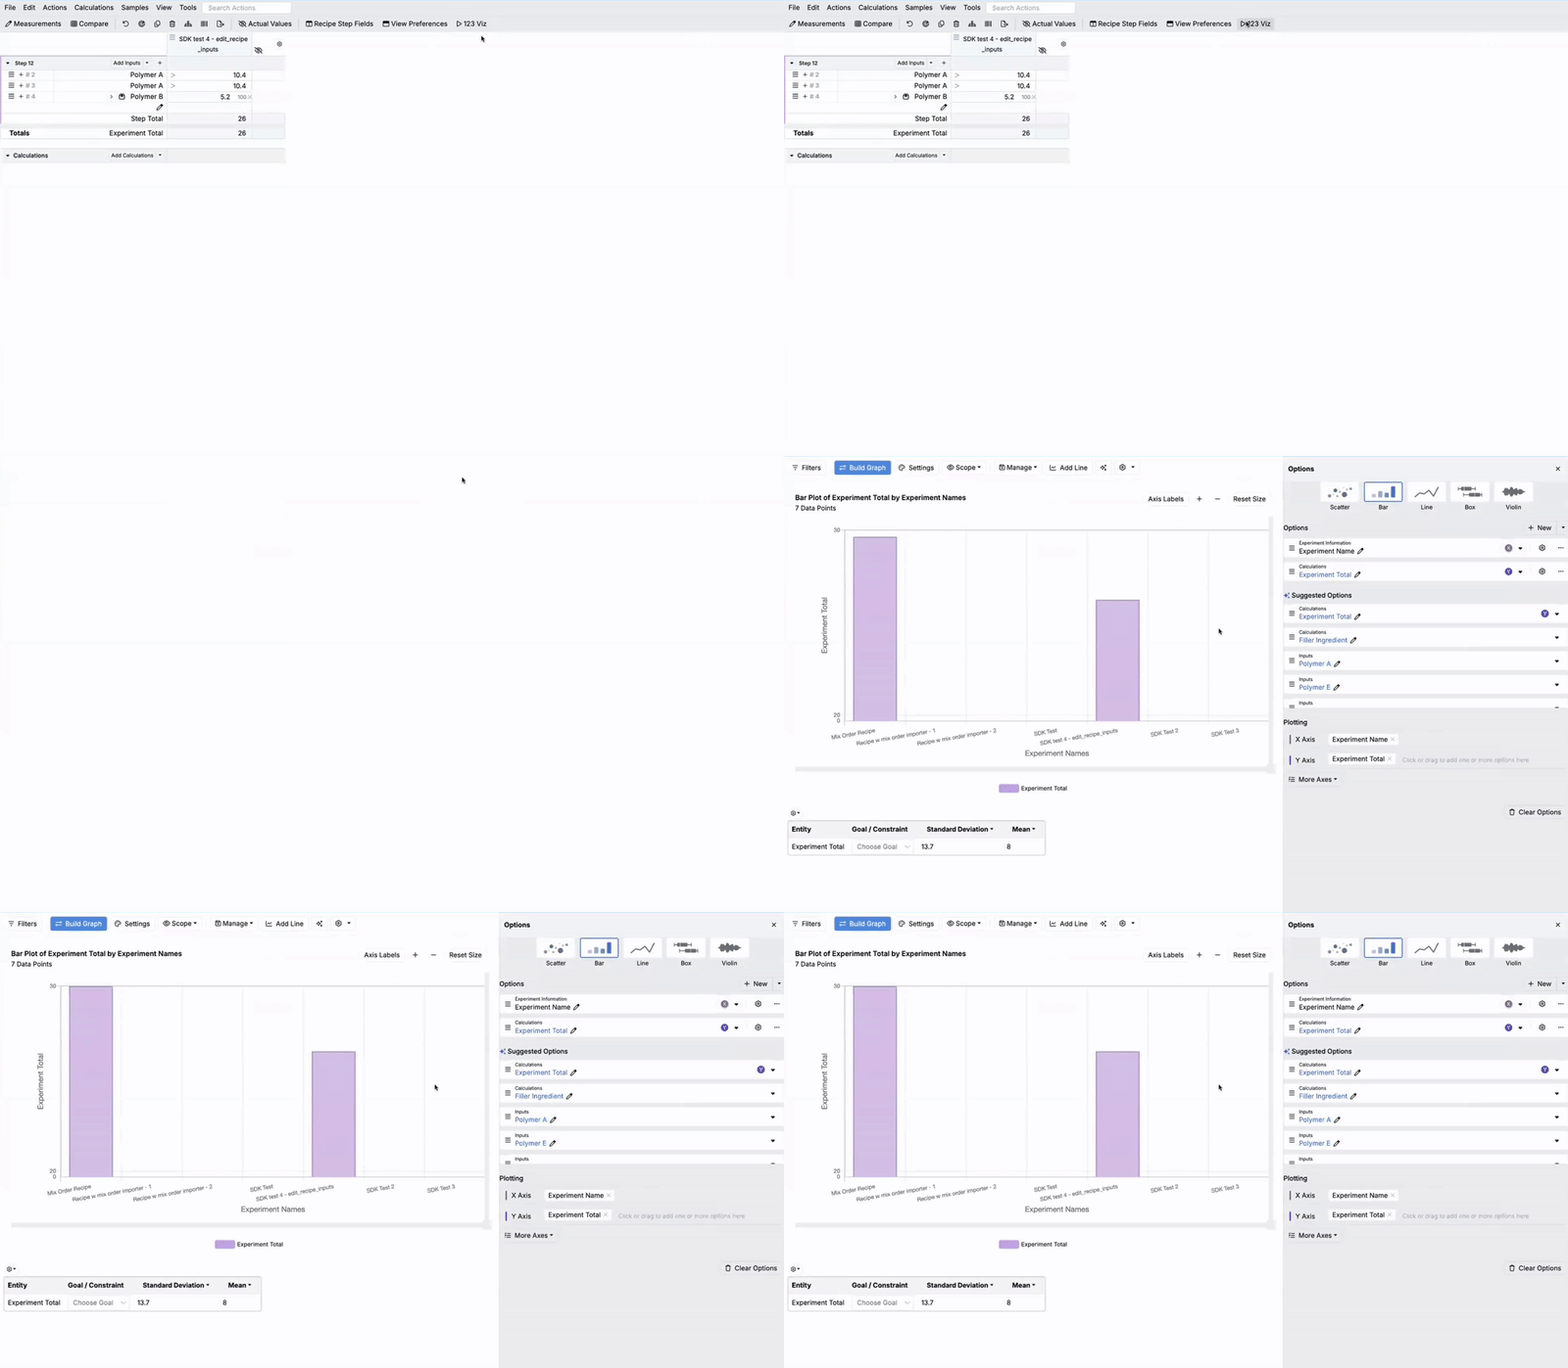
By configuring action buttons with the new “Save” UI Entity Actions, teams can quickly access relevant data. For example, a button could be added to the Enter Recipe view of an experiment which quickly navigates to a saved visualization relevant to that recipe. Previously, visualizations could only be accessed manual via Explore Data or via a notebook.
How to configure these triggers:
- Navigate to the trigger set associated with the page you want to navigate from (e.g. an Experiment or Lab Request definition).
- Create a new UI Entity Action Trigger:
- Add a trigger Name (this will appear on the button).
- Set When to Explicit.
- Select UI Entity Action Trigger from the Actions dropdown.
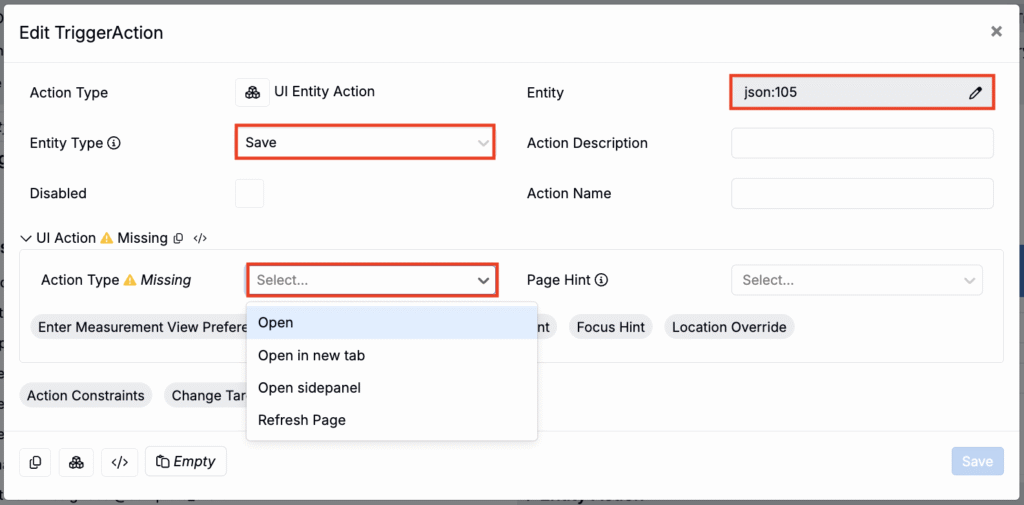
- In the Edit Trigger modal:
- Use the Entity field to associate the trigger with a specific entity using value spec.
- To access a listing of the json codes associated saved visualizations, access the Saves custom listing by appending your url with “/entities?entityType=save”.
- Set the Entity Type to Save.
- Select an Action Type:
- Open — Redirects your page to the saved entity.
- Open in a new tab — Opens the entity in a new tab.
- Open in sidepanel — Opens the entity in the sidepanel.
- Refresh — Refreshes the saved entity page.
- Use the Entity field to associate the trigger with a specific entity using value spec.
- Within the Entity Action tab of the trigger, ensure that it is configured as an entity action.
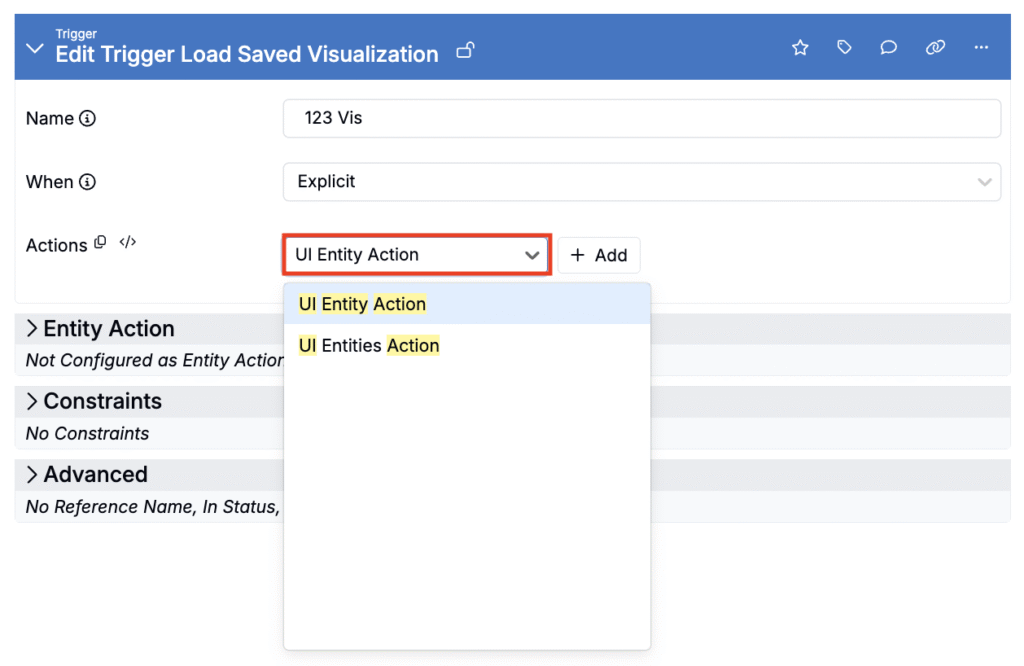
Once the trigger is configured, it can be added as an entity action or action button on the entity definition. Clicking the button will automatically redirect you to the saved entity or visualization.
Simplified Navigation Bar Labels
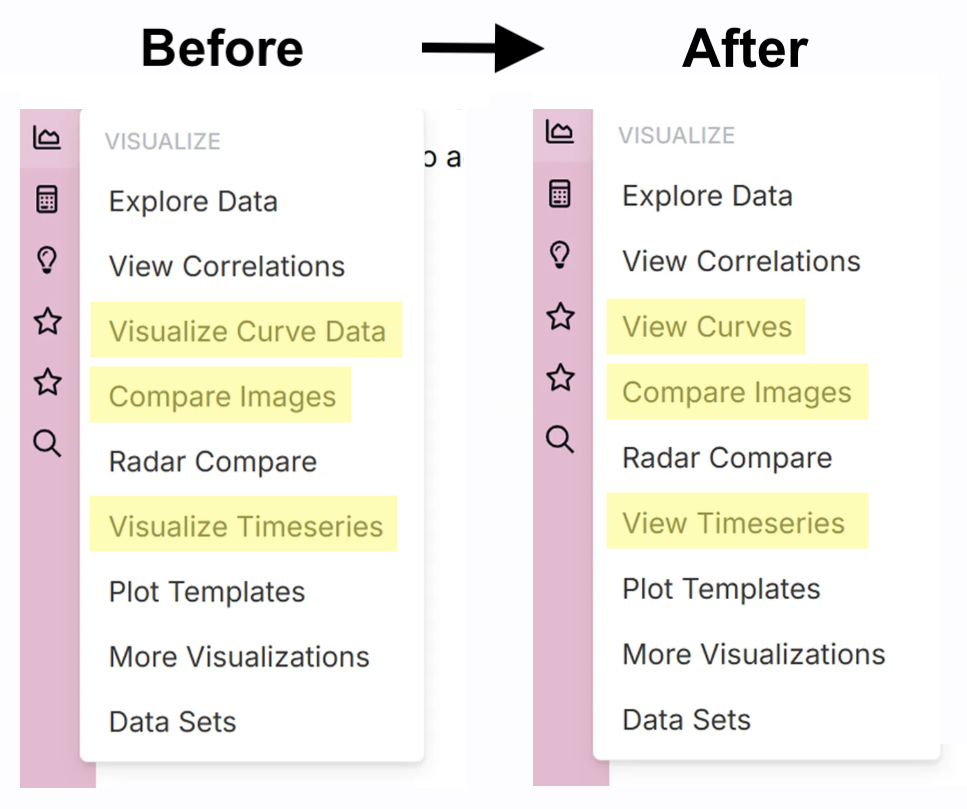
We’ve updated the Uncountable navigation bar to make it simpler and easier to scan by shortening several page labels.
Within the Visualize tab:
- Visualize Curve Data → View Curves
- Visualize Timeseries → View Timeseries
Within the Design tab:
- Suggest Experiments with AI → Suggest with AI
- Analyze Experiments with AI → Analyze with AI
- Advanced Screening Design → Advanced Design
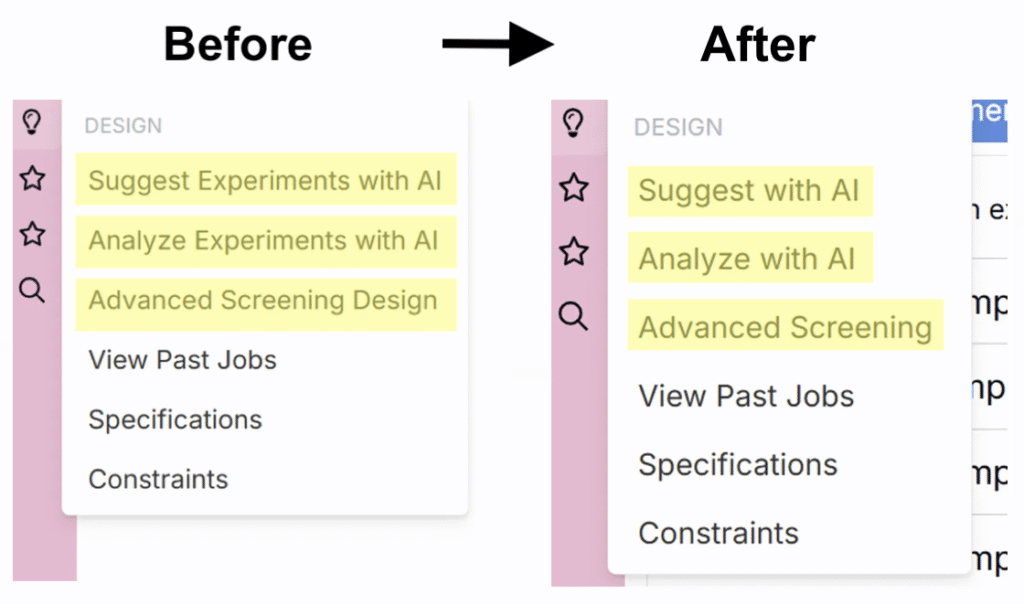
These updates only change how labels appear in the navigation bar. Page names, functionality, and search remain the same—you can still find and access pages using their original names.