Platform Config Page Improvements
We’ve updated Company-Wide Settings > Platform Config to make settings clearer and faster for admins to manage. Labels and descriptions now explain what each option does, and new reset controls let you quickly return either an entire config object or a single field to Uncountable defaults.
These improvements help admins audit setups, undo changes safely, and keep environments consistent across sites.
How to use:
- Read labels & info
- Every config field now has a clear label and an info icon.
- Hover the ℹ︎ to see what the field controls/when to use it.
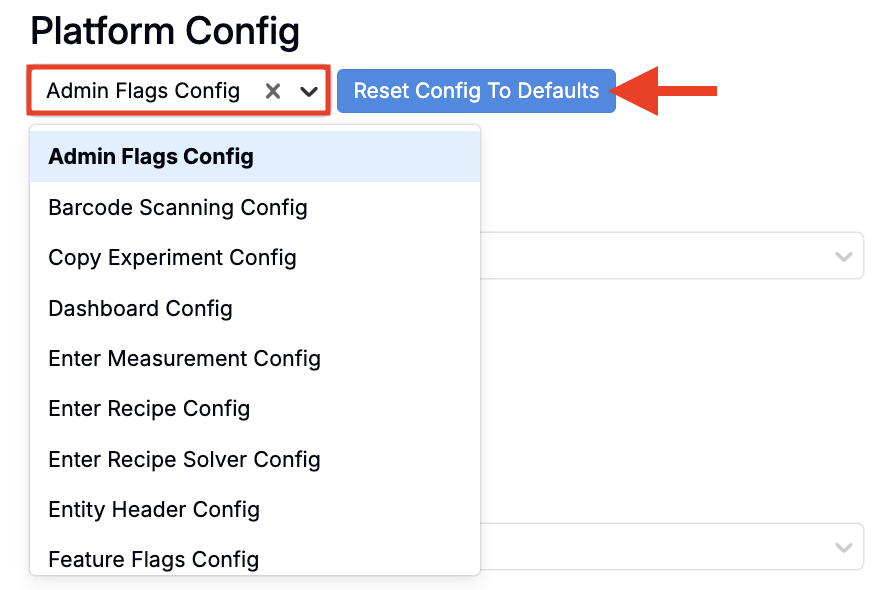
- Reset an entire config object
- At the top of the page, choose a config from Select Config (e.g., Copy Experiment Settings, Admin Flags Settings).
- Click Reset Config to Defaults to restore the full object to Uncountable defaults.
- Clear an individual field
- Next to a field, click the trash button to clear only that field back to its default.
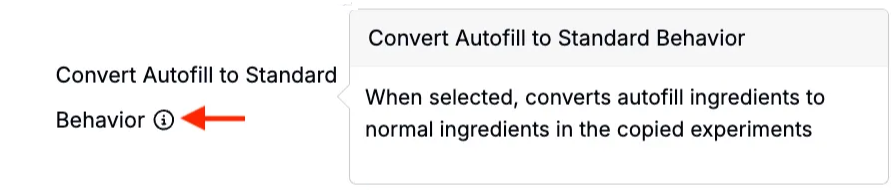
- Note: For checkbox config setting, resetting to default is different from setting a field to false—it restores the system’s baseline value.


Resolve Comments in Notebooks
You can now resolve comments in Notebooks, mimicking Google Docs functionality.
When a comment is resolved, it is hidden from view and prevents further commenting. This helps keep notebook discussions focused on active issues and reduces clutter.
How to resolve a comment:
- Open the comment thread in a notebook.
- Hover your mouse over a comment and click … > Resolve.
- The comment will remain visible but will be marked as Resolved and will prevent further commenting.
- You can then re-open a comment by hovering your mouse and clicking … > Re-open.

Instructions Layout Options
Two new layout options make longer Instructions easier to read on the recipe view, especially in multi-recipe experiments. By letting Instructions span unused columns or merge identical text across recipes, teams can keep steps visible without scrolling and reduce duplicate content.
How to use:
- Span cells across unused columns — Instructions can now span across columns that aren’t applicable to them (e.g., columns without content).
- Open the Sections sidepanel (Search Actions > “Sections Sidepanel”).
- Under Layout, toggle on Span Cells Across Unused Columns
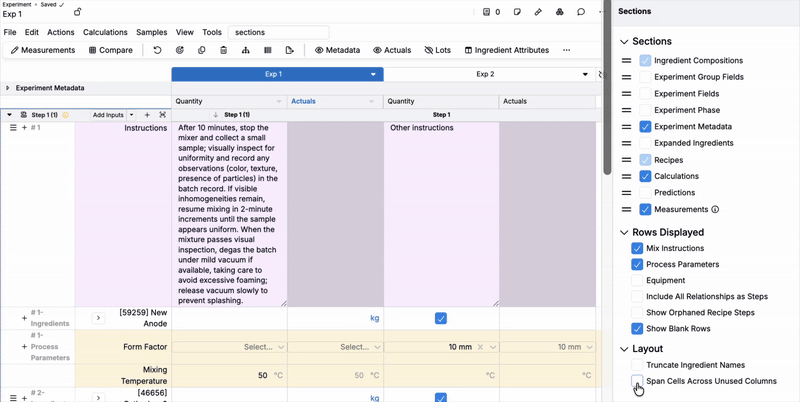
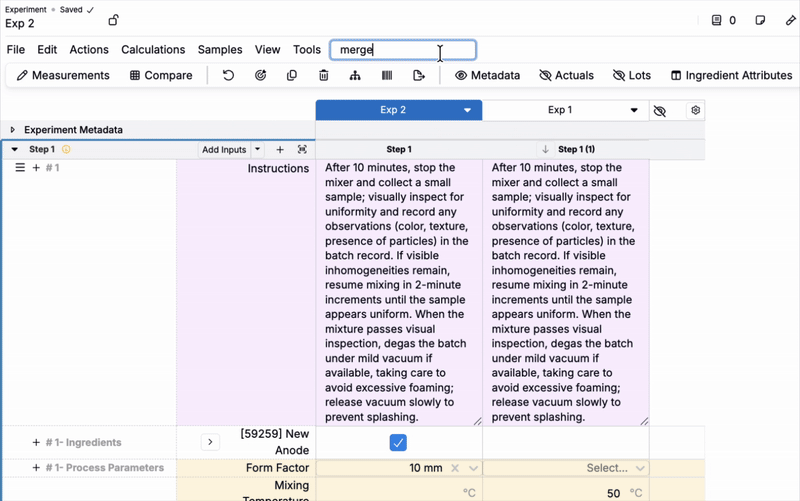
- Merge instructions across recipes — When multiple recipes have identical instructions, you can merge them into a single cell that spans the entire row. Columns must be contiguous.
- Toggle on/off Merge Identical Instructions (Search Actions > “Merge Identical Instructions”).
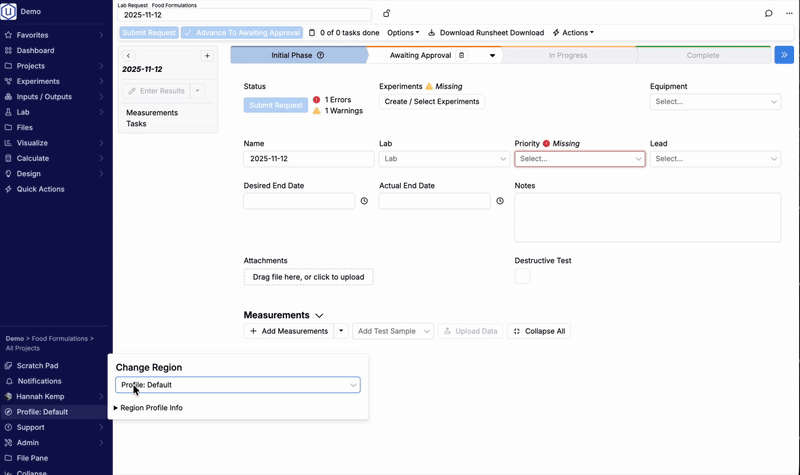
Region Profile for Ingredients
You can now enable a region profile feature that allows users to switch between regions (e.g., US, EU) and control which ingredient fields, groups, and calculations are visible based on the selected region.
This feature is particularly useful for global teams that need to see regional differences in formulations, such as different nutrient values, ingredient availability, or regulatory requirements by region.
How to enable/set up region profiles:
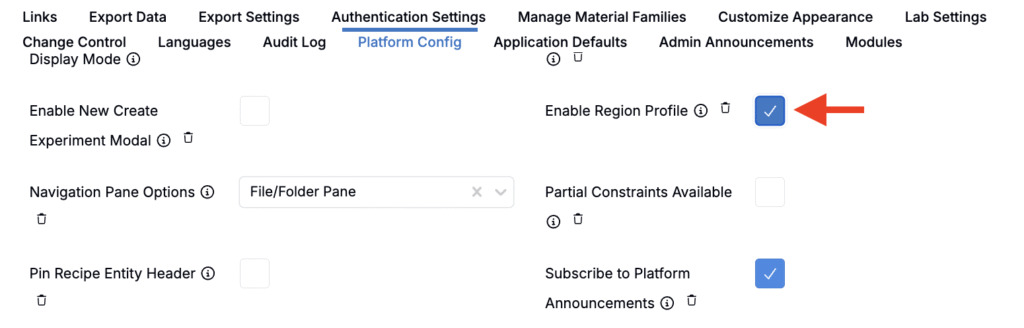
- Admins can enable Region Profile in the Platform Config (Company-Wide Settings > Platform Config > Enable Region Profile).
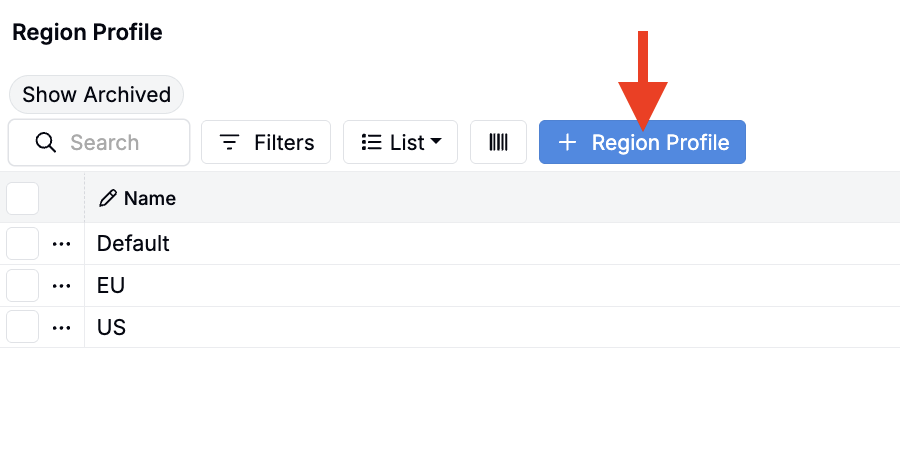
- On the Region Profile listing page, configure available regions.
- To access the listing, append “entities?entityType=region_profile” to your Uncountable URL.

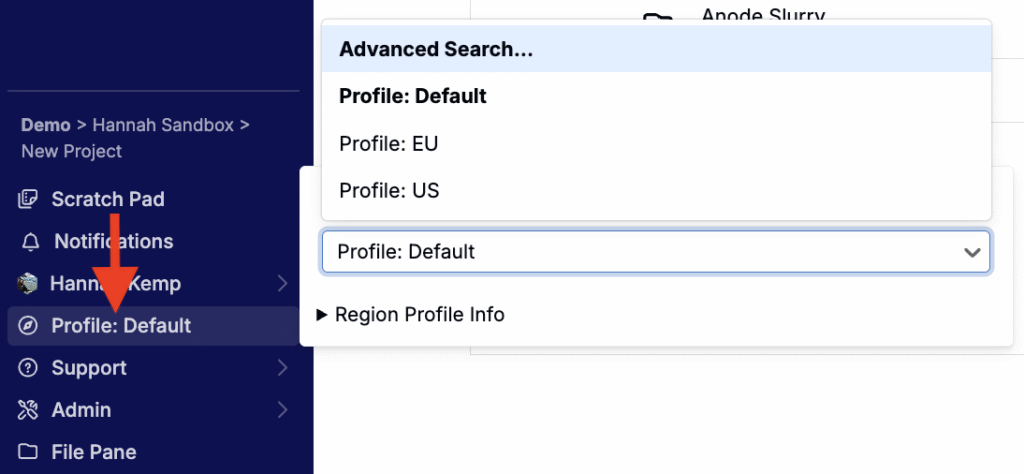
- A region selector will now appear in the navigation bar, allowing users to switch between configured regions.
How to use region profiles:
- In Form Admin, add constraints to a definition using the region profile field to control visibility (e.g., show a field only in the US region).
- Select a field or field group.
- Within the Constraints tab, add a new constraint (e.g. Visible).
- In the modal, set Constraint Type to Region Profile and select profiles.
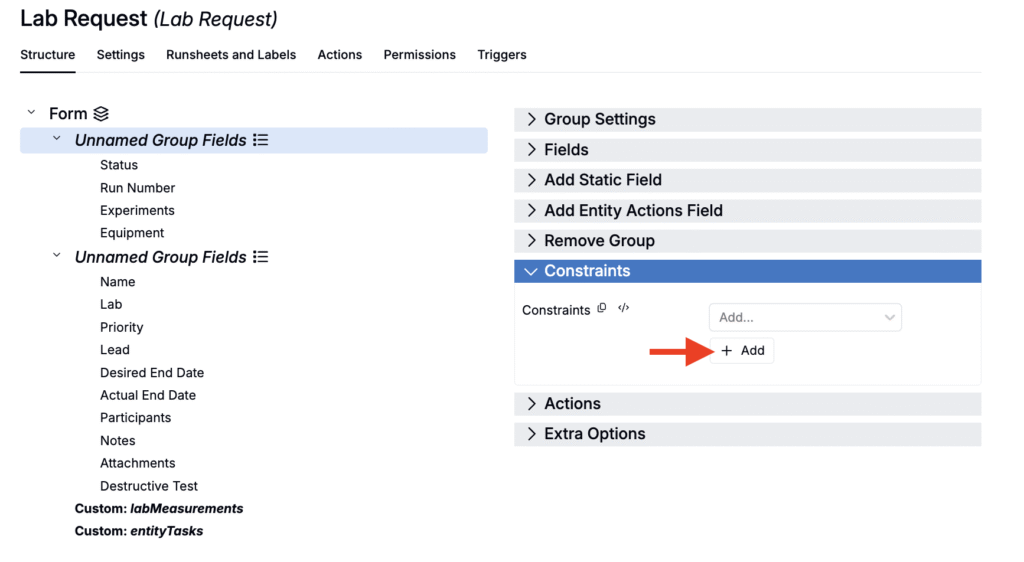

- Only users whose profile region matches the constraint will see the constrained fields or field groups on forms created from that definition.
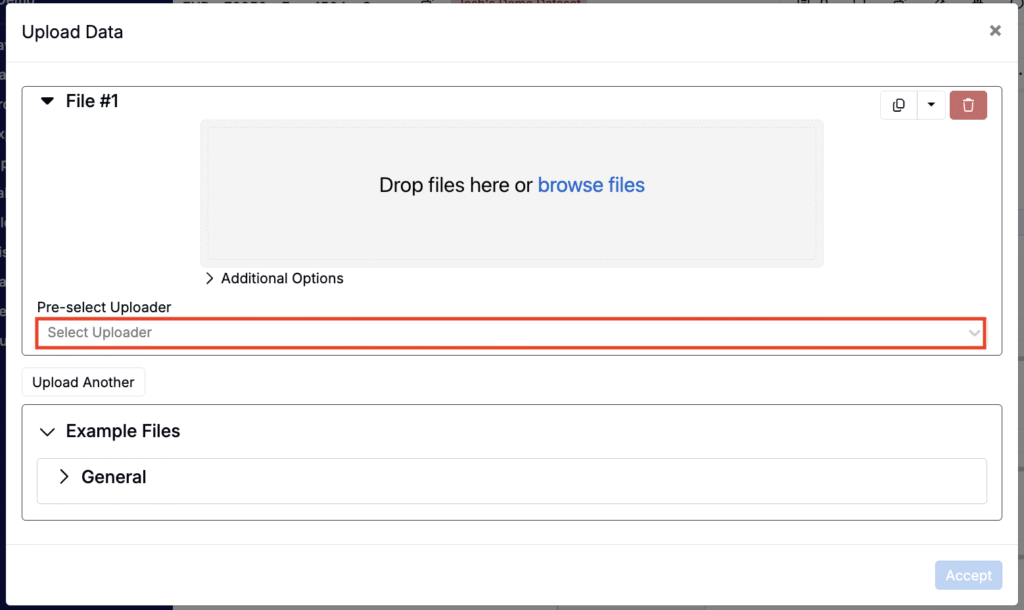
Pre-select Uploader for File Matching
When uploading a file that matches multiple uploaders, you can now pre-select the uploader you want to use before processing the file.
Previously, dragging in a file that matched multiple uploaders would trigger a reprocessing step. With this update, you can choose the target uploader upfront, streamlining the upload process—especially useful for async custom parser uploaders.
How to use:
- On the measurements view of experiments, click the Upload Data button.
- In the modal, use the new Pre-select Uploader field to select an uploader.
- Drag and drop in your raw file.
- The file will be processed using the pre-selected uploader.
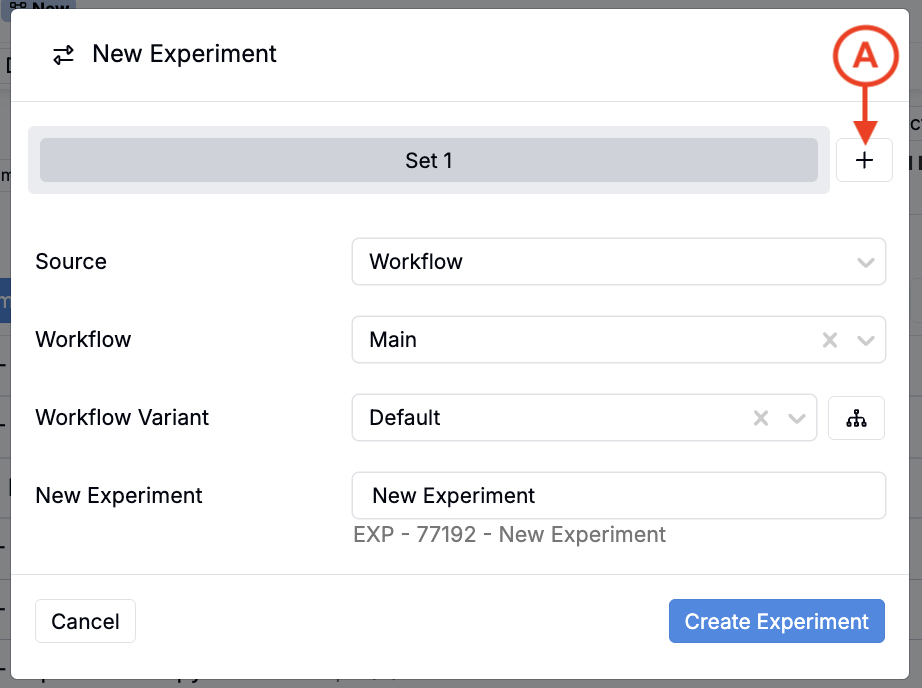
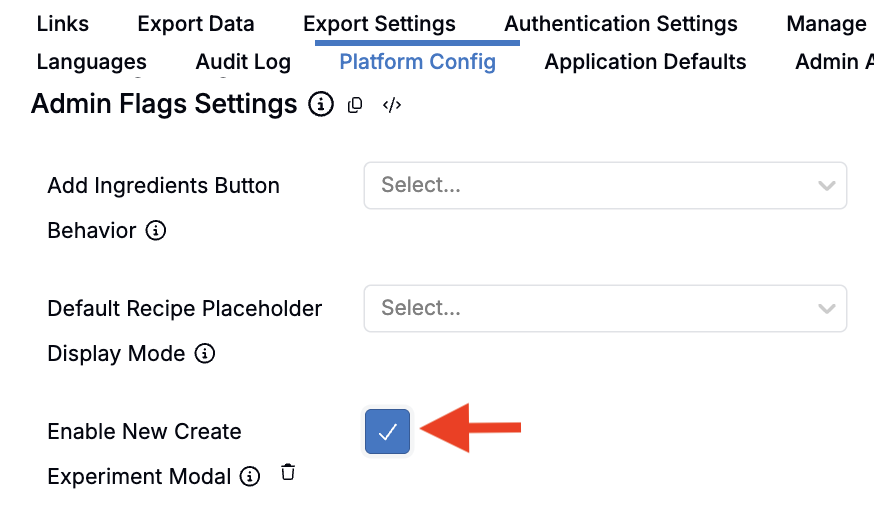
New Create Experiment Modal (Beta)
A beta New Experiment modal can now be enabled by admins in Platform Config. This redesigned modal simplifies the experiment creation process by:
- Providing a simpler, more modernized interface.
- Supporting creation of experiments from different sources (workflows, variants, product templates, or existing experiments).
- Allowing creation of multiple experiment sets (A) in one operation.
This is a V1 release with no advanced options yet. Advanced configuration will be added in future updates.
How to enable:
- Access Platform Config (Company-Wide Settings > Platform Config).
- Toggle on Enable New Create Experiment Modal.
Once enabled, the new modal will appear wherever you create experiments on the platform.
Copy Experiments With or Without Lots
When copying an active experiment, you can now choose whether to include Lots. Before this update, copying lots was not possible and teams needed to re-assign lots after cloning. This update saves time and reduces errors when copying experiments.
How to use:
- Open an experiment and select Copy Active Experiment.
- In the Select What to Copy dropdown, select Lots to include lot assignments.
- Click Copy Experiment.
Turn Off Outlier Detection
A new flag allows admins to turn off outlier detection in Company-Wide Settings.
This is useful for new schemas with limited data, where outlier detection isn’t meaningful or may produce false positives. Disabling outlier detection removes the visual indicators and warnings that typically appear when entering data.

How to use:
- Go to Company-Wide Settings > Customize Appearance.
- Toggle on Turn Off Outlier Detection.
- Outlier detection will be disabled across the platform.