Assign a Previous Task When Creating or Editing Tasks
Uncountable users can now define task order when creating or editing tasks. Use the Previous Task field to specify which task should come before another, making task sequences easier to build and maintain.
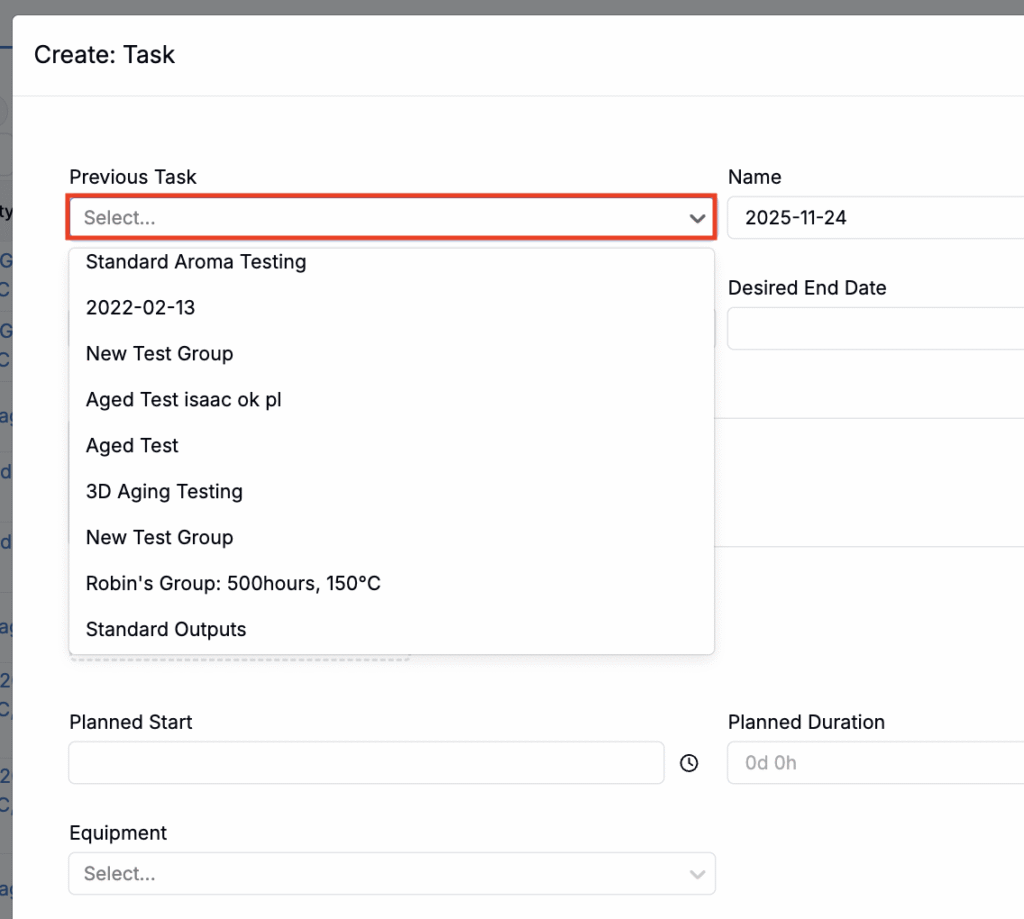
To set a previous tasks when creating a new task:
- Click Create on the Tasks listing page.
- In the modal, use the Previous Task field to select the task that should precede the one you’re creating.
To edit previous tasks inline on the Tasks listing page:
- Add the Previous Tasks column to the listing page (List > Set Columns). Learn more.
- Use the column to adjust task order inline without opening each task.
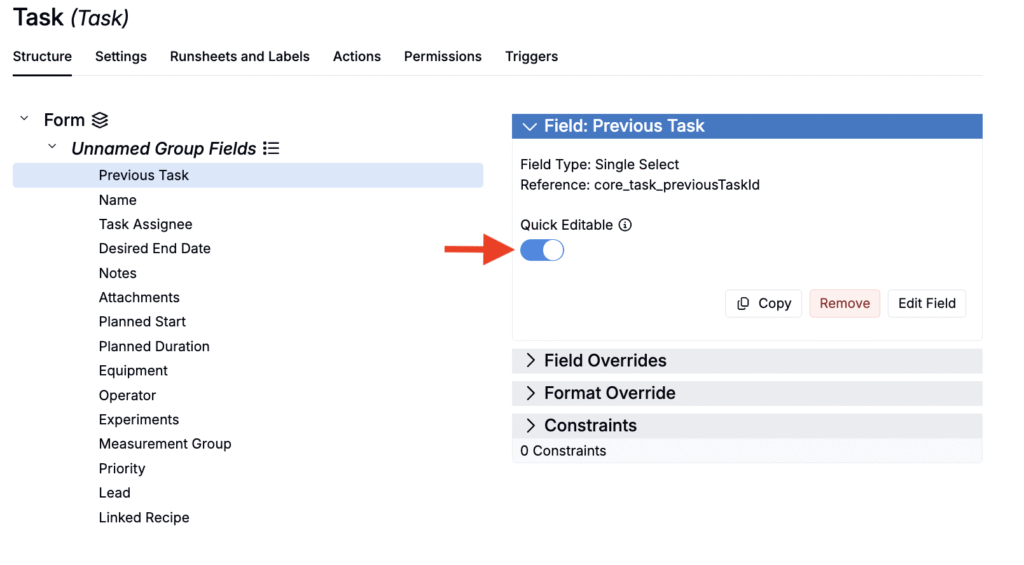
Note: Inline editing is available only if the Previous Tasks field in the Tasks definition is set as Quick Editable in Form Admin.
Plot Experiment Fields in Explore Data
You can now plot experiment fields directly on the Explore Data page. This update is part of an ongoing shift away from experiment metadata toward more structured, flexible experiment fields. Learn more about experiment listing fields.
How to Plot Experiment Fields
- Navigate to the Explore Data page and click + New in the Options side panel.
- Configure the new option:
- Set Type to Advanced Options.
- Set Sub Type to Experiment Fields.
- Select from the list of available experiment fields on your recipes.
- Add a label, if desired.
- Click Create.
- Assign the new option to an axis by clicking and dragging.
This change makes experiment fields more powerful for analysis and enables new ways to identify patterns and trends across your data.


Phase Workflows for Ingredients
Ingredients can now be tracked through phase workflows, just like other entities in the platform. This enhancement enables teams to manage ingredient lifecycles more systematically—supporting processes like review, testing, and approval.
To enable this feature, open the Settings tab of the Ingredient definition in Form Admin.
- Assign or edit the definition’s phase workflow by clicking the edit icon (A).
- Toggle on Show Workflow (B) to display the ingredient’s workflow.
Once enabled, users can view and advance each ingredient’s workflow phase on its Ingredient Details page.


New Value Spec Function: dateAtMidnight
A new value spec function, dateAtMidnight(date), helps with time zone accuracy when scheduling events via triggers.
Use this value spec to convert a user’s local date into a UTC midnight timestamp. This ensures that calendar-based logic, such as lab request deadlines, runs consistently regardless of user location.

Side-by-Side View for Control Experiments
Users can now display control experiments alongside the main experiment on the Enter pages.
To enable this view, open the control experiment’s menu and select the new Show Controls Side-by-Side option. To return to the default layout, click the control experiment’s column header and select Toggle Side-by-Side View.
This new option improves the comparison process by allowing multiple control experiments to be viewed simultaneously, eliminating the need to open each one separately.


Improved Enter Page Menus for iPads
On small-width screens like iPads, Uncountable now features a bottom control panel for easier access to Enter page entity actions. To open the panel, tap the “…” option in the top-right toolbar.
Actions that were previously cluttered the header are now organized into a collapsible menu, saving screen space while maintaining full functionality. This update provides a cleaner, more touch-friendly experience.

New Styling Options for Notebook Charts
Charts embedded in notebooks are now resizable and support a variety of line styles (dotted, dashed, or solid). These changes make it easier to distinguish between data series, especially when comparing overlapping or similar trends in a single view.
How to Adjust Chart Size
To resize a chart, click and drag its corners.
How to Customize Line Style
- On a notebook chart, access chart settings and select Edit Chart Configuration.
- Select the axis you want to edit.
- Use the Line Border Dash field to select:
- Dotted
- Long Dashes
- Short Dashes
- Solid Line
- Click Save to submit changes.


Dynamic Annotations Triggered by Output Field Values
Annotations can now be displayed automatically on the Enter Measurements page based on the values of recipe output fields. This update makes it easy to build responsive QA/QC workflows that surface information in real time.
For example, if an output field like Recorded Value exceeds a defined Max Threshold, a Boolean field such as Is Invalid can be set to true , automatically triggering an annotation on the measurement cell.
To set this up, first create and configure a recipe output field (e.g. Is Invalid) on your Experiment Output definition in Form Admin. Then, on the Annotation Types page, use the new Recipe Output Fields column to link your annotation to that Boolean field.


Remove Add Outputs Button from Enter Measurements
A new appearance setting allows users to hide the individual Add Outputs buttons from tables on the Enter Measurements page. This option simplifies the interface without removing functionality— users can still add outputs by selecting “Add Measurements” from the Edit tab in the File menu.
To enable this setting, access the Customize Appearance tab of the Company-Wide Settings page and toggle off Display Add Outputs Dropdown.


Show Populated Recipe Step Fields
We’ve added a new Show Populated Fields button to the Select Recipe Step Fields modal that lets users instantly reveal all fields that have been filled in for the recipe steps currently in view.
When clicked, the button pre-populates the field selector with only the relevant fields, helping users focus on the data that’s already present.
This is especially helpful for lab managers reviewing technician-entered data. For example, a technician might fill out fields while entering a recipe, and later the lab manager wants to see exactly which fields were used without having to scan through dozens of empty columns. Now, with a single click, only the populated fields are displayed.


Using Show Populated Fields to select only populated recipe step fields
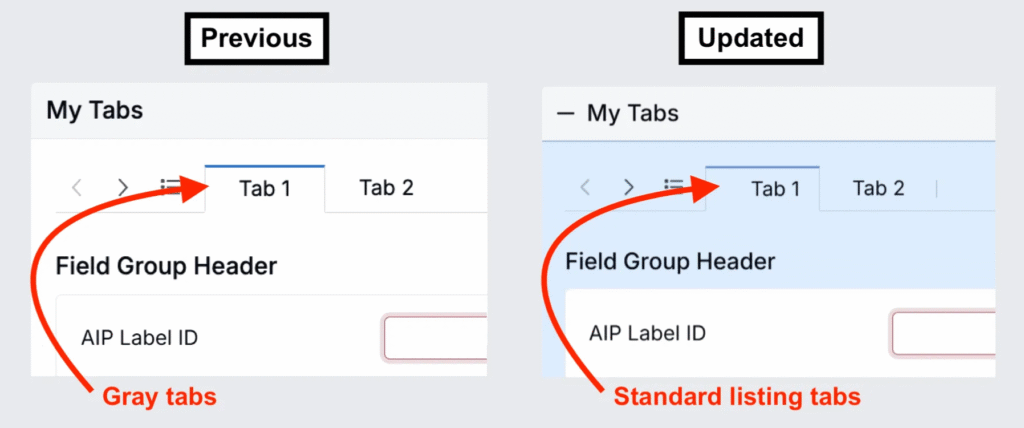
Visual Updates to Form Groups
We’re introducing several design changes to how groups are displayed within forms, aimed at simplifying the layout while keeping all existing functionality intact.
What’s changing:
- The light gray header at the top of groups will be removed.
- Excess borders across the page will be removed.
- For collapsible groups, the collapse icon will move to the right side of the group name to improve header alignment. The entire group name will remain clickable.
- Form tabs will be updated to match the standard listing tab design, replacing the current gray background style.
These updates apply to all forms, including lab requests, approvals, and COAs.


Export Runsheets via Triggers
Uncountable users can now export runsheets via triggers. Previously, this functionality was only available for exporting labels.
How to Configure
- On a definition, access the Runsheets and Labels tab.
- For an associated runsheet, click the edit button.
- In the modal, copy the Runsheet Ref Name.
- On the definition’s trigger set, create a new Export Runsheet trigger.
- When configuring, paste the reference name into the Reference field.


Once triggered, the runsheet export will begin automatically. A notification in the bottom-right corner will confirm the export request was received, followed by another notification when the export is successfully completed.

Paste from Excel into Enter Page Tables
Users can now copy data from Excel and paste it directly into unstructured rows on the Enter Recipe page. Each pasted row will automatically create a new unstructured row and fill in the copied values.
To use this feature:
- Add an unstructured row to the data table.
- Copy cells from Excel and paste them directly into the table.

After pasting, click the Assign Inputs button at the bottom of the page to bulk convert the unstructured rows into ingredients. Use the Bulk Convert Unstructured Rows sidepanel to quickly assign each row to an existing ingredient in the platform.


Insert Current Date or Time in Notebooks
You can now quickly insert the current date or time into a Notebook by typing /date or /datetime. These shortcuts will make it easy to timestamp notes or entries as you work.
New View Preferences Button on Enter Pages
A default View Preferences action button has been added to Enter pages. Clicking this button opens a dropdown showing all view preferences associated with the current experiment’s workflow.
This update makes it easier to quickly switch between relevant view configurations without navigating away from the page.
Learn more about View Preferences.

Entity Action Buttons on Experiment Group Pages
The View Recipes entity action has been added as a permanent action button to all experiment groups viewed on a dashboard. With this update, users can also now control which other action buttons appear for Experiment Group on a dashboard.
How to Add Entity Action Buttons to Experiment Groups
- Go to the Experiment Group definition in Form Admin.
- Select Single Action from the Actions dropdown menu or click Add.
- In the modal:
- Select the Trigger from the list of available entity actions on the definition.
- Set the Button Placement.
- Optionally, add a Label.
- Save and submit.


Once configured, your custom button will appear on all Experiment Group pages, making it easier to trigger key actions in context.

To learn more about entity actions and action buttons on a definition, refer to Action Buttons.
Resizable Chemical Structures in Experiment Metadata
Chemical Structures shown in the Experiment Metadata section on Enter pages are now resizable. Users can click and drag from the border of the molecule cell to adjust its size.
This enhancement makes it easier to view and work with complex molecular structures directly within the metadata view.
Ingredient Research with LLM-Powered Suggestions
A new Ingredient Research tool is now available to help you evaluate and swap ingredients—without ever leaving the platform. This feature uses a language model to suggest alternatives and provide real-time reference data, moving us closer to a fully integrated ingredient substitution workflow.
How to Use the Ingredient Research Tool
- On the Enter Recipe page, open an ingredient’s menu.
- Select Research Alternative Ingredients. This opens a side panel powered by a LLM.
- Enter a prompt describing your goal. For example, “I’m looking for alternatives to Ethylbenzene for synthesis applications.”

The assistant will search the web and return a structured table of alternatives, including source links to PubChem. You can also continue the conversation with follow-up prompts like “Suggest greener alternatives.”

How to Swap Ingredients
- Clicking the + icon next to any suggested ingredient in the table opens the Create Ingredient modal, allowing you to add it directly to your workspace.
- Back on the Enter Recipe page, use the ingredient’s menu and select Swap Ingredient to replace the original with your new choice.
Bulk Archive Inventory from the Barcode Tracking Page
With the new Bulk Archive Inventory feature, users can now archive multiple items at once directly from the Barcode Tracking page. Previously, inventory items could only be archived one at a time.
How to Bulk Archive Inventory
- Go to the Barcode Tracking page.
- Scan or manually enter a barcode.
- Select the Archive Inventory option.
- Toggle on Bulk Archive All Scanned Inventory.
- Continue scanning or entering additional barcodes.
- When ready, click Archive Inventories to archive all listed items at once.
This update streamlines the process of cleaning up inventory and is especially useful for managing large batches of materials.


Ternary Plot Now Available in Notebooks
Uncountable users can now use ternary plots to visualize data in notebooks. This new chart type gives users a way to explore balance or trade-offs between three variables.
How to Create a Ternary Plot
- Add a chart to your Notebook.
- Open Chart Settings and select Edit Chart Configuration.
- Choose an Entity Type.
- For Chart Type, select Ternary Plot.
- Choose values for the left, bottom, and right axes (e.g., three outputs or other experimental values).
- Add optional constraints.
- Add Point Labels.
- Add a Color component. For example, you can color points by an ingredient—all points with that ingredient will appear in the same color. Color settings can be further customized in Explore Visualizations.


Update to Histograms and Count Options in Explore Visualizations
We’ve recently added a Count option to the Explore Data tool, giving Uncountable users more control when visualizing histograms or other data distributions.
How to Use the New Count Option
- In the Explore Visualizations side panel, click New to create a new option.
- Set the option type to Advanced Options, then choose Count as the subtype.
- Add any field to the X-axis, and use the Count on the Y-axis.
The Count option shows how many records fall under each X-axis value, displayed as a percentage of the total. For example, you can now plot Experiment Total vs. Count to see how values are distributed across experiments.


How to Customize the Histogram Display
- Open the Settings menu.
- Under the Bar Plot tab to configure options like Y-axis Type and Bin Size.

One major benefit of this update is improved support in Notebooks. Embed Explore Visualizations histograms into your notebooks and, using Live View, edit, reload, and adjust plot context directly within the notebook.

Reference Ingredient Quantities from Recipes in Notebooks
You can now insert Input Value chips into notebook cells to reference the quantity of a specific ingredient from a recipe. These chips display the ingredient name and amount, remain up to date with the latest data, and can be placed inline with other text.

How to Insert an Input Value Chip
- In a notebook cell, type
/input_valueand select Input Value. - In the dialog that appears, select:
- Experiment: Select the experiment you are referencing. Toggling on the Filter to Linked Experiments setting will pre-filter menu options to linked experiments.
- Input: Select the ingredient you want to display the quantity for/link to. This list will automatically down selected to the ingredients used in the chosen recipe.
- Click Submit to insert the chip into the notebook.

Once inserted, chips resolve dynamically each time the notebook loads to ensure the latest value is shown. Clicking a chip (A) will navigate you to its recipe, and selecting the "..." menu (B) allows you to edit the reference.

Proportional Constraint in Solver
We’ve added a new Proportional constraint in the Solver, enabling you to maintain fixed ratios across unlocked ingredients when solving. This is useful when your formulation requires consistent proportions but you want to scale the total or adjust one ingredient.
Currently, this constraint is supported in Unlocked Ingredient mode, which ensures that all ingredients without a direct Ingredient Quantity lock are updated proportionally during solving.
How to Use the Proportional Solver Constraint
To use this feature:
- Open the Solver Locks side panel.
- Add a new Proportional rule.
- Set the rule to apply to Unlocked Ingredients and define your constraint.
- Adjust ingredient amounts, modify recipe totals, or add other constraints.
- Click Solve.


Once solved, the Solver will automatically update all unlocked ingredient amounts proportionally, maintaining their ratios while meeting the rest of the Solver constraints.


Bulk Unset “Compound as Intermediate”
You can now unset the “Compound as Intermediate” field for multiple ingredients at once using the Bulk Modify page. This makes it easier to clean up or adjust recipe settings across many experiments in a single action.
To use this feature:
- Access the Bulk Modify Experiments page.
- In the operation field, select Unset Compound as Intermediate.
- Add filters (A) to narrow the Experiments listing to the experiments you want to modify.
- Review the list of selected experiments.
- Under Run Bulk Operation, click Submit (B).

The Compound as Intermediate value will be cleared from any matching ingredients in the selected experiments.

Optimize Process Parameters in Solver
We’ve added a new optimization mode to the Solver that focuses exclusively on process parameters. When this mode is selected, ingredient values remain fixed and only process parameters are adjusted.
This new mode is useful for workflows where ingredient ratios are already validated but you want to adjust process conditions to meet a target or improve performance.
How to Optimize Process Parameters
To use this mode, you’ll need a Solver rule that links a process parameter to an ingredient quantity. For example, this could be a Calculated Ingredient Quantity rule with a Mass Amount basis, where the Mass Amount equation includes a process parameter variable (e.g., Batch Size).


Once your setup includes at least one process parameter in a lock rule, follow these steps:
- Open Solver/Locks → Advanced Settings (A).
- Set Values to Optimize to Optimize Parameter Value (B).
- In the field that appears, select the process parameters you want to optimize (C).
- Click Solve (D).

When you solve, only the selected process parameters will adjust. All ingredient values will remain fixed according to their existing equations or locked values.
Updates to Workflow Step Menu
To improve efficiency when managing recipes with workflow steps, we have made some updates to the Workflow Step menu on the Enter Recipe page. These include terminology changes, action reordering, and new submenus.
Recipe Step Action Terminology Changes
The following terms have been updates:
- Create Stocked Workflow Step → Create Stock
- Copy Workflow Step → Copy
- View Workflow Step Fields → View Details
- Import Workflow Step → Import into Workflow Step
- Change Workflow Step Source Behavior → Change Source Behavior
Workflow Step Menu Reordering
The ordering of actions in the Workflow Step menu has also changed. The new order is:
- Workflow Step Actions (new submenu)
- Create Test Sample
- Mix Order (new submenu)
- View Details
- Solve (new submenu)
- Stock (new submenu)


New “Workflow Step Actions” Submenu
This new submenu groups workflow step actions, including:
- Rename
- Delete
- Import into Workflow Step
- Mark as Never Final Step
- Change Source Behavior

New “Mix Order” Submenu
This new submenu groups mix order step actions, including:
- Remove Mix Order
- Clean Up Mix Order
- Clean Up Mix Order (Including Blank Steps)

New “Solve” Submenu
This new submenu groups solver actions, including:
- Solve Step
- Solve Step for All

New “Stock” Submenu
This new submenu groups stocked workflow actions, including:
- Create Stock
- Use Stock

Barcode Scanner Moved from Enter Recipe Page
As of May 1, we’ve updated the Enter Recipe page to simplify the interface by removing the default barcode scanner icon next to the Add Ingredients/Add Inputs button.
To access the barcode scanner, use the Search Actions bar and search for “Show Barcode Scanning”. Selecting this action will toggle the barcode scanner button back on locally, allowing you to continue using it as needed.
This update helps to streamline the Enter Recipe page by moving less frequently used actions out of the main workflow area, while still making them accessible on demand.

Add Test Methods from the Enter Measurements Page
Users can now add Test Methods directly from the Enter Measurements page, making it easier to create Test Samples while entering data.
How to Add Test Methods:
- Access the Add Outputs dropdown menu on the Enter Measurements page.
- Select Add Test Method.
- This will open the Create Test Samples side panel, where you can select a Test Method and create a Test Sample linked to the current measurement entry.


Additionally, Admin users can configure the default option shown in the Add Outputs button on a Material Family basis. In Company-Wide Settings under Manage Material Families, enable Default Show Add Test Methods in Measurements in the Settings dropdown for a material family. Enabling this setting will make Add Test Sample Template the default option on the button.

