This article covers advanced uploader configuration tools and settings. To learn more about mapping, refer to Configuring Uploaders.
File Parsing Tools
When configuring a general parser uploader, use the options under the settings cog to help break the file into extractable cells for headers and channels.
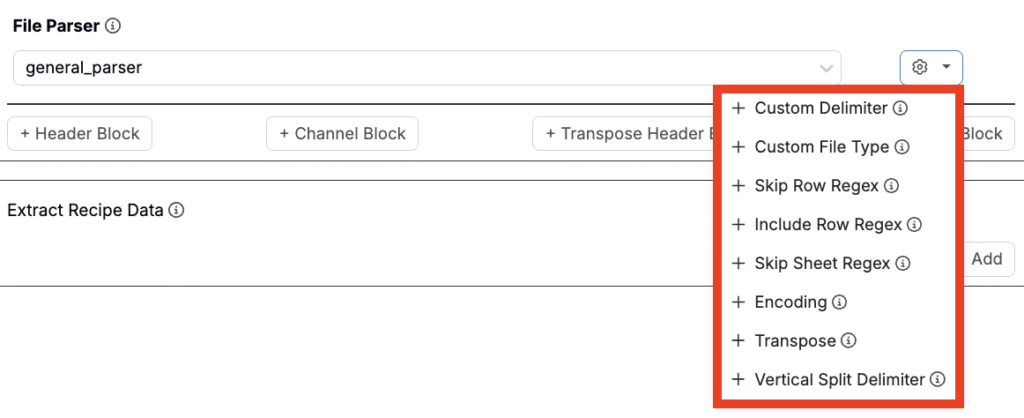
Options include:
- Custom Delimiter: Manually define the character used to separate values in a row (e.g.,
,for CSVs,\\tfor TSVs,;or|are also common). - Custom File Type: Overrides the file extension if the file structure differs from the default type.
- Skip Row Regex: Skips rows where any cell matches a regex pattern. For example, to skip rows with “n.a.” or “-” use the Regex pattern
(n\\.a\\.|^-$). - Include Row Regex: Only includes rows that match a given regex pattern.
- Skip Sheet Regex: Skips sheets in Excel files where the tab name matches a regex pattern. For example, the Regex pattern
(samples|summary)skips sheets named “samples” or “summary”. - Encoding: Allows manual selection of the file’s text encoding (e.g.,
utf-8). Use encodings like Japanese or Chinese for region-specific files. - Transpose: Flips the file layout—rows become columns and vice versa. Useful when data is stored vertically.
- Vertical Split Delimiter: Specifies a delimiter for splitting stacked values within a single column.
Note: Regex101.com is a helpful tool when using regex.
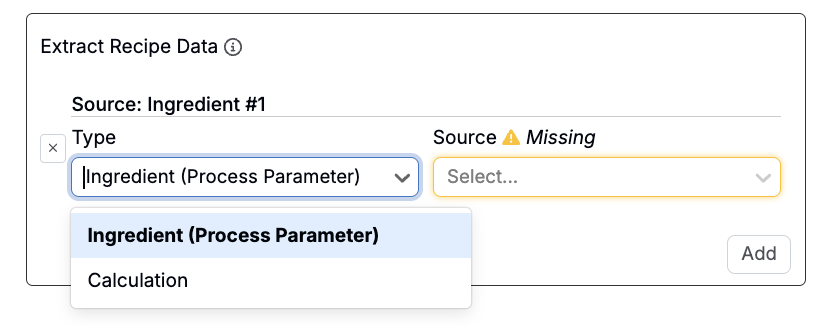
Extracting Recipe Data
The Extract Recipe Data section allows you to pull values directly from the recipe the file is being uploaded into. You can extract either an ingredient (process parameter) or a calculation, and use it during parsing or transformation.
A common use case is trimming uploaded curve data using a recipe-defined parameter. For example, you could use this section to limit a time-based curve to specific duration specified in the recipe.
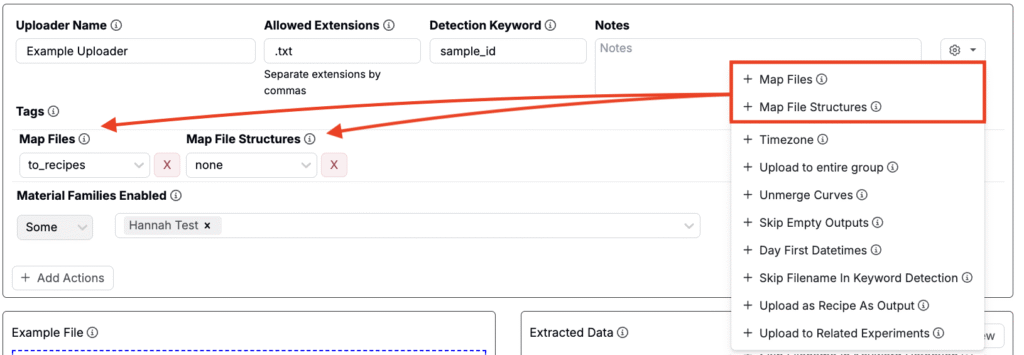
File and File Structure Mapping
Once an uploader has been configured, you can use it to upload multiple files of the same type at the same time. Each file may contain one or many file structures. By default, Uncountable maps:
- Each file → to a recipe
- Each file structure within a file → to a replicate of that recipe
This mapping behavior is customizable via Map Files and Map File Structures options, found in the uploader’s settings menu (via the cog icon). Once the fields have been added to your uploader, select whether you want to map each to recipes, replicates, custom, or none.
- Recipes: Map each file or file structure to a new recipe.
- Replicates: Map each file or file structure to a replicate of the same recipe.
- Custom: If both Map Files and Map File Structures are set to Custom, you can create more complex mapping logic. See the section below for details.
- None: Removes all mapping logic.
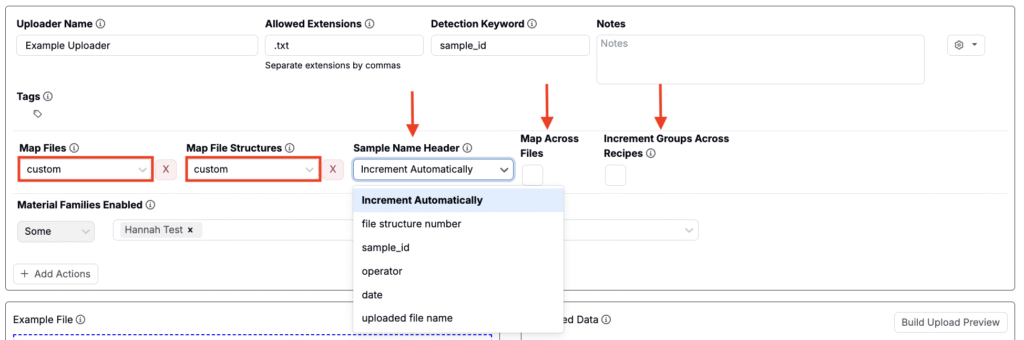
Custom Mapping with Sample Name Header
If both Map Files and Map File Structures options are set to Custom, new settings appears:
- Sample Name Header. This allows you to control grouping based on extracted metadata. Options include:
- Increment Automatically (default): Each file structure is treated independently—no grouping applied.
- Metadata Field: Select from one of the extracted metadata fields. File structures with matching values in these fields will be grouped into the same replicate or experiment.
- Map Across Files: When enabled, grouping is applied across all uploaded files, not just within individual files. This allows file structures from different files to be grouped together based on shared metadata values.
- Increment Groups Across Recipes: When enabled, grouped file structures will be assigned across multiple recipes in the current view. This is useful when uploading many groups and distributing them sequentially across recipes (starting with the selected one).
Mapping File Structures to Specific Recipes
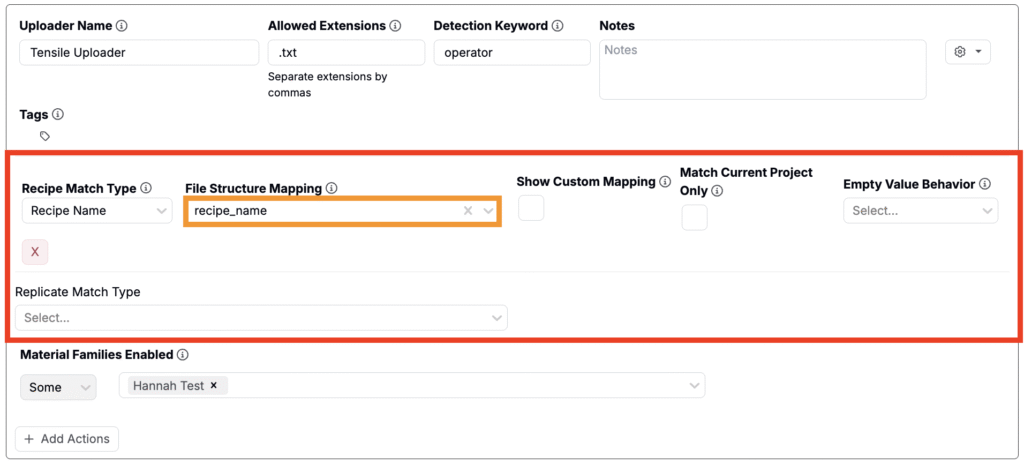
You can automatically map file structures to specific recipes in Uncountable by enabling File Structure Mapping and configuring recipe-matching logic. To set this up, take the following steps:
- Open the uploader settings and add File Structure Mapping.
- Under the File Structure Mapping section, configure the following:
- Recipe Match Type: Choose the field in Uncountable you want to match against. Options include:
- Recipe ID
- Recipe Name
- Recipe Metadata
- Wellplate
- Recipe Structured Filters
- Recipe Source: Select one of the parsed headers or channels that contains the value to match (e.g., a column labeled “recipe_name” in your file).
- Recipe Match Type: Choose the field in Uncountable you want to match against. Options include:
- Configure additional settings, if relevant:
- Show Custom Mapping: When enabled, displays a custom mapping step in the preview modal to review or override assignments.
- Match Current Project Only: Restricts matching to recipes in the current project only.
- Empty Value Behavior: Choose how to handle cases when the Recipe Source field is missing or empty.
- Replicate Match Type: Choose how replicates are assigned within matched recipes.
Once saved, Uncountable will automatically assign file structures to recipes based on exact matches between the selected file source and the target recipe field. Note that recipes must be in view during upload for the file structure to be assigned.


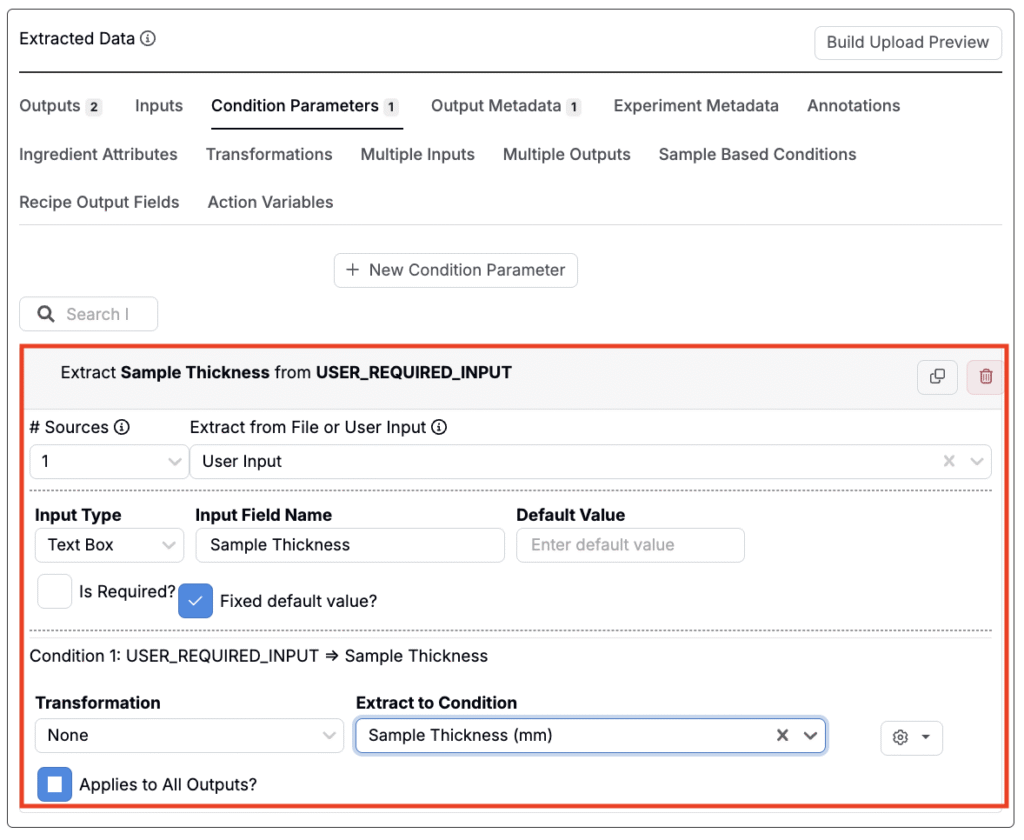
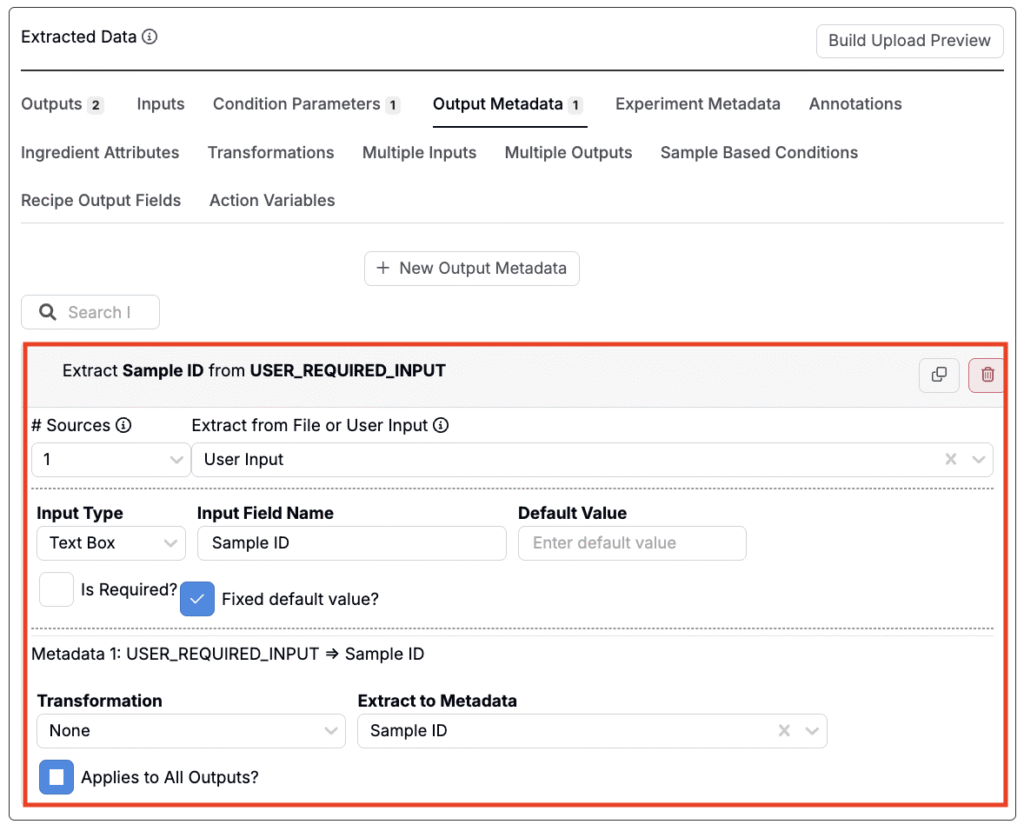
User Input Fields
When extracting condition parameters or output metadata, you can set the source to User Input. This allows you to define a field that users must fill in when uploading a file—useful when the value isn’t available in the file itself but is still required for proper data mapping.
For example, User Input may be used for fields like operator, instrument, batch ID, or date.
Related configuration settings include:
- Input Type: Choose the format of the input: Textbox, Dropdown, or Datetime.
- Input Field Name: The label shown to the user when they’re prompted to provide the value.
- Default Value: A pre-filled value that appears in the input field, which users can change if needed.
- Is Required: If enabled, the user must enter a value before the uploader can be submitted.
- Fixed Default Value: If set, the field is pre-filled and cannot be edited by the user.
- Transformation: Apply a optional transformation to the input before storing it.
- Extract to Condition: Select an existing condition parameter or output metadata field where the input should be stored.
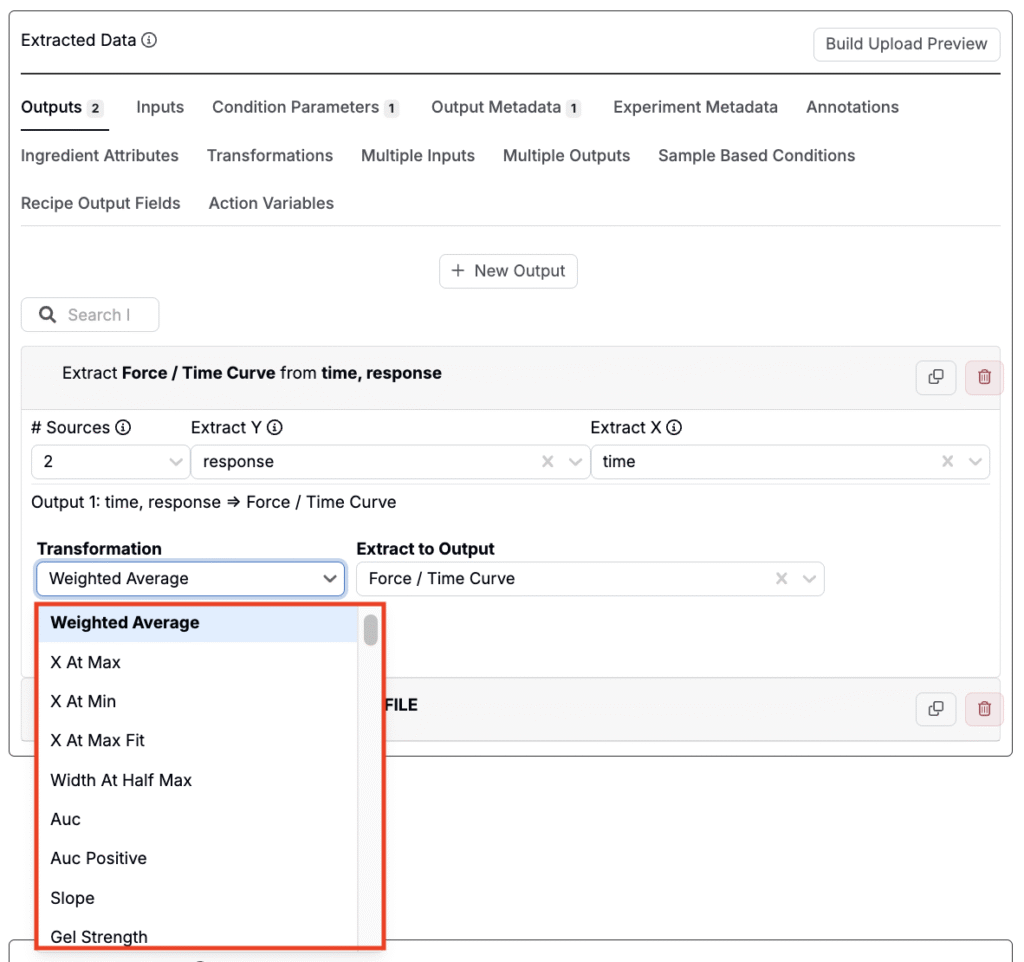
Transformations
When mapping blocks to outputs, the Transformation field lets you automatically apply formulas to the extracted data. This is useful when you want to summarize, reshape, or clean a channel before mapping it to an output.
Examples include:
- Min / Max: Extract the lowest or highest value from a data set.
- Min X / Max Y: Get the X-position where the min or max Y occurs.
- Average / Weighted Average: Return the mean value; weighted average considers X-values.
- Slope: Calculate the slope of a curve.
- Remove Nulls: Exclude empty or invalid points before extracting.
- Curve Rounding: Round curve values to clean noisy data.
- Diff from Start X: Return how much Y changes relative to the first X-point.
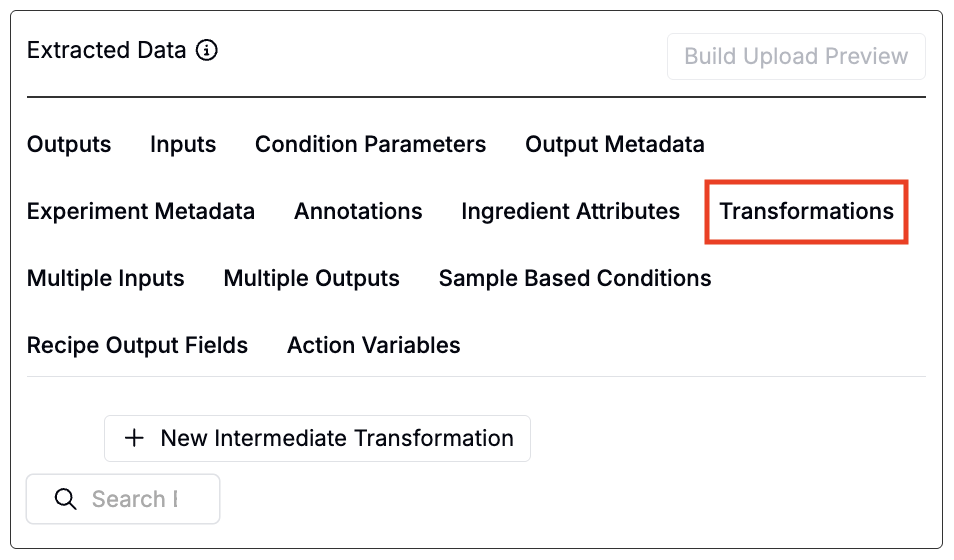
Intermediate transformations (Transformations tab)
You can also use the Transformations tab to set up intermediate transformations. Intermediate transformations can be used in cases where you need to chain multiple operations or reuse a transformed result across multiple extractions.