Use the Entities Importer to bulk create or update entities across your Uncountable schema. This importer supports creating new records and updating existing entities based on their ID or name.
The Entities Importer lets you create custom entities, analytical methods, equipment, equipment types, projects, certifications, tasks, lab requests, and more. You can update any entity type that has a definition configured in Form Admin and can be selected in the Entities Importer.
Common use cases
Teams most often use the Entities Importer when they need to move or maintain a lot of configuration data at once, or when the UI would be too tedious for long lists. Examples include:
- Setting up or maintaining projects, equipment, AMCPs, and other entity types in bulk.
- Bulk‑creating and maintaining large custom‑entity catalogs from spreadsheets (for example, customers, applications, or other custom entities).
- Bulk‑creating or maintaining dropdown lists that are used as ID sources on other entities.
- Bulk updating specific fields on existing entities (metadata maintenance), such as User definitions.
For small, one‑off changes, you can still edit entities manually through their standard pages. However, the importer is the fastest and most consistent option for bulk setup and maintenance.
Using the Entities Importer
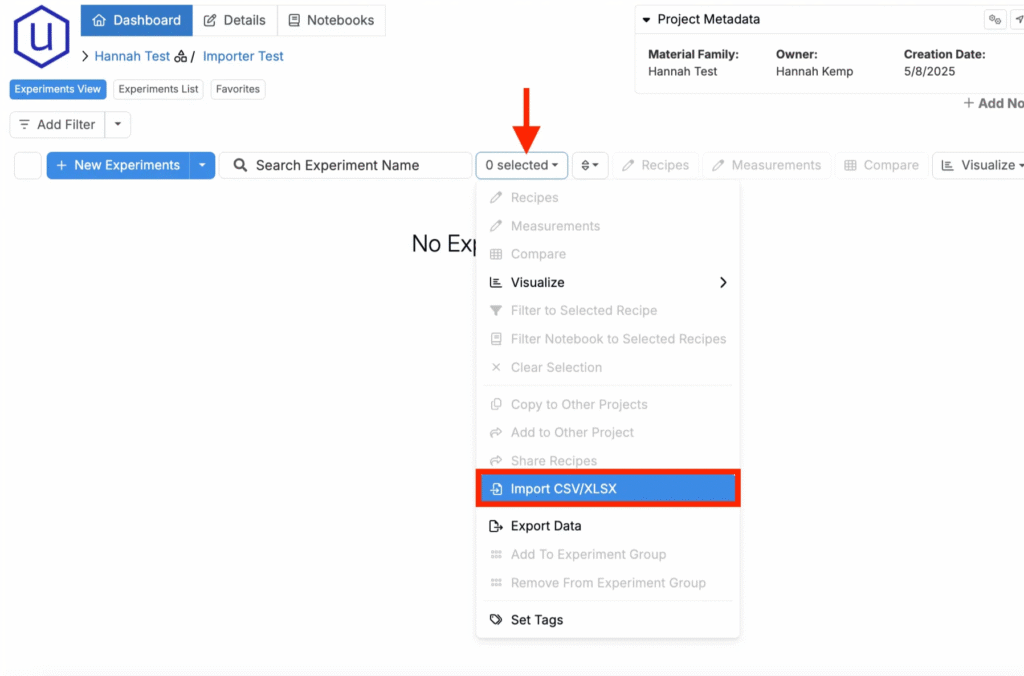
Step 1 — Access the Importer
- Navigate to any project dashboard.
- Open the selection menu and click Import CSV/XLSX.
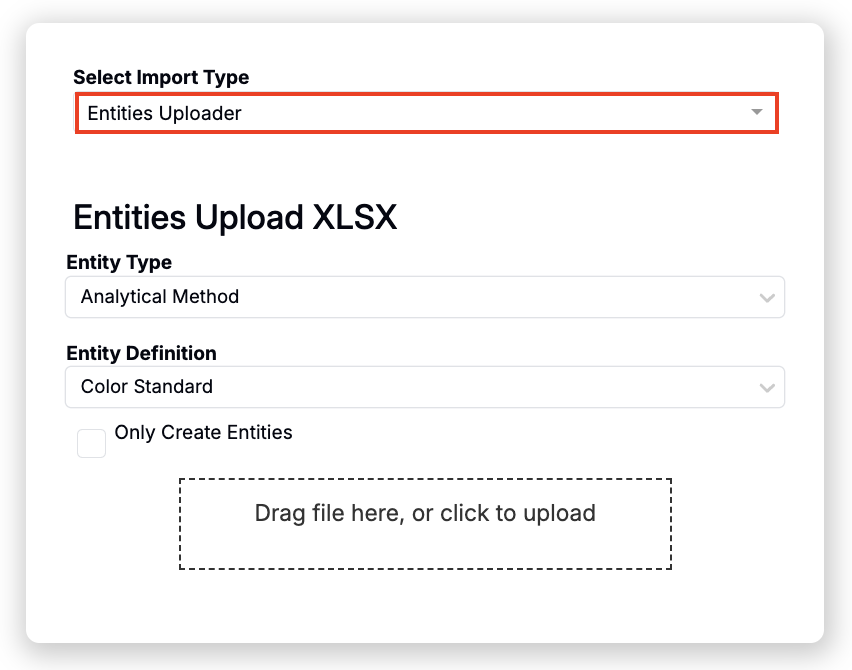
Step 2 — Select Import Type
- From the modal, choose the Entities Importer.
- Choose an Entity Type and Definition to create or update.
- Check Only Create Entities if you want to create new entities without updating existing ones for the selected definition.
Step 3 — Prepare Your Spreadsheet
As the entity type and definition are selected before uploading, that information doesn’t need to be in the XLSX file. You also don’t need to include every field in the definition – only the fields you wish to update (or populate if creating a new entity).
Identifier Column (Required)
Every row must include a unique identifier so the importer knows whether to create a new entity or update an existing one. Use one of the following headers:
- id — The backend ID of the entity.
- name — The entity’s name, when it is unique.
Rules:
- Where creating new entities, there is no existing ID, so name is required.
- When updating existing entities, you may use id, name, or both. If no id is provided but name already exists in the system, the row is treated as an update to the existing entity with that name.
- If you want to change the name of an entity:
- You must provide id so the system can match the correct entity.
- The value in the name column will then be updated like an ordinary field.
Field Columns
All other columns in your spreadsheet should represent fields defined on the selected entity definition. Column headers must match the reference names of those fields.
To find a field’s reference name:
- Go to the entity’s definition in Form Admin.
- Locate the field and note its reference name.
- Use this exact reference name as the column header in your spreadsheet.
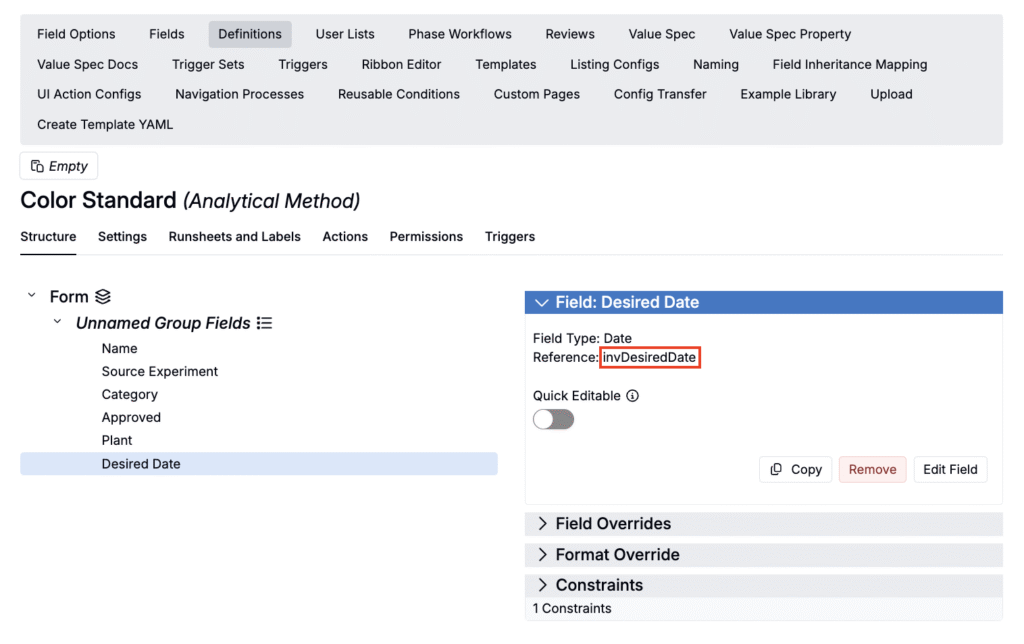
In this example, the AMCP “Desired Date” field has reference “invDesiredDate” so your Excel column header should be “invDesiredDate”.
Empty Cells
Empty cells do not remove or clear existing values. If a field is blank in the spreadsheet, it is ignored during an update.
Supported Field Types and Values
Most field types are supported in the Entities Importer, with the main exception being files.
- Files
- Not currently supported in the Entities Importer. File upload must be done through the UI or other dedicated flows.
- Array values
- Can be included within a single cell using semicolons as separators.
- Example:
41;35for a multi-select or multi-ID field.
- Boolean values
- The importer interprets:
falseorf→ false- Any other non‑empty value → true
- The importer interprets:
Spreadsheet Example
Here is an example of using the Entities Importer to update an analytical method using id as the identifier:
| name | approved | datetime | invDesiredDate | plant |
|---|---|---|---|---|
| AMCP 1 | true | 2023-05-09T08:01:00+00:00 | 2023-05-02 | Plant A;Plant B |
| AMCP 2 | true | 2023-05-09T08:01:00+00:00 | 2023-05-03 | Plant A;Plant C |
| AMCP 3 | false | 2023-05-09T08:01:00+00:00 | 2023-05-04 | Plant A;Plant D |
In this example:
- name — Identifies which analytical method to update.
- approved — A checkbox boolean field.
- datetime — A datetime field, using ISO‑8601 format.
- invDesiredDate — A date-only field.
- plant — A Fixed List field that accepts multiple values, provided as a semicolon‑separated list.
Tips & Reminders
- Always verify you have the correct entity type and definition selected before importing; all validation is based on that definition.
- Use id when changing names to avoid ambiguity.
- Keep column headers strictly aligned with field reference names.
- The importer currently processes only the first 1,000 rows of an XLSX file. To work with larger datasets, split your data into multiple files and upload them in batches.