Uploaders allow you to drag and drop a raw machine file directly into Uncountable instead of entering values manually. Uploaders can be used to extract all different types of data from raw files including numeric or curve outputs, condition parameters, and metadata.
To upload data, use the Upload Data modal on the Measurements view of your experiments. After the file has been dropped in, the uploader parses the values. Once accepted, the data will be imported into the experiment. However, uploaders require some initial configuration to know how to interpret and map the data.
Uploader configuration is usually handled by your Uncountable representative. However, article introduces how that configuration works and how to build your own mappings.
Raw Files
Uncountable uploaders can parse common Excel files (with data in multiple tabs), and files that can be opened in a simple text editor (.txt, .csv, .xlsx, .rtf, and .dat). Files must be machine-readable, so formats like .pdf are not supported.
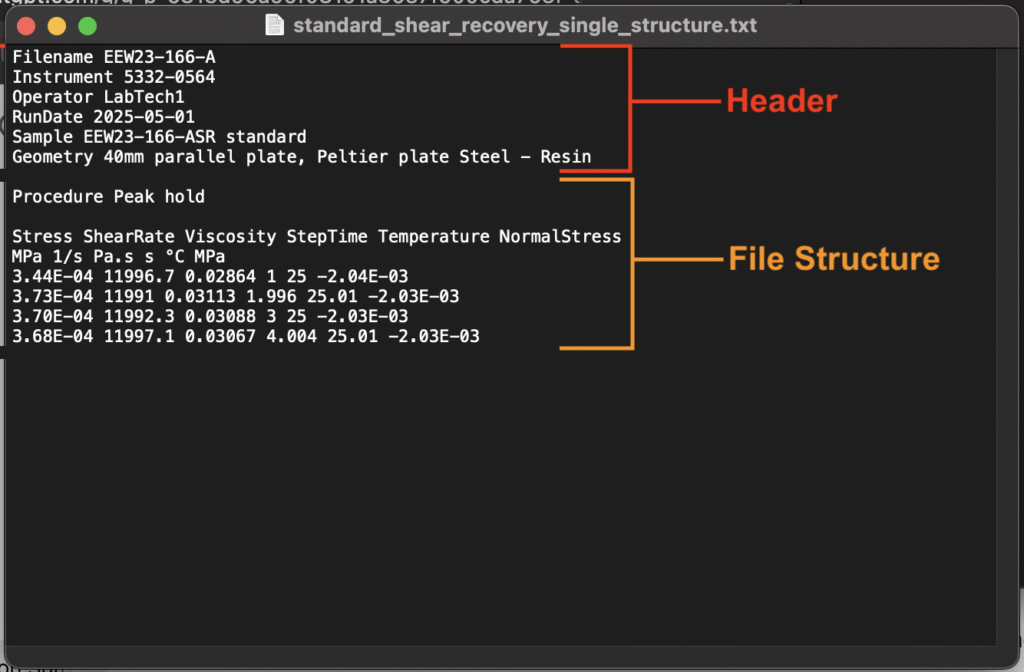
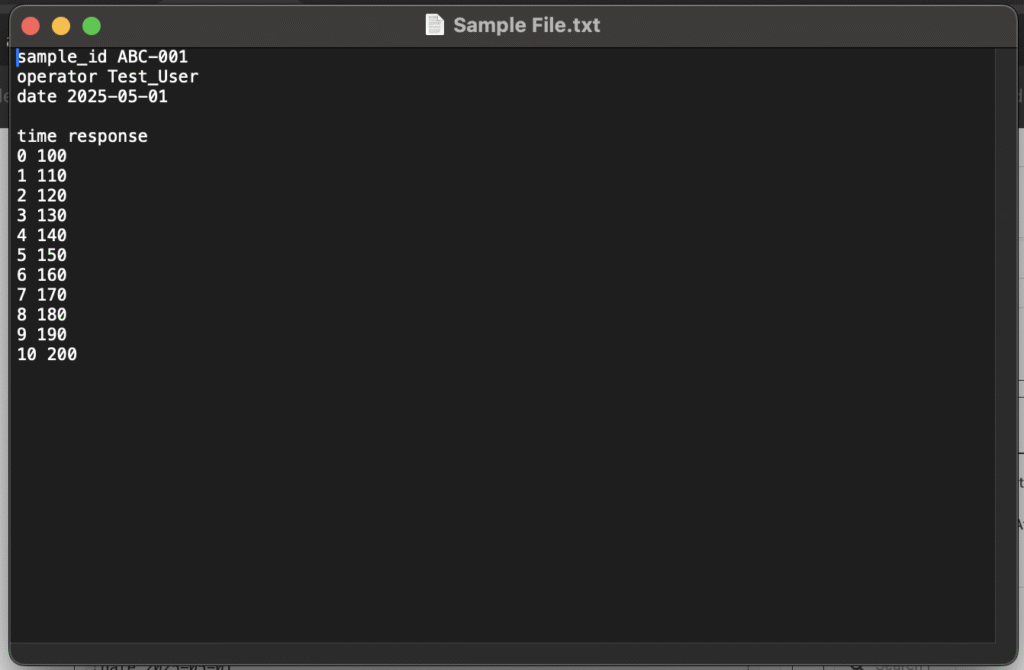
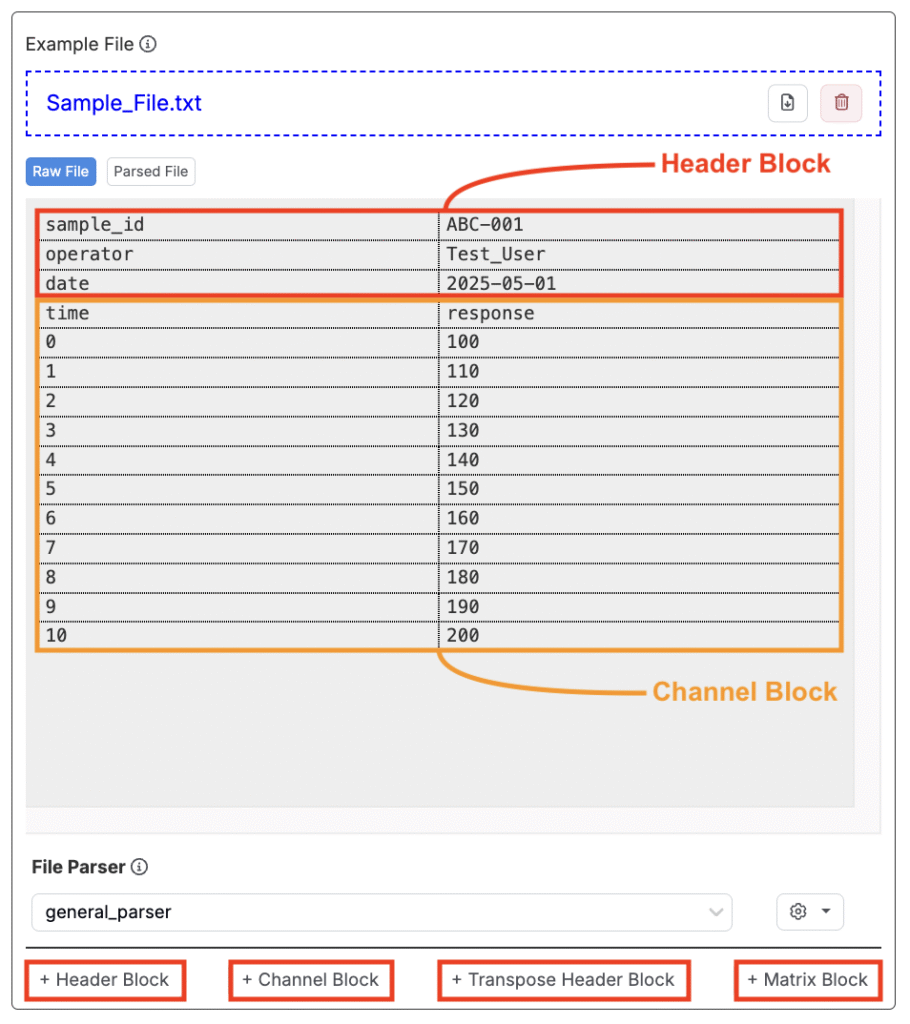
A machine file used typically consists of two main components:
- Headers: Contains information that applies to the entire file, such as the file name, instrument used, operator, or run date. Header fields consist of one field name paired with one value (1:1 field:value).
- File Structures: File structures are self-contained blocks of recipe data, organized into channels.
File Structures
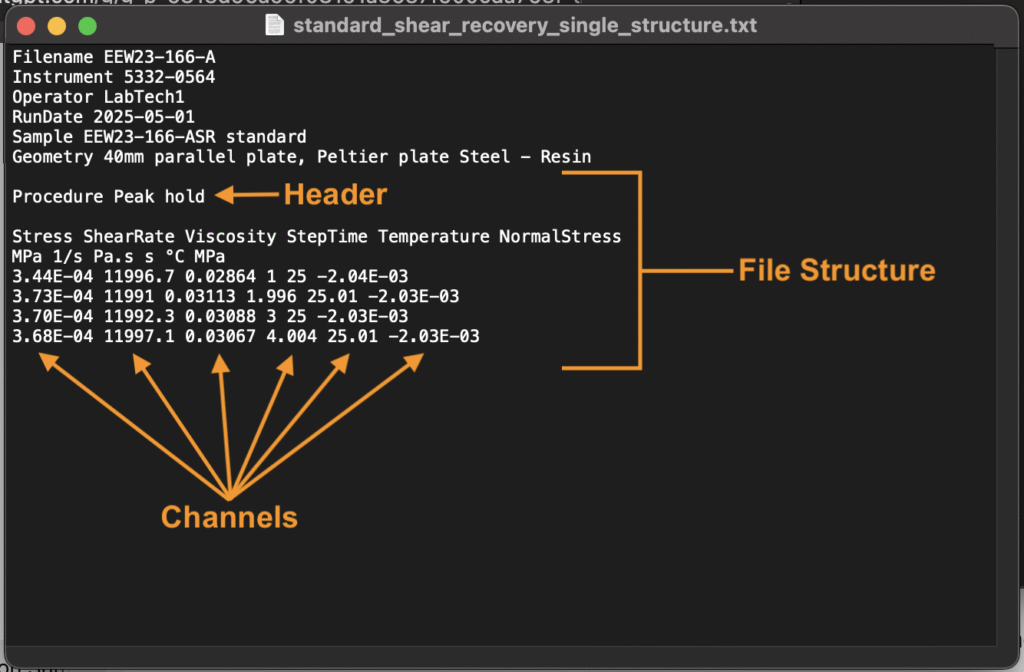
A file will contain one or more file structures. File structures contain the actual data measured and consist of:
- Headers: Contain information that applies to an entire file structure. Headers are typically found in the first few lines or columns and follow a simple 1:1 field-to-value format. Within file structures, headers often capture condition parameters, output metadata, or transformations.
- Channels: Represent the actual measured values, organized into rows or columns. A channel consists of a name, a numeric data array, and an optional unit. There are two main types:
- Numeric Channels: A single list of measured values (e.g., Viscosity).
- Curve Channels: Paired lists of values used together (e.g., Time vs Force).
- A single channel can be reduced to its maximum value (
1 Channel → 1 Numeric Value). - Two channels can be processed to extract a value like the x-value at the peak y-value (
2 Channels → 1 Numeric Value).
Files may also contain multiple file structures. Cases in which you might see multiple file structures in a single file include:
- Replicates: Multiple replicates saved into one file.
- Phases or Steps: A single experiment broken into sequential phases, each recorded as its own curve.
- Condition Sets: Several curves recorded under different condition parameters.
By default, uploaders treat distinct file structures as replicates. However, using the Map File Structures settings, you can customize this behavior. Learn more.

How to Build an Uploader
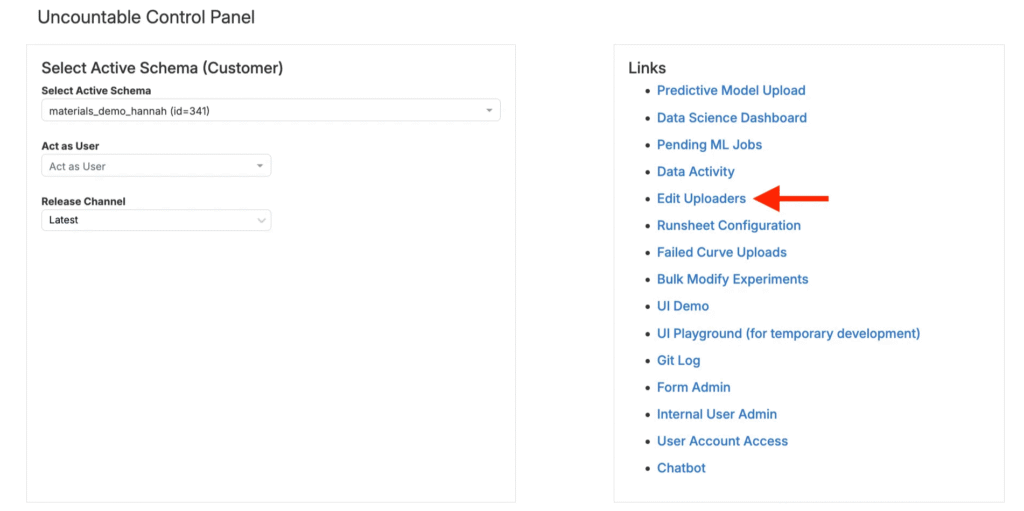
Step 1— Create a New Uploader
Uploaders are created on the Control Panel Edit Uploaders page.
Step 2— Load an Example File
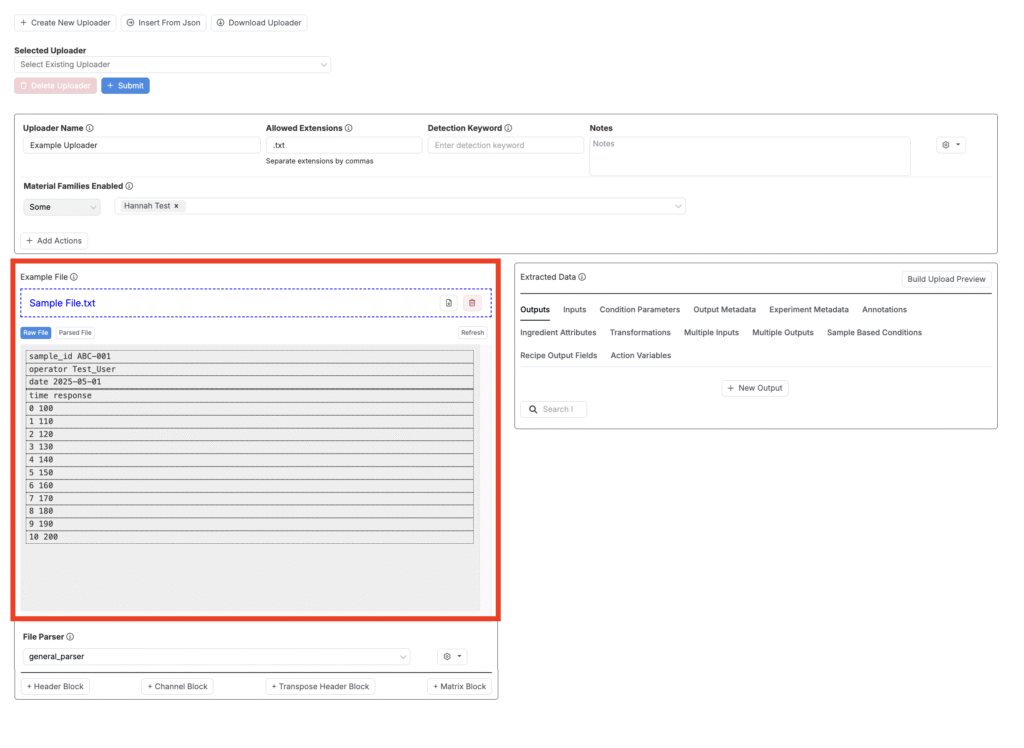
To build an uploader, you’ll first need an example raw file to configure it against. Drag and drop a sample file directly into the Example File field. This should be a real, representative file of the type users will upload into the platform.
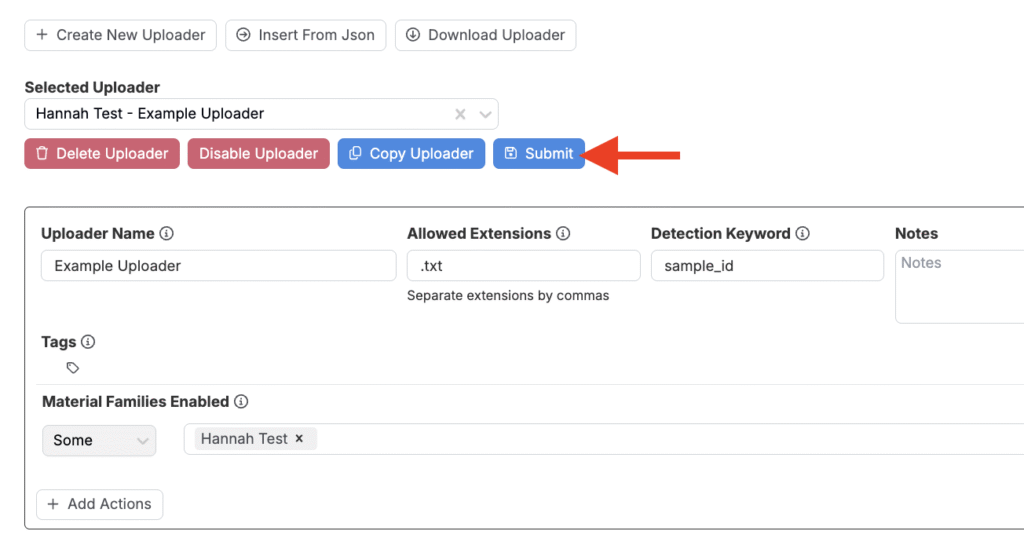
Step 3— Uploader Settings
Once you’d loaded an example file, fill out the following information:
- Uploader Name: Add a clear, descriptive label.
- Allowed Extensions: List file types this uploader should accept, separated with a comma (e.g.,
.txt, .csv). - Detection Keyword: Choose a unique word or phrase that appears in every file of this type. The platform uses this keyword to match uploads to this uploader.
- Notes: Instrument details, version info, or admin tips.
- Material Families Enabled: Select the families where this uploader should appear.

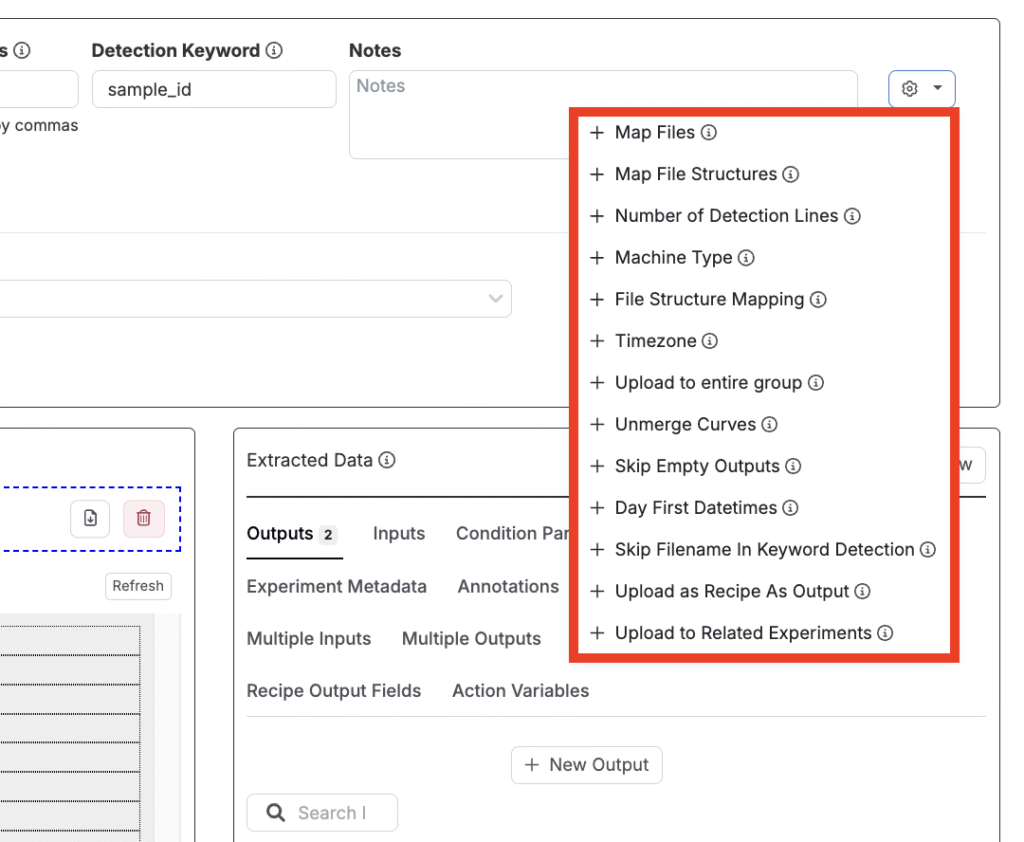
Additional settings are also available within the uploader settings menu, including:
- Map Files: Uploaders can be used to upload multiple files of the same file type at once. The Map Files setting allows you to define how the uploader should process these files. Options include mapping to recipes (default), to replicates, custom, or none. Learn more.
- Map File Structures: In cases where a file contains multiple file structures, the Map File Structures setting allows you to define how the uploaders should handle these file structures. Options include mapping to replicates (default), to recipes, custom, or none. Learn more.
- Number of Detection Lines: Set how many lines the uploader should search through for the detection keyword (default is 15 lines). This setting is useful if your detection keyword appears further down in your file.
- Machine Type: Associate the uploader with a specific machine.
- File Structure Mapping: Automatically map file structures to an existing recipe in Uncountable. Learn more.
- Timezone: Select a timezone to be applied to dates parsed using this uploader.
- Upload to Entire Group: Set whether the uploader should upload to all experiments in the same group as the target experiment.
- Unmerge Curves: Unmerge any curves merged during the upload process.
- Skip Empty Outputs: Instruct the upload to skip over any empty outputs.
- Day First Datetimes: Enable this setting to parse datetimes as day first (e.g. 1/6/2025 is the first day of June).
- Skip Filename in Keyword Detection: Skip filename when searching through the uploaded file for a detection keyword.
- Upload as Recipe As Output: Inputs uploaded to recipes will instead have a Recipe As Output created within, which will contain the inputs. If there is an existing Recipe As Output, then it will be replaced but not deleted.
- Upload to Related Experiments: Upload files to related structures (e.g. lots).
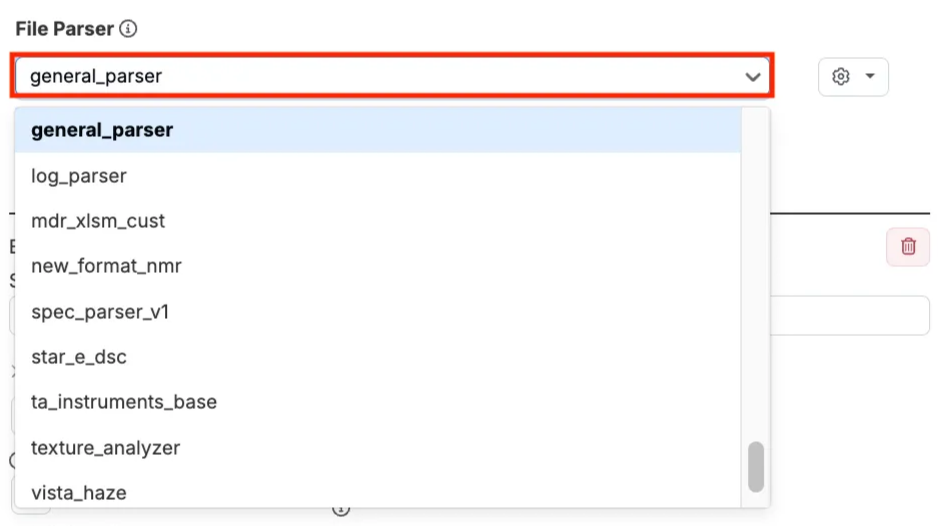
Step 4— Select a Parser
Next, select a parser. A parser reads a file’s raw text and breaks it into structured pieces (headers, channels, data values) so the rest of the system can understand and process it automatically.
In the File Parser field, select one of the following:
- General Parser: Unless you have had a custom parser build for you, you will typically use the General Parser (”general_parser”). This parser is configurable.
- Other Parsers: Other preconfigured options are also available, such as “format_unlabeled_channels” which can be used when your files contains channels with no headers.
- Custom Parser: Sometimes customer files cannot be used with the General Parser. In this case, a Custom Parser may need to be built. Learn more.
By clicking the ⚙️ next to File Parser, you can also access various additional parsing tools. Learn more.
Step 5— Parse Header/Channel Blocks
To pull the right values into Uncountable, you’ll need to define which parts of the file contain header information and which parts contain channel data.
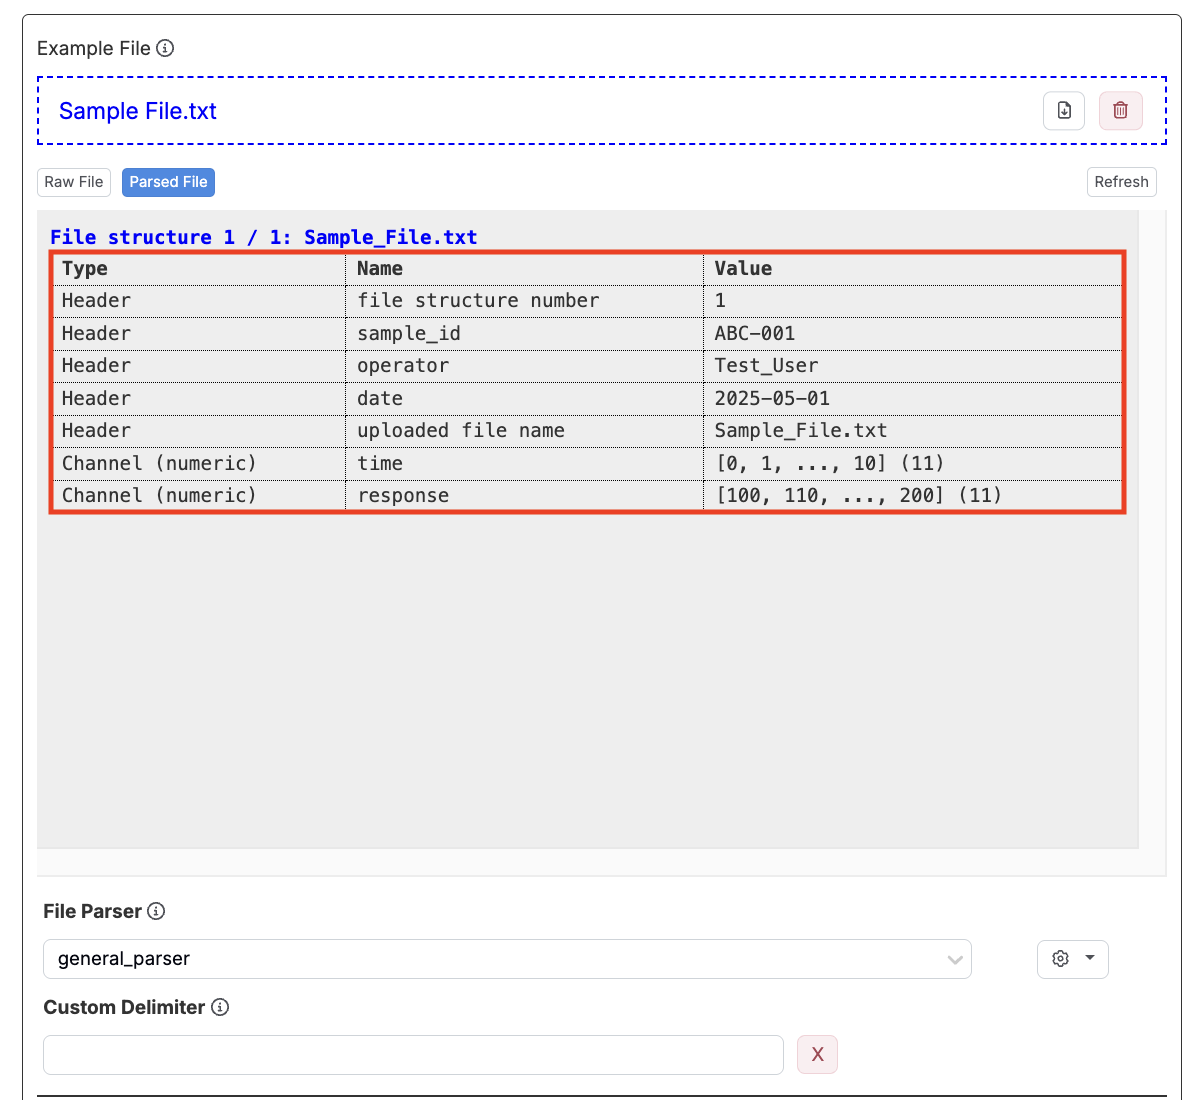
On the Edit Uploader page, use Raw File tab to identify your header and channel blocks. Then, add blocks using the following buttons:
- Header Block: Use when header fields are displayed horizontally.
- Channel Block: Use for data columns (e.g., curves or numeric arrays).
- Transpose Header Block: Use when header fields are displayed vertically.
- Matrix Block: Use for grid-style data that doesn’t fit typical channel or header formats.
As you add blocks, use and refresh the Parsed File tab to verify that information is being correctly parsed.
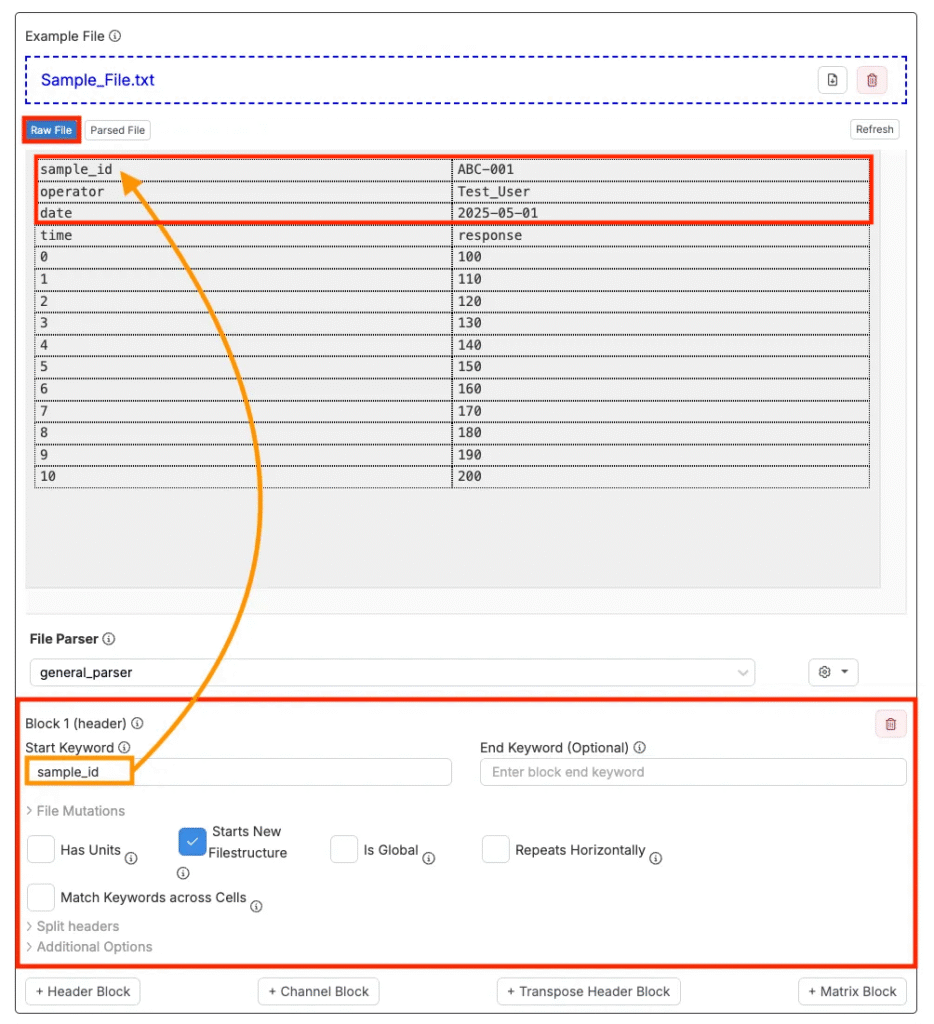
Adding a Header Block
Using a header block tells the uploader to pull individual field:value pairs from the file and treat each one as a separate output. The header block will extract the first cell as the field name, the second cell as the value, the third cell as units (if present and the Has Units is checked).
To add a header block:
- Click Add Header Block.
- Add a Start Keyword—the first text that marks the beginning of the header section.
- Enter an End Keyword if the header stops before the data starts (optional).
- Configure header settings:
- Has Units: Check this if there’s a row directly below the channel names that contains units. When enabled, the uploader will skip that row instead of interpreting it as data.
- Starts New Filestructure: When checked, this block starts a new file structure. If left unchecked, the data will be treated as part of the same structure (a single long, appended channel).
- Is Global: If a file contains multiple file structures, this setting will will insert the header block in every file structure generated.
- Repeats Horizontally: Enable this setting if the header block repeats horizontally.
- Match Keywords Across Cells: When checked, keywords will be matched across cells instead of an entire line.
- Starting Index: Use to ignore the first specified number of columns. This is useful if your header does not begin on the first line. By default, this value is set to 0.
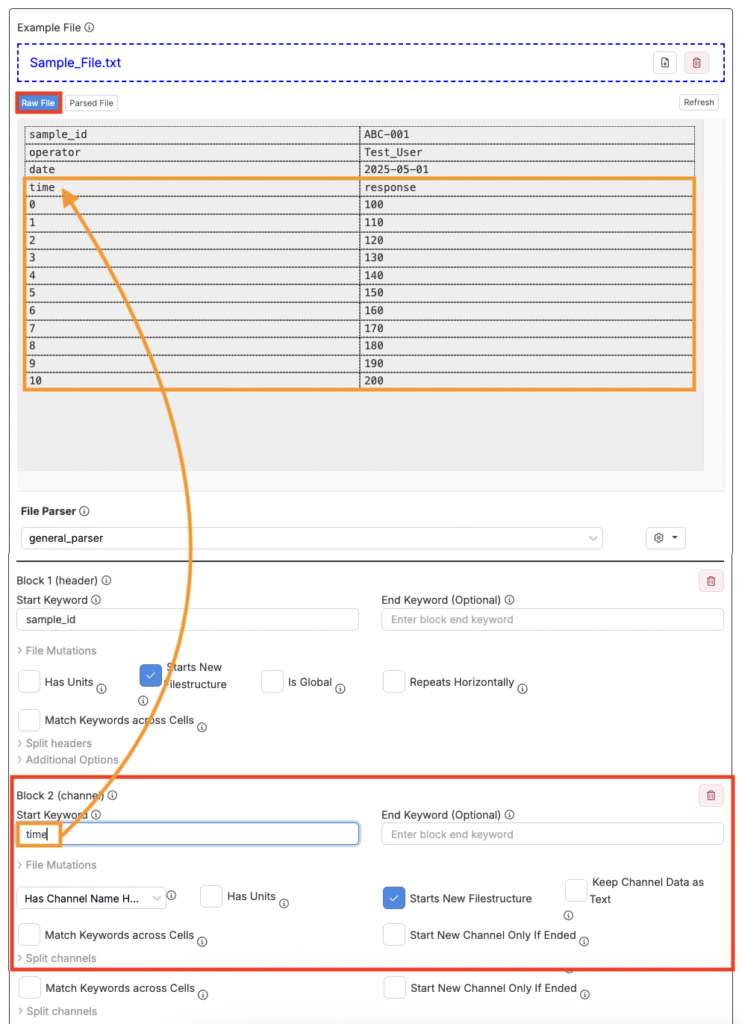
Adding a Channel Block
A channel block takes two or more columns (typically one X and one Y) and converts them into single overall channel.
To add a channel block:
- Click Add Channel Block.
- Enter a Start Keyword—usually the first column header.
- Enter an End Keyword if the data ends before the file does (optional).
- Configure channel settings:
- Header: Select either No Header, Has Associated Header, or Has Channel Header.
- Has Units: Check this if there’s a row directly below the channel names that contains units. When enabled, the uploader will skip that row instead of interpreting it as data.
- Starts New Filestructure: When checked, this block starts a new file structure. If left unchecked, the data will be treated as part of the same structure (a single long, appended channel).
- Keep Channel Data as Text: When checked, all data will be parsed as text, including numeric or timestamp data.
- Match Keywords Across Cells: When checked, keywords will be matched across cells instead of an entire line.
- Start New Channel Only If Ended: When enabled, a block is only restarted if it was ended explicitly or if a new block is started.
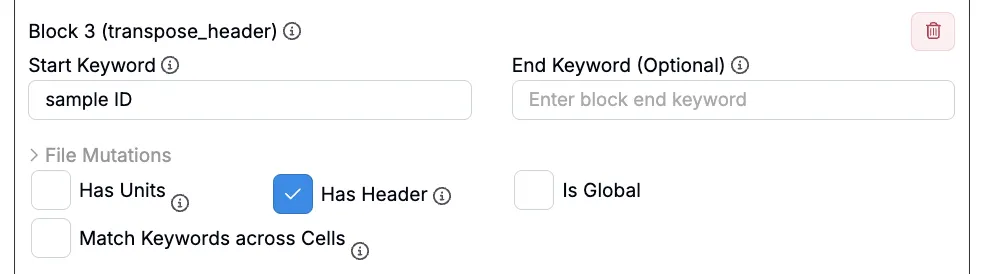
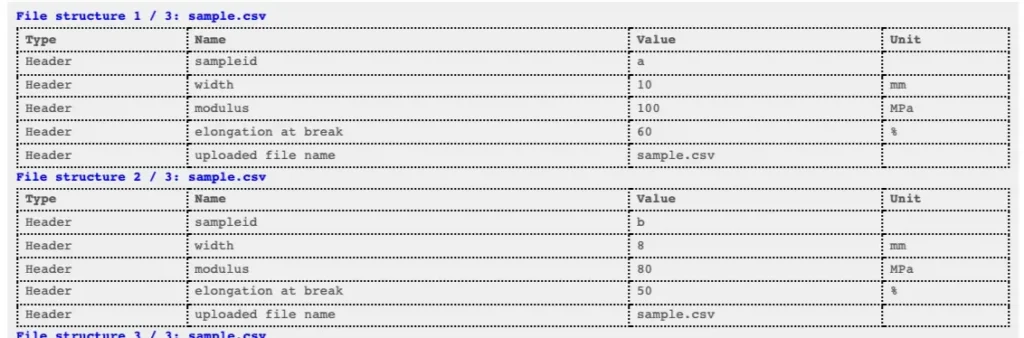
Adding a Transpose Header Block
If header values are arranged vertically rather than horizontally, use a transpose header block to extract them correctly. Transpose headers allow you to parse tabular data where:
- The columns represent header names.
- Each row corresponds to a distinct file structure.
- Each cell contains the value for its associated header.
This structure is especially useful when a single table contains multiple samples or replicates, with one row per entry.

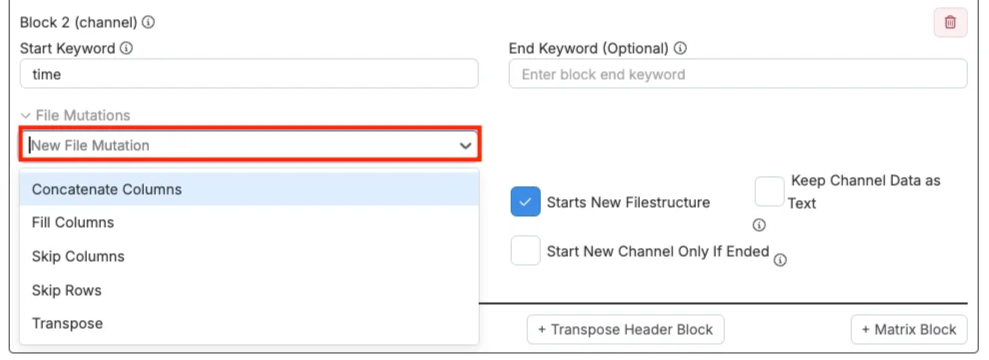
File Mutations
Each header or channel block also includes a File Mutations setting where you can adjust how the uploader reads the block. Options include:
- Concatenate Columns: Combine multiple columns into one. Useful if a value is split across columns.
- Fill Columns: Fill empty cells in a column using the last value above. Helpful when labels are listed only once at the start of a group.
- Skip Columns: Ignore specific columns that you don’t need.
- Skip Rows: Skip a set number of rows after the start keyword. Useful when the data starts a few lines down.
- Transpose: Flip the block so that rows become columns and vice versa. Mainly used for matrix or rotated layouts. These settings help clean up or reshape the data before it’s parsed.
Once you’ve finished adding your blocks, all file information should be correctly organized within the Parsed File tab.
Step 6— Map Header/Channel Blocks to Data
Parsing the file is only part of the process. While it organizes the content into headers and columns, it doesn’t tell Uncountable what that data actually represents.
In the Extracted Data section of the Edit Uploader page, you’ll decide what each piece of parsed data means and where it should go in the system. There are tabs for extracting data to outputs, inputs, condition parameters, metadata, etc.
Mapping Channels to Outputs
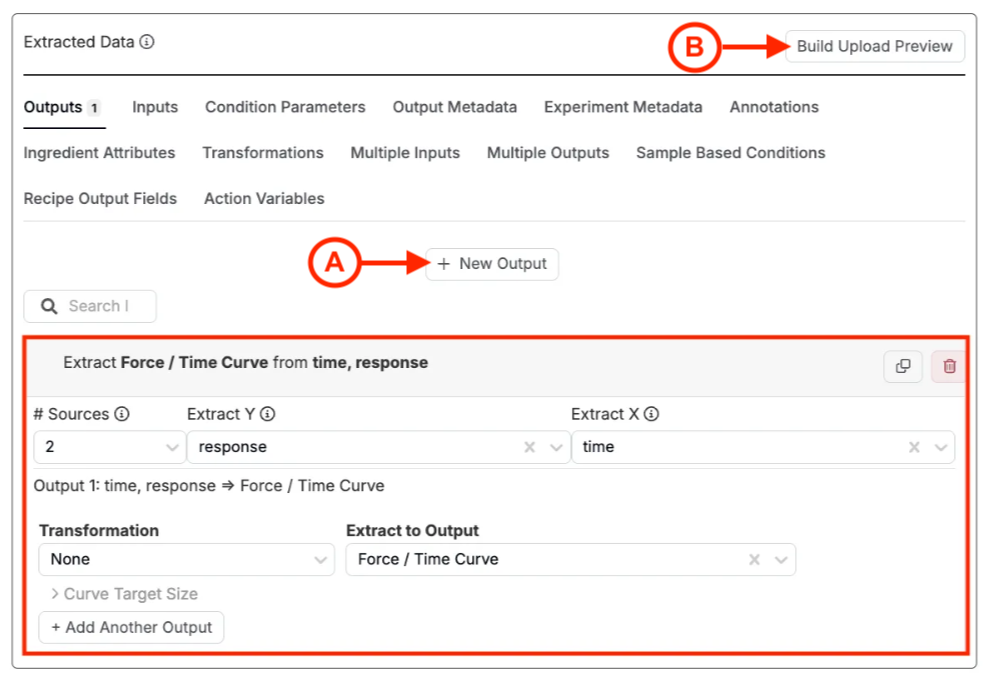
Most work is done in the Outputs tab, where you define anything in the file that represents a measured result.
- Click into the Outputs tab of the Extracted Data section.
- Select + New Output (A) button.
- Set the # Sources. This tells the uploader how many channels to pull. Typically, one source is used to extract numeric outputs and two sources are used to extract a curve output output.
- Select the source using the Extract from File/Source or Extract X/Y fields. These should match the Name column of the channels shown in the Parsed File tab.
- Add an optional Transformation, such as min, max, or a weighted average to process channel data before storing it. Learn more.
- Use the Extract to Output field to tell Uncountable where to send the data. You can select an existing output or create a new one directly from this field.
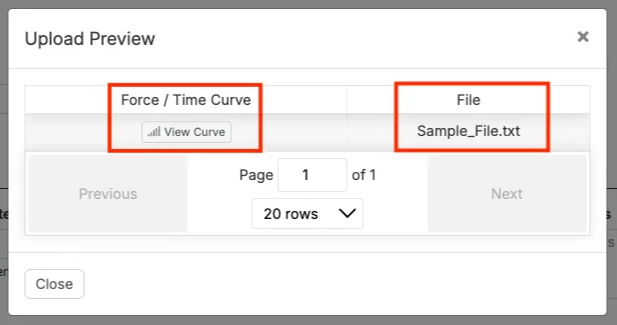
- As you go, use the Build Upload Preview (B) check your work. Note this works for testing outputs but will not work for testing output metadata.

Adding Files as Outputs
If you want to automatically include the original machine file as File output on the recipe in Uncountable, this is also possible when configuring your uploader.
- Click into the Outputs tab of the Extracted Data section.
- Select + New Output (A) button.
- Set the # Sources to 1.
- In the Extract from File/Source field, select “Uploaded File”.
- In the Extract to Output field, select a File type output.
- Use the Build Upload Preview (B) check your work.

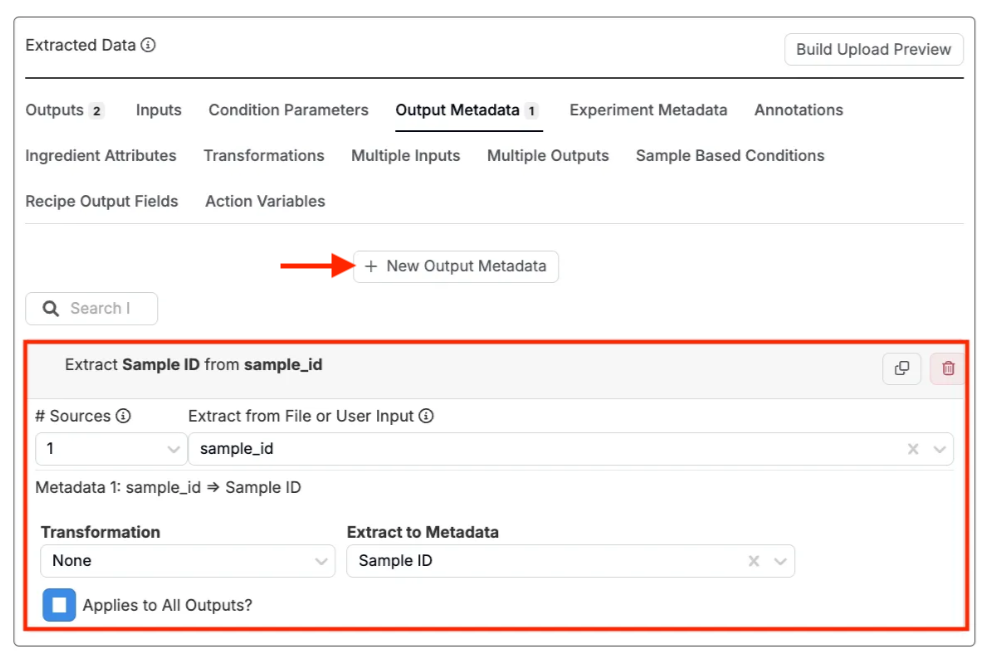
Mapping Headers to Output Metadata
In the Output Metadata tab, you can manually enter values or map fields from the header to define output metadata.
- Click into the Output Metadata tab of the Extracted Data section.
- Select + New Output Metadata button.
- Set the # Sources to 1.
- Select or input the source using the Extract from File or User Input field.
- Use the Extract to Metadata field to extract to a new of existing metadata field.
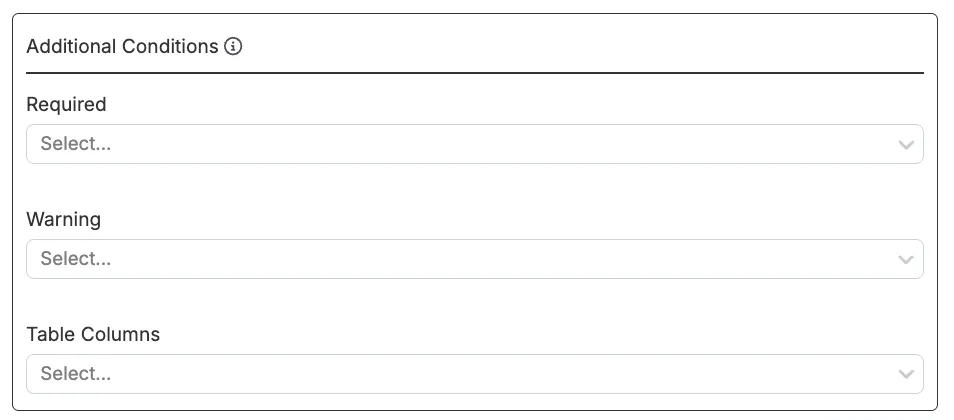
Step 7— Additional Conditions
In the Additional Conditions section, we also have the ability to add conditions to be required or prompted for in the preview uploader modal.
- Required: Condition parameters selected must be have values entered into the preview uploader modal before submitting.
- Warning: Condition parameters selected will be prompted for in the preview uploader modal.
Step 8— Save the Uploader
Once you have mapped all your blocks and finished configuring all settings, click the blue Submit at the top or bottom of the Edit Uploader page.
Step 9— Test on a Recipe
Last, it is important to test your new uploader on a test recipe.
- Navigate to the measurements view of a test recipe.
- Click the Upload Data button in the top toolbar.
- Drag and drop in your example file.
- If the uploader isn’t automatically matched, select it from the dropdown menu.
- Click Accept to load the data into the test recipe.
- On the measurements view, check to make sure that all your outputs were added properly.