A well plate in Uncountable is a specialized type of experiment group that organizes experiments in a grid layout instead of a standard list. This structure makes it easier to plan, run, and analyze workflows where spatial placement matters.
Well plates can represent standard lab formats (e.g., 96- or 384-well plates) as well as custom grids such as exposure panels. They provide the container for experiments, while the Well Plate Editor tool gives you the workspace to populate wells, assign parameters, upload results mapped to coordinates, and visualize outcomes (e.g., heatmaps).
Common use cases for well plates include:
- High-throughput assays — biological screening in 96- and 384-well formats
- Biofermentation runs — growth curves and time-series reads with plate readers
- Coatings/exposure panels — “wells” represent grid positions on test panels
- Test sample creation — repeated runs with parent–child linkage and replicate handling
Creating a New Well Plate
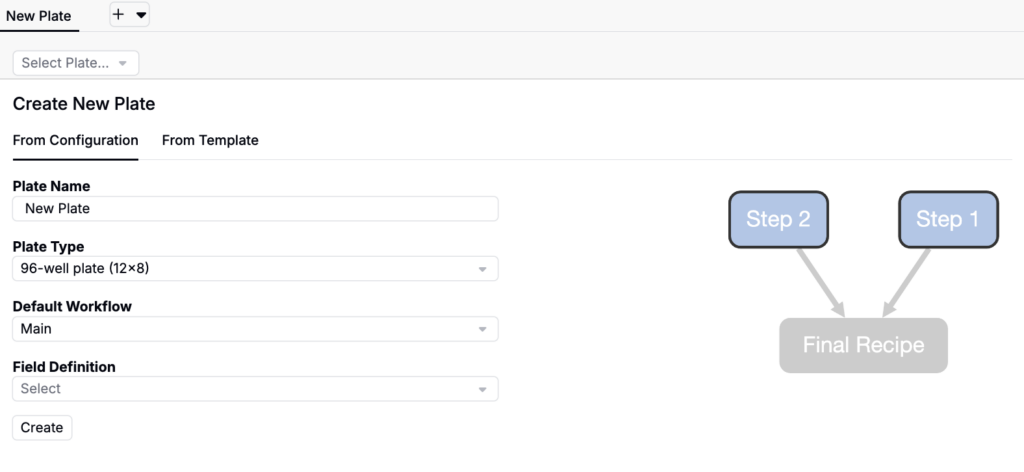
New well plates can be created from the Well Plate Editor (Experiments > Well Plate Editor). To create a new place, enter the following information:
- Plate Name — Auto-generated, but editable.
- Plate Type — Select an existing experiment group template (e.g. 96-well, 384-well, 1×8 panel, etc). If you don’t see a plate type you need, it likely needs to be created as a template first. Learn more.
- Default Workflow/Variant — Determines experiment setup for wells.
- Field Definition — Link the plate to an experiment group, with defined experiment group fields (optional). If selected, you can then add experiment group field values.
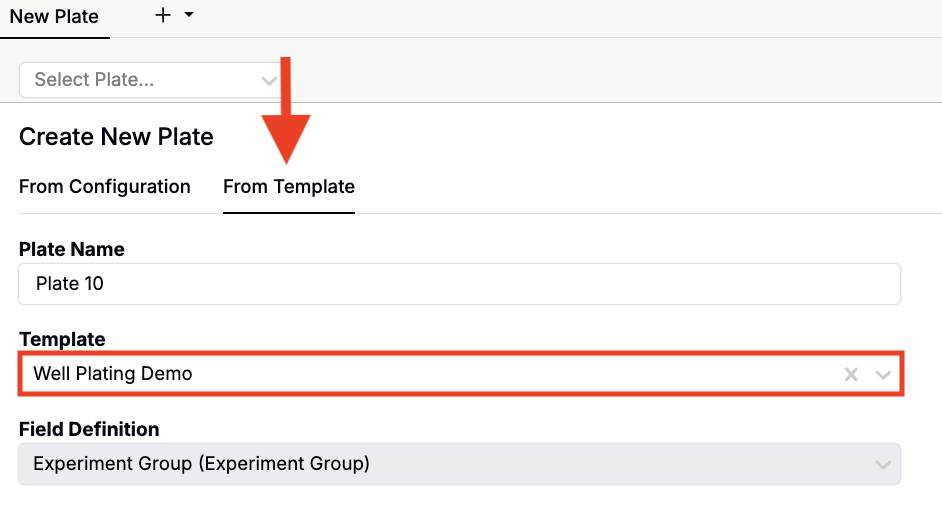
Alternatively, start From Templates if repeating a common layout.
Populating Wells
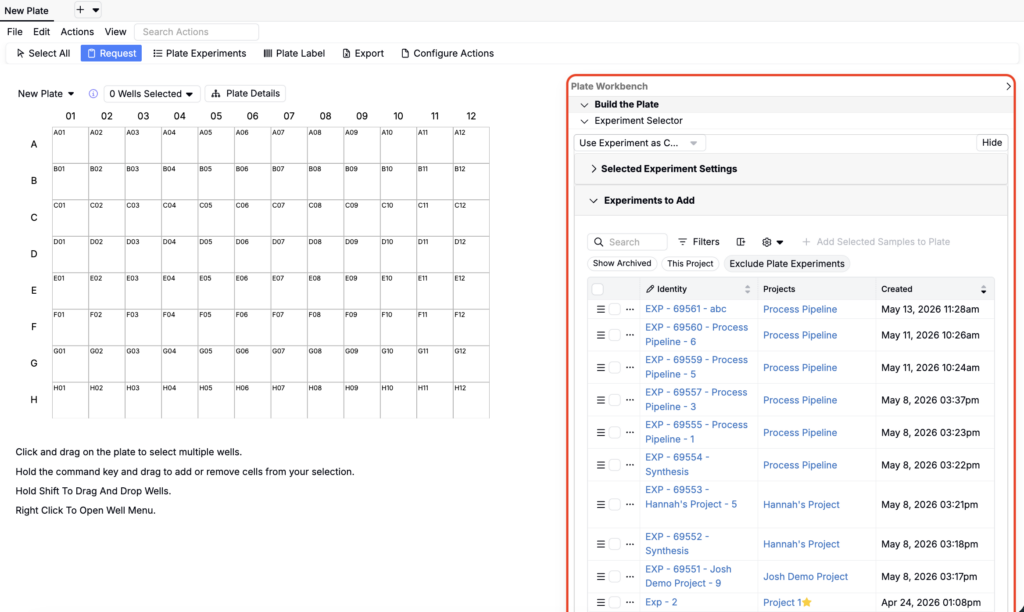
All well-filling tools are accessed through the Plate Workbench sidebar on the right side of the editor. The sidebar opens to the most relevant section by default — Build the Plate when the plate is empty, and Enter Data once experiments have been assigned. Click the ▶ arrow at the top right to collapse or expand the sidebar at any time.
Assign Existing Experiments
To assign existing experiments, open the Build the Plate section in the Plate Workbench sidebar. The Experiment Selector subsection will appear by default when the plate is empty.
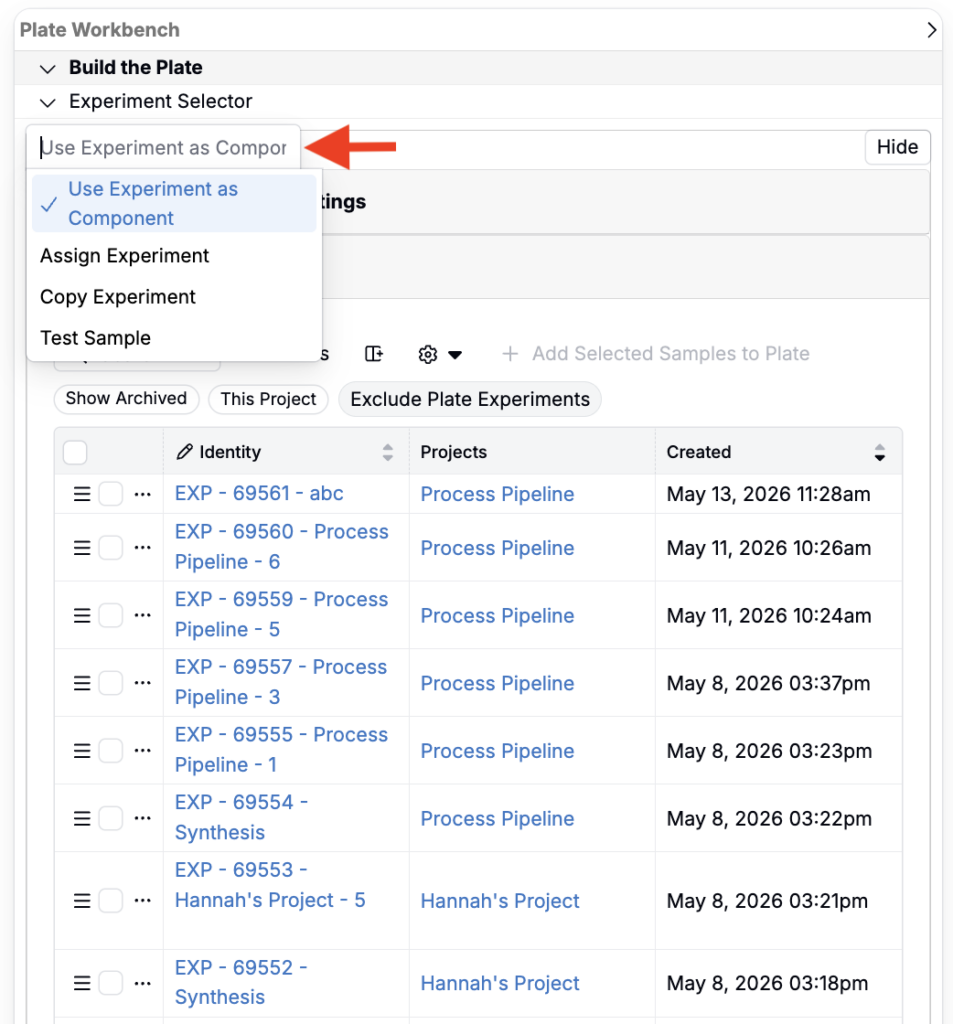
First, use the top dropdown menu to choose how experiments should be placed:
- Assign Experiment — Places an existing experiment in a well. Inputs/outputs recorded in that well write directly to the experiment. If assigned to multiple wells, outputs are stored as replicates.
- Copy Experiment — Creates a new copy of the experiment in each well.
- Test Sample — Creates a test sample on the experiment brought into well (recommended for repeating experiments across plates with clean separation).
- Filled Well Behavior:
- Add as Test Sample Parent — Links the experiment as the parent. No new experiment is created, only a parent–child link. Useful in templates for consistent reference.
- Overwrite Well — Creates a new test sample in the well (overwriting existing content). A new experiment is created and linked to the parent.
- Test Method (optional) — Select a preconfigured template for the test sample.
- Filled Well Behavior:
- Use as Component — Treats an experiment as an ingredient in the well’s recipe. This is useful in cases where you have an experimental sample and a prepared buffer or dye (with a separate recipe) that you’d like to combine in the well.
Next, use the Experiments to Add listing table to select and assign experiments to wells.
- Use search and filter options to search for experiments to add.
- To add experiments one by one:
- On the well plate, highlight the wells you want to place the experiment in.
- Use the stacked lines icon to drag and drop your experiments into the highlighted cells.
- To select an entire row or column, click the header.
- To add multiple experiments to a plate at once:
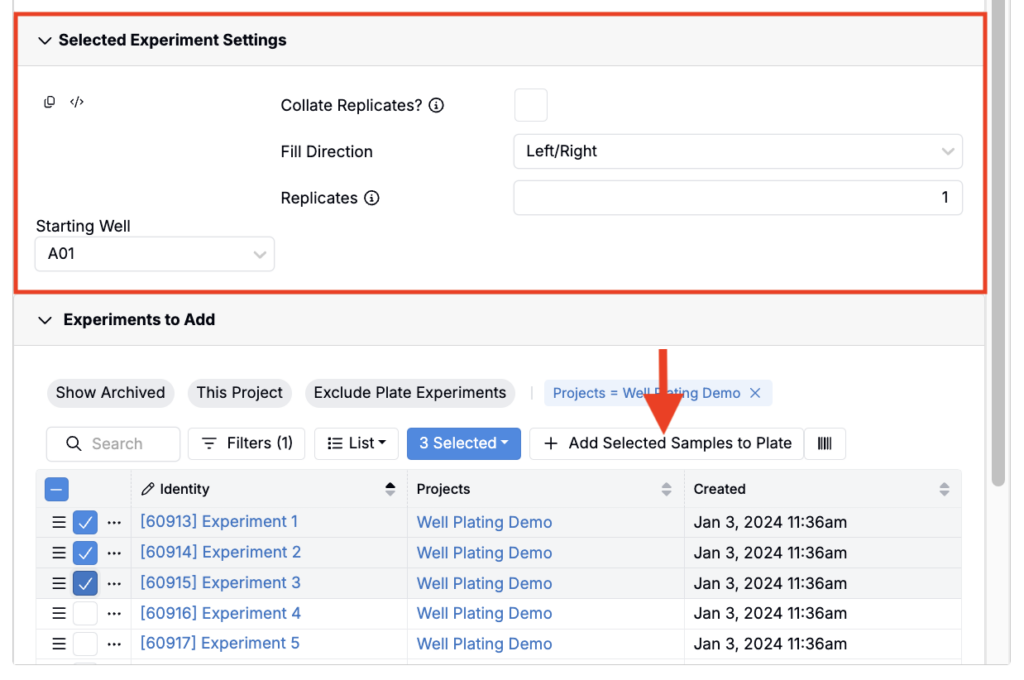
- Select the experiments from the listing table.
- In the Selected Experiment Settings section, specify fill direction, starting well, the number of replicates, and whether or not replicate wells should be collated.
- Click Add Selected Samples to Plate to fill the wells.
Creating Recipes in the Well Plate Editor
You can also create new experiments from scratch directly in the Well Plate Editor.
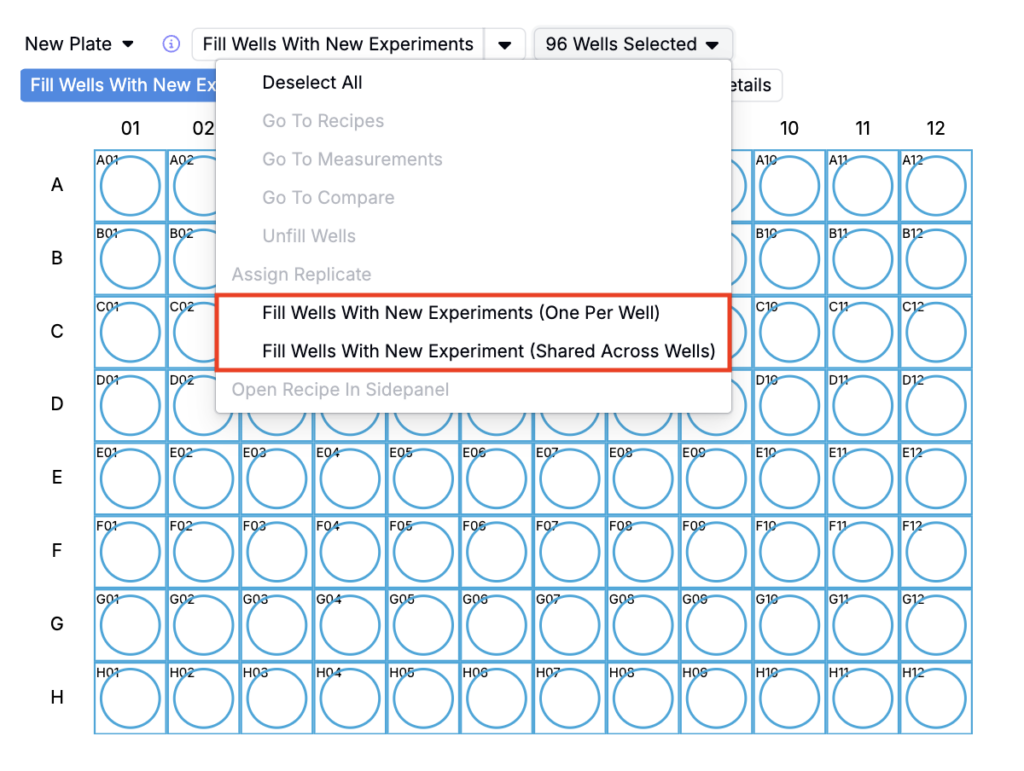
- Highlight the wells you want to fill.
- In the selection menu, choose how the wells should be filled:
- Fill Wells with New Experiments (One per Well): Creates a unique experiment in each highlighted well.
- Fill Wells with New Experiment (Shared Across Wells): Creates a single experiment and places it in all highlighted wells.
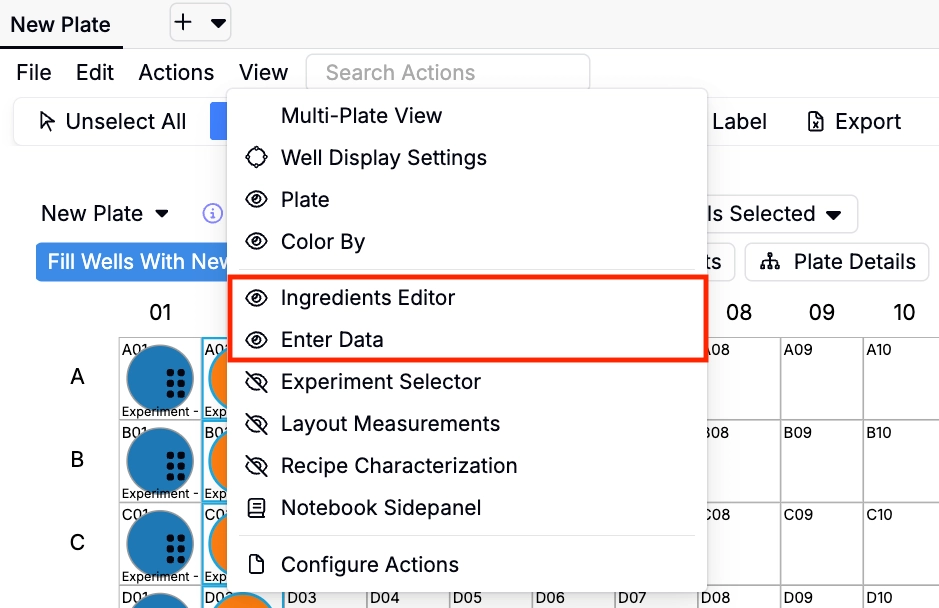
Once you have experiments assigned or created in the well plate cells, you can use the Ingredients Editor and Value Editor tools to assign inputs. If these sections are not visible in the Plate Workbench, add them via the the File Menu (View > Ingredient Editor/Enter Data).
Ingredients Editor
The Ingredients Editor lets you assign ingredients and quantities to selected wells.
- Click Add Ingredient.
- Select an Ingredient from the dropdown (can include intermediate recipes, e.g., a buffer).
- Enter an Initial Quantity (defaults to grams unless specified in the workflow).
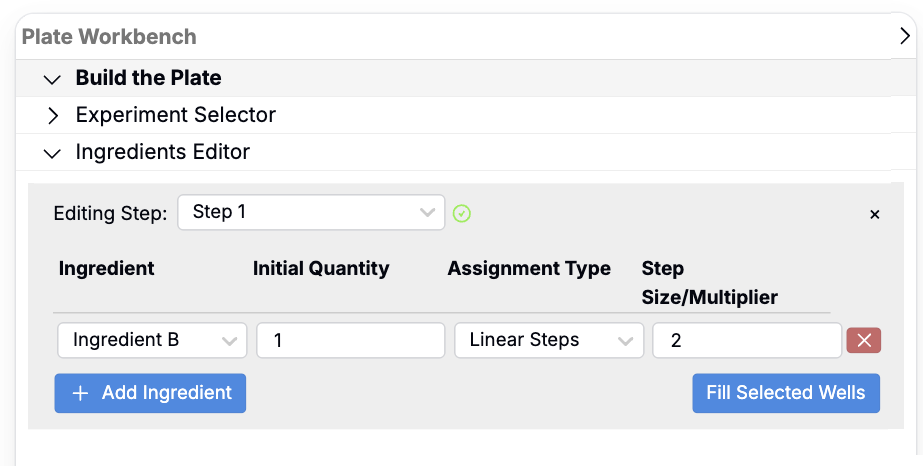
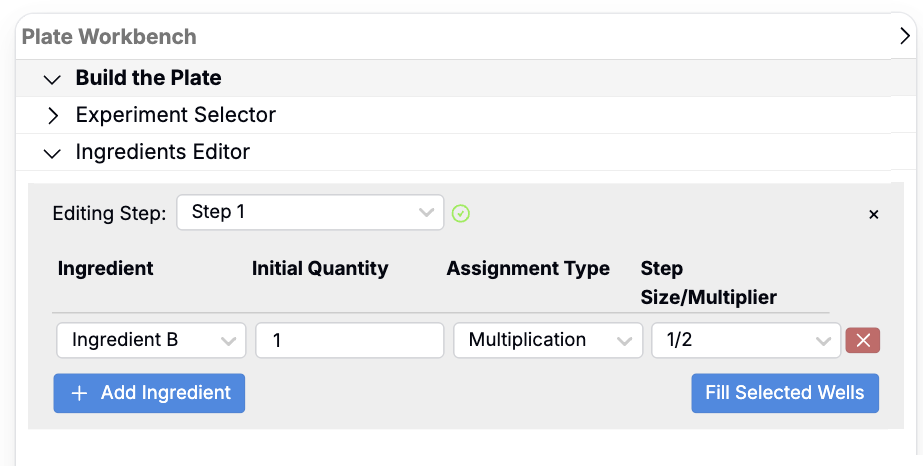
- Choose an Assignment Type:
- Fixed Quantity — Same value in all selected wells.
- Linear Steps — Adds a step each well (e.g., start 1 g, step +2 g → 1 g, 3 g, 5 g…).
- Multiplication — Multiplies per well (e.g., start 1 g, multiplier ½ → 1 g, 0.5 g, 0.25 g…).
- Click Fill Selected Wells to apply.
The ingredients editor allows you to assign specific ingredients with quantities to the wells of your choosing.
Value Editor
In the Enter Data section of the sidebar, users can bring in data saved on experiments added to wells or manually enter it.
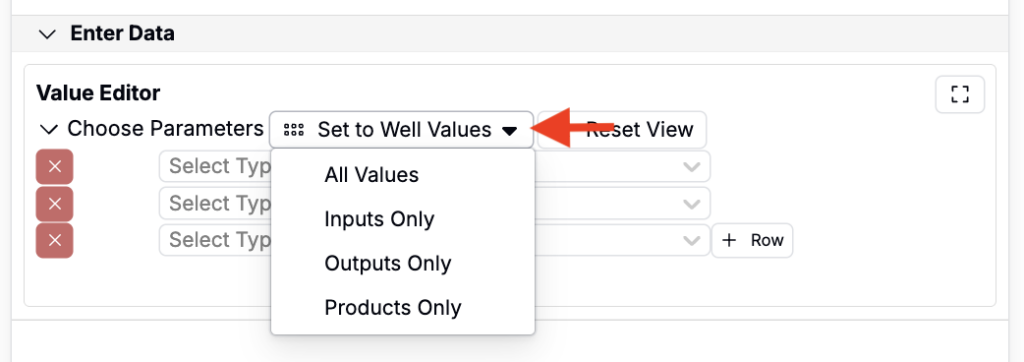
- Use Set to Well Values to auto-populate values already saved on the experiments (often inherited from the workflow and variant used when the plate was created). In this menu, you can choose to apply:
- All Values
- Inputs Only
- Outputs Only
- Products Only
Alternatively, use the fields below to add outputs, process parameters, ingredient categories, metadata, or products manually.
Adding Outputs
- Select Output in the first dropdown.
- Choose a specific output in the second dropdown.
- Add condition parameters in the third dropdown (optional)
- Enter values using one of two tabs:
- Edit Wells — Select individual cells on the plate and manually enter values.
- Edit Bulk — Apply one value across all or selected wells.

Adding Process Parameters
- In the first dropdown, select Process Parameter.
- In the second, select the parameter.
- Use the third dropdown to specify the workflow step.
- Enter values using one of two tabs:
- Edit Wells — Select individual cells on the plate and manually enter values.
- Edit Bulk — Apply one value across all or selected wells.
Adding Ingredient Categories
- In the first dropdown, select Ingredient Category.
- In the second, select the category.
- Use the third dropdown to specify the workflow step.
- To include a value, check the Value checkbox.
- Add ingredients and values using one of two tabs:
- Edit Wells — Click individual wells on the plate and assign an ingredient from the selected category (e.g., choose a specific additive).
- Edit Bulk — Apply one ingredient across all or selected wells.
Adding Experiment Metadata
- In the first dropdown, select Experiment Metadata.
- In the second, select the metadata field.
- Add metadata using one of two tabs:
- Edit Wells — Click individual wells on the plate and assign metadata values manually.
- Edit Bulk — Apply one metadata value across all or selected wells.
Adding Products
- In the first dropdown, select Product
- In the second, select the product folder.
- Use the third dropdown to specify the workflow step.
- Add individual products using one of two tabs:
- Edit Wells — Click individual wells on the plate and assign products manually.
- Edit Bulk — Apply one product across all or selected wells.
Uploading Results
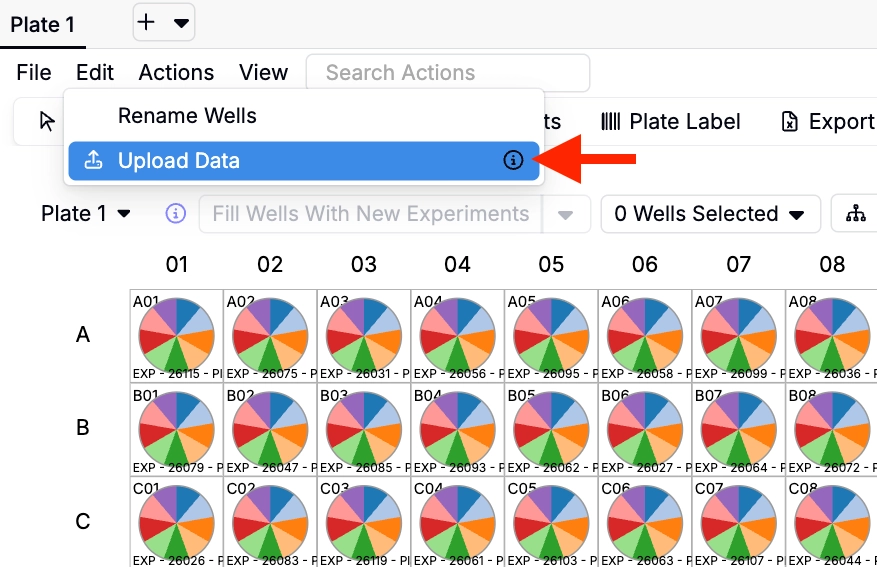
You can upload instrument results (e.g., Optical Density or Absorbance readings) directly into the Well Plate Editor using uploaders, similar to those used to upload data on the measurements view of an experiment.
- In the File menu, select File > Upload Data to display the uploader section.
- Drag and drop your raw data file, or browse to select it.
- Files should include row and column headers so values map correctly to wells.
- Results are written automatically to the experiments in your well plate.
For help setting up an uploader, reach out to your Uncountable contacts.
Visualizations
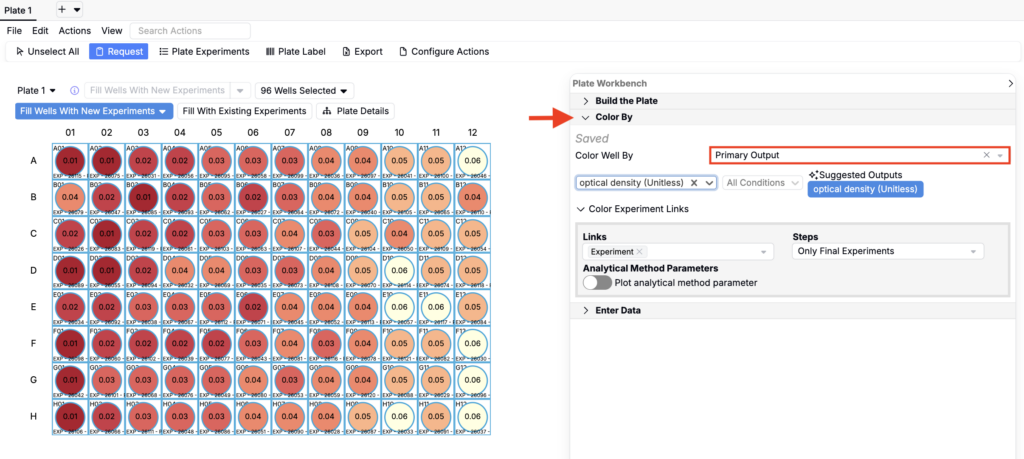
The Well Plate Editor includes built-in tools to visualize wells by experiment, ingredient, outputs, controls, and more. To use them, expand the Color By section in the sidebar If the section is visible, add it via the the File Menu (View > Color By).
Examples
- By Output (heatmap view): Set Color Well By to Primary Output to color wells by outputs such as optical density. This will create a heatmap.
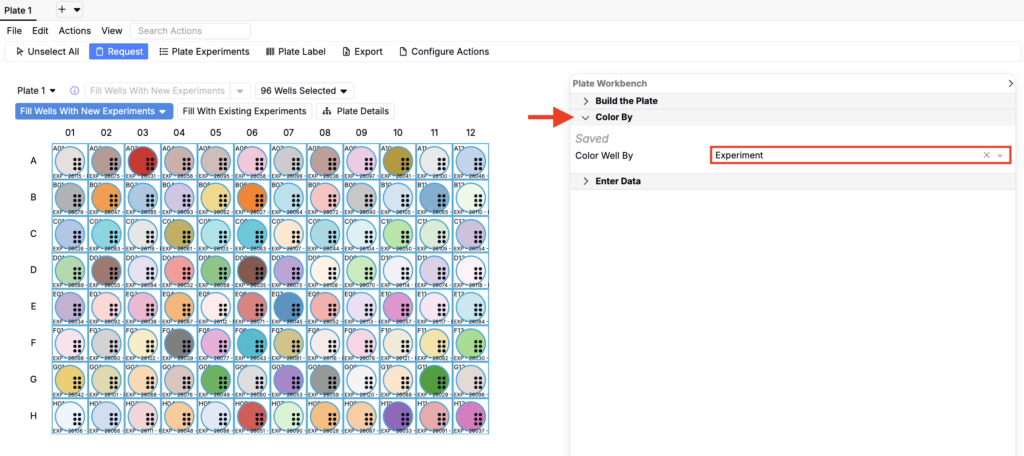
- By Experiment: Set Color Well By to Experiment to highlight how many unique experiments are placed on the plate.
- By Ingredient: Set Color Well By to Ingredient to display ingredient breakdowns in each well, with an option to separate by workflow step.

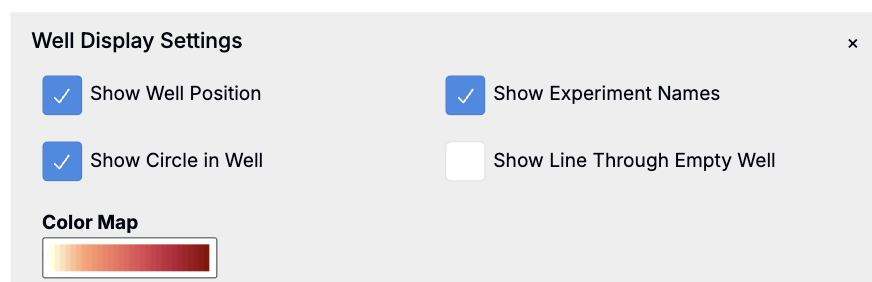
Customizing
Use the Well Display menu in the gray toolbar below the actions bar to adjust colors and change how wells are rendered.
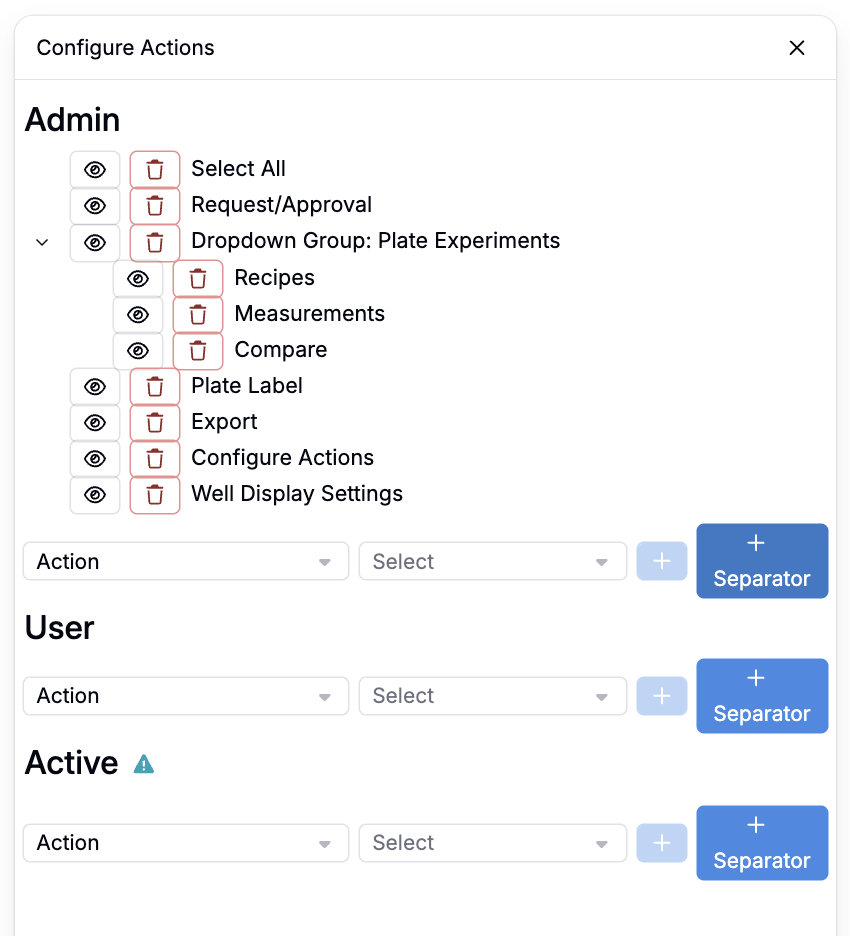
Configuring the Actions Bar
The Well Plate Editor uses a file and actions bar at the top for plate-level actions, replacing the old ribbon-style toolbar. The actions bar is configurable — select View > Configure Actions to open the configuration panel.
From there, you can:
- Show or hide individual action buttons (e.g., Ingredients Editor, Select All, Plate Label, Export)
- Add separators between buttons to group related actions
- Set separate configurations for Admin and User roles
Changes to the actions bar apply to all users of that plate schema.
Well Plate Templates
If you frequently run experiments with the same plate setup, creating a well plate template can save time and ensure consistency. Templates preserve experiment relationships, simplify data entry, and reduce repetitive setup.
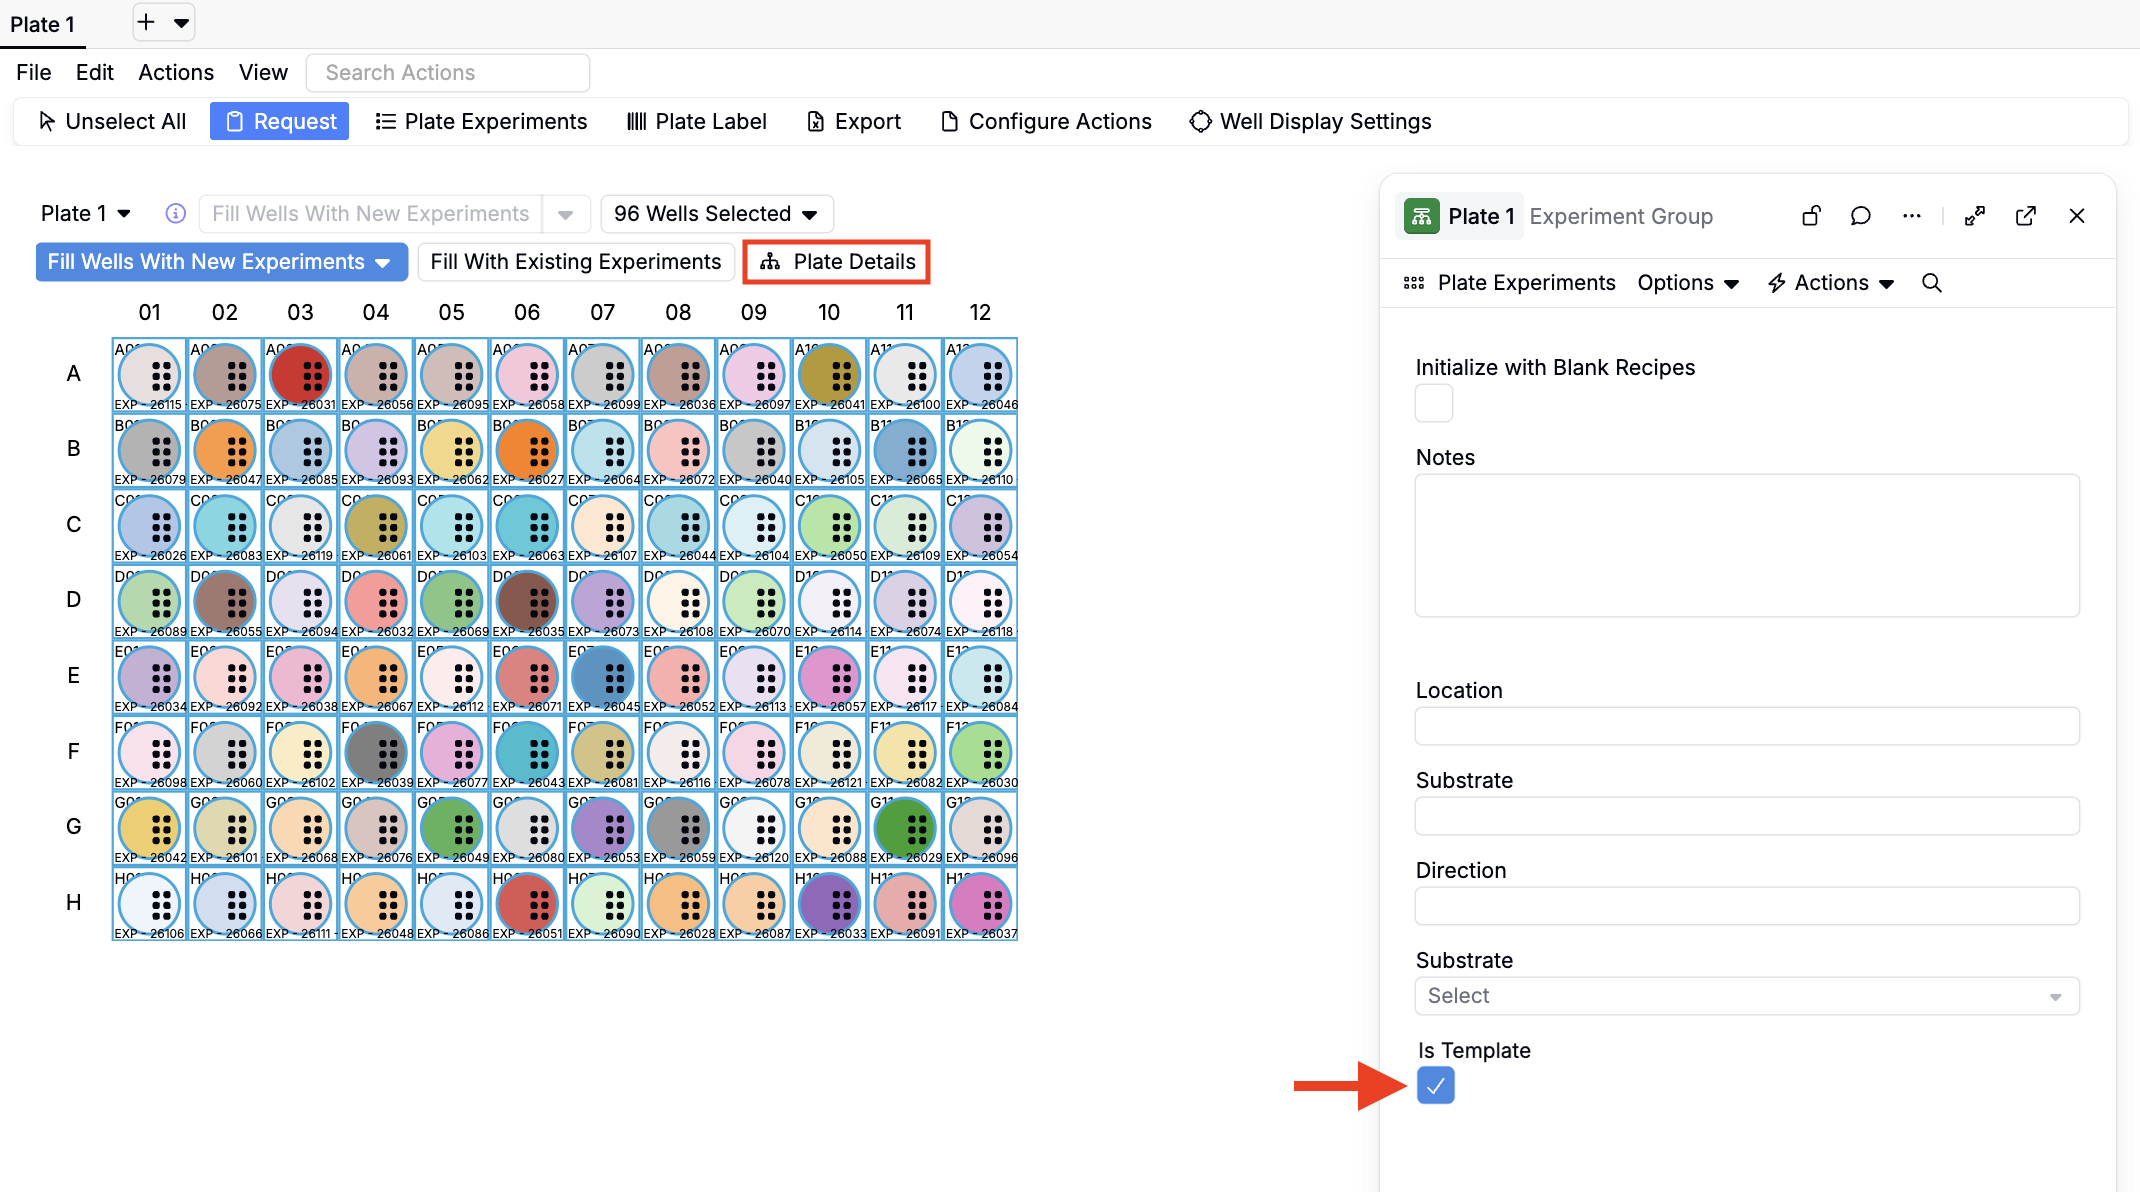
Setting Up a Template
- Configure a well plate with the required layout and controls.
- Include positive and negative controls.
- Add any metadata that should remain consistent across runs.
- Open Plate Details.
- Check the box for Is Template.
Using a Template
When creating a new plate, select the saved template from the Template dropdown to instantly apply the layout.